Quick Start vESR
Connection to vESR and console connection configuration
Connecting a Serial port to a virtual machine using the example of the VirtualBox hypervisor
To connect to vESR using Serial Port, perform the following:
1) Go to the settings of the virtual machine on which vESR is installed.
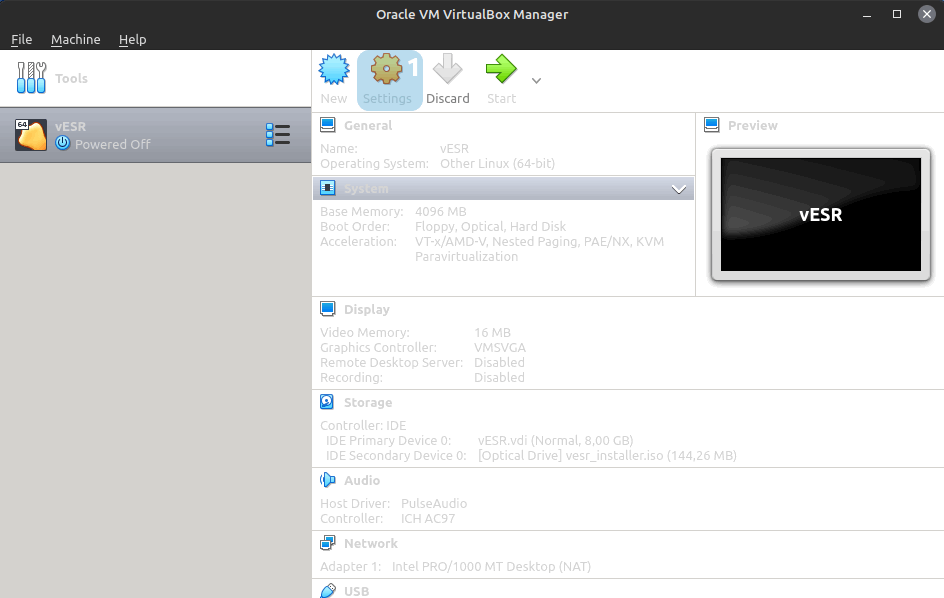
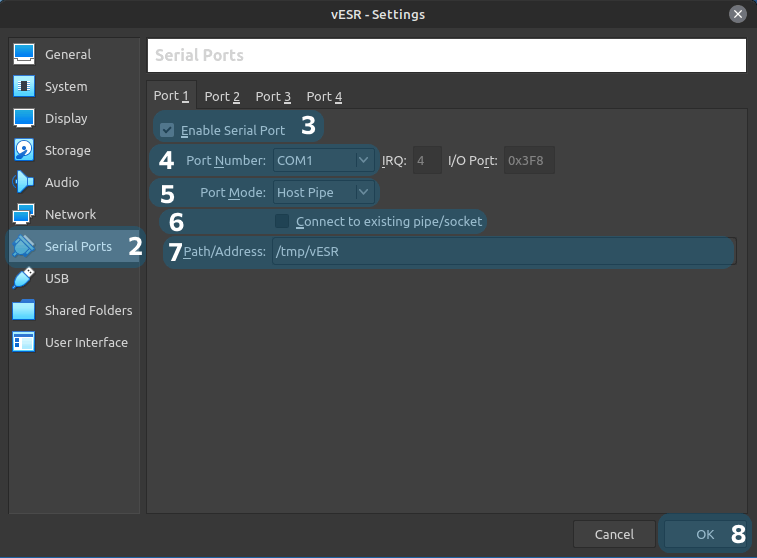
2) Open 'Serial Ports' menu.
3) Enable Serial port.
4) Select COM Port.
5) Select port mode.
6) Disable the option 'Connect to existing pipe/socket'.
7) Specify address for connection.
8) Click 'OK' to complete configuration.
Now you can connect to vESR via Serial Port.
Example of connection via the minicom utility:
minicom -D unix#/tmp/vESR
Configuring Virtual Serial
In order for logs to be displayed in the console when connecting via Serial Port, additional settings need to be made.
1) Switch to global configuration mode.
vesr# config2) Go to syslog console.
vesr(config)# syslog console3) Enable virtual Serial Port by 'virtual-serial' command.
vesr(config-syslog-console)# virtual-serial4) Apply the configuration.
vesr# commit
vesr# confirm5) Reboot the device.
vesr# reload systemAfter rebooting, the logs will be displayed in the console when connecting via Serial Port.
Creating vESR network interfaces
Connecting network interfaces to a virtual machine using the example of the VirtualBox hypervisor
In this example, two network interfaces will be created in virtual machine.
1) Go to the settings of the virtual machine on which vESR is installed.
2) Open the 'Network' menu.
3) Enable network adapter.
4) Select connection type.
5) Select which interface on the host system will be used for connection.
6) To configure additional parameters, click 'Advanced'.
7) Select adapter type. In the example, the settings are made by VirtualBox by default.
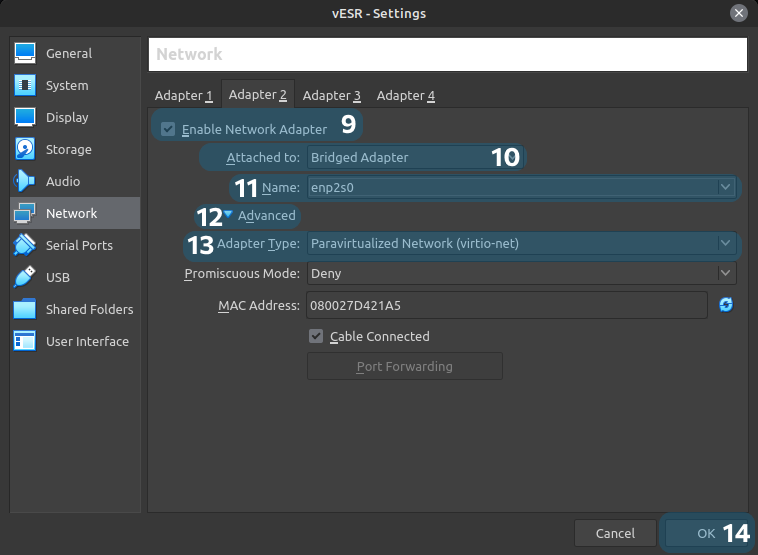
8) Proceed to second interface configuration.

9) Enable network adapter.
10) Select connection type.
11) Select which interface on the host system will be used for connection.
12) To configure additional parameters, click 'Advanced'.
13) Select adapter type. In the example, paravirtualized type is selected.
14) Click 'OK' to complete interfaces configuration.
Assigning virtual machine interfaces to vESR interfaces
1) If you execute the 'show interface status' command after starting vESR, you will see that there are no interfaces with a paravirtualized connection type.
vesr# show interfaces status
Interface              Admin   Link    MTU     MAC address         Last change                 Mode
                       State   State
--------------------   -----   -----   -----   -----------------   -------------------------   ------------
gi1/0/1 Up Up 1500 08:00:27:b3:9a:05 19 minutes and 8 seconds routerport 2) To check access to the interface, go to the debug menu.
vesr# debug 3) By executing the 'show nic' command, you will see that the interface is available.
vesr(debug)# show nic
Interface    Permanent MAC        Connected    NIC model
----------   ------------------   ----------   ------------------------
gi1/0/1      08:00:27:b3:9a:05    Yes          82540EM Gigabit Ethernet
                                               Controller

virtio 1 08:00:27:d4:21:a5 Yes Virtio network device 4) Next bind MAC address of this interface to vESR interface. In this example, MAC address is bound to fortygigabitethernet 1/0/1.
vesr(debug)# nic bind mac 08:00:27:d4:21:a5 fortygigabitethernet 1/0/15) Reboot the device to apply configuration.
vesr# reload system 6) After reboot, check that the interface is displayed in show interfaces status.
vesr# show interfaces status
Interface              Admin   Link    MTU     MAC address         Last change                 Mode
                       State   State
--------------------   -----   -----   -----   -----------------   -------------------------   ------------
gi1/0/1                Up      Up      1500    08:00:27:b3:9a:05   47 seconds                  routerport
fo1/0/1 Up Up 1500 08:00:27:d4:21:a5 47 seconds routerport Licensing on vESR
Functionality available in vESR-Demo
Without vESR connection to ELM (Eltex License Manager) the list of available functions will be limited, but enough to get acquainted with ESR series.
Without a license, the device supports the following features:
- Two IPsec tunnels;
- Device bandwidth 1 Mbps;
- BGP RIB 1024;
- OSPF RIB 1000;
- RIP RIB 1000;
- ISIS RIB 1000;
- SLA functionality disabled.
The following licenses will already be installed on the ESR on first run and will work on the device with serial number VESR0000000:
- WIFI-DEMO — license for 5 simultaneously operating access points, with the ability to activate and monitor the status of SoftGRE tunnels for the operation of WiFi access points.
- BRAS-DEMO — license for 5 simultaneously operating subscribers, with the functions of authorization/authentication/accounting of users whose traffic is routed. The functionality is available if a correctly configured RADIUS server is present. AAA is possible by IP or MAC address of the subscriber.
- IPS-DEMO — license grants access to IDS/IPS system configuration commands with limited performance (the IDS/IPS system will run on one processor core).
Connecting to ELM
To connect to ELM server, do the following:
1) Switch to global configuration mode.
configure
2) Go to licence-manager configuration.
licence-manager3) To connect to ELM, specify your serial-number and licence-key.
Connection data must be provided when purchasing vESR.
3.1) Set serial number.
vesr# set serial-number VESRXXXXXXX3.2) Reboot the device.
The serial number will change only after a reboot. Do not take any further steps until the serial number is set. After 10 attempts to connect to the license server with incorrect credentials, your IP address will be automatically blocked by the licensing server's protection system.
3.3) Configure connection to the license server.
vesr# configure
vesr(config)# licence-manager
vesr(config-licence-manager)# host address elm.eltex-co.ru
vesr(config-licence-manager)# licence-key ELM-LICENCEKEY
vesr(config-licence-manager)# enable
vesr(config-licence-manager)# end
3.4) Apply configuration.
After applying the configuration and communicating with the license server, a license will become available that will expand the capabilities of your device.
4) Using the show license-manage status command, you can see if the ELM server has connected, when it was last contacted, and when the next call is scheduled.
vesr# show licence-manager status
ELM server type:                root
Last request status:            success
Last request to licence server: Tuesday 2023/04/11 08:11:33
Next request to licence server: Tuesday 2023/04/11 08:16:335) Using the show license command, you can view the activated licenses and their limits.
vesr# show licence
Feature                            Value                              Valid from                         Expiries
--------------------------------   --------------------------------   --------------------------------   --------------------------------
ESR-VIRTUAL-LIMIT-BGP-RIB          1000000                            --                                 --
ESR-VIRTUAL-LIMIT-DEFAULT          true                               --                                 --
ESR-VIRTUAL-LIMIT-IPSEC-VPN        3                                  --                                 --
ESR-VIRTUAL-LIMIT-NET              10000000                           --                                 --