Security management. Firmware version 1.13.0
AAA configuration
AAA (Authentication, Authorization, Accounting) is used for description of access provisioning and control.
- Authentication is a matching of a person (request) for the existing account in the security system. Performed by the login and password.
- Authorization (authorization, privilege verification, access level verification) is a matching of the existing account in the system (passed authentication) and specific privileges.
- Accounting (accounting) is a monitoring of user connection or changes made by the user.
Local authentication configuration algorithm
Step | Description | Command | Keys |
|---|---|---|---|
1 | Set local as authentication method. | esr(config)# aaa authentication login { default | <NAME> } <METHOD 1> | <NAME> – list name, set by the string of up to 31 characters. Authentication methods:
|
2 | Set enable as authentication method of user privileges elevation. | esr(config)# aaa authentication enable <NAME><METHOD 1> [ <METHOD 2> ] | <NAME> – list name, set by the string of up to 31 characters. Authentication methods:
|
3 | Set the method for iterating over authentication methods (optional). | esr(config)# aaa authentication mode <MODE> | <MODE> – options of iterating over methods:
Default value: chain. |
4 | Specify the number of failed authentication attempts to block the user login and time of the lock (optional) | esr(config)# aaa authentication attempts max-fail <COUNT> <TIME> | <COUNT> – amount of failed authentication attempts after which a user is blocked, takes the values of [1..65535]; <TIME> – user blocking time in minutes, takes the values of [1..65535]. Default value: |
5 | Enable request for change the default password for the ‘admin’ user (optional) | esr(config)# security passwords default-expired | |
6 | Enable the inhibit mode on the use of previously set local user passwords (optional) | esr(config)# security passwords history <COUNT> | <COUNT> – number of passwords saved in the router memory. Takes values in the range of [1..15]. Default value: 0 |
7 | Set the lifetime of local user password (optional) | esr(config)# security passwords lifetime <TIME> | <TIME> – password lifetime in days. Takes values in the range of [1..365]. Default: The lifetime of local user password is unlimited. |
8 | Set a limit on the minimum length of local user password and ENABLE password (optional) | esr(config)# security passwords min-length <NUM> | <NUM> – minimum number of characters in the password. Takes values in the range of [8..128]. Default value: 0 |
9 | Set a limit on the maximum length of local user password and ENABLE password (optional) | esr(config)# security passwords max-length <NUM> | <NUM> – maximum number of characters in the password. Takes values in the range of [8..128]. Default value: no limit. |
10 | Set the minimum number of character types that must be present in the local user password and ENABLE password (optional) | esr(config)# security passwords symbol-types <COUNT> | <COUNT> – minimum number of character types in the password. Takes values in the range of [1..4]. Default value: 1 |
11 | Set the minimum number of lower case letters in the local user password and ENABLE password (optional) | esr(config)# security passwords lower-case <COUNT> | <COUNT> – minimum number of lower case letters in the local user password and ENABLE password. Takes values in the range of [0..128]. Default value: 0 |
12 | Set the minimum number of upper case letters in the local user password and ENABLE password (optional) | esr(config)# security passwords upper-case <COUNT> | <COUNT> – minimum number of upper case letters in the password. Takes values in the range of [0..128]. Default value: 0 |
13 | Set the minimum number of digits in the local user password and ENABLE password (optional) | esr(config)# security passwords numeric-count <COUNT> | <COUNT> – minimum number of digits in the password. Takes values in the range of [0..128]. Default value: 0 |
14 | Set the minimum number of special characters in the local user password and ENABLE password (optional) | esr(config)# security passwords special-case <COUNT> | <COUNT> – minimum number of special characters in the password. Takes values in the range of [0..128]. Default value: 0 |
15 | Add user in the local database and switch to the user parameters configuration mode | esr(config)# username <NAME> | <NAME> – user name, set by the string of up to 31 characters. |
16 | Set user password | esr(config-user)# password { <CLEAR-TEXT> | encrypted <HASH_SHA512> } | <CLEAR-TEXT> – password, set by the string of 8 to 32 characters, takes the value of [0-9a-fA-F]; <HASH_SHA512> – hash password via sha512 algorithm, set by the string of 110 characters. |
17 | Set user privileges level | esr(config-user)# privilege <PRIV> | <PRIV> – required privilege level. Takes values in the range of [1..15]. |
18 | Switch to the corresponding terminal configuration mode | esr(config)# line console or esr(config)# line telnet or esr(config)# line ssh | |
19 | Activate user login authentication list | esr(config-line-ssh)# login authentication <NAME> | <NAME> – list name, set by the string of up to 31 characters. |
20 | Activate authentication list of user privileges elevation | esr(config-line-ssh)# enable authentication <NAME> | <NAME> – list name, set by the string of up to 31 characters. |
21 | Set the interval after which the idle session will be terminated | esr(config-line-ssh)# exec-timeout <SEC> | <SEC> – time interval in minutes, takes values of [1..65535]. |
AAA configuration algorithm via RADIUS
Step | Description | Command | Keys |
|---|---|---|---|
1 | Set the DSCP code global value for the use in IP headers of RADIUS server egress packets (optional). | esr(config)# radius-server dscp <DSCP> | <DSCP> – DSCP code value, takes values in the range of [0..63]. Default value: 63. |
2 | Set the global number of iterative queries to the last active RADIUS server (optional). | esr(config)# radius-server retransmit <COUNT> | <COUNT> – amount of iterative requests to RADIUS server, takes values of [1..10]. Default value: 1. |
3 | Set the global value of the interval after which the router assumes that the RADIUS server is not available (optional). | esr(config)# radius-server timeout <SEC> | <SEC> – time interval in seconds, takes values of [1..30]. Default value: 3 seconds. |
4 | Add RADIUS server to the list of used servers and switch to its configuration mode. | esr(config)# radius-server host | <IP-ADDR> – RADIUS server IP address, defined as AAA.BBB.CCC.DDD where each part takes values of [0..255]; <IPV6-ADDR> – RADIUS server IPv6 address, defined as X:X:X:X::X where each part takes values in hexadecimal format [0..FFFF] <VRF> – VRF instance name, set by the string of up to 31 characters. |
5 | Specify the number of failed authentication attempts to block the user login and time of the lock (optional). | aaa authentication attempts max-fail <COUNT> <TIME> | <COUNT> – amount of failed authentication attempts after which a user is blocked, takes the values of [1..65535]; <TIME> – user blocking time in seconds, takes the values of [1..65535]. Default value: <COUNT> – 5; <TIME> – 300 |
6 | Set the password for authentication on remote RADIUS server. | esr(config-radius-server)# key ascii-text | <TEXT> – string [8..16] ASCII characters; <ENCRYPTED-TEXT> – encrypted password, [8..16] bytes size, set by the string of [16..32] characters. |
7 | Prioritize the use of a remote RADIUS server (optional). | esr(config-radius-server)# priority <PRIORITY> | <PRIORITY> – remote server priority, takes values in the range of [1..65535]. The lower value, the higher the priority of server is. Default value: 1. |
8 | Set the interval after which the router assumes that the RADIUS server is not available (optional). | esr(config-radius-server)# timeout <SEC> | <SEC> – time interval in seconds, takes values of [1..30]. Default value: global timer value is used. |
9 | Set IPv4/IPv6 address that will be used as source IPv4/IPv6 address in transmitted RADIUS packets. | esr(config-radius-server)# source-address { <ADDR> | <IPV6-ADDR> } | <ADDR> – source IP address, defined as AAA.BBB.CCC.DDD where each part takes values of [0..255]; <IPV6-ADDR> – source IPv6 address, defined as X:X:X:X::X where each part takes values in hexadecimal format [0..FFFF]. |
10 | Set radius as authentication method. | esr(config)# aaa authentication login { default | <NAME> } <METHOD 1> | <NAME> – list name, set by the string of up to 31 characters. Authentication methods:
|
11 | Set radius as authentication method of user privileges elevation. | esr(config)# aaa authentication enable <NAME><METHOD 1> | <NAME> – list name, set by the string of up to 31 characters;
<METHOD> – authentication methods:
|
12 | Set the method for iterating over authentication methods (optional). | esr(config)# aaa authentication mode <MODE> | <MODE> – options of iterating over methods:
Default value: chain. |
13 | Configure radius in the list of user session accounting methods (optional). | esr(config)# aaa accounting login start-stop <METHOD 1> | <METHOD> – accounting methods:
|
14 | Switch to the corresponding terminal configuration mode. | esr(config)# line <TYPE> | <TYPE> – console type:
|
15 | Activate user login authentication list. | esr(config-line-console)# login authentication <NAME> | <NAME> – list name, set by the string of up to 31 characters. Created in step 8. |
16 | Activate authentication list of user privileges elevation. | esr(config-line-console)# enable authentication <NAME> | <NAME> – list name, set by the string of up to 31 characters. Created in step 9. |
AAA configuration algorithm via TACACS
Step | Description | Command | Keys |
|---|---|---|---|
1 | Set the DSCP code global value for the use in IP headers of TACACS server egress packets (optional). | esr(config)# tacacs-server dscp <DSCP> | <DSCP> – DSCP code value, takes values in the range of [0..63]. Default value: 63. |
2 | Set the global value of the interval after which the router assumes that the TACACS server is not available (optional). | esr(config)# tacacs-server timeout <SEC> | <SEC> – time interval in seconds, takes values of [1..30]. Default value: 3 seconds. |
3 | Add TACACS server to the list of used servers and switch to its configuration mode. | esr(config)# tacacs -server host esr(config-tacacs-server)# | <IP-ADDR> – TACACS server IP address, defined as AAA.BBB.CCC.DDD where each part takes values of [0..255] <IPV6-ADDR> – TACACS server IPv6 address, defined as X:X:X:X::X where each part takes values in hexadecimal format [0..FFFF] <VRF> – VRF instance name, set by the string of up to 31 characters. |
4 | Specify the number of failed authentication attempts to block the user login and time of the lock (optional) | aaa authentication attempts max-fail <COUNT> <TIME> | <COUNT> – amount of failed authentication attempts after which a user is blocked, takes the values of [1..65535]; <TIME> – user blocking time in minutes, takes the values of [1..65535]. Default value: <COUNT> – 5; <TIME> – 300 |
5 | Set the password for authentication on remote TACACS server. | esr(config-tacacs-server)# key ascii-text { <TEXT> | encrypted <ENCRYPTED-TEXT> } | <TEXT> – string [8..16] ASCII characters; <ENCRYPTED-TEXT> – encrypted password, [8..16] bytes size, set by the string of [16..32] characters. |
6 | Set the port number to communicate with remote TACACS server (optional). | esr(config-tacacs-server)# port <PORT> | <PORT> – number of TCP port to exchange data with a remote server, takes values of [1..65535]. Default value: 49 for TACACS server. |
7 | Prioritize the use of a remote TACACS server (optional). | esr(config-tacacs-server)# priority <PRIORITY> | <PRIORITY> – remote server priority, takes values in the range of [1..65535]. The lower value, the higher the priority of server is. Default value: 1. |
8 | Set IPv4/IPv6 address that will be used as source IPv4/IPv6 address in transmitted TACACS packets. | esr(config-tacacs-server)# source-address { <ADDR> | <IPV6-ADDR> } | <ADDR> – source IP address, defined as AAA.BBB.CCC.DDD where each part takes values of [0..255]; |
9 | Set TACACS as authentication method of user privileges elevation. | esr(config)# aaa authentication enable <NAME><METHOD 1> | <NAME> – list name, set by the string of up to 31 characters;
<METHOD> – authentication methods:
|
10 | Set the method for iterating over authentication methods (optional). | esr(config)# aaa authentication mode <MODE> | <MODE> – options of iterating over methods:
Default value: chain. |
11 | Configure the list of CLI commands accounting methods (optional). | esr(config)# aaa accounting commands stop-only tacacs | |
12 | Configure tacacs in the list of user session accounting methods (optional). | esr(config)# aaa accounting login start-stop <METHOD 1> | <METHOD> – accounting methods:
|
13 | Switch to the corresponding terminal configuration mode. | esr(config)# line <TYPE> | <TYPE> – console type:
|
14 | Activate user login authentication list. | esr(config-line-console)# login authentication <NAME> | <NAME> – list name, set by the string of up to 31 characters. Created in step 7. |
15 | Activate authentication list of user privileges elevation. | esr(config-line-console)# enable authentication <NAME> | <NAME> – list name, set by the string of up to 31 characters. Created in step 8. |
AAA configuration algorithm via LDAP
Step | Description | Command | Keys |
|---|---|---|---|
1 | Specify basic DN (Distinguished name) which will be used when searching for users. | esr(config)# ldap-server base-dn <NAME> | <NAME> – basic DN, set by the string of up to 255 characters. |
2 | Set the interval after which the router assumes that the LDAP server is not available (optional). | esr(config)# ldap-server bind timeout <SEC> | <SEC> – time interval in seconds, takes values of [1..30]. Default value: 3 seconds. |
3 | Specify the DN (Distinguished name) of a user with administrator rights, under which authorization will take place on the LDAP server when searching for users. | esr(config)# ldap-server bind authenticate root-dn <NAME> | <NAME> – DN of a user with administration rights, set by the string of up to 255 characters. |
4 | Specify the password of a user with administrator rights, under which authorization will take place on the LDAP server when searching for users. | esr(config)# ldap-server bind authenticate root-password ascii-text | <TEXT> – string [8..16] ASCII characters; <ENCRYPTED-TEXT> – encrypted password, [8..16] bytes size, set by the string of [16..32] characters. |
5 | Specify a class name of the objects among which it is necessary to search for users on LDAP server (optional). | esr(config)# ldap-server search filter user-object-class <NAME> | <NAME> – object class name, set by the string of up to 127 characters. Default value: posixAccount. |
6 | Specify the user search scope in LDAP server tree (optional). | esr(config)# ldap-server search scope <SCOPE> | <SCOPE> – user search scope on LDAP server, takes the following values:
Default value: subtree. |
7 | Specify the interval after which the device assumes that LDAP server has not found users entries satisfying the search condition (optional). | esr(config)# ldap-server search timeout <SEC> | <SEC> – time interval in seconds, takes values of [0..30] Default value: 0 – device is waiting for search completion and response from LDAP server. |
8 | Specify an attribute name of the object which is compared with the name of the desired user on LDAP server (optional). | esr(config)# ldap-server naming-attribute <NAME> | <NAME> – object attribute name, set by the string of up to 127 characters. Default value: uid. |
9 | Specify the object attribute name which is compared with the name of a desired user on LDAP server (optional). | esr(config)# ldap-server privilege-level-attribute <NAME> | <NAME> – object attribute name, set by the string of up to 127 characters. Default value: priv-lvl |
10 | Set the DSCP code global value for the use in IP headers of LDAP server egress packets (optional). | esr(config)# ldap-server dscp <DSCP> | <DSCP> – DSCP code value, takes values in the range of [0..63]. Default value: 63 |
11 | Add LDAP server to the list of used servers and switch to its configuration mode. | esr(config)# ldap -server host { <IP-ADDR> | <IPV6-ADDR> } esr(config-ldap-server)# | <IP-ADDR> – LDAP server IP address, defined as AAA.BBB.CCC.DDD where each part takes values of [0..255] <IPV6-ADDR> – LDAP server IPv6 address, defined as X:X:X:X::X where each part takes values in hexadecimal format [0..FFFF] <VRF> – VRF instance name, set by the string of up to 31 characters. |
12 | Specify the number of failed authentication attempts to block the user login and time of the lock (optional) | aaa authentication attempts max-fail <COUNT> <TIME> | <COUNT> – amount of failed authentication attempts after which a user is blocked, takes the values of [1..65535]; <TIME> – user blocking time in minutes, takes the values of [1..65535]. Default value: <COUNT> – 5; <TIME> – 300 |
13 | Set the port number to communicate with remote LDAP server (optional). | esr(config-ldap-server)# port <PORT> | <PORT> – number of TCP port to exchange data with a remote server, takes values of [1..65535]. Default value: 389 for LDAP server. |
14 | Prioritize the use of a remote LDAP server (optional). | esr(config-ldap-server)# priority <PRIORITY> | <PRIORITY> – remote server priority, takes values in the range of [1..65535]. The lower value, the higher the priority of server is. Default value: 1. |
15 | Set IPv4/IPv6 address that will be used as source IPv4/IPv6 address in transmitted LDAP packets. | esr(config-ldap-server)# source-address { <ADDR> | <IPV6-ADDR> } | <ADDR> – source IP address, defined as AAA.BBB.CCC.DDD where each part takes values of [0..255]; <IPV6-ADDR> – source IPv6 address, defined as X:X:X:X::X where each part takes values in hexadecimal format [0..FFFF]. |
16 | Set LDAP as authentication method. | esr(config)# aaa authentication login { default | <NAME> } | <NAME> – list name, set by the string of up to 31 characters. Authentication methods:
|
17 | Set LDAP as authentication method of user privileges elevation. | esr(config)# aaa authentication enable <NAME> | <NAME> – list name, set by the string of up to 31 characters;
<METHOD> – authentication methods:
|
18 | Set the method for iterating over authentication methods. | esr(config)# aaa authentication mode <MODE> | <MODE> – options of iterating over methods:
Default value: chain. |
19 | Switch to the corresponding terminal configuration mode. | esr(config)# line <TYPE> | <TYPE> – console type:
|
20 | Activate user login authentication list. | esr(config-line-console)# login authentication <NAME> | <NAME> – list name, set by the string of up to 31 characters. Created in step 14. |
21 | Activate authentication list of user privileges elevation. | esr(config-line-console)# enable authentication <NAME> | <NAME> – list name, set by the string of up to 31 characters. Created in step 15. |
Example of authentication configuration using telnet via RADIUS server
Objective:
Configure authentication for users being connected via Telnet and RADIUS (192.168.16.1/24).
Solution:
Configure connection to RADIUS server and specify the key (password):
esr# configure
esr(config)# radius-server host 192.168.16.1
esr(config-radius-server)# key ascii-text encrypted 8CB5107EA7005AFF
esr(config-radius-server)# exitCreate authentication profile:
esr(config)# aaa authentication login log radiusSpecify authentication mode used for Telnet protocol connection:
esr(config)# line telnet
esr(config-line-telnet)# login authentication log
esr(config-line-telnet)# exit
esr(config)# exitTo view the information on RADIUS server connection settings, use the following command:
esr# show aaa radius-serversTo view the authentication profiles, use the following command:
esr# show aaa authenticationCommand privilege configuration
Command privilege configuration is a flexible tool that allows you to assign baseline user privilege level (1–15) to a command set. In future, you may specify privilege level during user creation which will define a command set available to them.
- Levels 1-9 enable all monitoring commands (show …);
- Levels 10-14 enable all commands except for device reboot, user management and other specific commands;
- Level 15 enables all monitoring commands.
Configuration algorithm
To change minimum privilege level required for CLI command execution, use the following command:
esr(config)# privilege <COMMAND-MODE> level <PRIV><COMMAND>
<COMMAND-MODE> – command mode;
<PRIV> – required command subtree privilege level, takes value in the range of [1..15];
<COMMAND> – command subtree, set by the string of up to 255 characters.
Example of command privilege configuration
Objective:
Transfer all interface information display commands to the privilege level 10 except for 'show interfaces bridges' command. Transfer 'show interfaces bridges' command to the privilege level 3.
Solution:
In configuration mode, identify commands enabled for operation under privilege level 10 and privilege level 3:
esr(config)# privilege root level 3 "show interfaces bridge"
esr(config)# privilege root level 10 "show interfaces"Configuration of logging and protection against network attacks
Configuration algorithm
Step | Description | Command | Keys |
|---|---|---|---|
1 | Enable protection against ICMP flood attacks. | esr(config)# ip firewall screen dos-defense | <NUM> – amount of ICMP packets per second, set in the range of [1..10000] |
2 | Enable protection against land attacks. | esr(config)# firewall screen dos-defense land | |
3 | Enable a limit on the number of packets sent per second per destination address | esr(config)# ip firewall screen dos-defense | <NUM> – limit number of IP |
4 | Enable a limit on the number of packets sent per second per source address | esr(config)# ip firewall screen dos-defense | <NUM> – limit number of IP Packets per second, set in the range of [1..10000]. |
5 | Enable protection against SYN flood attacks. | esr(config)# ip firewall screen dos-defense | <NUM> – maximum amount of TCP packets with the set SYN flag per second, set in the range of [1..10000]. src-dst – limitation on the amount of TCP packets with the SYN flag set, based on the source and destination addresses. |
6 | Enable protection against UDP flood attacks. | esr(config)# ip firewall screen dos-defense | <NUM> – maximum amount of UDP packets per second, set in the range of [1..10000]. |
7 | .Enable protection against winnuke attacks. | esr(config)# ip firewall screen dos-defense winnuke | |
8 | Enable the blocking of TCP packets with the FIN flag set and the ACK flag not set. | esr(config)# ip firewall screen spy-blocking fin-no-ack | |
9 | Enable the blocking of various type ICMP packets. | esr(config)# ip firewall screen spy-blocking icmp-type | <TYPE> – ICMP type, may take the following values:
|
10 | Enable the protection against IP sweep attacks. | esr(config)# ip firewall screen spy-blocking ip-sweep { <NUM> } | <NUM> – ip sweep attack detection time, set in milliseconds [1..1000000]. |
11 | Enable protection against port scan attacks. | esr(config)# ip firewall screen spy-blocking port-scan | <threshold> – interval in milliseconds during which the port scan attack will be recorded [1..1000000]. <TIME> – blocking time in milliseconds [1..1000000]. |
12 | Enable the protection against IP spoofing attacks. | esr(config)# ip firewall screen spy-blocking spoofing | |
13 | Enable the blocking of TCP packets, with the SYN and FIN flags set. | esr(config)# ip firewall screen spy-blocking syn-fin | |
14 | Enable the blocking of TCP packets, with all flags or with the set of flags: FIN, PSH, URG. The given command provides the protection against XMAS attack | esr(config)# ip firewall screen spy-blocking tcp-all-flag | |
15 | Enable the blocking of TCP packets, with the zero “flags” field. | esr(config)# ip firewall screen spy-blocking tcp-no-flag | |
16 | Enable the blocking of fragmented | esr(config)# ip firewall screen suspicious-packets icmp-fragment | |
17 | Enable the blocking of fragmented IP packets. | esr(config)# ip firewall screen suspicious-packets ip-fragment | |
18 | Enable the blocking of ICMP packets more than 1024 bytes. | esr(config)# ip firewall screen suspicious-packets icmp-fragment | |
19 | Enable the blocking of fragmented TCP packets, with the SYN flag. | esr(config)# ip firewall screen suspicious-packets syn-fragment | |
20 | Enable the blocking of fragmented UDP packets. | esr(config)# ip firewall screen suspicious-packets udp-fragment | |
21 | Enable the blocking of packets, with the protocol ID contained in IP header equal to 137 and more. | esr(config)# ip firewall screen suspicious-packets unknown-protocols | |
22 | Set the frequency of notification (via SNMP, syslog and in CLI) of detected and blocked network attacks. | esr(config)# ip firewall logging interval <NUM> | <NUM> – time interval in seconds [30 .. 2147483647] |
23 | Enable more detailed message output about detected and blocked network attacks in the CLI. | esr(config)# logging firewall screen detailed | |
24 | Enable mechanism of DoS attacks detection and logging via CLI, syslog and SNMP. | esr(config)# logging firewall screen dos-defense <ATACK_TYPE> | <ATACK_TYPE> – DoS attack type, takes the following values: icmp-threshold, land, limit-session-destination, limit-session-source, syn-flood, udp-threshold, winnuke. |
25 | Enable mechanism of espionage activity detection and logging via CLI, syslog and SNMP. | esr(config)# logging firewall screen spy-blocking | <ATACK_TYPE> – espionage activity type, takes the following values: fin-no-ack, ip-sweep, port-scan, spoofing, syn-fin, tcp-all-flag, tcp-no-flag. <ICMP_TYPE> – ICMP type, takes the following values: destination-unreachable, echo-request, reserved, source-quench, time-exceeded. |
26 | Enable mechanism of specialized packets detection and logging via CLI, syslog and SNMP. | esr(config)# logging firewall screen suspicious-packets <PACKET_TYPE> | <PACKET_TYPE> – non-standard packets type, takes the following values: icmp-fragment, ip-fragment, large-icmp, syn-fragment, udp-fragment, unknown-protocols. |
Description of attack protection mechanisms
Command | Description |
|---|---|
ip firewall screen dos-defense icmp-threshold | This command enables the protection against ICMP flood attacks. When the protection is enabled, the amount of all types ICMP packets per second for one destination address is limited. The attack leads to the host reboot and its failure due to the necessity to process each query and respond to it. |
firewall screen dos-defense land | This command enables the protection against land attacks. When the protection is enabled, the packets with the same source and destination IP addresses and with SYN flag in TCP header are blocked. The attack leads to the host reboot and its failure due to the necessity to process each TCP SYN packet and the attempts of the host to establish a TCP session with itself. |
ip firewall screen dos-defense limit-session-destination | When the host IP sessions table is overfilled, the host is unable to establish new sessions and it drops the requests (this may happen during various DoS attacks: SYN flood, UDP flood, ICMP flood, etc.). The command enables limiting the number of packets transmitted per second per destination address, which attenuates DoS attacks. |
ip firewall screen dos-defense limit-session-source | When the host IP sessions table is overfilled, the host is unable to establish new sessions and it drops the requests (this may happen during various DoS attacks: SYN flood, UDP flood, ICMP flood, etc.). The command enables limiting the number of packets transmitted per second per source address, which attenuates DoS attacks. |
ip firewall screen dos-defense syn-flood | This command enables the protection against SYN flood attacks. When the protection is enabled, the amount of TCP packets with the SYN flag set per second for one destination address is limited. The attack leads to the host reboot and its failure due to the necessity to process each TCP SYN packet and the attempts to establish a TCP session. |
ip firewall screen dos-defense udp-threshold | This command enables the protection against UDP flood attacks. When the protection is enabled, the amount of UDP packets per second for one destination address is limited. The attack lead to the host reboot and its failure due to the massive UDP traffic. |
ip firewall screen dos-defense winnuke | This command enables the protection against winnuke attacks. When the protection is enabled, |
ip firewall screen spy-blocking fin-no-ack | The given command enables the blocking of TCP packets with the FIN flag set and the ACK flag not set. These packets are specialized and it is possible to determine a victim operational system by the respond. |
ip firewall screen spy-blocking icmp-type destination-unreachable | The given command enables the blocking of all 3 type ICMP packets (destination-unreachable) including the packets generated by the router itself. The protection prevents an attacker from learning about network topology and hosts availability |
ip firewall screen spy-blocking icmp-type echo-request | The given command enables the blocking of all 8 type ICMP packets (echo-request) including the packets generated by the router itself. The protection prevents an attacker from learning about network topology and hosts availability |
ip firewall screen spy-blocking icmp-type reserved | The given command enables the blocking of all 2 and 7 type ICMP packets (reserved) including the packets generated by the router itself. The protection prevents an attacker from learning about network topology and hosts availability |
ip firewall screen spy-blocking icmp-type source-quench | The given command enables the blocking of all 4 type ICMP packets (source quench) including the packets generated by the router itself. The protection prevents an attacker from learning about network topology and hosts availability |
ip firewall screen spy-blocking icmp-type time-exceeded | The given command enables the blocking of all 11 type ICMP packets (time exceeded) including the packets generated by the router itself. The protection prevents an attacker from learning about network topology and hosts availability |
ip firewall screen spy-blocking ip-sweep | This command enables the protection against IP-sweep attacks. When the protection is enabled, if more than 10 ICMP queries from one source arrive within the specified interval, the first 10 queries are dropped by the router and 11th with the following ones are discarded for the remaining interval time. The protection prevents an attacker from learning about network topology and hosts availability. |
ip firewall screen spy-blocking port-scan | This command enables the protection against port scan attacks. If more than 10 TCP packets with the SYN flag arrive to several TCP ports and or more than 10 UDP packets arrive ti several UDP ports of one source within the first specified interval (<threshold>), then this behaviour is recorded as port scan attack and all the following packets of that type are blocked for the second specified time interval (<TIME>). An attacker will not be able to scan the device open ports quickly. |
ip firewall screen spy-blocking spoofing | The given command enables the protection against ip spoofing attacks. When the protection is enabled, the router checks packets for matching the source address and routing table entries, and in case of mismatch the packet is dropped. For example, if a packet with source address 10.0.0.1/24 arrives to the Gi1/0/1 interface and the given subnet is located after the Gi1/0/2 interface in the routing table, it is considered that the source address has been replaced. Protects from network intrusions with replaced source IP addresses. |
ip firewall screen spy-blocking syn-fin | The given command enables the blocking of TCP packets, with the SYN and FIN flags set. These packets are specialized and it is possible to determine a victim operational system by the respond. |
ip firewall screen spy-blocking tcp-all-flag | This command enables the blocking of TCP packets, with all flags or with the set of flags: FIN, PSH, URG. The protection against XMAS attack is provided. |
ip firewall screen spy-blocking tcp-no-flag | This command enables the blocking of TCP packets with the zero 'flags' field. These packets are specialized and it is possible to determine a victim operational system by the respond. |
ip firewall screen suspicious-packets icmp-fragment | The given command enables the blocking of fragmented ICMP packets. ICMP packets are usually small and there is no need to fragment them. |
ip firewall screen suspicious-packets ip-fragment | The given command enables the blocking of fragmented packets. |
ip firewall screen suspicious-packets large-icmp | The given command enables the blocking of ICMP packets more than 1024 bytes. |
ip firewall screen suspicious-packets syn-fragment | This command enables the blocking of fragmented TCP packets with the SYN flag. TCP packets with the SYN flag are usually small and there is no need to fragment them. The protection prevents concentration of fragmented packets in a buffer. |
ip firewall screen suspicious-packets udp-fragment | The given command enables the blocking of fragmented UDP packets. |
ip firewall screen suspicious-packets unknown-protocols | The given command enables the blocking of packets, with the protocol ID contained in IP header equal to 137 and more. |
Configuration example of logging and protection against network attacks
Objective:
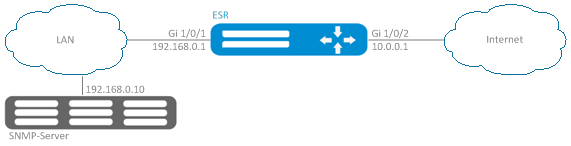
Protect LAN and ESR router from land, syn-flood, ICMP flood network attacks and configure the notification of attacks by SNMP to SNMP server 192.168.0.10
Solution:
You should first configure interfaces and firewall (firewall configuration or its absence will not influence on the operation of network attacks protection):
esr(config)# security zone LAN
esr(config-zone)# exit
esr(config)# security zone WAN
esr(config-zone)# exit
esr(config)# security zone-pair LAN WAN
esr(config-zone-pair)# rule 100
esr(config-zone-pair-rule)# action permit
esr(config-zone-pair-rule)# enable
esr(config-zone-pair-rule)# ex
esr(config-zone-pair)# exit
esr(config)# security zone-pair WAN LAN
esr(config-zone-pair)# rule 100
esr(config-zone-pair-rule)# action permit
esr(config-zone-pair-rule)# enable
esr(config-zone-pair-rule)# exit
esr(config-zone-pair)# exit
esr(config)# interface gigabitethernet 1/0/1
esr(config-if-gi)# security-zone LAN
esr(config-if-gi)# ip address 192.168.0.1/24
esr(config-if-gi)# exit
esr(config)# interface gigabitethernet 1/0/2
esr(config-if-gi)# security-zone WAN
esr(config-if-gi)# ip address 10.0.0.1/24
esr(config-if-gi)# exitEnable the protection against land, syn-flood, ICMP flood attacks:
esr(config)# ip firewall screen dos-defense land
esr(config)# ip firewall screen dos-defense syn-flood 100 src-dst
esr(config)# ip firewall screen dos-defense icmp-threshold 100 Configure the logging of detected attacks:
esr(config)# ip firewall logging screen dos-defense land
esr(config)# ip firewall logging screen dos-defense syn-flood
esr(config)# ip firewall logging screen dos-defense icmp-threshold Configure SNMP server to which the traps will be sent:
esr(config)# snmp-server
esr(config)# snmp-server host 192.168.0.10 To view the statistics on recorded network attacks, use the following command:
esr# show ip firewall screen countersFirewall configuration
Firewall is a package of hardware or software tools that allows for control and filtering of transmitted network packets in accordance with the defined rules.
Configuration algorithm
Step | Description | Command | Keys |
|---|---|---|---|
1 | Create security zones. | esr(config)# security zone <zone-name1> esr(config)# security zone <zone-name2> | <zone-name> – up to 12 characters. |
2 | Specify a security zone description. | esr(config-zone)# description <description> | <description> – up to 255 characters.. |
3 | Specify VRF instance, in which the given security zone will operate (optional). | esr(config- zone)# ip vrf forwarding <VRF> | <VRF> – VRF name, set by the string of up to 31 characters. |
4 | Enable session counters for NAT and Firewall (optional, may reduce the performance). | esr(config)# ip firewall sessions counters | |
5 | Disable filtration of packets for which it was not possible to determine belonging to any known connection and which are not the beginning of a new connection (optional, may reduce the performance). | esr(config)# ip firewall sessions allow-unknown | |
6 | Select firewall operation mode (optional) The firewall by application list is possible only in stateless mode | esr(config)# ip firewall mode <MODE> | <MODE> – firewall operation mode, may take the following values: stateful, stateless. Default value: stateful |
7 | Determine the session lifetime for unsupported protocols (optional). | esr(config)# ip firewall sessions generic-timeout <TIME> | <TIME> – session lifetime for unsupported protocols, takes values in seconds [1..8553600]. Default value: 60 seconds. |
8 | Determine ICMP session lifetime after which it is considered to be outdated (optional). | esr(config)# ip firewall sessions icmp-timeout <TIME> | <TIME> – ICMP session lifetime, takes values in seconds [1..8553600]. Default value: 30 seconds. |
9 | Determine ICMPv6 session lifetime after which it is considered to be outdated (optional). | esr(config)# ip firewall sessions icmpv6-timeout <TIME> | <TIME> – ICMP session lifetime, takes values in seconds [1..8553600]. Default value: 30 seconds. |
10 | Determine the size of outstanding sessions table (optional). | esr(config)# ip firewall sessions max-expect <COUNT> | <COUNT> – table size, takes values of [1..8553600]. Default value: 256. |
11 | Determine the size of trackable sessions table (optional). | esr(config)# ip firewall sessions max-tracking <COUNT> | <COUNT> – table size, takes values of [1..8553600]. |
12 | Determine the lifetime of TCP session in “connection is being established” state after which it is considered to be outdated (optional). | esr(config)# ip firewall sessions tcp-connect-timeout <TIME> | <TIME> – lifetime of TCP session in “connection is being established” state, takes values in seconds [1..8553600]. Default value: 60 seconds. |
13 | Determine the lifetime of TCP session in 'connection is being closed' state after which it is considered to be outdated (optional). | esr(config)# ip firewall sessions tcp-disconnect-timeout <TIME> | <TIME> – lifetime of TCP session in “connection is being closed” state, takes values in seconds [1..8553600]. |
14 | Determine the lifetime of TCP session in “connection is being established” state after which it is considered to be outdated (optional). | esr(config)# ip firewall sessions tcp-established-timeout <TIME> | <TIME> – lifetime of TCP session in “connection is being established” state, takes values in seconds [1..8553600]. Default value: 120 seconds. |
15 | Determine the timeout after which the closed TCP session is actually deleted from the table of trackable sessions (optional). | esr(config)# ip firewall sessions tcp-latecome-timeout <TIME> | <TIME> – timeout, takes value in seconds [1..8553600]. Default value: 120 seconds. |
16 | Enable application-level session tracking for certain protocols (optional). | esr(config)# ip firewall sessions tracking | <PROTOCOL> - application-level protocol [ftp, h323, pptp, netbios-ns, tftp] sessions of which should be tracked. <OBJECT-GROUP-SERVICE> – sip session TCP/UDP ports’ profile name, set by the string of up to 31 characters. If a group is not specified, sip sessions monitoring will be performed for 5060 port. Instead of a certain protocol you can use the “all” key that enables application-level session tracking for all available protocols. By default - disabled for all protocols. |
17 | Determine the lifetime of UDP session in “connection is confirmed” state after which it is considered to be outdated (optional). | esr(config)# ip firewall sessions udp-assured-timeout <TIME> | <TIME> – lifetime of UDP session in “connection is confirmed” state, takes values in seconds [1..8553600]. Default value: 180 seconds. |
18 | Determine the lifetime of UDP session in 'connection is not confirmed' state after which it is considered to be outdated. | esr(config)# ip firewall sessions udp-wait-timeout <TIME> | <TIME> – lifetime of UDP session in “connection is not confirmed” state, takes values in seconds [1..8553600]. Default value: 30 seconds. |
19 | Create IP addresses lists which will be used during filtration. | esr(config)# object-group network <obj-group-name> | <obj-group-name> – up to 31 characters. |
20 | Specify IP addresses list description (optional). | esr(config-object-group-network)# description <description> | <description> – profile description, set by the string of up to 255 characters. |
21 | Add necessary IPv4/IPv6 addresses to the list. | esr(config-object-group-network)# ip prefix <ADDR/LEN> | <ADDR/LEN> – subnet, defined as AAA.BBB.CCC.DDD/EE where each part AAA-DDD takes values of [0..255] and EE takes values of [1..32]. |
esr(config-object-group-network)# ip address-range | <FROM-ADDR> – range starting IP address; <TO-ADDR> – range ending IP address, optional parameter; If the parameter is not specified, a single IP address is set by the command. The addresses are defined as AAA.BBB.CCC.DDD where each part takes values of [0..255]. | ||
esr(config-object-group-network)# ipv6 prefix <IPV6-ADDR/LEN> | <IPV6-ADDR/LEN> – IP address and mask of a subnet, defined as X:X:X:X::X/EE where each X part takes values in hexadecimal format [0..FFFF] and EE takes values of [1..128]. | ||
esr(config-object-group-network)# ipv6 address-range | <FROM-ADDR> – range starting IPv6 address; <TO-ADDR> – range ending IPv6 address, optional parameter. If the parameter is not specified, a single IPv6 address is set by the command. The addresses are defined as X:X:X:X::X where each part takes values in hexadecimal format [0..FFFF]. | ||
22 | Create services lists which will be used during filtration. | esr(config)# object-group service <obj-group-name> | <obj-group-name> – service profile name, set by the string of up to 31 characters. |
23 | Specify services list description (optional). | esr(config-object-group-service)# description <description> | <description> – profile description, set by the string of up to 255 characters. |
24 | Add necessary services (tcp/udp ports) to the list. | esr(config-object-group-service)# port-range <port> | <port> – takes values in the range of [1..65535]. You can specify several ports separated by commas “,” or you can specify the range of ports with “-”. |
25 | Create applications lists which will be used in DPI mechanism. | esr(config)# object-group application <NAME> | <NAME> – application profile name, set by the string of up to 31 characters. |
26 | Specify applications list description (optional). | esr(config-object-group-application)# description <description> | <description> – profile description, set by the string of up to 255 characters. |
27 | Add necessary applications to the lists. | esr(config-object-group-application)# application < APPLICATION > | <APPLICATION> – specifies the application covered by the given profile |
28 | Add interfaces (physical, logical, E1/Multilink and connected), remote-access server (l2tp, openvpn, pptp) or tunnels (gre, ip4ip4, l2tp, lt, pppoe, pptp) into security zones (optional). | esr(config-if-gi)# security-zone <zone-name> | <zone-name> – up to 12 characters. |
Disable Firewall functions on the network interface (physical, logical, E1/Multilink and connected), remote-access server (l2tp, openvpn, pptp) or tunnels (gre, ip4ip4, l2tp, lt, pppoe, pptp) (optional). | esr(config-if-gi)# ip firewall disable | ||
29 | Create an interzone interaction rule set. | esr(config)# security zone-pair <src-zone-name1> <dst-zone-name2> | <src-zone-name> – up to 12 characters. <dst-zone-name> – up to 12 characters. |
30 | Create an interzone interaction rule set. | esr(config-zone-pair)# rule <rule-number> | <rule-number> – 1..10000. |
31 | Specify rule description (optional). | esr(config-zone-rule)# description <description> | <description> – up to 255 characters.. |
32 | Specify the given rule force. | esr(config-zone-rule)# action <action> [ log ] | <action> – permit/deny/reject/netflow-sample/sflow-sample log – activation key for logging of sessions established according to the given rule. |
33 | Set name or number of IP for which the rule should work (optional). | esr(config-zone-rule)# match [not] protocol <protocol-type> | <protocol-type> – protocol type, takes the following values: esp, icmp, ah, eigrp, ospf, igmp, ipip, tcp, pim, udp, vrrp, rdp, l2tp, gre. When specifying the “any” value, the rule will work for any protocols. |
esr(config-zone-rule)# match [not] protocol-id <protocol-id> | <protocol-id> – IP identification number, takes values of [0x00-0xFF]. | ||
34 | Specify the profile of transmitter IP addresses for which the rule should work (optional). | esr(config-zone-rule)# match [not] source-address <OBJ-GROUP-NETWORK-NAME> | <OBJ-GROUP-NETWORK-NAME> – IP addresses profile name, set by the string of up to 31 characters. When specifying the “any” value, the rule will work for any sender/recipient IP address. |
35 | Set the profile of destination IP addresses for which the rule should work (optional). | esr(config-zone-rule)# match [not] destination-address <OBJ-GROUP-NETWORK-NAME> | |
36 | Set source MAC address for which the rule should work (optional). | esr(config-zone-rule)# match [not] source-mac <mac-addr> | <mac-addr> – defined as XX:XX:XX:XX:XX:XX where each part takes the values of [00..FF]. |
37 | Set sender MAC address for which the rule should work (optional). | esr(config-zone-rule)# match [not] destination-mac <mac-addr> | |
38 | Set TCP/UDP ports profile for which the rule should work (if the protocol is specified). | esr(config-zone-rule)# match [not] source-port <PORT-SET-NAME> | <PORT-SET-NAME> – set by the string of up to 31 characters. When specifying the “any” value, the rule will work for any sender/recipient TCP/UDP port. |
39 | Set the destination TCP/UDP ports profile for which the rule should work (if the protocol is specified). | esr(config-zone-rule)# match [not] destination-port <PORT-SET-NAME> | |
40 | Specify the type and code of ICMP messages for which the rule should work (if ICMP is selected as protocol) (optional). | esr(config-zone-rule)# match [not] icmp <ICMP_TYPE> <ICMP_CODE> | <ICMP_TYPE> – ICMP message type, takes values of [0..255]. <ICMP_CODE> – ICMP message code, takes values of [0..255]. When specifying the “any” value, the rule will work for any ICMP message code. |
41 | Set the limitation under which the rule will only work for traffic modified by the IP address and destination ports translation service. | esr(config-zone-rule)# match [not] destination-nat | |
42 | Set the maximum packet rate (optional, available only for zone-pair any self and zone-pair <zone-name> any). | esr(config-zone-pair-rule)# rate-limit pps <rate-pps> | <rate-pps> – maximum amount of packets that can be transmitted. Takes values in the range of [1..10000]. |
43 | Set the filtration only for fragmented IP packets (optional, available only for zone-pair any self and zone-pair <zone-name> any). | esr(config-zone-pair-rule)# match [not] fragment | |
44 | Set the filtration only for IP packets including ip-option (optional, available only for zone-pair any self and zone-pair <zone-name> any). | esr(config-zone-pair-rule)# match [not] ip-option | |
45 | Create an interzone interaction rule. | esr(config-zone-rule)# enable | |
46 | Enable filtering and session tracking mode while packets are transmitted between one Bridge group participants (optional, available only for ESR-1000/1200/1500/1511/1700 | esr(config-bridge)# ports firewall enable |
1 When using the not key, the rule will work for values which are not included in a specified profile.
Each “match” command may contain “not” key. When using the key, packets that do not meet the given requirement will fall under the rule.
You can obtain more detail information about firewall configuration in “CLI command reference guide”.
Firewall configuration example
Objective:
Enable message passage via ICMP between R1, R2 and ESR router.

Solution:
Create a security zone for each ESR network:
esr# configure
esr(config)# security zone LAN
esr(config-zone)# exit
esr(config)# security zone WAN
esr(config-zone)# exitConfigure network interfaces and identify their inherence to security zones:
esr(config)# interface gi1/0/2
esr(config-if-gi)# ip address 192.168.12.2/24
esr(config-if-gi)# security-zone LAN
esr(config-if-gi)# exit
esr(config)# interface gi1/0/3
esr(config-if-gi)# ip address 192.168.23.2/24
esr(config-if-gi)# security-zone WAN
esr(config-if-gi)# exit For definition of rules for security zones, create 'LAN' address profile that includes addresses which are allowed to access WAN network and 'WAN' network address profile.
esr(config)# object-group network WAN
esr(config-object-group-network)# ip address-range 192.168.23.2
esr(config-object-group-network)# exit
esr(config)# object-group network LAN
esr(config-object-group-network)# ip address-range 192.168.12.2
esr(config-object-group-network)# exit
esr(config)# object-group network LAN_GATEWAY
esr(config-object-group-network)# ip address-range 192.168.12.1
esr(config-object-group-network)# exit
esr(config)# object-group network WAN_GATEWAY
esr(config-object-group-network)# ip address-range 192.168.23.3
esr(config-object-group-network)# exitTo transfer traffic from 'LAN' zone into 'WAN' zone, create a pair of zones and add a rule allowing ICMP traffic transfer from R1 to R2. Rules are applied with the enable command:
esr(config)# security zone-pair LAN WAN
esr(config-zone-pair)# rule 1
esr(config-zone-pair-rule)# action permit
esr(config-zone-pair-rule)# match protocol icmp
esr(config-zone-pair-rule)# match destination-address WAN_GATEWAY
esr(config-zone-pair-rule)# match source-address LAN_GATEWAY
esr(config-zone-pair-rule)# enable
esr(config-zone-pair-rule)# exit
esr(config-zone-pair-pair)# exitTo transfer traffic from 'WAN' zone into 'LAN' zone, create a pair of zones and add a rule allowing ICMP traffic transfer from R2 to R1. Rules are applied with the enable command:
esr(config)# security zone-pair WAN LAN
esr(config-zone-pair)# rule 1
esr(config-zone-pair-rule)# action permit
esr(config-zone-pair-rule)# match protocol icmp
esr(config-zone-pair-rule)# match destination-address LAN_GATEWAY
esr(config-zone-pair-rule)# match source-address WAN_GATEWAY
esr(config-zone-pair-rule)# enable
esr(config-zone-pair-rule)# exit
esr(config-zone-pair)# exitRouter always has a security zone named 'self'. When the traffic recipient is the router itself, i.e. traffic is not transit, pass 'self' zone as a parameter. Create a pair of zones for traffic coming from 'WAN' zone into 'self' zone. In order the router could response to the ICMP requests from 'WAN' zone, add a rule allowing ICMP traffic transfer from R2 to ESR router:
esr(config)# security zone-pair WAN self
esr(config-zone-pair)# rule 1
esr(config-zone-pair-rule)# action permit
esr(config-zone-pair-rule)# match protocol icmp
esr(config-zone-pair-rule)# match destination-address WAN
esr(config-zone-pair-rule)# match source-address WAN_GATEWAY
esr(config-zone-pair-rule)# enable
esr(config-zone-pair-rule)# exit
esr(config-zone-pair)# exitCreate a pair of zones for traffic coming from 'LAN' zone into 'self' zone. In order the router could response to the ICMP requests from 'LAN' zone, add a rule allowing ICMP traffic transfer from R1 to ESR:
esr(config)# security zone-pair LAN self
esr(config-zone-pair)# rule 1
esr(config-zone-pair-rule)# action permit
esr(config-zone-pair-rule)# match protocol icmp
esr(config-zone-pair-rule)# match destination-address LAN
esr(config-zone-pair-rule)# match source-address LAN_GATEWAY
esr(config-zone-pair-rule)# enable
esr(config-zone-pair-rule)# exit
esr(config-zone-pair)# exit
esr(config)# exitTo view port membership in zones, use the following command:
esr# show security zoneTo view zone pairs and their configuration, use the following commands:
esr# show security zone-pair
esr# show security zone-pair configurationTo view active sessions, use the following commands:
esr# show ip firewall sessionsConfiguration example of application filtering (DPI)
The use of application filtering mechanism reduces by several times the router performance because of the need to check each packet. The performance decreases with an increase in amount of the selected for filtration applications.
Objective:
Block access to such resources as youtube, bittorrent and facebook.

Solution:
Create a security zone for each ESR network:
esr# configure
esr(config)# security zone LAN
esr(config-zone)# exit
esr(config)# security zone WAN
esr(config-zone)# exitConfigure network interfaces and identify their inherence to security zones:
esr(config)# interface gi1/0/1
esr(config-if-gi)# ip address 10.0.0.1/24
esr(config-if-gi)# security-zone WAN
esr(config-if-gi)# exit
esr(config)# interface gi1/0/2
esr(config-if-te)# ip address 192.168.0.1/24
esr(config-if-te)# security-zone LAN
esr(config-if-te)# exit Switching the ESR firewall mode to stateless:
esr(config)# ip firewall mode stateless
To configure security zones rules, you should create profile of the applications that should be blocked.
esr(config)# object-group application APP
esr(config-object-group-application)# application youtube
esr(config-object-group-application)# application bittorrent
esr(config-object-group-application)# application facebook
esr(config-object-group-application)# exit To set the rules of traffic passing from “WAN” zone to “LAN” zone, create a couple of zones and add a rule prohibiting the application traffic from passing and a rule allowing the rest of traffic to pass. Rules are applied with the enable command:
esr(config)# security zone-pair WAN LAN
esr(config-zone-pair)# rule 1
esr(config-zone-pair-rule)# action deny
esr(config-zone-pair-rule)# match application APP
esr(config-zone-pair-rule)# enable
esr(config-zone-pair-rule)# exit
esr(config-zone-pair)# rule 2
esr(config-zone-pair-rule)# action permit
esr(config-zone-pair-rule)# enable
esr(config-zone-pair-rule)# exit
esr(config-zone-pair-pair)# exitTo set the rules for passing traffic from the "LAN" zone to the "WAN" zone, create a pair of zones and add a rule that prohibits the passage of application traffic and a rule that allows all other traffic to pass. Rules are applied with the enable command:
esr(config)# security zone-pair LAN WAN
esr(config-zone-pair)# rule 1
esr(config-zone-pair-rule)# action deny
esr(config-zone-pair-rule)# match application APP
esr(config-zone-pair-rule)# enable
esr(config-zone-pair-rule)# exit
esr(config-zone-pair)# rule 2
esr(config-zone-pair-rule)# action permit
esr(config-zone-pair-rule)# enable
esr(config-zone-pair-rule)# exit
esr(config-zone-pair-pair)# exitTo view port membership in zones, use the following command:
esr# show security zoneTo view zone pairs and their configuration, use the following commands:
esr# show security zone-pair
esr# show security zone-pair configurationTo view active sessions, use the following commands:
esr# show ip firewall sessionsAccess list (ACL) configuration
Access Control List or ACL is a list that contains rules defining traffic transmission through the interface.
Configuration algorithm
Step | Description | Command | Keys |
|---|---|---|---|
1 | Create access control list and switch to its configuration mode. | esr(config)# ip access-list extended <NAME> | <NAME> – access control list name, set by the string of up to 31 characters. |
2 | Specify the description of a configurable access control list (optional). | esr(config-acl)# description <DESCRIPTION> | <DESCRIPTION> – access control list description, set by the string of up to 255 characters. |
3 | Create a rule and switch to its configuration mode. The rules are proceeded by the router in number ascending order. | esr(config-acl)# rule <ORDER> | <ORDER> – rule number, takes values of [1..4094]. |
4 | Specify the action that should be applied for the traffic meeting the given requirements. | esr(config-acl-rule)# action <ACT> | <ACT> – allocated action:
|
5 | Set name of protocol for which the rule should work (optional). | esr(config-acl-rule)# match protocol <TYPE> | <TYPE> – protocol type, takes the following values: esp, icmp, ah, eigrp, ospf, igmp, ipip, tcp, pim, udp, vrrp, rdp, l2tp, gre. When specifying the “any” value, the rule will work for any protocols. |
esr(config-acl-rule)# match protocol-id <ID> | <ID> – IP identification number, takes values of [0x00-0xFF]. | ||
6 | Set sender IP addresses for which the rule should work (optional). | esr(config-acl-rule)# match source-address { <ADDR> <MASK> | any } | <ADDR> – sender IP address, defined as AAA.BBB.CCC.DDD where each part takes values of [0..255]; <MASK> – IP address mask, defined as AAA.BBB.CCC.DDD where each part takes values of [0..255]. Mask bits, set to zero, specify IP address bits excluded from the comparison when searching. When specifying the “any” value, the rule will work for any sender/recipient IP address. |
7 | Set destination IP addresses for which the rule should work (optional). | esr(config-acl-rule)# match destination-address { <ADDR> <MASK> | any } | |
8 | Set sender MAC addresses for which the rule should work (optional). | esr(config-acl-rule)# match source-mac <ADDR><WILDCARD> | <ADDR> – sender MAC address, defined as XX:XX:XX:XX:XX:XX where each part takes the values of [00..FF]. <WILDCARD> – MAC address mask, defined as XX:XX:XX:XX:XX:XX where each part takes the values of [00..FF]. Mask bits, set to zero, specify MAC address bits excluded from the comparison when searching. |
9 | Set destination MAC addresses for which the rule should work (optional). | esr(config-acl-rule)# match destination-mac <ADDR><WILDCARD> | |
10 | Set the number of sender TCP/UDP ports for which the rule should work (if the protocol is specified). | esr(config-acl-rule)# match source-port { <PORT> | any } | <PORT> – number of sender TCP/UDP port, takes values of [1..65535]. When specifying the “any” value, the rule will work for any sender TCP/UDP port. |
11 | Set the destination TCP/UDP ports number for which the rule should work (if the protocol is specified). | esr(config-acl-rule)# match destination-port { <PORT> | any } | |
12 | Set priority 802.1p value for which the rule should work (optional). | esr(config-acl-rule)# match с os <COS> | <COS> – priority 802.1p value, takes values of [0..7]. |
13 | Set DSCP code value for which the rule should work (optional). Can not be used with IP Precedence. | esr(config-acl-rule)# match dscp <DSCP> | <DSCP> – DSCP code value, takes values in the range of [0..63]. |
14 | Set IP Precedence code for which the rule should work (optional). Can not be used with DSCP. | esr(config-acl-rule)# match ip-precedence <IPP> | <IPP> – IP Precedence code value, takes values in the range of [0..7]. |
15 | Set VLAN ID for which the rule should work (optional). | esr(config-acl-rule)# match vlan <VID> | <VID> – VLAN ID, takes values of [1..4094]. |
16 | Activate a rule. | esr(config-acl-rule)# enable | |
17 | Specify access control list for the configured interface to filtrate incoming traffic. | esr(config-if-gi)# service-acl input <NAME> | <NAME> – access control list name, set by the string of up to 31 characters. |
Also the access lists can be used to organize QoS policy.
Access list configuration example
Objective:
Allow traffic transmission from 192.168.20.0/24 subnet only.
Solution:
Configure access control list for filtering by a subnet:
esr# configure
esr(config)# ip access-list extended white
esr(config-acl)# rule 1
esr(config-acl-rule)# action permit
esr(config-acl-rule)# match source-address 192.168.20.0 255.255.255.0
esr(config-acl-rule)# enable
esr(config-acl-rule)# exit
esr(config-acl)# exitApply access list to Gi1/0/19 interface for inbound traffic:
esr(config)# interface gigabitethernet 1/0/19
esr(config-if-gi)# service-acl input whiteTo view the detailed information on access control list, use the following command:
esr# show ip access-list whiteIPS/IDS configuration
IPS/IDS (Intrusion Prevention System/Intrusion Detection System) – a network and computer security software system that detects intrusions or security breaches and automatically protecting from them.
The system is based on signature traffic analysis. Signatures for IPS/IDS systems are commonly called rules. ESR devices allow you to download current rules from open sources on the Internet or from a corporate server. Using the CLI, you can also create your own specific rules.
By default, ESR devices have a basic set of rules from EmergingThreats designed for testing and verifying system health.
Base configuration algorithm
Step | Description | Command | Keys |
|---|---|---|---|
1 | Create IPS/IDS security policy. | esr(config)# security ips policy <NAME> | <NAME> – security policy name, set by the string of up to 32 characters |
2 | Specify policy description (optional). | esr(config-ips-policy)# description <DESCRIPTION> | <DESCRIPTION> – description, set by the string of up to 255 characters. |
3 | Specify the IP address profile that IPS/IDS will protect. | esr(config-ips-policy)# protect network-group <OBJ-GROUP-NETWORK_NAME> | <OBJ-GROUP-NETWORK-NAME> – protected IP addresses profile name, set by the string of up to 32 characters. |
4 | Specify the profile of IP addresses that are external for IPS/IDS (optionally). | esr(config-ips-policy)# external network-group <OBJ-GROUP-NETWORK_NAME> | <OBJ-GROUP-NETWORK-NAME> – external IP addresses profile name, set by the string of up to 32 characters. |
5 | Switch to the IPS/IDS configuration mode. | esr(config)# security ips | |
6 | Assign IPS/IDS security policy. | esr(config-ips)# policy <NAME> | <NAME> – security policy name, set by the string of up to 32 characters |
7 | Use all ESR rosiurces for IPS/IDS (optional). | esr(config-ips)# perfomance max | By default, half of the available processor cores are allocated for IPS/IDS. |
8 | Set external drive for recording logs in EVE format (optional). | esr(config-ips)# logging storage-path <DEVICE_NAME> | <DEVICE_NAME> the name of the USB or MMC drive. |
9 | Enable IPS/IDS. | esr(config-ips )# enable | |
10 | Enable IPS/IDS on the interface. | esr(config-if-gi)# service-ips enable |
Configuration algorithm for IPS/IDS rules autoupdate from external sources
Step | Description | Command | Keys |
|---|---|---|---|
1 | Switch to the autoupdate configuration mode | esr(config-ips)# auto-upgrade | |
2 | Specify a name and enter the configuration mode of the user update server. | esr(config-ips-auto-upgrade)# user-server <WORD> | <WORD> – server name, set by the string of up to 32 characters. |
3 | Specify the description of the user update server (optional). | esr(config-ips-upgrade-user-server)# description <DESCRIPTION> | <DESCRIPTION> – description, set by the string of up to 255 characters. |
4 | Specify URL. | esr(config-ips-upgrade-user-server)# url <URL> | <URL> – text field containing URL link of 8-255 characters length. As an URL-links can be specified:
|
5 | Set the frequency for update checking (optional). | esr(config-ips-upgrade-user-server)# upgrade interval <HOURS> | <HOURS> – update interval in hours, from 1 to 240. Default value: 24 hours |
Recommended open rule update source
SSL Blacklist contains lists of 'bad' SSL certificates, i.e. certificates in respect of which the fact of their use by malware and botnets has been established. The lists contain SHA1 fingerprints of public keys from SSL certificates. | |
Feodo Tracker – list of management servers for the Feodo Trojan. Feodo (also known as Cridex or Bugat) is used by cybercriminals to steal sensitive information in the field of electronic banking (credit card information, logins/passwords) from users' computers. Currently, there are four versions of the Trojan (versions A, B, C and D), mainly distinguished by the infrastructure of control servers. | |
https://rules.emergingthreats.net/open/suricata/rules/botcc.rules | These rules describe well-known botnets and control servers. Sources: Shadowserver.org, Zeus Tracker, Palevo Tracker, Feodo Tracker, Ransomware Tracker. |
https://rules.emergingthreats.net/open/suricata/rules/ciarmy.rules | These rules describe malicious hosts by the classification of the www.cinsarmy.com project. |
https://rules.emergingthreats.net/open/suricata/rules/compromised.rules | These rules describe well-known compromised and malicious hosts. Ыщгксуы: Daniel Gerzo’s BruteForceBlocker, The OpenBL, Emerging Threats Sandnet, SidReporter Projects. |
https://rules.emergingthreats.net/open/suricata/rules/drop.rules | These rules describe spammer hosts/networks by the classification of the www.spamhaus.org project. |
https://rules.emergingthreats.net/open/suricata/rules/dshield.rules | These rules describe malicious hosts by the classification of the www.dshield.org project. |
https://rules.emergingthreats.net/open/suricata/rules/emerging-activex.rules | These rules contain signatures for using ActiveX content. |
https://rules.emergingthreats.net/open/suricata/rules/emerging-attack_response.rules | Rules that detect host behavior after successful attacks. |
https://rules.emergingthreats.net/open/suricata/rules/emerging-chat.rules | These rules describe signs of accessing popular chat rooms. |
https://rules.emergingthreats.net/open/suricata/rules/emerging-current_events.rules | Temporary rules awaiting possible inclusion in permanent rule lists. |
https://rules.emergingthreats.net/open/suricata/rules/emerging-dns.rules | These rules contain signatures of vulnerabilities in the DNS protocol, signs of the use of DNS by malware, and incorrect use of the DNS protocol. |
https://rules.emergingthreats.net/open/suricata/rules/emerging-dos.rules | These rules contain DOS attack signatures. |
https://rules.emergingthreats.net/open/suricata/rules/emerging-exploit.rules | These rules contain exploit signatures. |
https://rules.emergingthreats.net/open/suricata/rules/emerging-ftp.rules | These rules contain signatures of vulnerabilities in the FTP protocol, signs of incorrect use of the FTP protocol. |
https://rules.emergingthreats.net/open/suricata/rules/emerging-games.rules | These rules describe the signs of reference to popular game sites: World of Warcraft, Starcraft, etc. |
https://rules.emergingthreats.net/open/suricata/rules/emerging-icmp.rules | These rules contain signatures of incorrect use of the ICMP protocol. |
https://rules.emergingthreats.net/open/suricata/rules/emerging-icmp_info.rules | These rules contain signatures of ICMP information messages. |
https://rules.emergingthreats.net/open/suricata/rules/emerging-imap.rules | These rules contain signatures of vulnerabilities in the IMAP protocol, signs of incorrect use of the IMAP protocol. |
https://rules.emergingthreats.net/open/suricata/rules/emerging-inappropriate.rules | These rules describe signs of accessing unwanted resources. |
https://rules.emergingthreats.net/open/suricata/rules/emerging-info.rules | These rules contain different vulnerabilities signatures. |
https://rules.emergingthreats.net/open/suricata/rules/emerging-malware.rules | These rules contain signatures of malware that uses the HTTP protocol in their work. |
https://rules.emergingthreats.net/open/suricata/rules/emerging-misc.rules | These rules contain different vulnerabilities signatures. |
https://rules.emergingthreats.net/open/suricata/rules/emerging-mobile_malware.rules | These rules contain malware signatures for mobile platforms. |
https://rules.emergingthreats.net/open/suricata/rules/emerging-netbios.rules | These rules contain signatures of vulnerabilities in the NetBIOS protocol, signs of incorrect use of the NetBIOS protocol. |
https://rules.emergingthreats.net/open/suricata/rules/emerging-p2p.rules | These rules describe signs of access to P2P networks (Bittorrent, Gnutella, Limewire). |
https://rules.emergingthreats.net/open/suricata/rules/emerging-policy.rules | These rules describe unwanted network activity (access to MySpace, Ebay). |
https://rules.emergingthreats.net/open/suricata/rules/emerging-poprules | These rules contain signatures of vulnerabilities in the POP3 protocol, signs of incorrect use of the POP3 protocol. |
https://rules.emergingthreats.net/open/suricata/rules/emerging-rpc.rules | These rules contain signatures of vulnerabilities in the RPC protocol, signs of incorrect use of the RPC protocol. |
https://rules.emergingthreats.net/open/suricata/rules/emerging-scada.rules | These rules contain vulnerability signatures for SCADA systems. |
https://rules.emergingthreats.net/open/suricata/rules/emerging-scan.rules | These rules describe signs of activity associated with network scanning (Nessus, Nikto, portscanning). |
https://rules.emergingthreats.net/open/suricata/rules/emerging-shellcode.rules | These rules describe signs of activity associated with attempts to gain shell access as a result of exploits. |
https://rules.emergingthreats.net/open/suricata/rules/emerging-smtp.rules | These rules contain signatures of vulnerabilities in the SMTP protocol, signs of incorrect use of the SMTP protocol. |
https://rules.emergingthreats.net/open/suricata/rules/emerging-sql.rules | These rules contain vulnerability signatures for SQL DBMS. |
https://rules.emergingthreats.net/open/suricata/rules/emerging-telnet.rules | These rules contain signatures of vulnerabilities in the telnet protocol, signs of incorrect use of the telnet protocol. |
https://rules.emergingthreats.net/open/suricata/rules/emerging-tftp.rules | These rules contain signatures of vulnerabilities in the TFTP protocol, signs of incorrect use of the TFTP protocol. |
https://rules.emergingthreats.net/open/suricata/rules/emerging-trojan.rules | These rules contain signs of network activity of Trojans. |
https://rules.emergingthreats.net/open/suricata/rules/emerging-user_agents.rules | These rules contain signs of suspicious and potentially dangerous HTTP clients (identified by the values in the User-Agent HTTP header). |
https://rules.emergingthreats.net/open/suricata/rules/emerging-l.rules | These rules contain vulnerability signatures for VOIP protocol. |
https://rules.emergingthreats.net/open/suricata/rules/emerging-web_client.rules | These rules contain vulnerability signatures for WEB clients. |
https://rules.emergingthreats.net/open/suricata/rules/emerging-web_server.rules | These rules contain vulnerability signatures for WEB servers. |
https://rules.emergingthreats.net/open/suricata/rules/emerging-web_specific_apps.rules | These rules contain vulnerability exploitation signatures for WEB applications. |
https://rules.emergingthreats.net/open/suricata/rules/emerging-worm.rules | These rules describe signs of network worm activity. |
IPS/IDS configuration example with auto-update rules
Objective:
Organize LAN protection with auto-update rules from open sources.
192.168.1.0/24 – LAN
Solution:
Create a profile of addresses of LAN which we will protect:
esr(config)# object-group network LAN
esr(config-object-group-network)# ip prefix 192.168.1.0/24
esr(config-object-group-network)# exitConfigure the DNS client on the ESR to allow the names of the IPS/IDS rule update sources:
esr(config)# domain lookup enable
esr(config)# domain name-server 8.8.8.8Create IPS/IDS security policy:
esr(config)# security ips policy OFFICE
esr(config-ips-policy)# description "My Policy"
esr(config-ips-policy)# protect network-group LANAllow IPS/IDS operation on the bridge 1 LAN interface:
esr(config)# bridge 1
esr(config-bridge)# service-ips enableConfigure IPS/IDS parameters:
esr(config)# security ips
esr(config-ips)# logging storage-patch usb://DATA
esr(config-ips)# policy OFFICE
esr(config-ips)# enableThe device will be used only as a security gateway, for this allocate the IPS/IDS service all available resources:
esr(config-ips)# perfomance maxConfigure auto-update rules from EmergingThreats.net, etnetera.cz and Abuse.ch sites
esr(config-ips)# auto-upgrade
esr(config-auto-upgrade)# user-server ET-Open
esr(config-ips-upgrade-user-server)# description «emerging threats open rules»
esr(config-ips-upgrade-user-server)# url https://rules.emergingthreats.net/open/suricata-4.0/rules/
esr(config-ips-upgrade-user-server)# exit
esr(config-auto-upgrade)# user-server Aggressive
esr(config-ips-upgrade-user-server)# description «Etnetera aggressive IP blacklist»
esr(config-ips-upgrade-user-server)# url https://security.etnetera.cz/feeds/etn_aggressive.rules
esr(config-ips-upgrade-user-server)# upgrade interval 4
esr(config-ips-upgrade-user-server)# exit
esr(config-auto-upgrade)# user-server SSL-BlackList
esr(config-ips-upgrade-user-server)# description «Abuse.ch SSL Blacklist»
esr(config-ips-upgrade-user-server)# url https://sslbl.abuse.ch/blacklist/sslblacklist.rules
esr(config-ips-upgrade-user-server)# upgrade interval 4
esr(config-ips-upgrade-user-server)# exit
esr(config-auto-upgrade)# user-server C2-Botnet
esr(config-ips-upgrade-user-server)# description «Abuse.ch Botnet C2 IP Blacklist»
esr(config-ips-upgrade-user-server)# url https://sslbl.abuse.ch/blacklist/sslipblacklist.rules
esr(config-ips-upgrade-user-server)# upgrade interval 4
esr(config-ips-upgrade-user-server)# exitBasic user rules configuration algorithm
Step | Description | Command | Keys |
|---|---|---|---|
1 | Specify a name and enter the configuration mode of the set of user rules. | esr(config)# security ips-category user-defined <WORD> | <WORD> – user rule set name, set by the string of up to 32 characters. |
2 | Define a description of a set of user rules (optionally). | esr(config-ips-category)# description <DESCRIPTION> | <DESCRIPTION> – description, set by the string of up to 255 characters. |
3 | Create a rule and switch to its configuration mode. | esr(config-ips-category)# rule <ORDER> | <ORDER> – rule number, takes values of [1..512]. |
4 | Specify rule description (optional). | esr(config-ips-category-rule)# description <DESCRIPTION> | <DESCRIPTION> – description, set by the string of up to 255 characters. |
5 | Specify the given rule force. | esr(config-ips-category-rule)# action { alert | reject | pass | drop } |
|
6 | Set name of IP protocol for which the rule should work. | esr(config-ips-category-rule)# protocol <PROTOCOL> | <PROTOCOL> – take values: any/ip/icmp/http/tcp/udp When specifying the 'any' value, the rule will work for any protocols |
7 | Set sender IP addresses for which the rule should work. | esr(config-ips-category-rule)# source-address | <ADDR> – sender IP address, defined as AAA.BBB.CCC.DDD where each part takes values of [0..255]; <ADDR/LEN> – sender IP subnet, defined as AAA.BBB.CCC.DDD/EE where each part AAA-DDD takes values of [0..255] and LEN takes values of [1..32]. <OBJ_GR_NAME> – name of IP addresses profile that contains sender IP address, set by the string of up to 31 characters.
When specifying the 'any' value, the rule will be triggered for any source IP address. |
8 | Set the profile of source TCP/UDP ports for which the rule should work. For protocol icmp value, source-port can only be any. | esr(config-ips-category-rule)# source-port {any | <PORT> | object-group <OBJ-GR-NAME> } | <PORT> – number of sender TCP/UDP port, takes values of [1..65535]. <OBJ_GR_NAME> – sender TCP/UDP ports profile name, set by the string of up to 31 characters. When specifying the “any” value, the rule will work for any sender TCP/UDP port. |
9 | Set destination IP addresses for which the rule should trigger. | esr(config-ips-category-rule)# destination-address | <<ADDR> – recepient IP address, defined as AAA.BBB.CCC.DDD where each part takes values of [0..255]; <ADDR/LEN> – recepient IP subnet, defined as AAA.BBB.CCC.DDD/EE where each part AAA-DDD takes values of [0..255] and LEN takes values of [1..32]. <OBJ_GR_NAME> – name of IP addresses profile that contains recepient IP address, set by the string of up to 31 characters.
When specifying the “any” value, the rule will work for any sender IP address. |
10 | Set the profile of destination TCP/UDP ports for which the rule should work. For protocol icmp value, destination-port can only be any. | esr(config-ips-category-rule)# destination-port | <PORT> – number of destination TCP/UDP port, takes values of [1..65535]. <OBJ_GR_NAME> – recepient TCP/UDP ports profile name, set by the string of up to 31 characters. When specifying the 'any' value, the rule will be triggered for any source TCP/UDP port. |
11 | Set traffic direction for which the rule should trigger. | esr(config-ips-category-rule)# direction { one-way | round-trip } |
|
12 | Define the message that IPS/IDS will record to the log when this rule will trigger. | esr(config-ips-category-rule)# meta log-message <MESSAGE> | <MESSAGE> – text message, specified by a string of up to 129 characters. |
13 | Define the traffic classification which will record to the log when this rule will trigger (optional). | esr(config-ips-category-rule)# meta classification-type |
|
14 | Set DSCP code value for which the rule should work (optional). | esr(config-ips-category-rule)# ip dscp <DSCP> | <DSCP> – DSCP code value, takes values in the range of [0..63]. |
15 | Set the packet lifetime (TTL) value for which the rule will trigger (optional). | esr(config-ips-category-rule)# ip ttl <TTL> | <TTL> – TTL value, takes values in the range of [1..255]. |
16 | Set number of IP for which the rule should work (optional). Applicable only for protocol any value. | esr(config-ips-category-rule)# ip protocol-id <ID> | <ID> – IP identification number, takes values of [1..255]. |
17 | Set ICMP CODE value for which the rule should trigger (optional). Applicable only for protocol icmp value. | esr(config-ips-category-rule)# ip icmp code <CODE> | <CODE> – ICMP CODE value, takes a value in the range [0..255]. |
esr(config-ips-category-rule)# ip icmp code comparison-operator | Comparison operator for ip icmp code value:
| ||
18 | Set ICMP ID value for which the rule should trigger (optional). Applicable only for protocol icmp value. | esr(config-ips-category-rule)# ip icmp id <ID> | <ID> – ICMP ID value, takes a value in the range [0..65535]. |
19 | Set ICMP Sequence-ID value for which the rule should trigger (optional). Applicable only for protocol icmp value. | esr(config-ips-category-rule)# ip icmp sequence-id <SEQ-ID> | <SEQ-ID> – ICMP Sequence-ID value, takes a value in the range [0..4294967295]. |
20 | Set ICMP TYPE value for which the rule should trigger (optional). Applicable only for protocol icmp value. | esr(config-ips-category-rule)# ip icmp type <TYPE> | <TYPE> – ICMP TYPE value, takes a value in the range [0..255]. |
esr(config-ips-category-rule)# ip icmp type comparison-operator | Comparison operator for ip icmp type value:
| ||
21 | Set TCP Acknowledgement-Number value for which the rule should trigger (optional). Applicable only for protocol tcp value. | esr(config-ips-category-rule)# ip tcp acknowledgment-number <ACK-NUM> | <ACK-NUM> – TCP Acknowledgement-Number value, takes a value in the range [0..4294967295]. |
22 | Set TCP Sequence-ID value for which the rule should trigger (optional). Applicable only for protocol tcp value. | esr(config-ips-category-rule)# ip tcp sequence-id <SEQ-ID> | <SEQ-ID> – TCP Sequence-ID value, takes a value in the range [0..4294967295]. |
23 | Set TCP Window-Size value for which the rule should trigger (optional). Applicable only for protocol tcp value. | esr(config-ips-category-rule)# ip tcp window-size <SIZE> | <SIZE> – TCP Window-Size value, takes a value in the range [0..65535]. |
24 | Set HTTP protocol keywords for which the rule will trigger (optional). Applicable only for protocol http value. | esr(config-ips-category-rule)# ip http { accept | accept-enc | | See the Suricata 4.X documentation for the meaning of the keywords. https://suricata.readthedocs.io/en/suricata-4.1.4/rules/http-keywords.html |
25 | Set HTTP protocol URI LEN keyword value for which the rule will trigger (optional). Applicable only for protocol http value. | esr(config-ips-category-rule)# ip http urilen <LEN> | <LEN> – takes values in the range of [0.. 65535]. |
esr(config-ips-category-rule)# ip http urilen comparison-operator | Comparison operator for ip http urilen value:
| ||
26 | Set the value of the content of packages (Payload content) for which the rule will trigger (optional). | esr(config-ips-category-rule)# payload content <CONTENT> | <CONTENT> – text message specified by a string of up to 1024 characters. |
27 | Do not distinguish between uppercase and lowercase letters in the description of package contents (optional). Only applicable in conjunction with the payload content command. | esr(config-ips-category-rule)# payload no-case | |
28 | Set how many bytes from the beginning of the contents of the packet will be checked (optional). Only applicable in conjunction with the payload content command. | esr(config-ips-category-rule)# payload depth <DEPTH> | <DEPTH> – the number of bytes from the beginning of the packet contents, takes a value in the range [1 .. 65535]. By default, the entire contents of the package are checked. |
29 | Set the number of offset bytes from the beginning of the contents of the packet to check (optional). Only applicable in conjunction with the payload content command. | esr(config-ips-category-rule)# payload offset <OFFSET> | <OFFSET> – the number of offset bytes from the beginning of the packet contents, takes a value in the range [1 .. 65535]. By default, it is checked from the beginning of the content. |
30 | Set the size of the contents of packets for which the rule will trigger (optional). | esr(config-ips-category-rule)# payload data-size <SIZE> | <SIZE> – packet content size, takes values in the range of [0.. 65535]. |
esr(config-ips-category-rule)# payload data-size | Comparison operator for payload data-size value:
| ||
31 | Specify the threshold number of packets at which the rule will trigger (optional). | esr(config-ips-category-rule)# threshold count <COUNT> | <COUNT> – number of packets, takes values in the range of [1.. 65535]. |
32 | Specify the time interval for which the threshold number of packets is considered (Mandatory if threshold count is enabled). | esr(config-ips-category-rule)# threshold second <SECOND> | <SECOND> – time interval in seconds, takes values in the range of [1.. 65535]. |
33 | Specify at the sender or recipient address thresholds will be considered. (Mandatory if threshold count is enabled). | esr(config-ips-category-rule)# threshold track |
|
34 | Specify threshold handling method. | esr(config-ips-category-rule)# threshold type |
A message will be generated if during the <SECOND> time interval there were <COUNT> or more packets matching the rule conditions, and the message will be sent only once during the <SECOND> time interval. |
35 | Activate a rule. | esr(config-ips-category-rule)# enable |
Basic user rules configuration example
Objective:
Write a rule to protect a server with IP 192.168.1.10 from a DOS attack by large ICMP packets.
Solution:
Create a set of user rules:
esr(config)# security ips-category user-defined USERCreate a rule to protect against attack:
esr(config-ips-category)# rule 10
esr(config-ips-category-rule)# description «Big ICMP DoS»We will drop packets:
esr(config-ips-category-rule)# action dropConfigure attack message:
esr(config-ips-category-rule)# meta log-message «Big ICMP DoS»
esr(config-ips-category-rule)# meta classification-type successful-dosSpecify protocol type for the rule:
esr(config-ips-category-rule)# protocol icmpSince we specified the icmp protocol, we need to specify any as the port of the sender and recipient:
esr(config-ips-category-rule)# source-port any
esr(config-ips-category-rule)# destination-port anyWe will indicate our server as the recipient address:
esr(config-ips-category-rule)# destination-address ip 192.168.1.10Attacker can send packets from any address:
esr(config-ips-category-rule)# source-address anySet traffic direction:
esr(config-ips-category-rule)# direction one-wayThe rule will trigger on packets larger than 1024 bytes:
esr(config-ips-category-rule)# payload data-size 1024
esr(config-ips-category-rule)# payload data-size comparison-operator greate r-thanThe rule will trigger if the load on the server exceeds 3 Mbps, while an attack message will be generated not more than once a minute:
3 Mbps = 3145728 bps
1KB packet = 8192 bits
3145728/8192 = 384 packet per second
384 * 60 = 23040 packets per minuteesr(config-ips-category-rule)# threshold count 23040
esr(config-ips-category-rule)# threshold second 60
esr(config-ips-category-rule)# threshold track by-dst
esr(config-ips-category-rule)# threshold type bothExtended user rules configuration algorithm
Step | Description | Command | Keys |
|---|---|---|---|
1 | Specify a name and enter the configuration mode of the set of user rules. | esr(config)# security ips-category user-defined <WORD> | <WORD> – user rule set name, set by the string of up to 32 characters. |
2 | Define a description of a set of user rules (optionally). | esr(config-ips-category)# description <DESCRIPTION> | <DESCRIPTION> – description, set by the string of up to 255 characters. |
3 | Create extended rule and switch to its configuration mode. | esr(config-ips-category)# rule-advanced <SID> | <SID> – rule number, takes values of [1..4294967295]. |
4 | Specify rule description (optional). | esr(config-ips-category-rule-advanced)# description <DESCRIPTION> | <DESCRIPTION> – description, set by the string of up to 255 characters. |
5 | Specify the given rule force. | esr(config-ips-category-rule-advanced)# rule-text <LINE> | <CONTENT> – text message in SNORT 2.X/Suricata 4.X format, specified by a string of up to 1024 characters. When writing rules, the symbol '' needs to be replaced with the symbol ' |
6 | Activate a rule. | esr(config-ips-category-rule-advanced)# enable |
Extended user rules configuration example
Objective:
Write a rule detecting attack like Slowloris.
Solution:
Create a set of user rules:
esr(config)# security ips-category user-defined ADVCreate an extended rule:
esr(config-ips-category)# rule-advanced 1
esr(config-ips-category-rule-advanced)# description «Slow Loris rule 1»
esr(config-ips-category-rule-advanced)# rule-text "alert tcp any any -> any 80 (msg:'Possible Slowloris Attack Detected';
flow:to_server,established; content:'X-a|3a|'; distance:0; pcre:'/\d\d\d\d/'; distance:0; content:'|0d 0a|'; sid:10000001;)"Create another extended rule that works on a similar algorithm to determine which rule will be more effective:
esr(config-ips-category)# rule-advanced 2
esr(config-ips-category-rule-advanced)# description «Slow Loris rule 2»
esr(config-ips-category-rule-advanced)# rule-text «alert tcp $EXTERNAL_NET any -> $HOME_NET $HTTP_PORTS (msg:'SlowLoris.py DoS attempt'; flow:established,to_server,no_stream; content:'X-a:'; dsize:<15; detection_filter:track by_dst, count 3, seconds 30; classtype:denial-of-service; sid: 10000002; rev:1; )Eltex Distribution Manager interaction configuration
EDM (Eltex Distribution Manager) is a service for distributing licensed content to devices via commercial subscription.
Using Kaspersky Lab's security infrastructure, including the Kaspersky Security Network cloud-based "collective intelligence" with Kaspersky SafeStream II support, the ESR service router is able to detect malware in all types of traffic (web, email, P2P, instant messaging services, etc.). As a result, users are protected from the most dangerous cyber threats, including zero-day threats, encryption programs, infected sites and other types.
IPS on ESR devices can use the following sets of rules provided by Kaspersky SafeStream II:
- IP address Reputation Data – a set of IP addresses with contextual information that reports suspicious and malicious hosts;
- URLs of malicious links – a set of URLs corresponding to dangerous links and websites;
- URLs of phishing links – a set of URLs recognized by Kaspersky Lab as phishing. Masked and unmasked entries are available;
- URLs of botnet command servers – a set of URLs of botnet command servers and associated malicious objects;
- URLs of encryptors – set of encryptor URLs;
- Hashes of malicious objects – a set of file hashes that covers the most dangerous and common, as well as the newest malicious programs;
- Hashes of malicious objects for mobile devices – a set of file hashes to detect malicious objects infecting mobile devices;
- URLs of botnet command servers for mobile devices – a set of URLs with contextual information to identify botnet command servers using mobile devices;
- URLs of websites used to host malicious programs that infect Internet of Things (IoT) devices.
EDM Server software is provided to operate under a group license, allowing the new ESR service router to be automatically enabled under an existing license. Thus, the user of the system can manage the allocation of licenses to ESR devices within his organization. EDM Server software can be installed on multiple hosts to provide scalability and fault tolerance.
Basic configuration algorithm
Step | Description | Command | Keys |
|---|---|---|---|
1 | Go to the content provider configuration. | esr (config)# content-provider | |
2 | Specify edm server IP address. | esr (config-content-provider)# host address <A.B.C.D | WORD | X:X:X:X::X> | <IP-ADDR> – IP address, defined as AAA.BBB.CCC.DDD where each part takes values of [0..255]; <IPV6-ADDR> – RADIUS server IPv6 address, defined as X:X:X:X::X where each part takes values in hexadecimal format [0..FFFF]. WORD(1-31) - DNS name of the server. |
3 | Set the port to connect to the edm server. | esr (config-content-provider)# host port <PORT> | <PORT> – number of sender TCP/UDP port, takes values of [1..65535]. |
4 | Set the type and partition of the external device to create a crypto store. | esr (config-content-provider)# storage-device <DEVICE> | <DEVICE> – label and partition name on the external storage in the format of usb://Partion_name:/ |
5 | Set the time to reboot the device after receiving the certificate. | esr (config-content-provider)# reboot immediately | [time <HH:MM:SS>] | Restart the device after receiving the certificate. time <HH:MM:SS> – The time at which ESR will reboot <hours:minutes:seconds>. |
6 | Enable content provider. | enable | |
7 | Set the interval for accessing the edm server in hours. | esr (config-content-provider)# upgrade interval <1-240> | |
8 | Specify description (optional). | esr (config-content-provider)# description edm | LINE (1-255) String describing server |
9 | Create IP addresses lists which will be used during filtration. | esr (config)# object-group network <WORD>esr (config-object-group-network)# ip prefix <ADDR/LEN> | <WORD> – server name, set by the string of up to 32 characters. <ADDR/LEN> – subnet, defined as AAA.BBB.CCC.DDD/EE where each part AAA-DDD takes values of [0..255] and EE takes values of [1..32]. |
10 | Enable service-ips on interface. | esr (config)# interface gigabitethernet 1/0/Xesr (config-if-gi)# service-ips enable | |
11 | Create IPS/IDS security policy. | esr (config)# security ips policy WORD(1-31) | WORD(1-31) |
12 | Specify the IP address profile that IPS/IDS will protect. | esr(config-ips-policy)# protect network-group <OBJ-GROUP-NETWORK_NAME> | <OBJ-GROUP-NETWORK-NAME> – protected IP addresses profile name, set by the string of up to 32 characters. |
13 | Enter the vendor configuration section. | esr (config-ips-policy)# vendor kaspersky | |
14 | Connect the desired category. | esr (config-ips-vendor)# category WORD(1-64) | Phishing URL Data Feed – Phishing URL data streams Malicious URL Data Feed – Malicious URL data streams Botnet C&C URL Data Feed – Botnet C&C URL data streams Malicious Hash Data Feed – Malicious Hashes data streams Mobile Malicious Hash Data Feed – mobile Malicious Hashes data streams IP Reputation Data Feed – IP address data streams Mobile Botnet Data Feed – mobile Botnet data streams Ransomware URL Data Feed – Ransomware URL data stream Botnet C&C URL Exact Data Feed – Botnet C&C URL Exact data stream Phishing URL Exact Data Feed – Phishing URL Exact data stream Malicious URL Exact Data Feed – Malicious URL Exact data stream Iot URL Data Feed – IoT URL data stream |
15 | Specify rule type. | esr (config-ips-vendor-category)# rules action <ACTION> | <ACTION> - drop | reject | alert | pass – actions to be applied to packages.
|
16 | Set the number of downloadable rules. | esr (config-ips-vendor-category)# rules count <number> | <number> |
17 | Enable category | enable | |
18 | Switch to the IPS/IDS configuration mode. | esr (config)# security ips | |
19 | Assign IPS/IDS security policy. | esr(config-ips)# policy <NAME> | <NAME> – security policy name, set by the string of up to 32 characters. |
20 | Use all ESR rosiurces for IPS/IDS (optional). | esr(config-ips)# perfomance max | |
21 | Set USB drive for recording logs in EVE format (optional). | esr(config-ips)# logging storage-path <DEVICE_NAME> | <DEVICE> – label and partition name on the external storage in the format of usb://Partion_name:/ |
22 | Enable IPS/IDS. | esr(config- ips )# enable |
Configuration example:
Set the content-provider parameters – this is the address of the Eltex server. There must be network reachability between the content-provider server and the router.
content-provider
  host address edm.eltex-co.ru
  host port 8098
  upgrade interval 1
  storage-device mmc://TEST:/
  reboot immediately
  enable
exitAfter rebooting the device, you can start configuring the IPS service.
Specify the IP address profile that IPS/IDS will protect:
object-group network objectgroup0
  ip prefix 192.168.30.0/24
exitEnable IPS on the interface:
interface gigabitethernet 1/0/1
  service-ips enable
exitConfigure security policy:
security ips policy policy0
  protect network-group objectgroup0
  vendor kaspersky
    category MaliciousURLsDF
      rules action alert
      rules count 100
      enable
    exit
    category MobileBotnetCAndCDF
      rules action alert
      rules count 1000
      enable
    exit
    category APTIPDF
      rules action alert
      rules count 1000
      enable
exit category APTURLsDF
rules action alert
rules count 1000
enable
exit
category BotnetCAndCURLsDF
rules action alert
rules count 1000
enable
exit
category IPReputationDF
rules action alert
rules count 1000
enable
exit
category IoTURLsDF
rules action alert
rules count 1000
enable
exit
category MaliciousHashDF
rules action alert
rules count 1
enable
exit
category MobileMaliciousHashDF
rules action alert
rules count 1
enable
exit
category PSMSTrojanDF
rules action alert
rules count 1
enable
exit
category PhishingURLsDF
rules action alert
rules count 1000
enable
exit
category RansomwareURLsDF
rules action alert
rules count 1000
enable
exit
exit
exitAssign an IPS policy to the service and enable it:
security ips
  performance max
  policy policy0
  enable
exit
You can use the following two commands to view information about downloaded content for IPS/IDS:
show security ips content-provider:
esr-20# show security ips content-provider
 Server: content-provider
                Last MD5 of received files:        c60bd0f10716d3f48e18f24828337135
                Next update: 30 October 2020 00:37:06
With this command you can find out if the content provider has downloaded rules from the EDM server (based on the presence of the md5 checksum) and when the next update is scheduled for the device.
show security ips counters:
esr-20# show security ips counters
TCP flows processed :     191
Alerts generated :        0
Blocked by ips engine :   7
Accepted by ips engine :  51483
Content filtering service configuration
The content filtering service is designed to restrict access to HTTP sites based on their content. For each site is determined by its belonging to a particular category. Kaspersky Lab database is used as a database of site categories. ESR sends HTTPS requests to Kaspersky Lab's server at https://ksn-vt.kaspersky-labs.com to determine the category of sites.
The operation of the content filtering service is based on the Intrusion Prevention System (IPS) and is configured as user IPS rules.
Basic configuration algorithm
Step | Description | Command | Keys |
|---|---|---|---|
1 | Define DNS server IP address used for DNS names resolution. | esr(config)# domain name-server <IP> | <IP> – IP address of DNS server being used, defined as AAA.BBB.CCC.DDD where each part takes values of [0..255]. |
2 | Enable DNS name resolution on the device | esr(config)# domain lookup enable | |
3 | Create IPS/IDS security policy. | esr(config)# security ips policy <NAME> | <NAME> – security policy name, set by the string of up to 32 characters. |
4 | Specify policy description (optional). | esr(config-ips-policy)# description <DESCRIPTION> | <DESCRIPTION> – description, set by the string of up to 255 characters. |
5 | Create IP addresses lists which will be used during filtration. | esr (config)# object-group network <WORD> esr (config-object-group-network)# ip prefix <ADDR/LEN> | <WORD> – server name, set by the string of up to 32 characters. <ADDR/LEN> – subnet, defined as AAA.BBB.CCC.DDD/EE where each part AAA-DDD takes values of [0..255] and EE takes values of [1..32]. |
6 | Specify the IP address profile that IPS/IDS will protect. | esr(config-ips-policy)# protect network-group <OBJ-GROUP-NETWORK_NAME> | <OBJ-GROUP-NETWORK-NAME> – protected IP addresses profile name, set by the string of up to 32 characters. |
7 | Specify the profile of IP addresses that are external for IPS/IDS (optionally). | esr(config-ips-policy)# external network-group <OBJ-GROUP-NETWORK_NAME> | <OBJ-GROUP-NETWORK-NAME> – external IP addresses profile name, set by the string of up to 32 characters. |
8 | Create a content filter category profile | esr(config)# object-group content-filter <NAME> | <NAME> – name of the content filtering profile, specified as a string of up to 31 characters. |
9 | Set the description of the content filter categories profile (optional). | esr(config-object-group-content-filter)# description <DESCRIPTION> | <DESCRIPTION> – description, set by the string of up to 255 characters. |
10 | Set the content filtering category provider. | esr(config-object-group-content-filter)# vendor <CONTENT-FILTER-VENDOR> | <CONTENT-FILTER-VENDOR> – name of the content filtering category provider. In the current version of the software, only Kaspersky Lab can act as a content filtering category provider. |
11 | Set the necessary categories of content filtering | esr(config-object-group-cf-kaspersky)# category <CATEGORY> | <CATEGORY> – category name. A description of the available categories can be found in the CLI command reference. |
12 | Switch to the IPS/IDS configuration mode. | esr(config)# security ips | |
13 | Assign IPS/IDS security policy. | esr(config-ips)# policy <NAME> | <NAME> – security policy name, set by the string of up to 32 characters. |
14 | Use all ESR rosiurces for IPS/IDS (optional). | esr(config-ips)# perfomance max | By default, half of the available processor cores are allocated for IPS/IDS. |
15 | Set external drive for recording logs in EVE format (optional). | esr(config-ips)# logging storage-path <DEVICE_NAME> | <DEVICE_NAME> the name of the USB or MMC drive. |
16 | Enable IPS/IDS. | esr(config-ips )# enable | |
17 | Enable IPS/IDS on the interface. | esr(config-if-gi)# service-ips enable | |
18 | Specify a name and enter the configuration mode of the set of user rules. | esr(config)# security ips-category user-defined <WORD> | <WORD> – user rule set name, set by the string of up to 32 characters. |
19 | Define a description of a set of user rules (optionally). | esr(config-ips-category)# description <DESCRIPTION> | <DESCRIPTION> – description, set by the string of up to 255 characters. |
20 | Create a rule and switch to its configuration mode. | esr(config-ips-category)# rule <ORDER> | <ORDER> – rule number, takes values of [1..512]. |
21 | Specify rule description (optional). | esr(config-ips-category-rule)# description <DESCRIPTION> | <DESCRIPTION> – description, set by the string of up to 255 characters. |
22 | Specify the given rule force. | esr(config-ips-category-rule)# action { alert | reject | pass | drop } |
|
23 | Set the IP protocol to HTTP. | esr(config-ips-category-rule)# protocol http | |
24 | Set sender IP addresses for which the rule should work. | esr(config-ips-category-rule)# source-address | <ADDR> – sender IP address, defined as AAA.BBB.CCC.DDD where each part takes values of [0..255]; <ADDR/LEN> – sender IP subnet, defined as AAA.BBB.CCC.DDD/EE where each part AAA-DDD takes values of [0..255] and LEN takes values of [1..32]. <OBJ_GR_NAME> – name of IP addresses profile that contains sender IP address, set by the string of up to 31 characters.
When specifying the 'any' value, the rule will be triggered for any source IP address. |
25 | Set the profile of source TCP ports for which the rule should work. | esr(config-ips-category-rule)# source-port {any | <PORT> | object-group <OBJ-GR-NAME> } | <PORT> – number of sender TCP/UDP port, takes values of [1..65535]. <OBJ_GR_NAME> – sender TCP/UDP ports profile name, set by the string of up to 31 characters. When specifying the “any” value, the rule will work for any sender TCP/UDP port. |
26 | Set destination IP addresses for which the rule should trigger. | esr(config-ips-category-rule)# destination-address | <<ADDR> – recepient IP address, defined as AAA.BBB.CCC.DDD where each part takes values of [0..255]; <ADDR/LEN> – recepient IP subnet, defined as AAA.BBB.CCC.DDD/EE where each part AAA-DDD takes values of [0..255] and LEN takes values of [1..32]. <OBJ_GR_NAME> – name of IP addresses profile that contains recepient IP address, set by the string of up to 31 characters.
When specifying the “any” value, the rule will work for any sender IP address. |
27 | Set the profile of destination TCP ports for which the rule should trigger. Normally TCP port 80 is used for the http protocol. In cases where web servers are used on non-standard ports need to write these ports too. | esr(config-ips-category-rule)# destination-port {any | <PORT> | object-group <OBJ-GR-NAME> } | <PORT> – number of destination TCP/UDP port, takes values of [1..65535]. <OBJ_GR_NAME> – recepient TCP/UDP ports profile name, set by the string of up to 31 characters. When specifying the 'any' value, the rule will be triggered for any source TCP/UDP port. |
28 | Set traffic direction for which the rule should trigger. | esr(config-ips-category-rule)# direction { one-way | round-trip } |
|
29 | Define the message that IPS/IDS will record to the log when this rule will trigger. | esr(config-ips-category-rule)# meta log-message <MESSAGE> | <MESSAGE> – text message specified by a string of up to 129 characters. |
30 | Assign a content filter category profile | esr(config-ips-category-rule)# ip http content-filter <NAME> | <NAME> – name of the content filtering profile, specified as a string of up to 31 characters. any – rule will trigger for http sites of any category. |
31 | Activate a rule. | esr(config-ips-category-rule)# enable |
Content filtering rules configuration example
Objective:
Deny access to http sites related to the categories of adult-content, casino, online-betting, online-lotteries from the local network 192.168.1.0/24
Solution:
Interfaces and firewall rules must be configured on the device beforehand.
Create a profile of addresses of LAN which we will protect:
esr(config)# object-group network LAN
esr(config-object-group-network)# ip prefix 192.168.1.0/24
esr(config-object-group-network)# exitConfigure the DNS client on the ESR to allow the names of the IPS/IDS rule update sources:
esr(config)# domain lookup enable
esr(config)# domain name-server 8.8.8.8Create IPS/IDS security policy:
esr(config)# security ips policy OFFICE
esr(config-ips-policy)# description "My Policy"
esr(config-ips-policy)# protect network-group LANAllow IPS/IDS operation on the bridge gigabitethernet 1/0/2 interface:
esr(config)# interface gigabitethernet 1/0/2
esr(config-if-gi)# service-ips enableConfigure IPS/IDS parameters:
esr(config)# security ips
esr(config-ips)# logging storage-path usb://DATA
esr(config-ips)# policy OFFICE
esr(config-ips)# enableThe device will be used only as a security gateway, for this allocate the IPS/IDS service all available resources:
esr(config-ips)# perfomance maxCreate a content filtering profile for the selected categories:
esr(config)# object-group content-filter Black
esr(config-object-group-content-filter)# vendor kaspersky-lab
esr(config-object-group-cf-kaspersky)# category adult-content
esr(config-object-group-cf-kaspersky)# category casino
esr(config-object-group-cf-kaspersky)# category online-betting
esr(config-object-group-cf-kaspersky)# category online-lotteriesCreate a set of user rules:
esr(config)# security ips-category user-defined USERCreate the rule:
esr(config-ips-category)# rule 10
esr(config-ips-category-rule)# description «Content-Filter Block»We will drop packets:
esr(config-ips-category-rule)# action dropConfigure attack message:
esr(config-ips-category-rule)# meta log-message «Corporate policy violation»
Specify protocol type for the rule:
esr(config-ips-category-rule)# protocol httpFor http requests, the operating system uses a random value as the TCP sender port, so you must specify any:
esr(config-ips-category-rule)# source-port anyAs the TCP destination port for the protocol http is usually used port 80, but Internet sites can also work on non-standard ports, so we specify any:
esr(config-ips-category-rule)# destination-port anyAs the recipient's address can be any site on the Internet:
esr(config-ips-category-rule)# destination-address anyRequests to the sites are sent from our local network:
esr(config-ips-category-rule)# source-address policy-object-group protect Set traffic direction:
esr(config-ips-category-rule)# direction one-wayThe rule will trigger for categories of sites listed in the Black profile:
esr(config-ips-category-rule)# ip http content-filter Black
Activate the rule:
esr(config-ips-category-rule)# enable
esr(config-ips-category-rule)# exit
esr(config-ips-category-rule)# threshold type both"Antispam" service configuration
Mail antispam or spam filter is a program for detecting and filtering unwanted e-mail messages that can come through corporate mail servers and public e-mail services (spam, mail phishing, etc.).
The main task of the "Anti-spam" service is to detect such unwanted emails while they are still being delivered to the recipient's mailbox. For this purpose, the ESR service router with configured "Antispam" service is installed in the network in front of the protected mail server and redirects e-mail between this server and other mail servers on the Internet through itself, actually performing the function of Mail Proxy.
Emails from external email domains will be analyzed in the Antispam service in the following ways:
- authentication of the sending domain via SPF;
- verification of the signature of an email signed with a domain key using DKIM technology;
- identification of e-mails according to DMARC technology;
- checking if there is a correct MX record for the domain from which the email is sent;
- searching for the sender of an email in a list of known broadcast services;
- searching for the sender of a letter in the RBL;
- analysis of SMTP commands correctness during SMTP session pickup;
- analysis of Unicode encodings present in the text of the letter;
- analysis of references in the text of the email to phishing.
Emails that do not pass most of the checks will be discarded and will not reach the protected mail server.
When using the "Antispam" service to protect the mail server, make a number of additional settings not directly related to the ESR router configuration.
1) Change the MX record for the domain in use so that it does not point to a protected mail server, but to the ESR IP address with the "Antispam" service configured.
2) Configure the mail server to use SMTP Proxy, where the Proxy will be ESR with the "Antispam" service configured.
Basic configuration algorithm
Step | Description | Command | Keys |
|---|---|---|---|
1 | Configure router network name. | esr(config)# hostname <NAME> | <NAME> - up to 64 characters. |
2 | Assign domain name for the router. | esr(config)# domain name <NAME> | <NAME> - up to 255 characters. |
3 | Assign DNS server IP address used for DNS names resolution. | esr(config)# domain name-server <IP> | <IP> – in the format of AAA.BBB.CCC.DDD, where each part takes values from 0 to 255. |
4 | Enable DNS name resolution. | esr(config)# domain lookup enable | |
5 | Create an "Antispam" service profile | esr(config)# security antispam profile <NAME> | <NAME> - up to 31 characters. |
6 | Set the description of the "Antispam" service profile (optional). | esr(config-antispam-profile)# description <DESCRIPTION> | <DESCRIPTION> – up to 255 characters. |
7 | Set the marking type for e-mails that the "Antispam" service classifies as "Spam". | esr(config-antispam-profile)# mark-type <MARK-TYPE> | <MARK-TYPE> – the marking type of an email categorized as "Spam". Possible values:
|
8 | Create the mail domain profile and mailbox addresses (optional). | esr(config)# object-group email <NAME> | <NAME> - up to 31 characters. |
9 | Set the description of the mail domain profile and mailbox addresses (optional). | esr(config-object-group-email)# description <DESCRIPTION> | <DESCRIPTION> – up to 255 characters. |
10 | Enter the mail domain or mailbox address into the profile (optional). | esr(config-object-group-email)# email <NAME> | <NAME> - up to 63 characters. |
11 | Create a rule in the "Antispam" service profile (optional). | esr(config-antispam-profile)# rule <ORDER> | <ORDER> – rule number, may take values from 1..100. |
12 | Set the description of the "Antispam" service profile rule (optional). | esr(config-antispam-profile)# description <DESCRIPTION> | <DESCRIPTION> – up to 255 characters. |
13 | Specify the profile of transmitter IP addresses for which the rule should work (optional). | esr(config-antispam-profile-rule)# sender ip <NAME> | <NAME> - up to 31 characters. |
14 | Set the profile of mail domains and mailbox addresses for which the rule should trigger (optional). | esr(config-antispam-profile-rule)# sender email <NAME> | <NAME> - up to 31 characters. |
15 | Specify the action for the rule. | esr(config-antispam-profile-rule)# action <ACTION> | <ACTION> – assigned action. Possible values:
|
16 | Enable a rule in the "Antispam" service profile (optional). | esr(config-antispam-profile-rule)# enable | |
17 | Create mail domain. | esr(config)# mailserver domain <DOMAIN-NAME> | <DOMAIN-NAME> - up to 31 characters. |
18 | Set the description of the email domain (optional). | esr(config-mailserver-domain)# description <DESCRIPTION> | <DESCRIPTION> – up to 255 characters. |
19 | Set the name of the email domain to be served. | esr(config-mailserver-domain)# mail domain <NAME> | <NAME> - up to 63 characters. |
20 | Set the IP address of the mail server for which the "Antispam" service on ESR acts as SMTP Proxy. | esr(config-mailserver-domain)# mail server ip <ADDR> | <ADDR> – in the format of AAA.BBB.CCC.DDD, where each part takes values from 0 to 255. |
21 | Set the "Antispam" service profile, the settings of which will be applied to the current email domain. | esr(config-mailserver-domain)# profile antispam <NAME> | <NAME> - up to 63 characters. |
22 | Enable mail domain. | esr(config-mailserver-domain)# enable | |
23 | Proceed to the mail server configuration. | esr(config)# mailserver | |
24 | Set the name of the email domain. | esr(config-mailserver)# domain <NAME> | <NAME> - up to 63 characters. |
25 | Specify certificates and keys for the TLS protocol (optional). | esr(config-mailserver)# tls keyfile <TYPE> <NAME> | <TYPE> – type of certificate or key file. Possible values:
<NAME> – certificate file name, set by the string of up to 31 characters. |
26 | Enable TLS support on the mail server (optional). If TLS is enabled, the configuration must include a preset CA certificate, server private key and public server certificate. | esr(config-mailserver)# tls enable | |
27 | Set the maximum size of email headers in KB (optional). | esr(config-mailserver)# headers max-size <SIZE> | <SIZE> - the maximum size of email headers in KB, takes values from 50 to 200. |
28 | Set the maximum email size in KB (optional). | esr(config-mailserver)# mail max-size <SIZE> | <SIZE> - the maximum email size in KB, takes values from 5120 to 51200. |
29 | Enable mandatory HELO or EHLO SMTP command when establishing an SMTP session (optional). | esr(config-mailserver)# smtp helo-required | |
30 | Enable the VRFY SMTP command on the mail server during an SMTP session (optional). | esr(config-mailserver)# smtp vrfy-enable | |
31 | Enable mail server. | esr(config-mailserver)# enable |
Configuration example:
Objective:
Configure the "Antispam" service on ESR to work as an SMTP Proxy to analyze e-mail addressed to the mail server located in the enterprise network and serving the eltex-co.ru domain.
Solution:
Ensure that the MX record for the domain eltex-co.ru points to the ESR IP address:
esr@eltex:~$ dig +noall +answer eltex-co.ru MX
eltex-co.ru.	3548	IN	MX	10 mail-gate.eltex-co.ru.
esr@eltex:~$ dig +noall +answer mail-gate.eltex-co.ru A
mail-gate.eltex-co.ru. 3453 IN A 95.171.220.11Configure the network interfaces:
esr# config
esr(config)# interface gi1/0/1
esr(config-if-gi)# ip address 95.171.220.11/18
esr(config-if-gi)# ip firewall disable
esr(config-if-gi)# exit
esr(config)# interface gi1/0/2
esr(config-if-te)# ip address 192.168.1.1/24
esr(config-if-te)# ip firewall disable
esr(config-if-te)# exitConfigure the network name, domain name and DNS settings. The network name and domain name must form the FQDN Fully Qualified Domain Name), prescribed in the MX record for the domain eltex-co.ru:
esr(config)# hostname mail-gate
esr(config)# domain name eltex-co.ru
esr(config)# domain name-server 1.1.1.1
esr(config)# domain lookup enableCreate a profile for the "Antispam" service that will add an X-Spam header to emails identified as spam:
esr(config)# security antispam profile SimpleProfile
esr(config-antispam-profile)# description "Basic Antispam profile without rules"
esr(config-antispam-profile)# mark-type header
esr(config-antispam-profile)# exitCreate a mail domain, which will be configured to process emails for the eltex-co.ru domain and retransmit such emails to the local mail server. Add the "Antispam" service profile created above to the configuration of the mail domain so that the mail in transit will be analyzed for spam:
esr(config)# mailserver domain MainDomain
esr(config-mailserver-domain)# mail domain eltex-co.ru
esr(config-mailserver-domain)# description "Mail domain eltex-co.ru"
esr(config-mailserver-domain)# mail server ip 192.168.1.10
esr(config-mailserver-domain)# profile antispam SimpleProfile
esr(config-mailserver-domain)# enable
esr(config-mailserver-domain)# exitAdd the domain we created to the mail server configuration and write the settings for TLS:
esr(config)# mailserver
esr(config-mailserver)# domain MainDomain
esr(config-mailserver)# tls keyfile ca ca.crt
esr(config-mailserver)# tls keyfile server-crt server.crt
esr(config-mailserver)# tls keyfile server-key server.key
esr(config-mailserver)# tls enable
esr(config-mailserver)# enable
esr(config-mailserver)# exitApplying the current configuration will start the service.
The SMTP protocol (TCP port 25) must be enabled on the firewall.