
...
To link an address group to a domain, return to the "Domain" app, select the domain, and go to the settings by clicking the "Domain Properties" button or double-clicking the domain.
...
Figure 18 — List of services now available to subscribers of the new domain
0000000000000000000000000000000000000000000000000000000000000000000
Configuring ecss-mysql package
When installing the package, the following data will be requested:
...
Changing the default path — agree to change the configuration file to enter the path to the ecss-mysql databases by entering "Y".
MySQL databases used by the ECSS-10 system will be stored under the path /var/lib/ecss-mysql after installation. Check for files in the folder:
...
ls -l /var/lib/ecss-mysql/
total 36
drwxr-xr-x 2 mysql mysql 4096 Sep 26 13:36 ecss_address_book
drwxr-xr-x 2 mysql mysql 4096 Sep 26 13:37 ecss_audit
drwxr-xr-x 2 mysql mysql 4096 Sep 26 13:36 ecss_calls_db
drwxr-xr-x 2 mysql mysql 4096 Sep 26 13:36 ecss_dialer_db
drwxr-xr-x 2 mysql mysql 4096 Sep 26 13:36 ecss_meeting_db
drwxr-xr-x 2 mysql mysql 4096 Sep 26 13:36 ecss_statistics
drwxr-xr-x 2 mysql mysql 4096 Sep 26 13:36 ecss_subscribers
drwxr-xr-x 2 mysql mysql 4096 Sep 26 13:36 history_db
drwxr-xr-x 2 mysql mysql 4096 Sep 26 14:32 web_conf
Check that the server is running:
...
sudo systemctl status mysql● mysql.service - MySQL Community Server
Loaded: loaded (/lib/systemd/system/mysql.service; enabled; vendor preset: enabled)
Drop-In: /etc/systemd/system/mysql.service.d
└─override.conf
Active: active (running) since Thu 2019-09-26 13:36:47 +07; 23h ago
Main PID: 11642 (mysqld)
CGroup: /system.slice/mysql.service
└─11642 /usr/sbin/mysqld --daemonize --pid-file=/run/mysqld/mysqld.pid
Installing the ecss-node package
Installing the ecss-node package:
| Без форматирования |
|---|
sudo apt install ecss-node |
During the package installation ssw user is created, on whose behalf all ecss services are launched*. The necessary directories are being created, DNS is being configured, SSL certificates are being configured. During the installation, 8 questions necessary for the formation of configuration files will be asked.
...
ntp.ubuntu.com (by default).
Enter one or more space-separated servers used on the site
...
192.168.0.0|255.255.0.0 (by default)
Enter a list of subnets from which this NTP server will be accessible, for example 10.10.0.0|255.255.255.0
...
Creating subscribers
The Subscriber card application is used to create and edit subscriber parameters in the system.
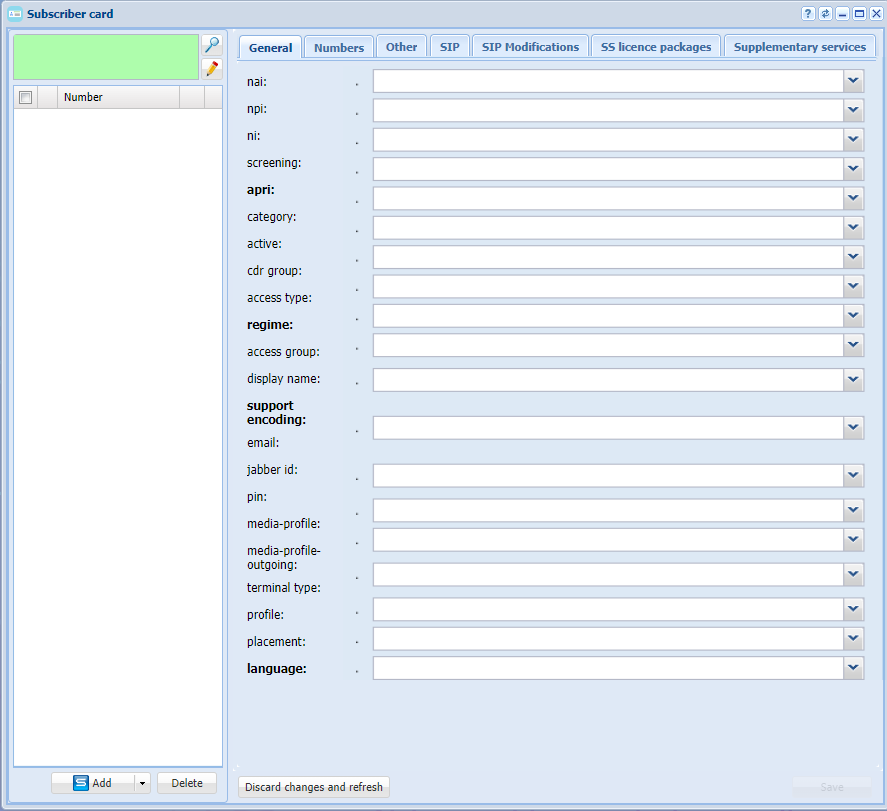
Figure 19 — Subscriber card application view
It is possible to create SIP subscribers and virtual subscribers in the application.
For users with a physical termination, the functionality of the SIP subscriber is used, while the virtual subscriber is used when functionality without physical endings is needed. For example, the number for accessing the ivr script.
To create new subscribers, click on the Add button.
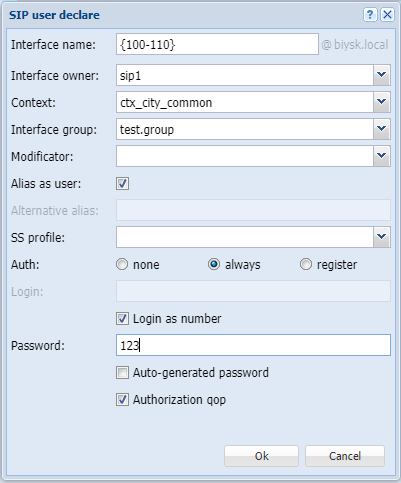
In the dialog box that opens, specify the following parameters:
- Context — routing context, select the one that you created, for example "test_name";
- Interface name — number or group of numbers that is assigned to the subscriber, for example {42001-42010} or abcd;
- Interface group — the name of a group that unites several subscribers, for example "sip";
- Alias as user — setting that binds entity number, alias and user with the same name, in the example the setting is activated;
- Authorization — procedure for verifying the authenticity of the user's rights to access data, in the example always is used.
- Login — use WHATEVER.
- Password — can be set or used generated by the system.
 ↓
↓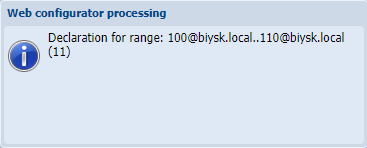
Figure 20 — Example of identifying subscribers in a domain
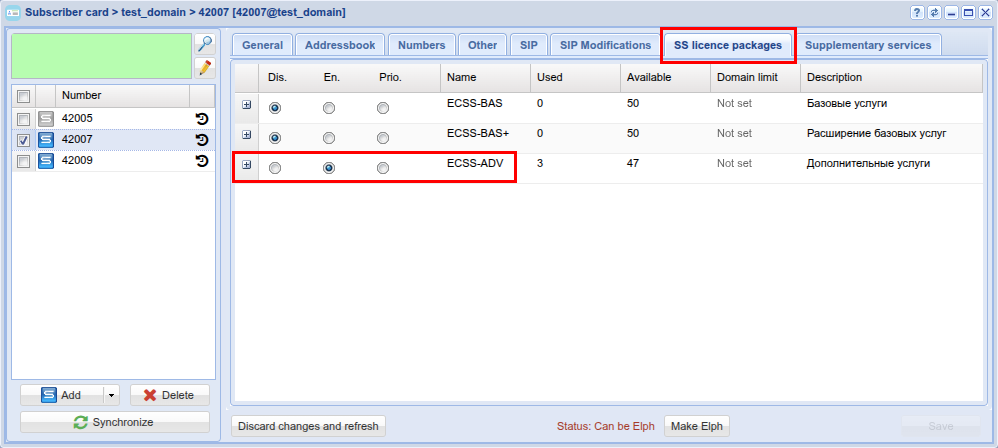
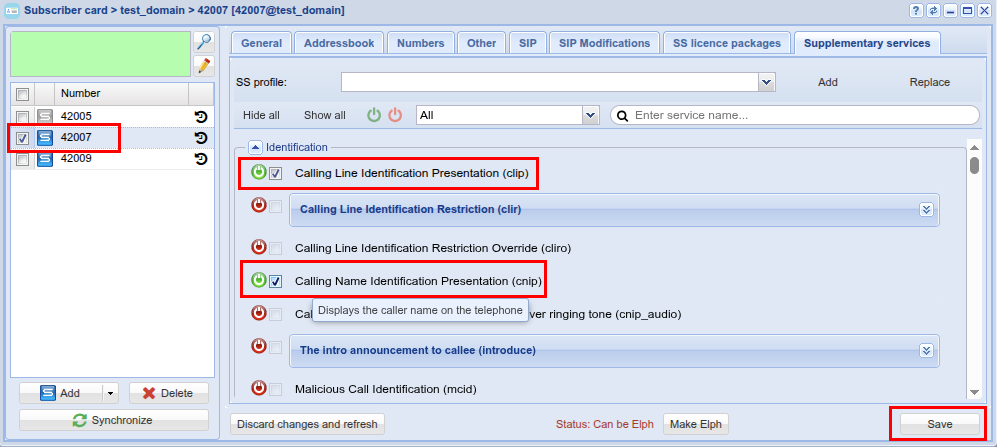
Figure 21 — Example of adding services for a subscriber
Creating and applying routing contexts for a domain
Routing is responsible for finding the number and then addressing the call. At least one routing context must be configured for the system to operate correctly.
Routing is configured in Routing Manager application.
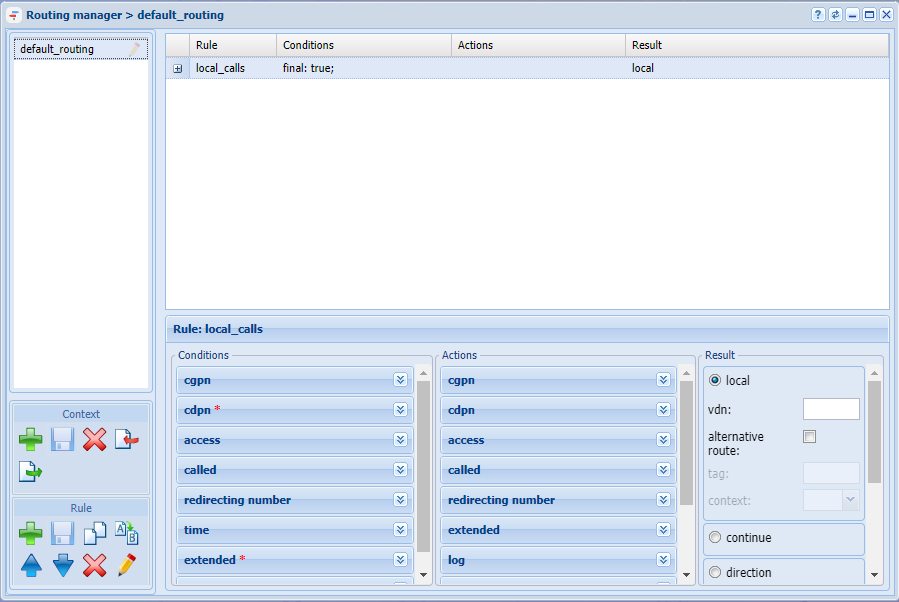
Figure 22 — Routing manager application view
Example of creating a context and a few rules in it:
1. In the left part of the window in the Context section click the Create context button  ;
;
2. In the dialog box that opens, indicate the name of the context;
3. Click Ok button;
4. Click Save context  ;
;
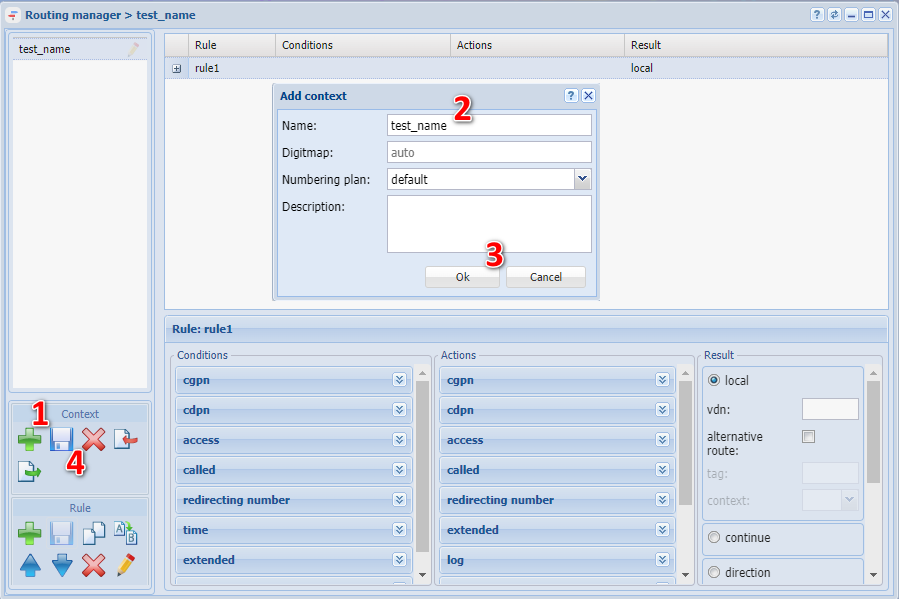
Create 4 rules in this context:
- rule1 — rule for accessing TAU-72 trunk;
- rule2 — local routing rule for numbers 42001-42005;
- rule3 — rule for entering the ivr;
- rule4 — exception rule.
To create a new rule, select the created context and click Create rule. In the window that appears, enter name of the rule. Then save the newly created rules.
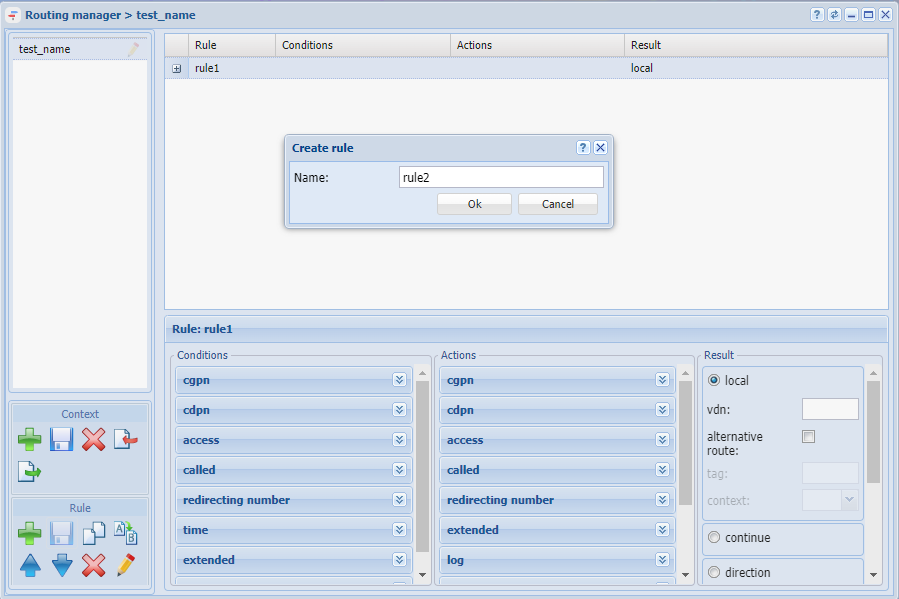
Figure 23 — Creating routing context rule
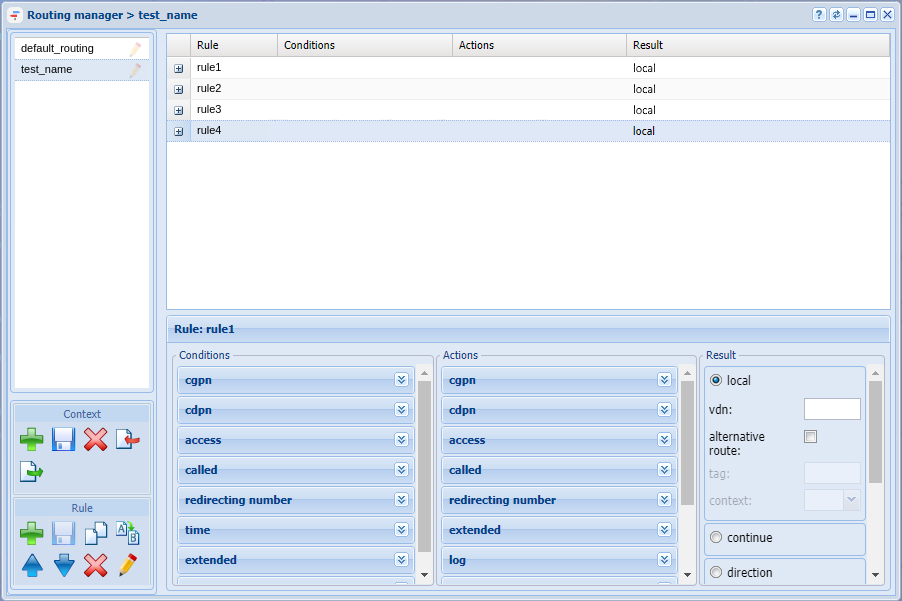
Figure 24 — Defining rules
At the moment, the trunk that can be referred in a rule is not defined, however it is possible to specify the numbers by which the selection will be made.
Go to the lower part of the screen by clicking on the rule1, where the areas for editing the routing context are located. It is conditionally defined in the example that selection for entering the trunk will be carried out based on the characteristics of the called subscriber number (CDPN), and the numbers in the trunk should start with digit 4.
Functionally, the routing context is divided into three parts:
- Condition — section defining the expressions for selection according to the proposed criteria;
- Action — section that converts the signs of numbers to a specific value;
- Result — section that completes the routing and determines its result.
rule1: To access the trunk, edit each part correctly:
- In the conditions section, go to the CDPN tab. Enter the phone numbers that are assigned to the trunk in the Number field. For example, to define numbers from 42006 to 42007, enter condition 420(6-7);
- In the actions section, go to the CDPN tab. Enter a mask to change the number in the Number field. For example, to add number 4 before the number, fill in the field with the following expression 4{1,2,3,4,5};
- Click Save rule and Save Context buttons to apply changes.
To configure the result field, the trunk must be defined in the system, so return to configuring this rule a little later.
Configure remaining rules in the same way.
For rule2:
- In CDPN tab in conditions section, enter phone numbers that are behind the trunk in "Number" field. For example, to define numbers from 42001 to 42005, enter condition 420(1-5);
- In the result section, define the result as local (e. local routing);
- Click Save rule and Save Context buttons to apply changes.
For rule 3, assume that subscribers with numbers 108, 109 and 110 get into the informant ivr script before calling further.
- In CGPN tab in conditions section, enter the phone numbers for which the selection will be in the field "Number", for example 420(10.08-09).
- Click Save rule and Save Context buttons to apply changes.
To configure the result field, ivr script must be defined in the system, so return to configuring this rule later.
For rule 4, define an exception rule — this is a rule that works in case any other rules fail.
- By default, this rule is created in the system in default_routing context. The % symbol is written to the called number in the conditions, and the result is local routing, however, it is recommended to create this rule at the end if assigning to the subscriber a context other than default_routing.
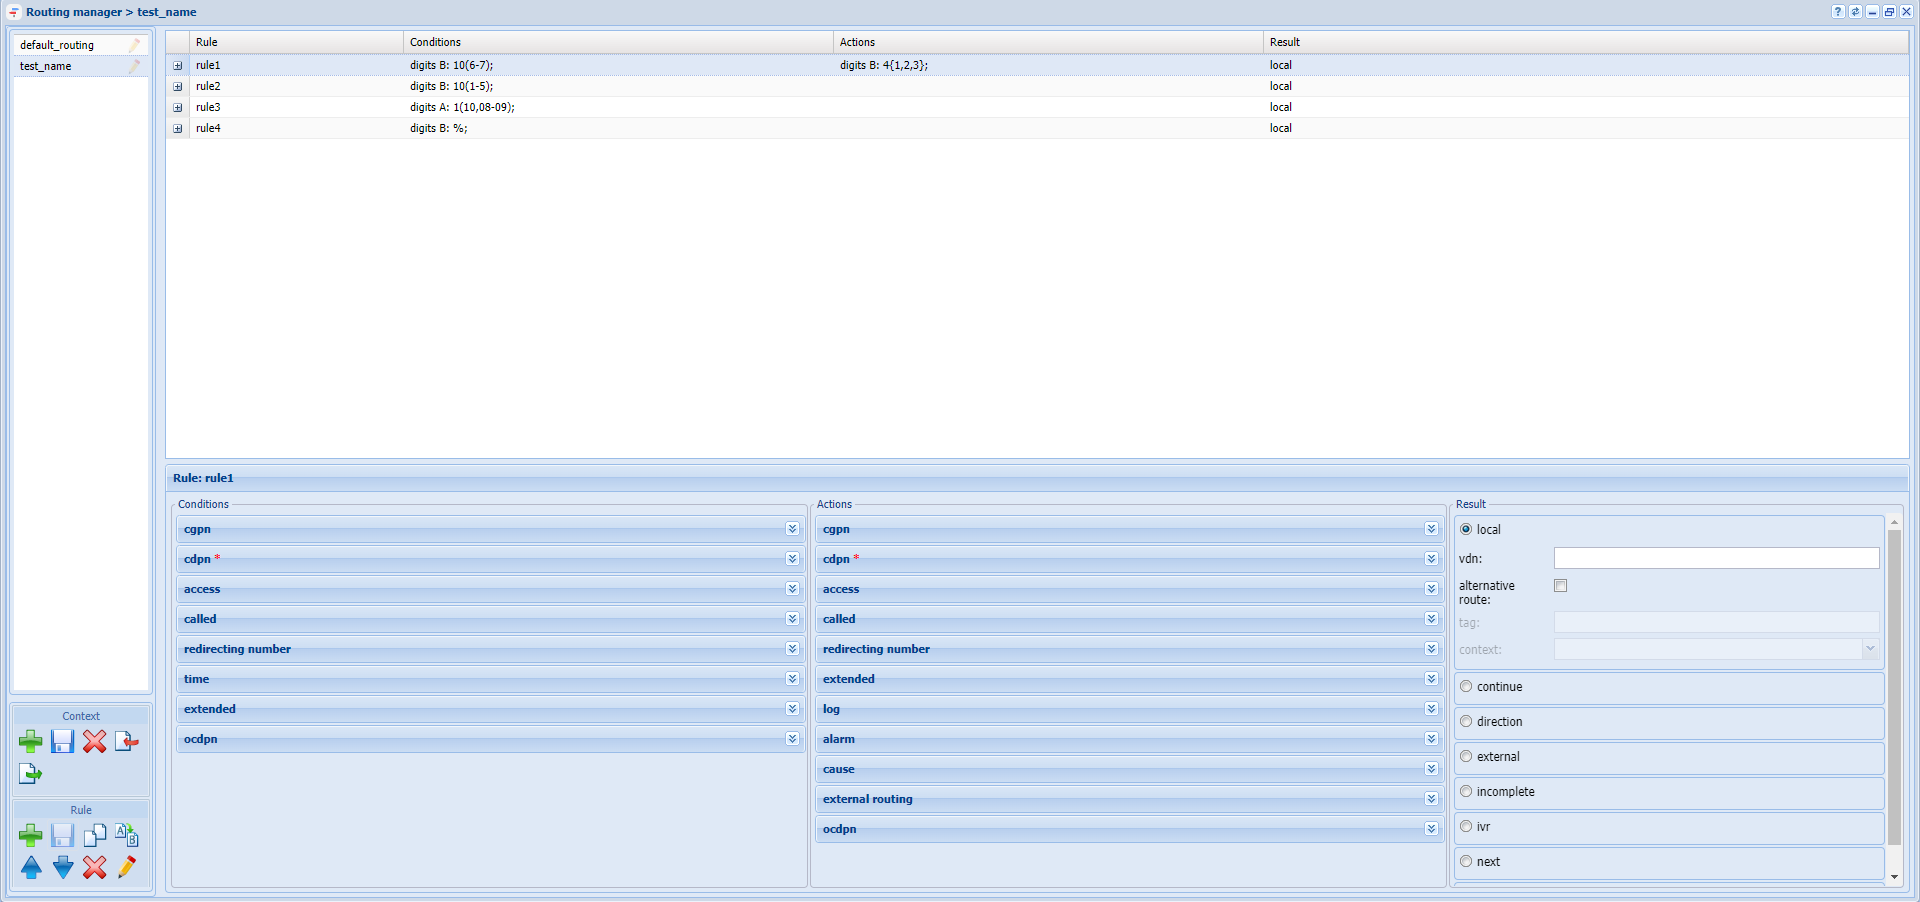
Figure 25 — Example of configuring routing context
Creating trunk
| Якорь | ||||
|---|---|---|---|---|
|
To create and edit trunk parameters in the system, use the Trunk manager application.
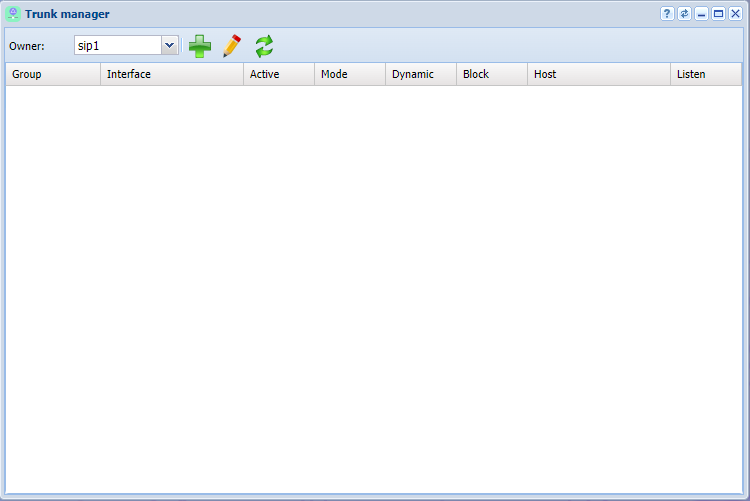
Figure 26 — Trunk Manager application view
To define a trunk in the system, click on the Trunk declare button, define parameters in the dialog box that opens:
- Name — assign trunk name by which it can be identified in the system;
- Context — apply previously created test_name routing context;
- Group — select the interface group created when defining 'test.group' subscribers;
- IP address group (IPSet) — 'ipset1' address group created on the domain;
- Registration — if trunk is used, then enable this parameter, it is not used in the example;
- Host [:port] — destination IP address of the trunk — 10.0.3.100;
- Listen port — transport port where traffic from the trunk will be listened to, corresponds to the port assigned to the IP address group.
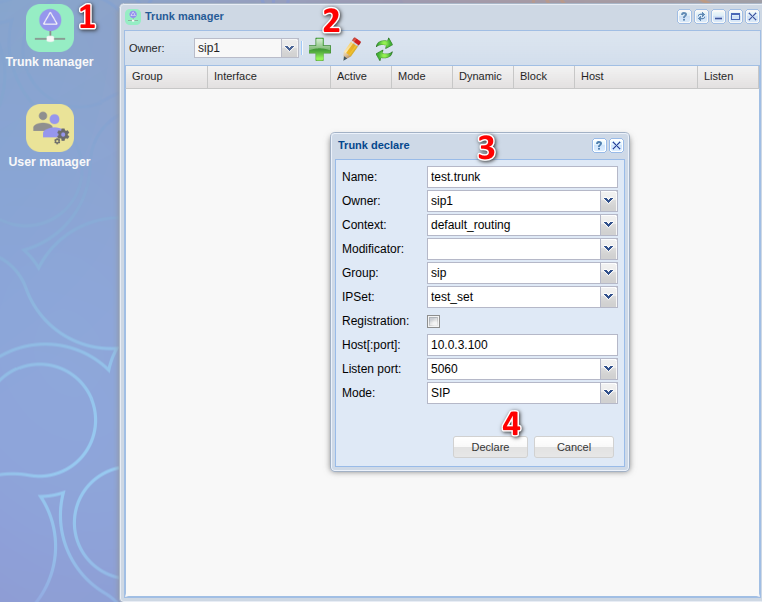
Figure 27 — Creating a trunk
Creating IVR script
| Якорь | ||||
|---|---|---|---|---|
|
To create IVR, use the IVR editor application.
To create a script, click on the Add button, select script type (in this case there is a script for incoming calls), specify the name of the script in the dialog box, for example "test_ivr".
After creating the script, a flowchart will appear in the main editor window.
In figures below is shown an example of making a script that plays a pre-recorded phrase to the caller when triggered, and then continues the call.
- Info — block that plays messages until the user responds. A tone generator is used as a recorded phrase:
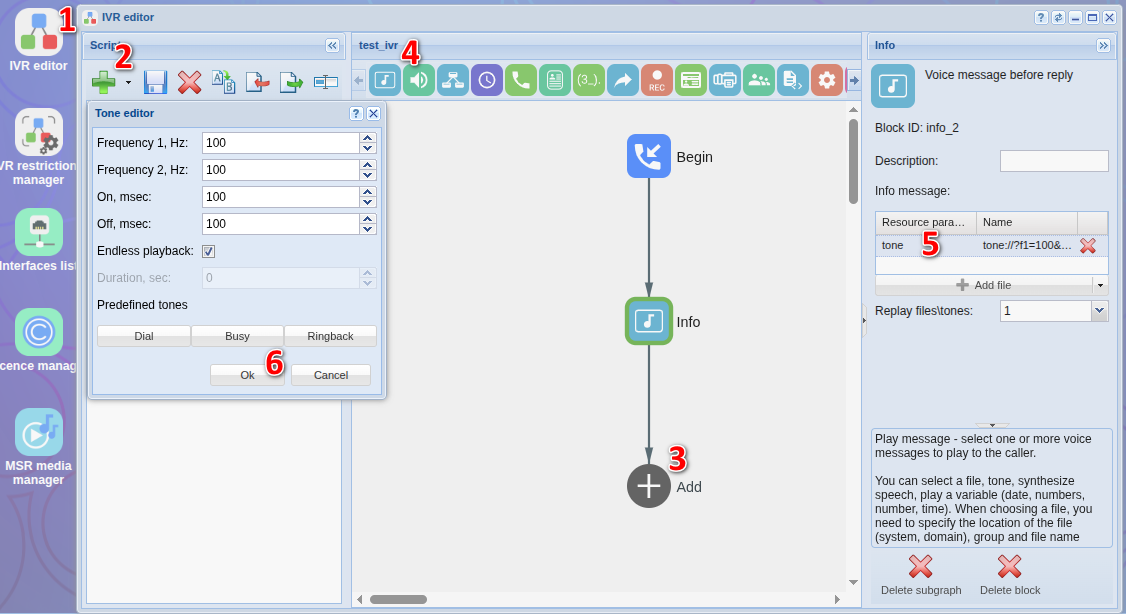
Figure 29 — View of the IVR workspace with the Info block settings
- Dial — block that makes a call to a given number. To continue the call, apply the predefined CDPN variable:
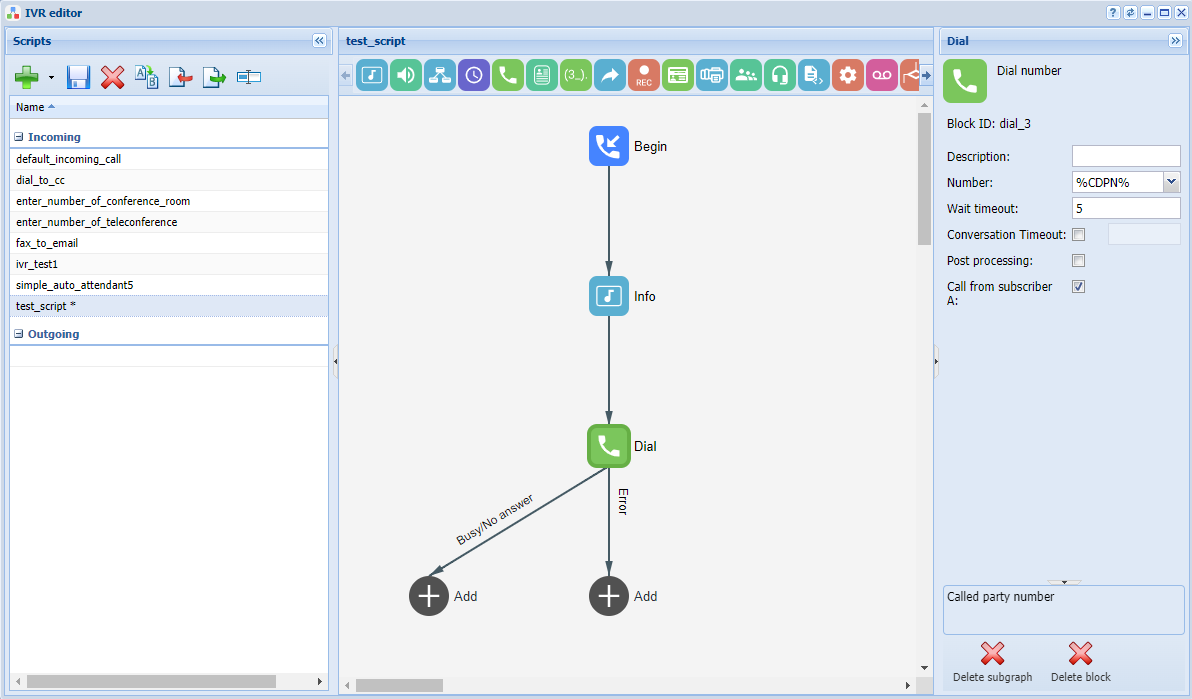
Figure 30 — View of the IVR workspace
Completing routing configuration
To complete routing, open Routing manager application and in rules rule1 and rule3 adjust the corresponding routing results, and follow the steps below:
- rule1: select the "external" sub-item in the Result section. In the Value field of the Directions table add the trunk created earlier, then save the rule .
- rule3: select the "ivr" sub-item in the Result section. In the script field add the previously created ivr script, then save the rule and the context .
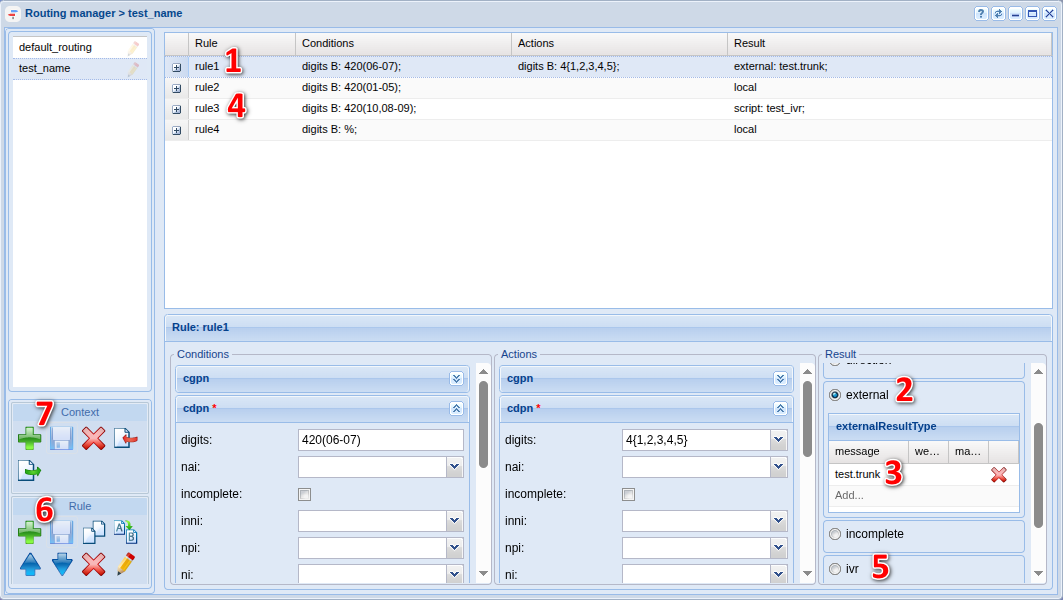
Figure 31 — Type of routing context
Initial system configuration via the command-line interface (CLI)
| Раскрыть | |||||||||||||||||||||||||||||||||||||||||||||||||||||||||||||||||||||||||||||||||||||||||||||||||||||||||||||||||||||||||||||||||||||||
|---|---|---|---|---|---|---|---|---|---|---|---|---|---|---|---|---|---|---|---|---|---|---|---|---|---|---|---|---|---|---|---|---|---|---|---|---|---|---|---|---|---|---|---|---|---|---|---|---|---|---|---|---|---|---|---|---|---|---|---|---|---|---|---|---|---|---|---|---|---|---|---|---|---|---|---|---|---|---|---|---|---|---|---|---|---|---|---|---|---|---|---|---|---|---|---|---|---|---|---|---|---|---|---|---|---|---|---|---|---|---|---|---|---|---|---|---|---|---|---|---|---|---|---|---|---|---|---|---|---|---|---|---|---|---|---|
| |||||||||||||||||||||||||||||||||||||||||||||||||||||||||||||||||||||||||||||||||||||||||||||||||||||||||||||||||||||||||||||||||||||||
Adding media resources using the command-line interface (CLI)Open CLI CoCon:
A media resource is a description of the media server parameters required for operation.
Example:
Result:
Пример:
Example:
Adding registrar control for MSR media manager in the Command Line Interface (CLI) CoCon
Example: Set the IP address for receiving connections from the media server:
Result:
Example:
After all services are started, the nodes will take some time to establish communication. Once all nodes are loaded, the following information will be output when the system-status query is executed:
In the example above, the nodes have started and the MSR have registered on the ecss-core node. Creating and configuring a SIP IP address group (IP-set)Configure the SIP adapter according to the specifications:
Result:
Creating a domain and connecting an IP-setCreate a Domain (virtual PBX) and assign it the SIP adapter settings group (IP set) created above:
After creating a domain, the system administrator should grant access to the Domain (virtual PBX) operator to manage services. To do this, use the "test_domain" command to allow the Domain (virtual PBX) operator to manage all services:
To enable subscribers to apply a service package immediately after creation, it is necessary to configure a licensed service package application policy. Create a license application policy named "new_sub"
To set the name of the additional services package, use the following commands:
The following information is important:
|
To generate certificates, select manual method. All questions can be answered as suggested by default.
Installing ecss-media-server, ecss-media-resources, ecss-restf, ecss-web-conf packages
...
ecss-media-server, ecss-media-resources
| Без форматирования |
|---|
sudo apt install ecss-media-server ecss-media-resources |
For the media server (ecss-media-server / MSR), initial configuration is possible with parameters recorded to the configuration file, it is required to perform the configuration without selecting any items:
...
After forming the default configurations, go to the directory where the configurations are located and check them:
| Блок кода |
|---|
cd /etc/ecss/ecss-media-server/
cat config.xml
cat conf.d/default.xml |
There is a configuration for msr: config.xml, the conf.d directory contains the configuration default.xml. At its core, default.xml is an addition to config.xml, which defines the accounts section. This is done in order for this configuration to remain unchanged after package updates.
Example of config.xml:
| Блок кода |
|---|
<?xml version="1.0" encoding="utf-8"?>
<config date="10:48:15 21.02.2022">
  <general log-level="3" log-rotate="yes" max-calls="8192" max-in-group="512" load-sensor="media" load-delta="10" calls-delta="100" spool-dir-size="100M" log-name="msr.log" log-path="/var/log/ecss/media-server" use-srtp="disabled" suspicious-mode="no"/>
  <transport bind-addr="192.168.2.21" port="5040" transport="udp+tcp"/>
  <!-- By default configured public TURN-server -->
  <turn-server use-turn="no" host="numb.viagenie.ca" user="webrtc@live.com" password="muazkh"/>
  <media mixer-clock-rate="8000" use-vad="no" cng-level="0" jb-size="60" rtcp-timeout="0" rtp-timeout="350" udp-src-check="no" cn-multiplier="3" port-start="12000" port-range="2048" tias-in-sdp="no" thread-cnt="2" silence-threshold="-30" dtmf-flash-disable="no" video-dscp="0" other-dscp="0" dummy-video-src="/usr/share/ecss-media-server/video/dummy_video.yuv" video-enc-width="1280" video-enc-height="720" finalsilence="1000" rtcp-stat-dump="yes"/>
  <codec pcma="1" pcmu="2" ilbc="0" gsm="0" g722="3" g729="0" speex="0" l16="0" g7221="0" opus="0" h264="1" h263-1998="2" t38="1" tel-event-pt="0"/>
  <accounts>
    <!-- <dynamic msr_name="msr.name"
            realm="sip:127.0.0.1:5000"
            dtmf_mode="rfc+inband+info"
            auth_name="user"
            auth_password="password" /> -->
  </accounts>
  <pbyte>
    <mcc bind-addr="192.168.2.21" port="5700"/>
  </pbyte>
  <conf_dir path="/etc/ecss/ecss-media-server/conf.d"/>
  <rtp>
    <auto addr-v4=""/>
  </rtp>
</config> |
Example of accounts section (default.xml file):
| Блок кода | ||
|---|---|---|
| ||
<?xml version="1.0"?>
<config>
      <accounts>
            <dynamic msr_name="msr.ecss1" realm="sip:127.0.0.1:5000" dtmf_mode="rfc+inband+info" auth_name="user" auth_password="password"/>
      </accounts>
</config> |
It contains current settings according to which the msr is registered on core.
The main parameters are: msr_name and realm.
msr_name is a parameter that defines the name of the msr. (it is recommended to set the name of the msr. and the host to which it belongs, for example, msr.ecss1);
realm — defines the address for registration on the core. Default entry point: port 5000, address: 127.0.0.1.
ecss-restfs
| Без форматирования |
|---|
sudo apt install ecss-restfs |
When installing, you will be prompted to set up the configuration:
...
Use TTS service
...
Configure phone book
...
Configure speech recognition service
...
Choose nothing
...
ecss-web-conf
| Без форматирования |
|---|
sudo apt install ecss-web-conf |
When installing, you will be prompted to set up the configuration:
...
Input port of MySQL db for web-conf DB
...
Input IP address or hostname for ECSS-10 with http_terminal
...
Input port SSW http_terminal
...
Input password for SSW http_terminal
...
Configuring security. SSH
Configuring SSH server:
...
sudo nano /etc/ssh/sshd_configIn the configuration file specify the port and address where you can access the server:
...
# This is the sshd server system-wide configuration file. See
# sshd_config(5) for more information.
# This sshd was compiled with PATH=/usr/bin:/bin:/usr/sbin:/sbin
# The strategy used for options in the default sshd_config shipped with
# OpenSSH is to specify options with their default value where
# possible, but leave them commented. Uncommented options override the
# default value.
Port 2000
#AddressFamily any
ListenAddress 10.0.3.237
#ListenAddress ::
<...>
Restart ssh:
| Без форматирования |
|---|
sudo systemctl restart ssh.service |
Initial configuration
Start the necessary services.
| Предупреждение | ||
|---|---|---|
| ||
Before starting, check Token availability in the system. |
Run the ecss-mycelium and ecss-ds packages on the first host:
| Без форматирования |
|---|
sudo systemctl start ecss-mycelium
sudo systemctl start ecss-ds |
Go to the CLI:
| Без форматирования |
|---|
ssh admin@localhost -p 8023
password: password |
Check system status:
| Без форматирования |
|---|
admin@mycelium1@ecss1$ system-status
Checking...
┌─┬───────────────┬────────────────────────┬───────────────┬────────────┬──────┐
│ │     Node      │        Release         │ Erlang nodes  │Mnesia nodes│Uptime│
├─┼───────────────┼────────────────────────┼───────────────┼────────────┼──────┤
│ │ds1@ecss1      │ecss-ds-3.14.10.91      │ds1@ecss1      │ds1@ecss1   │8m 9s │
│ │mycelium1@ecss1│ecss-mycelium-3.14.10.91│mycelium1@ecss1│not running │8m 10s│
└─┴───────────────┴────────────────────────┴───────────────┴────────────┴──────┘

All services are started.
|
Next, install passport and licenses to the system:
| Без форматирования |
|---|
admin@[mycelium1@ecss1]:/$ cluster/storage/ds1/licence/set-passport <passport>
admin@[mycelium1@ecss1]:/$ cluster/storage/ds1/licence/add <license> |
Exit the CoCon, reboot the ecss-mycelium and ecss-ds subsystems, and then connect the remaining subsystems in the following order: ecss-core, ecss-pa-sip, ecss-media-server, ecss-restfs, ecss-mediator, ecss-web-conf.
| Без форматирования |
|---|
sudo systemctl start ecss-core ecss-pa-sip ecss-mediator ecss-media-server ecss-restfs ecss-web-conf |
Return to the CoCon.
After that, the MSR- and Core-subsystems are connected. To do this, use the following command:
| Без форматирования |
|---|
admin@[mycelium1@ecss1]:/$ /system/media/resource/declare core1@ecss1 iface msr.ecss1 bond1_ecss1_pa default local true |
To check, run system-status command and see the output:
| Без форматирования | ||||||||||||||||||||||||||||||||||||||||||||||||||||||||||||||||||||||
|---|---|---|---|---|---|---|---|---|---|---|---|---|---|---|---|---|---|---|---|---|---|---|---|---|---|---|---|---|---|---|---|---|---|---|---|---|---|---|---|---|---|---|---|---|---|---|---|---|---|---|---|---|---|---|---|---|---|---|---|---|---|---|---|---|---|---|---|---|---|---|
admin@mycelium1@ecss1$ system-status
|
Configure the SIP adapter according to the technical specification. Define a group of IP addresses (IP-set):
| Без форматирования |
|---|
admin@[mycelium1@ecss1]:/$ /cluster/adapter/sip1/sip/network/set ip_set test_set node-ip node = sip1@ecss1 ip = 10.0.3.238


Property "ip_set" successfully changed from:


to
test_set: no ports set
test_set: sip1@ecss1 10.0.3.238
test_set: dscp 0. |
Next, create a domain and assign to it the created group (IP-set) of the SIP adapter settings:
| Без форматирования |
|---|
admin@[mycelium1@ecss1]:/$ domain/declare test_domain --add-domain-admin-privileges --add-domain-user-privileges
New domain test_domain is declared


domain/test_domain/sip/network/set ip_set [test_set] Property "ip_set" successfully changed from:


[] to ["test_set"]. |
After creating the domain, configure:
...
The service package name in this example is "ECSS-ADV". Add the license service package named "ECSS-FULL+" (that's how it's described in the license) to the created policy:
Result:
The package has been added, but the policy is currently not active (cannot be applied to the subscriber). To activate the new_sub policy, run the following command:
Now we can use additional services when creating subscribers. |