
...
Before starting configuring, make sure the following:
- operating system is installed;
- network is configured;
- necessary software is software is installed;
- necessary ECSS components are installed;
- NTP service is configured;
- Token is connected and operating;
- all ECSS subsystems are up and running;
- the correct passport and license are installed;
- if the system is in a cluster, then additionally:
Initial configuration order
First of all, perform general settings for the entire system:
- clusters;
- media server;
- routing, modification and adaptation;
- ECSS users;
- optionally;
- Radius;
- LDAP.
Next, declare and configure the following services:
- domains;
- trunks;
- bridges;
- IVR;
- subscribers;
- services on trunks and subscribers.
It is recommended to perform the initial setup in the order given below.
Configuring clusters
Classification of clusters by roles:
- BUS — integration bus cluster that provides reliable message transmission;
- CORE — cluster that performs the functions of routing telephone calls and processing services;
- STORAGE — cluster for storing long-term data;
- MEDIATOR — cluster that provides complex management functions, provision of statistical information and alarm;
- ADAPTER — cluster that performs functions of interacting with gateways operating under one of the protocols: H.248/Megaco, SIP and SIP-T, PA MGCP, PA Sigtran.
This stage includes configuration of all clusters of the system (core, ds, mediator, pa_sip, pa_megaco). Each cluster can include one or more nodes of the same type. For example, SIP adapter cluster (pa_sip) may consist of several SIP adapter nodes.
| Примечание |
|---|
When installing the license, the standard subsystem topology is automatically set:
|
To manage clusters of the system, the following can be used:
- CLI — Command Line Interface (for a description of the commands for managing clusters, see /cluster/);
- Clusters application in the web configurator.
General commands for configuring cluster properties
These commands are the main ones for setting any cluster.
To configure individual settings of a particular cluster, use the command:
/cluster/<SOME_ROLE>/<NAME_CLUSTER>/<GROUP>/set <PROPERTY> [<NAME_NODE>|add| remove] <VALUE>
To view individual settings of a particular cluster, use the command:
/cluster/<SOME_ROLE>/<NAME_CLUSTER>/<GROUP>/info [<PROPERTY>]
where:
- <SOME_ROLE> — cluster role: adapter, bus, core, mediator, storage;
- <NAME_CLUSTER> — cluster name;
- <GROUP> — group of parameters;
- <NAME_NODE> — node name;
- <PROPERTY> — property name;
- <VALUE> — property value.
STORAGE cluster settings
The storage cluster performs a function of a distributed configuration data storage of the entire system. Also, a telephone call routing module is implemented within this subsystem.
Configuring via CLI (CoCon)
To change individual cluster settings, use the command:
/cluster/storage/<NAME_CLUSTER>/<GROUP>/set <PROPERTY> <VALUE>
To view set values of cluster parameters, use the command:
/cluster/storage/<NAME_CLUSTER>/<GROUP>/info [<PROPERTY>]
where:
- <NAME_CLUSTER> — cluster name, default is ds1;
- <GROUP> — group of parameters;
- <PROPERTY> — property name;
- <VALUE> — property value.
At the initial stage at the level of the data storage cluster, it is enough to install only services (ss) that will be used in the domains in the future. Other settings do not need to be changed without a specific need.
Example:
| Блок кода |
|---|
admin@mycelium1@ecss1:/$ cluster/storage/ds1/ss/install ds1@ecss1 ss_fax_receiver.xml
Successfully installed: /var/lib/ecss/ss/ss_fax_receiver.xml |
Configuring cluster parameters via web interface
The Clusters application is used to view and change cluster properties, where a cluster with storage role should be selected.
To manage services in the web configurator, the Service Management (SS install) application is used.
Configuring MEDIATOR cluster parameters
The mediator cluster is designed to collect and export warnings and statistical information.
Configuring via CLI (CoCon)
To change individual cluster settings, use the command:
/cluster/mediator/<NAME_CLUSTER>/<GROUP>/set <PROPERTY> <VALUE>
To view the set values of cluster parameters, use the command:
/cluster/mediator/<NAME_CLUSTER>/<GROUP>/info [<PROPERTY>
where:
- <NAME_CLUSTER> — cluster name, by default is md1;
- <GROUP> — group of parameters;
- <PROPERTY> — property name;
- <VALUE> — property value.
The path to CLI commands for managing clusters with the mediator role is /cluster/mediator:
| Без форматирования |
|---|
admin@ds1@ecss1:/$ ls -t /cluster/mediator/
|-/md1
  |-/alarms
  | |-*clear
  | |-*delete
  | |-*export
  | |-*generate-alarm
  | |-*list
  | |-*maskadd
  | |-*maskdel
  | |-*masklist
  | |-*maskmod
  | |-*masktrace
  | |-*res-cleanup
  | |-/notifiers
  |   |-/email
  |   | |-*clean
  |   | |-*info
  |   | |-*send_test_email
  |   | |-*set
  |   |-/jabber
  |     |-*clean
  |     |-*info
  |     |-*send_test_jabber
  |     |-*set
  |-/ap
  | |-*speaker-off
  | |-*status
  |-/properties
  | |-/cocon_http_terminal
  | | |-*clean
  | | |-*info
  | | |-*set
  | |-/rpss
  |   |-*clean
  |   |-*info
  |   |-*set
  |-/sip
  | |-/isup-cause-messages
  | | |-*clean
  | | |-*info
  | | |-*set
  | |-/sip-error-messages
  | | |-*clean
  | | |-*info
  | | |-*set
  | |-/sip-internal-messages
  | | |-*clean
  | | |-*info
  | | |-*set
  | |-/sip-status-messages
  |   |-*clean
  |   |-*info
  |   |-*set
  |-/snmp
  | |-/agent
  |   |-/properties
  |     |-*clean
  |     |-*info
  |     |-*set
  |-/statistics
    |-*add
    |-*addcolmap
    |-*delcolmap
    |-*delete
    |-*list
    |-*statmodinfo
|
Configuring cluster parameters via web interface
The Clusters application is used to view and change properties, where a cluster with mediator role should be selected. To configure the masking of warnings, the Alarm list application is used.
Configuring CORE cluster parameters
The core cluster implements the logic of managing telephone calls processing (Call Control functions), providing services and billing functionality provision.
Configuring via CLI (CoCon)
To change individual cluster settings, use the command:
/cluster/core/<NAME_CLUSTER>/<GROUP>/set <PROPERTY> <VALUE>
To view the set values of cluster parameters, use the command:
/cluster/core/<NAME_CLUSTER>/<GROUP>/info [<PROPERTY>]
where:
- <NAME_CLUSTER> — cluster name, by default is core1;
- <GROUP> — group of parameters;
- <PROPERTY> — property name;
- <VALUE> — property value.
The path to CLI commands for managing clusters with the core role is /cluster/core: For clusters with core role, all the default parameter values necessary for operation are afore ready to handle the load.
If it is provided by the project, then the following are configured at the initial stage:
- call notification service parameters;
- TTS subsystem for CDR collection.
Configuring cluster parameters via web interface
The Clusters application is used to view and change properties, where cluster with the core role should be selected. The CDR is configured in the CDR Manager application.
Configuring PA_SIP cluster parameters
Configuring via CLI (CoCon)
To change individual cluster settings, use the command:
/cluster/core/<NAME_CLUSTER>/<GROUP>/set <PROPERTY> <VALUE>
To view the set values of cluster parameters, use the command:
/cluster/core/<NAME_CLUSTER>/<GROUP>/info [<PROPERTY>]
where:
- <NAME_CLUSTER> — cluster name, by default is sip1;
- <GROUP> — group of parameters;
- <PROPERTY> — property name;
- <VALUE> — property value.
The path to CLI commands for managing pa_sip clusters is /cluster/adapter/<PA_SIP>/.
At the initial stage, only SIP transport (ipset) needs to be configured on the adapter in accordance with the project:
- select interfaces (node-ip) for adapter operation. If the system is redundant, then the virtual IP configured in /etc/keepalived.conf are set;
- add transport ports for receiving SIP protocol messages;
- set the required QoS DSCP value.
| Примечание |
|---|
Configuration of the remaining SIP parameters has been moved to the virtual PBX level. |
Configuring cluster parameters via web interface
SIP transport parameters can also be configured using the web configurator. To configure the interface, open the Clusters application, select the adapter and enter the transport parameters.
Configuring a software media server
The procedure for configuring the software media server (MSR):
- configuring the media server file;
- starting the media server;
- adding media resources to ECSS-10:
- by CLI commands (/system/media/resource/);
- via web configurator application MSR registrars.
Creating and configuring domains (virtual PBX)
This step includes the process of creating virtual PBX, setting up call routing rules, trunks, subscribers, subscriber service rules.
...
It is necessary to create a domain for each of the projected domains. When creating, add the ECSS-10 administrator to the Administrators group, as well as to the Users group of this domain.
Virtual PBX configuration procedure (domain)
The entire infrastructure for providing telephone services based on ECSS-10, namely the configuration of connected gateways, subscriber data, numbering plan and routing rules, as well as access rights to operational management and support functions are described within a specific domain.
Thus, the domain can be represented as a logical part of a flexible switch that implements the functionality of a separate PBX.
There may be several such entities on a flexible switch. In the ECSS-10 system, domain and virtual PBX are synonyms.
In fact, the deployment of several domains and links between them makes it possible to implement a segment or the entire NGN network within a single installation.
Domain systems and flexible system of access rights differentiation allow the telecommunications carrier to perform the functions of PBX hosting for third-party customers.
Customer of the telecommunications carrier can place their corporate PBX or communication node on the capacities of the ECSS-10 system deployed by the carrier. Functions of operational management for this PBX can be transferred to the customer fully or partially (the scheme of responsibility differentiation for the operation of this PBX is used).
Each virtual PBX contains the following set of parameters:
- the list of routing contexts of the virtual PBX;
- the list of aliases contained in this this virtual PBX;
- the list of services set in virtual PBX.
Virtual PBX configuration algorithm:
- create a virtual PBX, when creating a VPBX, add the ECSS-10 administrator to the VPBX administrators group and the VPBX user group;
- set limits on the number of aliases, simultaneous calls (optional, performed by the ECSS-10 administrator);
- add and configure routing contexts;
- add and configure subscribers;
- add and configure services.
Domain creating is performed in one of two ways:
- via the Command Line Interface (
/domain/declare); - via web configurator Domains application.
After creating domains, the necessary domain-level directories will be automatically created in the file system.
Configuring routing
| Подсказка |
|---|
Routing of telephone calls — process of determining the destination interface for a specific call based on information about the interface of the call source, information about the caller's and called subscriber's phone number, caller category, time of day and day of the week. The routing context — set of routing rules unique in the routing domain, within which the interface of the called subscriber is defined. |
Description of the call routing process in the ECSS-10 system is given in the section "Virtual PBX. Telephone call routing v2".
Creating routing contexts
In accordance with the project, it is necessary to create call routing contexts that will be used in the domain settings in the future.
There are several ways to do this:
- create and import contexts manually in the format specified in the documentation. Xml-formatted contexts are created in the /var/lib/ecss/routing/ctx/src/<DOMAIN> directory;
- create and configure contexts using the web configurator application Routing manager for each domain;
Further, if it is defined in the project, it is necessary to prepare modification and adaptation contexts also for each domain.
Applying routing contexts to system interfaces
Routing contexts must be assigned for the system:ivr and system:teleconference interfaces. Settings are made using CLI commands. The path of the commands is /domain/<DOMAIN>/system-iface/.
Adding and configuring user rights
Users are subjects who work with the system via СoСon or web configurator.
Each user has the following set of parameters:
- Name;
- Password;
- User group(s);
- Role.
By default, an admin user with system administrator rights is created in the system. The default password is password.
To differentiate rights, create the required number of users and assign rights and roles to each. For more information, see /cocon/ commands description. For convenience's sake, each user can configure the parameters of the CoCon shell using the global command /shell-options.
Configuring subscriber service limiting rules
To apply different subscriber level limitations, configure them for each domain.
The following types of restrictions for subscribers are distinguished:
- long-term restrictions that are introduced when the subscriber connects and are prescribed in the contract with the subscriber are called the access type (access_type);
- grouping of subscribers to allow subscribers of one group to access subscribers of another group is called an access group (access_group);
- temporary restrictions associated with non-payment of bills by the subscriber are called the service mode (regime);
- restrictions that the subscriber sets themselves are called barring.
The configuring is performed :
- via the Command Line Interface, see commands:
- /domain/<DOMAIN>/access-group — access group management commands;
- /domain/<DOMAIN>/access-type — access type management commands;
- /domain/<DOMAIN>/regime/ — maintenance mode management commands subscribers.
- via web configurator application Access manager.
Creating and configuring subscribers
In accordance with the project, create the required number of subscribers in the domains. It can be done using the CLI command /domain/<DOMAIN>/sip/user/declare or using web configurator application Subscriber card.
When creating a subscriber, assign a number, a group, a routing context, a CDR group, an authorization method and authorization data. You can also immediately assign a set of necessary services for each subscriber and configure the necessary restrictions.
Subscribers in the domain is an optional condition, there may be purely transit domains in the system, on which the appropriate rules for passing calls are configured.
Creating and configuring trunks
| Подсказка |
|---|
|
The declaration and configuration of trunks is carried out:
- via the Command Line Interface, see section /domain/<DOMAIN>/trunk/sip/ — SIP trunk management commands;
- via web configurator application Trunk Manager.
Then, if necessary, supplementary services are configured on the trunks.
Creating and configuring bridge interfaces
| Подсказка |
|---|
Bridge is a virtual trunk that allows to connect two virtual PBX within one ECSS-10 system. |
If there is more than one domain in the system, then communication between them is carried out using bridges.
Bridges are created and configured:
- via Command Line Interface, see /bridge/ — bridge interfaces management commands;
- via web configurator application Bridge manager.
Setting restrictions
For each domain, it is possible to set different kinds of restrictions within the licence.
Table 1. List of domain level limits
...
Description
...
The need to reserve calls on this virtual PBX. This parameter is used only in redundant systems. Since the use of the backup increases the consumption of system resources (processor, RAM, etc.), the exclusion of a virtual PBX from the redundancy scheme allows saving some resources and direct the saved resources to call processing. In the regular operation of the system, this allows increasing productivity at the expense of reliability.
...
Maximum number of connected Call center agents for a domain.
...
Use the default_incoming_call script for incoming trunks as the IVR routing context.
...
Total number of active users of "meet me" rooms for this virtual PBX.
...
0 (limited by license)
...
Number of licensed service packages.
Configuring ECSS-10 for productive systems
For productive systems, ECSS-10 configuring consists of the following steps:
Allocation of individual processor cores for MSR
In order to isolate the MSR media server from the rest of the system, it is necessary to allocate separate processor cores for it. To allocate individual processor cores, perform the following steps:
Correct the grab file:
Без форматирования sudo nano /etc/default/grubbring the GRUB_CMDLINE_LINUX="" parameter to the following form:
Без форматирования GRUB_CMDLINE_LINUX="isolcpus=0-4"Update the grub configuration. To do this, run the command:
Без форматирования sudo update-grubRestart the system.
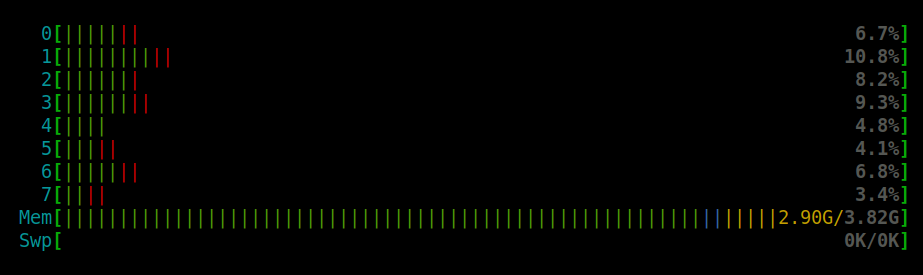
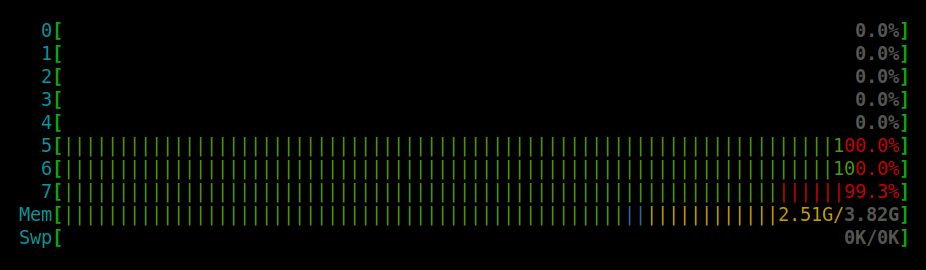
If everything is done correctly, then after a reboot htop will show zero load on isolated cores.
Example (Before / After):
Setting CPU to performance mode
By default, Ubuntu has five processor profiles:
Profile description:
- conservative — slowly increases the processor frequency depending on the load on the system and abruptly resets the frequency to the minimum at idle;
- ondemand — quickly increases the processor frequency with increasing load and slowly resets the frequency to a minimum when idle;
- userspace — allows specifying the frequency manually;
- powersave — corresponds to the minimum allowable CPU frequency;
- performance — corresponds to the maximum CPU frequency.
Set the operating system settings to performance mode
Use utility cpufrequtils.
| Блок кода | ||
|---|---|---|
| ||
sudo apt install cpufrequtils |
By default, after installation, Ubuntu uses the "ondemand" mode (CPU performance is based on application requests, saving power, but lower performance):
| Блок кода |
|---|
cat /etc/init.d/cpufrequtils | grep GOVERNOR=
|
| панель | ||
|---|---|---|
| ||
| # GOVERNOR="ondemand" GOVERNOR="ondemand" |
Set the mode to efficiency/performance - in the file /etc/init.d/cpufrequtils, replace the value "ondemand" with "performance"
| Блок кода | ||
|---|---|---|
| ||
sudo nano /etc/init.d/cpufrequtils |
Restart utility:
| Блок кода | ||
|---|---|---|
| ||
sudo /etc/init.d/cpufrequtils restart |
Then run the command:
| Блок кода | ||
|---|---|---|
| ||
sudo systemctl daemon-reload |
Running MSR on isolated CPU cores
For MSR to run on separate processor cores, it is necessary:
1. to enable MSR instance:
| Без форматирования |
|---|
systemctl enable ecss-media-server@msr.service
systemctl edit ecss-media-server@msr.service |
2. to bring the /etc/systemd/system/ecss-media-server.service.d/override.conf file to the following format:
| Без форматирования | ||
|---|---|---|
| ||
[Service]
CPUAffinity=8-11
CPUSchedulingPolicy=rr |
To view which cores the service has started on, you can use htop. It is necessary to add a Processor column in it.
In this example, MSR is running on cores 8, 9, 10, 11. CPUSchedulingPolicy is required only if isolcpus is specified.
MSR configuring is described in more detail on the page Configuring the software media server.
Configuring use of specific processor cores for erlang-based services
In order for processor cores to be used correctly, it is necessary to adjust the startup parameters of erlang nodes on productive systems.
To do this, a scheme for placing nodes on cores is being developed. The scheme is developed according to the following rules:
- use more than two cores;
- it is necessary that one node does not use cores on different processors;
- for heavily loaded nodes, such as core and sip, allocate individual cores;
- nodes that are not loaded can be placed on a single core;
- for core, it is necessary to allocate a larger number of cores.
The distribution of cores on the example of a dual-processor HP BL660 server with two Intel Xeon E5-4657L processors with 12 cores and hyperthreading support, which can form 8 virtual cores:
| Блок кода |
|---|
myc  0-3
ds   4-7
core 8-23
sip  24-31
md   32-35
rest 36-39
sp   40-43
msr 44-47 |
To implement this distribution, it is necessary to enable a mode of using only the required number of cores on the erlang node.
To do this, edit the vm.args file of each node located at the path /usr/lib/ecss/ECSS- SERVICE-NAME/releases/VERSION/.
For example, for ecss-core, edit the file:
| Блок кода |
|---|
sudo nano /usr/lib/ecss/ecss-core/releases/3.14.2.29/vm.args |
Add options to this file that specify the use of the required number of logical processor cores and the number of active schedulers.
For 16 cores, this is:
| Блок кода |
|---|
+sct L0-15c0-15
+sbt db
+S16:16 |
For 8 cores:
| Блок кода |
|---|
+sct L0-7c0-7
+sbt db
+S8:8 |
For 4 cores:
| Блок кода |
|---|
+sct L0-3c0-3
+sbt db
+S4:4 |
For 2 cores:
| Блок кода |
|---|
+sct L0-1c0-1
+sbt db
+S2:2 |
The next task is to install the service on the selected cores. This is done in the same way as described for MSR.
Run the command:
| Блок кода |
|---|
sudo systemctl edit ECSS-SERVICE-NAME |
Adding parameters:
| Блок кода |
|---|
[Service]
CPUAffinity=0-3 |
where CPUAffinity value specifies the cores on which the service processes should be started.
Example of ecss-core configuration according to the above scheme:
| Блок кода |
|---|
> sudo systemctl edit ecss-core.service
[Service]
CPUAffinity=8-23 |
After configuring the CPUAffinity parameters for all services, restart the service configuration with the command:
| Блок кода |
|---|
sudo systemctl daemon-reload |
Restart services:
| Блок кода |
|---|
sudo systemctl restart ecss.slice |
To make sure that the services are correctly linked to the cores, use the htop utility by enabling the display of the PROCESSOR column.
Порядок начальной настройки конфигурации
В первую очередь необходимо выполнить общие настройки для всей системы:
- медиасервер;
- IP-set
- Создание и настройка доменов
- маршрутизация, модификация и адаптация;
- пользователи ECSS;
- опционально:
- СОРМ;
- RADIUS;
- LDAP.
Далее необходимо задекларировать и настроить следующие сервисы:
- домены;
- транки;
- бриджи;
- IVR;
- абоненты;
- услуги на транках и абонентах.
В последнюю очередь настраиваются дополнительные сервисы.
Рекомендуется проводить первоначальную настройку в порядке, приведенном ниже.
Настройка программного медиасервера
Порядок настройки программного медиасервера (MSR):
- настройка конфигурационного файла медиасервера;
- запуск медиасервера;
- добавление медиаресурсов на ECSS-10:
- командами CLI (см. раздел "/system/media/resource/ - команды управления медиаресурсами");
- через приложение web-конфигуратора "Сетевые окончания MSR (MSR registrars)".
- опционально в соответствии с проектом:
Creating and configuring a SIP IP address group (IP Set)
There are two ways of SIP adapter configuring:
- via the command line interface (CLI);
- via the "Clusters" web configurator application.
| Предупреждение |
|---|
Without first creating an IP set, the Domain/Trunk/Subscriber creation commands will not work. For these objects to work, it is necessary to know which IP addresses (ports) will be used for signaling information exchange. An IP set can be either individual for each domain or shared across all SSW domains, depending on the project. It is also possible to assign individual ports to different domains (for example, Domain A uses port 5061, and Domain B uses port 5062) on the same IP addresses (10.0.10.91/92). |
Example of creation via CLI (in this example, the IP set name is "test_set", IP add = 10.0.10.91/92)
- Create an IP set and specify the IP address for the first node:
/cluster/adapter/sip1/sip/network/set ip_set test_set node-ip node = sip1@ecss1 ip = 10.0.10.91 - Add the IP address of the second node to the created IP set:
/cluster/adapter/sip1/sip/network/set ip_set test_set node-ip node = sip1@ecss2 ip = 10.0.10.92 - Add the IP port to the created IP set:
/cluster/adapter/sip1/sip/network/set ip_set test_set listen-ports list = [5060]
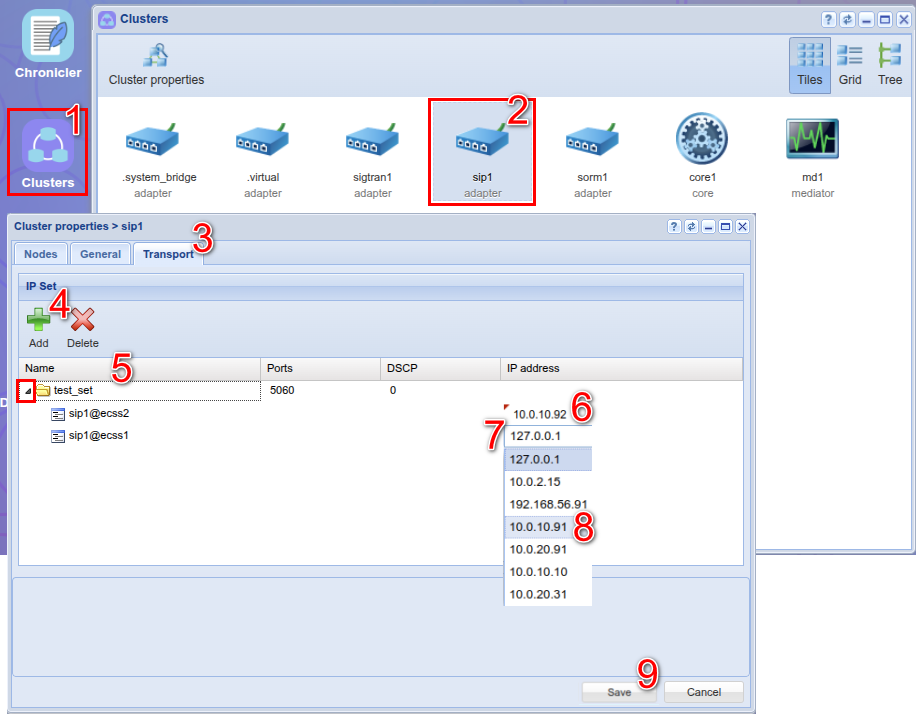
Example of creating a cluster via the web (in this example, the IP set name is "test_set", IP add = 10.0.10.91/92) in the "Clusters" application.
- Open the "Clusters" application;
- Double-click to open the "sip1 adapter";
- In the "sip1" cluster Properties window, select "Transport";
- Add;
- Specify a name for the new IP set (in this example, "test_set");
- From the drop-down list, select the IP address through which the ecss2 node will operate;
- Also specify the IP address for the ecss1 node (the default is 127.0.0.1);
- Select the correct address (in this example, 10.0.10.91);
- Save.
Example of creating the "Clusters" application via the Web (in the example, the IP set name is "test_set", IP add = 10.0.10.91/92)
Creating and configuring domains (virtual PBX)
This step includes the process of creating virtual PBX, setting up call routing rules, trunks, subscribers, subscriber service rules.
Domain declaration
| Якорь | ||||
|---|---|---|---|---|
|
It is necessary to create a domain for each of the projected domains (Virtual PBX).
You can create a domain in one of two ways:
- via the command line interface (CLI);
- via the "Domains" web configurator application.
Example of creation via CLI (in the example, the domain name is "test_test"):
- Create a domain named "test_domain":
/domain/declare test_test--add-domain-admin-privileges --add-domain-user-privileges - Connect the previously created IP set ("test_set") to the created domain:
/domain/test_test/sip/network/set ip_set [test_set] - Assign available services (all or specific/required) to the created domain:
/cluster/storage/ds1/ss/access-list add test_domain * - Set the license application policy on the created domain by specifying the name (for example, "new_sub"):
/domain/test_test/ss/licence/politics/declare new_sub - Add a license service package (for example, "ECSS-FULL+") to the new policy on the created domain:
/domain/test_test/ss/licence/politics/package-add new_sub ECSS-FULL+ - We activate the new license application policy on the new domain:
/domain/test_test/ss/licence/politics/activate new_sub
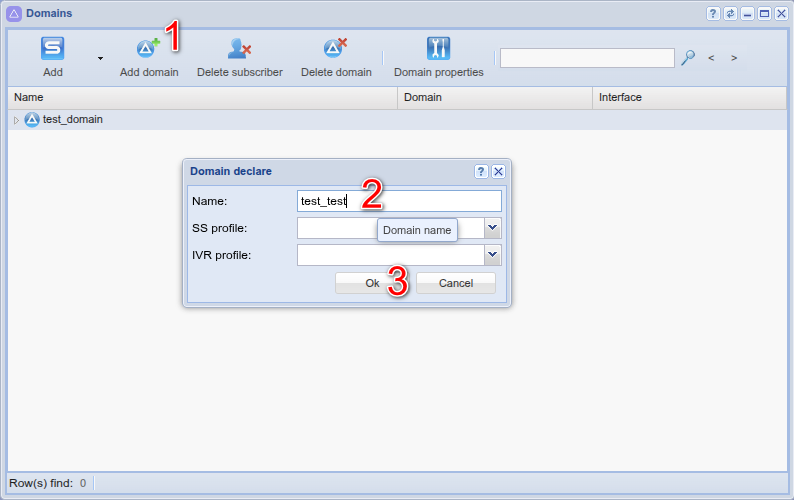
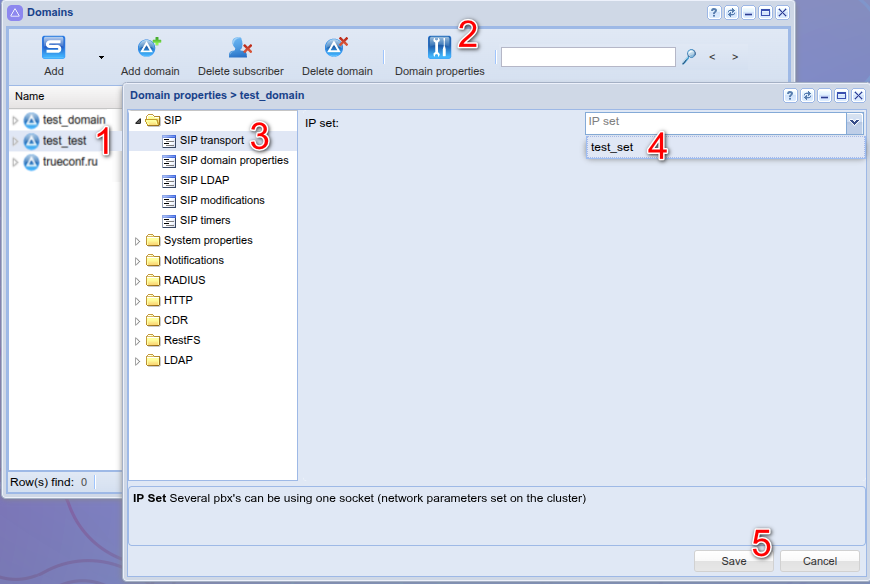
Example of creating a domain via the web (in this example, the domain name is "test_test") in the "Domains" application:
Create a domain
- Select "Add domain";
- Specify the name of the new domain (in this example, "test_test");
- Save ("OK").
Connecting IP set
Select a domain (in this example, "test_test");
Select "Domain Properties";
Select "SIP/SIP Transport";
Select the IP set that will serve this domain from the drop-down list;
Save.
Configure services for a new domain in the CLI.
After creating domains, the necessary domain-level directories will be automatically created in the file system.
For example:
/var/lib/ecss/modification/ctx/src/DomainName
/var/lib/ecss/routing/ctx/src/DomainName
/var/lib/ecss/cdDomainName
etc.
Configuring routing
| Подсказка |
|---|
Routing of telephone calls — process of determining the destination interface for a specific call based on information about the interface of the call source, information about the caller's and called subscriber's phone number, caller category, time of day and day of the week. The routing context — set of routing rules unique in the routing domain, within which the interface of the called subscriber is defined. |
Description of the call routing process in the ECSS-10 system is given in the section "Virtual PBX. Telephone call routing v2".
Creating routing contexts
In accordance with the project, it is necessary to create call routing contexts that will be used in the domain settings in the future.
There are several ways to do this:
- create and import contexts manually in the format specified in the documentation. Xml-formatted contexts are created in the /var/lib/ecss/routing/ctx/src/<DOMAIN> directory;
- create and configure contexts using the web configurator application Routing manager for each domain;
Further, if it is defined in the project, it is necessary to prepare modification and adaptation contexts also for each domain.
Applying routing contexts to system interfaces
Routing contexts must be assigned for the system:ivr and system:teleconference interfaces. Settings are made using CLI commands. The path of the commands is /domain/<DOMAIN>/system-iface/.
Creating and configuring subscribers
In accordance with the project, create the required number of subscribers in the domains. It can be done using the CLI command /domain/<DOMAIN>/sip/user/declare or using web configurator application Subscriber card.
When creating a subscriber, assign a number, a group, a routing context, a CDR group, an authorization method and authorization data. You can also immediately assign a set of necessary services for each subscriber and configure the necessary restrictions.
Subscribers in the domain is an optional condition, there may be purely transit domains in the system, on which the appropriate rules for passing calls are configured.
Creating and configuring trunks
| Подсказка |
|---|
|
The declaration and configuration of trunks is carried out:
- via the Command Line Interface, see section /domain/<DOMAIN>/trunk/sip/ — SIP trunk management commands;
- via web configurator application Trunk Manager.
Then, if necessary, supplementary services are configured on the trunks.
Creating and configuring bridge interfaces
| Подсказка |
|---|
Bridge is a virtual trunk that allows to connect two virtual PBX within one ECSS-10 system. |
If there is more than one domain in the system, then communication between them is carried out using bridges.
Bridges are created and configured:
- via Command Line Interface, see /bridge/ — bridge interfaces management commands;
- via web configurator application Bridge manager.
Setting restrictions
For each domain, it is possible to set different kinds of restrictions within the licence.
Description of general properties of virtual PBX
| Property name | Default value | Description |
|---|---|---|
| alias_limit | infinity (limited by license) | Total number of subscribers (including virtual ones) in this virtual PBX. |
| call_limit | infinity (limited by license) | Total number of simultaneously active calls for this virtual PBX. |
| virtual_alias_limit | infinity (limited by license) | Total number of virtual subscribers in this virtual PBX. |
| digitmap | List of the set masks by which aliases will be validated when created, parameters are described on the page / domain/ — commands for managing virtual PBX. | |
| failover | true | The need to reserve calls on this virtual PBX. This parameter is used only in redundant systems. Since the use of the backup increases the consumption of system resources (processor, RAM, etc.), the exclusion of a virtual PBX from the redundancy scheme allows saving some resources and direct the saved resources to call processing. In the regular operation of the system, this allows increasing productivity at the expense of reliability. |
| callcenter\enabled | true | Access to the contact center for this virtual PBX. |
| callcenter\active_agents | infinity (limited by license) | Maximum number of connected Call center agents for a domain. |
| callcenter\active_supervisors | infinity (limited by license) | Maximum number of connected Call center supervisors for a domain. |
tc\active_conferences | infinity (limited by license) | Maximum number of active conferences for a domain. |
| tc_count_active_channels | infinity (limited by license) | Maximum number of connected subscribers to the conference of the Teleconference service for a domain. |
| ivr\enabled | true | Access to the IVR and dialer functions for this virtual PBX. |
| ivr\incoming_script\enabled | true | Use the default_incoming_call script for incoming trunks as the IVR routing context. |
| teleconference\enabled | true | Access to the Selector communication service for this virtual PBX. |
| tsmn\concurrent_calls | 0 | Total number of simultaneously active calls for the TSMN system on the main trunk. |
| tsmn\concurrent_calls\redundancy | 0 | Total number of simultaneously active calls for the TSMN system on the backup trunk. |
| add_on_conferences_limit | infinity (limited by license) | Total number of simultaneously active conferences for this virtual PBX. |
| meet_me_limit | infinity (limited by license) | Total number of active users of "meet me" rooms for this virtual PBX. |
| chat_room_limit | infinity (limited by license) | Total number of active conference rooms for this virtual PBX. |
| dialer\channels | 0 (limited by license) | Number of simultaneous calls for calling campaigns. |
| recorder\voice\channels | 0 (limited by license) | Number of simultaneous channels for recording conversations. |
| ss_package | 0 (limited by license) | Number of licensed service packages. |
| elph\member\limi | infinity (limited by license) | Number of active Eltex Elph client registrations. |
| Примечание |
|---|
If the virtual PBX has the vats_type property set to transit or transit_offroad, calls will not be passed to the IVR. |
Restrictions are configured according to the project:
- via the Command Line Interface, see the section /domain/<DOMAIN>/properties/restrictions/ - virtual PBX restriction management commands;
via the Domains web configurator application (Domain Properties -> System Settings -> Restrictions).
IVR Scenarios
Additional IVR scenarios can be configured for each virtual PBX, if they are immediately provided by the project. Scripts are created in the web configurator application IVR editor. Scripts can also be managed using CLI commands. See /domain/<DOMAIN>/ivr/ — IVR script management commands.
If necessary, restrictions for IVR operation can be configured for each domain:
- via Command Line Interface, see section /system/ivr/script/restrictions/ — management commands for IVR script restriction settings;
- via web configurator application IVR restrictions manager.
Configuring supplementary services
If provided for by the project, additional services are also configured at the initial stage.
Configuring Interaction with RADIUS Servers
A description and configuration of interaction with the AAA (Authentication, Authorization, Accounting) subsystem are provided in the "Configuring Dynamic Subscribers and the RADIUS System" section.
The procedure for configuring interaction with AAA servers:
- Configuring virtual PBX parameters for interaction with the authentication/authorization server (RADIUS);
- Configuring virtual PBX parameters for interaction with the accounting server (RADIUS);
- Configuring communication restrictions during server failure.
Use of supplementary service applications that expand the functionality is available as a part of the ECSS-10 ecosystem:
- Call center;
- Tools for conducting conference calls;
- Auto call service;
- Automatic Speech Recognition (ASR) service;
- Integration with Desktop assistant, CRM, Skype for business;
- Auto Secretary service;
- Visualization of statistical data in the Grafana monitoring system;
- Subscriber Portal application;
- Autoprovision (AUP) system for automatic configuration and software updates of telephone sets.
Contact technical support for consultation on configuring.
Restrictions are configured in accordance with the project:
- via command line interface, see /domain/<DOMAIN>/properties/restrictions/ — commands for managing virtual PBX restrictions;
- via web configurator application Domains (Domain Properties →> System Properties →> Restrictions).
IVR Scenarios
Additional IVR scenarios can be configured for each virtual PBX, if they are immediately provided by the project. Scripts are created in the web configurator application IVR editor. Scripts can also be managed using CLI commands. See /domain/<DOMAIN>/ivr/ — IVR script management commands.
If necessary, restrictions for IVR operation can be configured for each domain:
- via Command Line Interface, see section /system/ivr/script/restrictions/ — management commands for IVR script restriction settings;
- via web configurator application IVR restrictions manager.
Configuring supplementary services
Use of supplementary service applications that expand the functionality is available as a part of the ECSS-10 ecosystem:
- Call center;
- tools for conducting conference calls;
- Auto call service ;
- Automatic Speech Recognition (ASR) service;
- integration with Desktop assistant, CRM, Skype for business;
- Auto Secretary service;
- visualization of statistical data in the Grafana monitoring system;
- Subscriber Portal application;
- Autoprovision (AUP) system for automatic configuration and software updates of telephone sets.
Contact technical support for consultation on configuring.
Configuring ECSS-10 for productive systems
For productive systems, ECSS-10 configuring consists of the following steps:
Allocation of individual processor cores for MSR
In order to isolate the MSR media server from the rest of the system, it is necessary to allocate separate processor cores for it. To allocate individual processor cores, perform the following steps:
...
Open the file:
| Без форматирования |
|---|
/etc/default/grub |
bring the GRUB_CMDLINE_LINUX="" parameter to the following form:
| Без форматирования |
|---|
GRUB_CMDLINE_LINUX="isolcpus=8-11" |
This example isolates cores from 8 to11. It is also possible to list 1, 2, 4-6, etc.
Update the grub configuration. To do this, run the command:
| Без форматирования |
|---|
sudo update-grub |
...
Restart the system.
If everything is done correctly, then after a reboot htop will show zero load on isolated cores.
Setting scaling_governor to performance mode
| Блок кода |
|---|
cat /sys/devices/system/cpu/cpu0/cpufreq/scaling_available_governors conservative ondemand userspace powersave performance |
By default, Ubuntu has five processor profiles:
Profile description:
- conservative — slowly increases the processor frequency depending on the load on the system and abruptly resets the frequency to the minimum at idle;
- ondemand — quickly increases the processor frequency with increasing load and slowly resets the frequency to a minimum when idle;
- userspace — allows specifying the frequency manually;
- powersave — corresponds to the minimum allowable CPU frequency;
- performance — corresponds to the maximum CPU frequency.
The system can withstand a heavy load in performance mode. To enable this mode by default, bring the /etc/rc.local file to the following format:
| Блок кода |
|---|
#!/bin/sh -e
#
# rc.local
#
# This script is executed at the end of each multiuser runlevel.
# Make sure that the script will "exit 0" on success or any other
# value on error.
#
# In order to enable or disable this script just change the execution
# bits.
#
# By default this script does nothing.
echo performance | tee /sys/devices/system/cpu/cpu*/cpufreq/scaling_governor >/dev/null
exit 0 |
| Предупреждение |
|---|
The installation must be done by creating an additional rule in /etc/udev/rules.d/. |
Running MSR on isolated CPU cores
For MSR to run on separate processor cores, it is necessary to bring the /etc/systemd/system/ecss-media-server.service.d/override.con file to the following format:
| Блок кода |
|---|
[Service]
CPUAffinity=8-11
CPUSchedulingPolicy=rr |
Before that, enable the MSR instance:
| Блок кода |
|---|
systemctl enable ecss-media-server@msr.service
systemctl edit ecss-media-server@msr.service |
To view which cores the service has started on, you can use htop. You need to add a Processor column in it.
In this example, MSR is running on cores 8, 9, 10, 11. CPUSchedulingPolicy is required only if isolcpus is specified.
MSR configuring is described in more detail on the page Configuring the software media server.
Configuring use of specific processor cores for erlang-based services
In order for processor cores to be used correctly, it is necessary to adjust the startup parameters of erlang nodes on productive systems.
To do this, a scheme for placing nodes on cores is being developed. The scheme is developed according to the following rules:
- use more than two cores;
- it is necessary that one node does not use cores on different processors;
- for heavily loaded nodes, such as core and sip, allocate individual cores;
- nodes that are not loaded can be placed on a single core;
- for core, it is necessary to allocate a larger number of cores.
The distribution of cores on the example of a dual-processor HP BL660 server with two Intel Xeon E5-4657L processors with 12 cores and hyperthreading support, which can form 8 virtual cores:
| Блок кода |
|---|
myc  0-3
ds   4-7
core 8-23
sip  24-31
md   32-35
rest 36-39
sp   40-43
msr 44-47 |
To implement this distribution, it is necessary to enable a mode of using only the required number of cores on the erlang node.
To do this, edit the vm.args file of each node located at the path /usr/lib/ecss/ECSS- SERVICE-NAME/releases/VERSION/.
For example, for ecss-core, edit the file:
| Блок кода |
|---|
sudo mcedit /usr/lib/ecss/ecss-core/releases/3.14.10.210/vm.args |
Add options to this file that specify the use of the required number of logical processor cores and the number of active schedulers.
For 16 cores, this is:
| Блок кода |
|---|
+sct L0-15c0-15
+sbt db
+S16:16 |
For 8 cores:
| Блок кода |
|---|
+sct L0-7c0-7
+sbt db
+S8:8 |
For 4 cores:
| Блок кода |
|---|
+sct L0-3c0-3
+sbt db
+S4:4 |
For 2 cores:
| Блок кода |
|---|
+sct L0-1c0-1
+sbt db
+S2:2 |
The next task is to install the service on the selected cores. This is done in the same way as described for MSR.
Run the command:
| Блок кода |
|---|
sudo systemctl edit ECSS-SERVICE-NAME |
Adding parameters:
| Блок кода |
|---|
[Service]
CPUAffinity=0-3 |
where CPUAffinity value specifies the cores on which the service processes should be started.
Example of ecss-core configuration according to the above scheme:
| Блок кода |
|---|
> sudo systemctl edit ecss-core.service
[Service]
CPUAffinity=8-23 |
After configuring the CPUAffinity parameters for all services, restart the service configuration with the command:
| Блок кода |
|---|
sudo systemctl daemon-reload |
Restart services:
| Блок кода |
|---|
sudo systemctl restart ecss.slice |
To make sure that the services are correctly linked to the cores, use the htop utility by enabling the display of the PROCESSOR column.