
...
| Оглавление |
|---|
| панель | ||
|---|---|---|
| ||
|
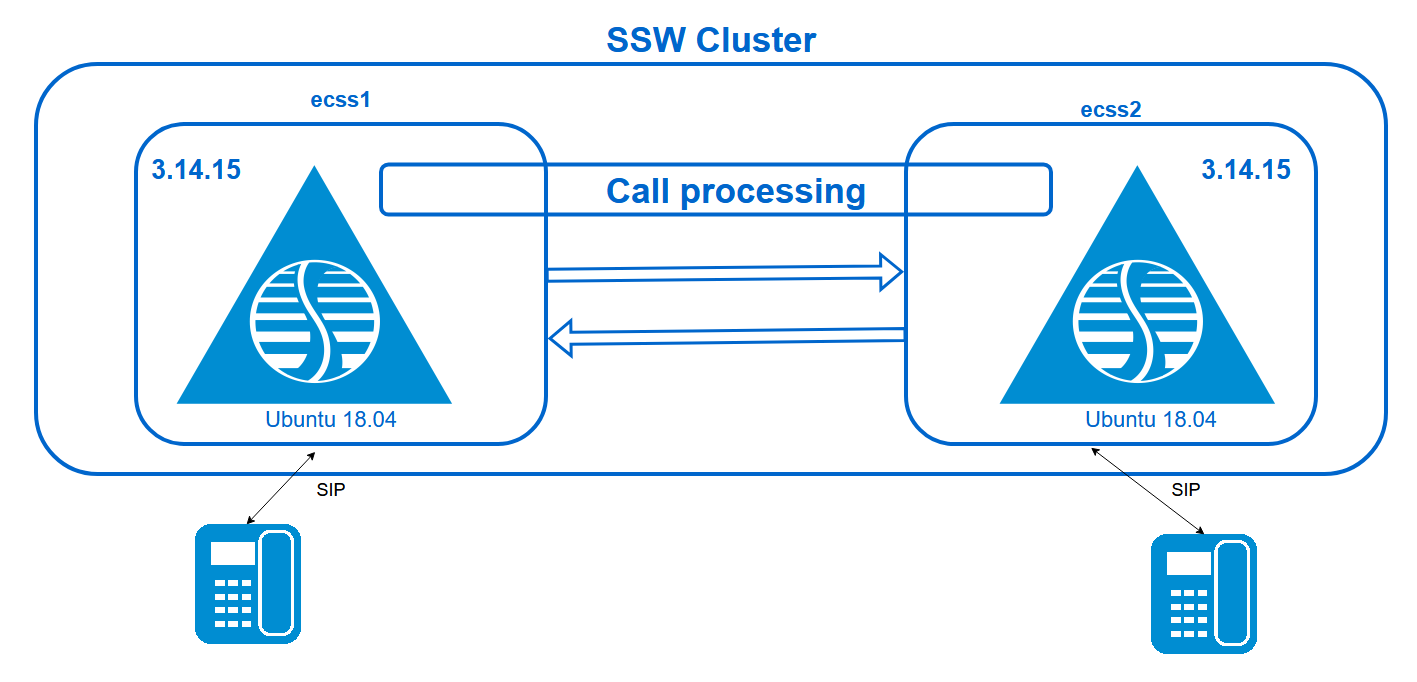
| панель | ||
|---|---|---|
| ||
|
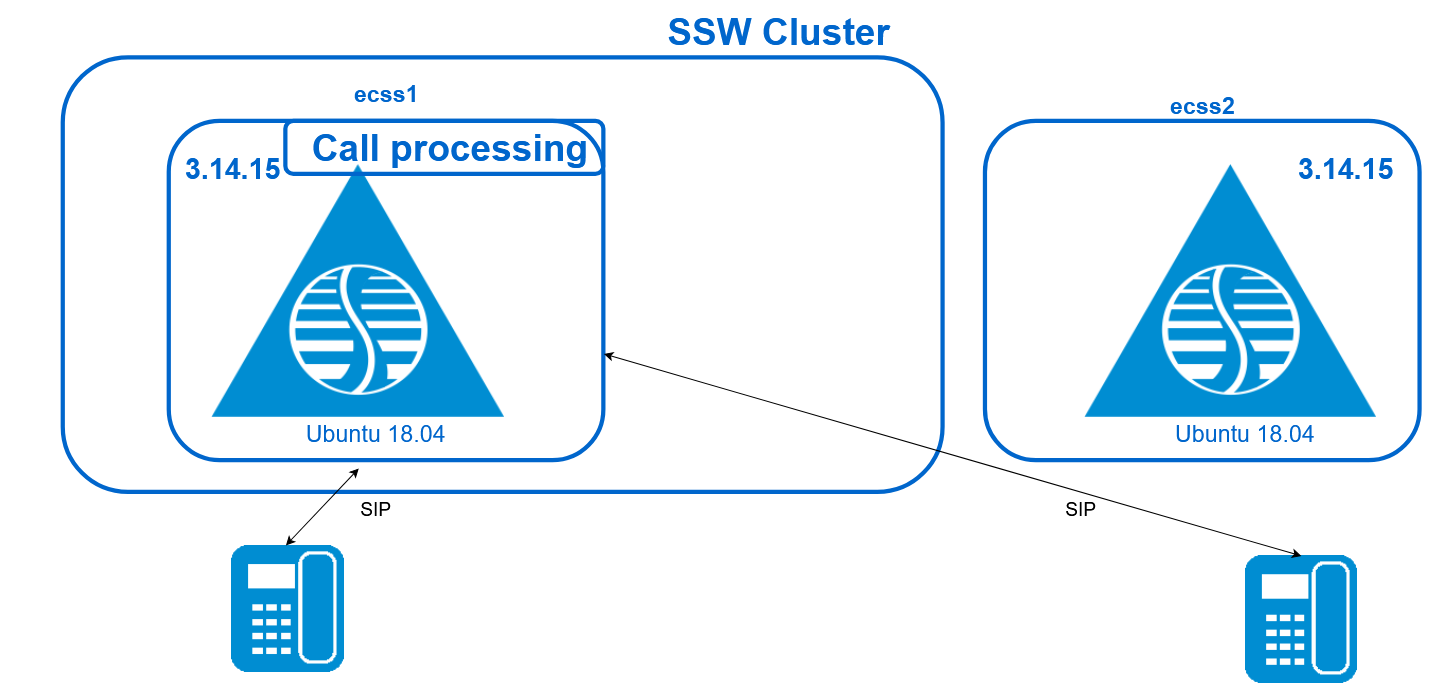
| панель | ||
|---|---|---|
| ||
|
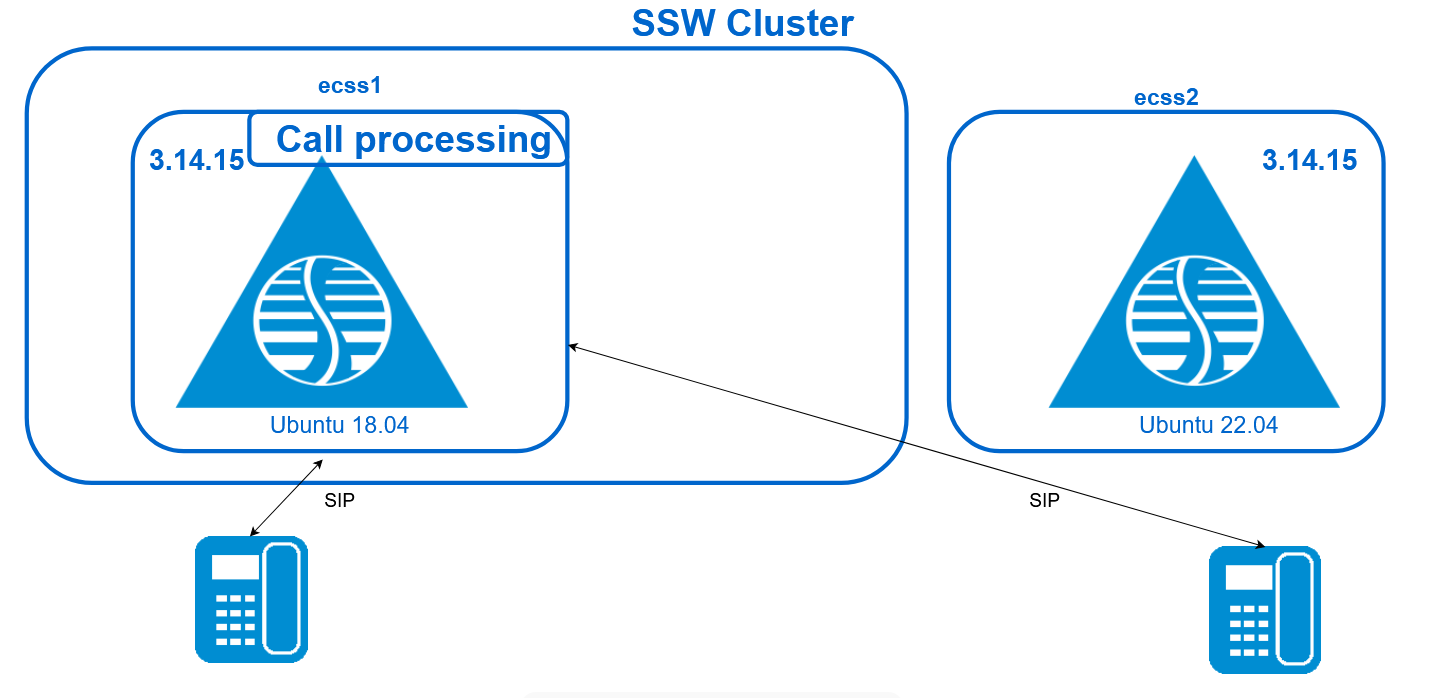
| панель | ||
|---|---|---|
| ||
|
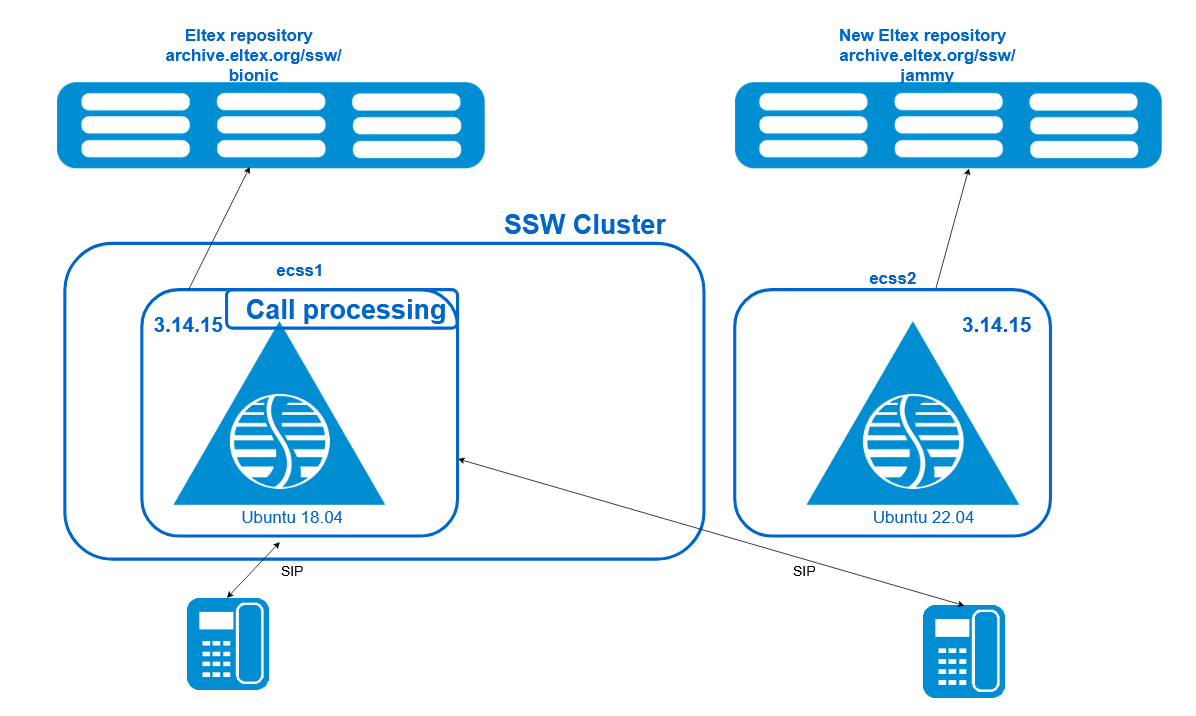
| панель | ||
|---|---|---|
| ||
|
| панель | ||
|---|---|---|
| ||
|
| панель | ||
|---|---|---|
| ||
|
| панель | ||
|---|---|---|
| ||
|
| панель | ||
|---|---|---|
| ||
|
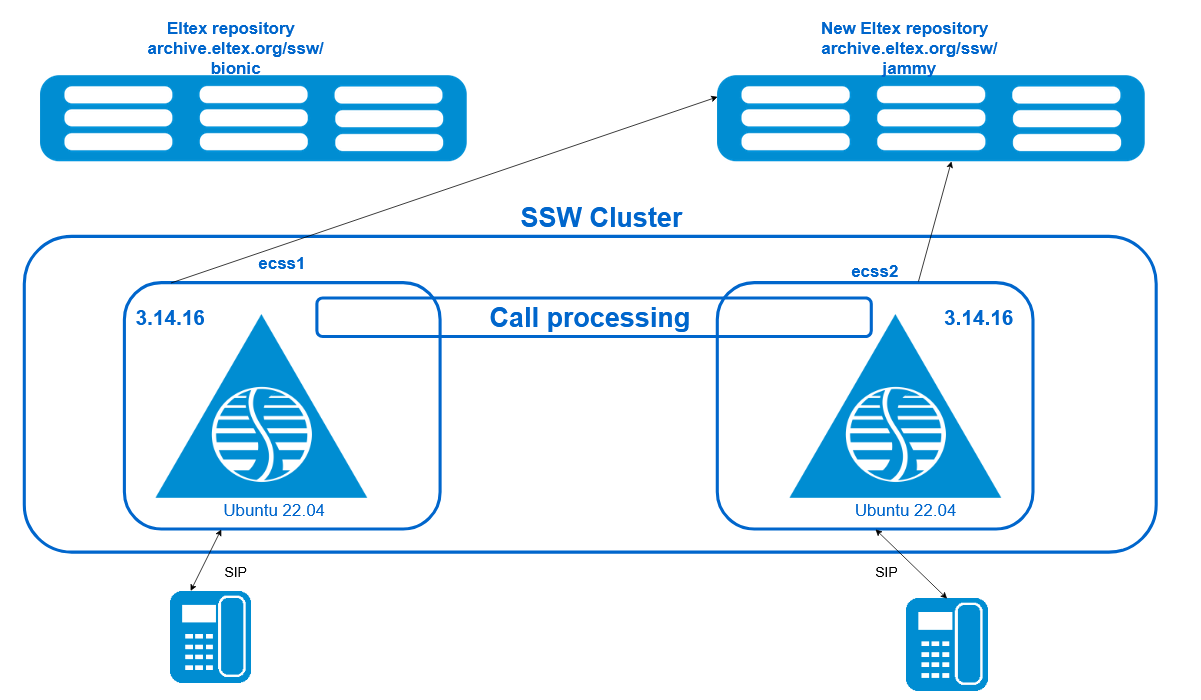
1
...
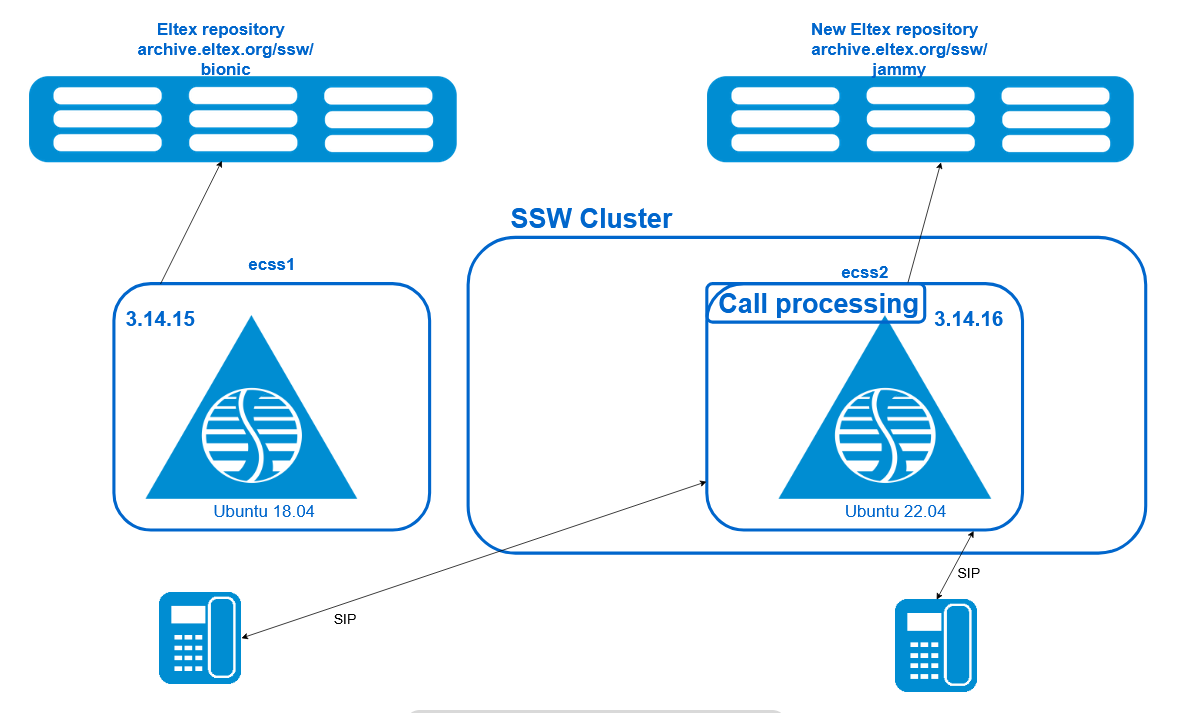
Preparatory steps on ecss2
- Run a full backup
- If you need the latest billing data, you must finalize the current CDR and download the CDR files to the remote server
- Выполнить полный «бэкап» (см. «Регламентное обслуживание и резервное копирование»).
- Если нужны последние данные биллинга, то необходимо финализировать текущую cdr и скачать CDR файлы на удаленный сервер:
Без форматирования /domain/test_domain/cdr/make_finalize_cdr Created file(s): cdr_20250822_11_51_16_1_c.csv
- Enable the setting to automatically sync files in a split (by larger size).
Включить настройку для автоматической синхронизации файлов, находящихся в сплите (по большему размеру). Подробнее см. "Проблемы связанные с возникновением split-brain" .Блок кода title on Без форматирования title на ecss1 sudo gluster volume set ecss_volume cluster.favorite-child-policy size
- Остановить репликации
Stop MySQL replication.
Убедитесь, что значения параметровMake sure the parameter values
равныSlave_IO_RunningиSlave_SQL_Runningequal to
No.Блок кода title на on ecss1/ecss2 sudo mysql -uroot -p -e 'STOP SLAVE;'
Блок кода title на on ecss1/ecss2 sudo mysql -uroot -p -e 'SHOW SLAVE STATUS \G;' | grep -E "Slave_IO_Running:|Slave_SQL_Running:"
Без форматированияcode title примерExample sudo mysql -uroot -p -e 'SHOW SLAVE STATUS \G;' | grep -E "Slave_IO_Running:|Slave_SQL_Running:" . . . Slave_IO_Running: No Slave_SQL_Running: No . . . When upgrading a cluster, upgrade the servers one at a time. This ensures that one server is always running during an upgrade, and services will not be interrupted. To split the cluster, use the ecss-control tool on both servers.
SIP signaling is exchanged via the SIP-VRRP IP address. Similarly, the connection to MySQL is established via the MySQL-VRRP IP address. This functionality is implemented to migrate the IP address to another host in the event of a failure, shutdown, or maintenance of the primary host. IP address migration is controlled by the keepalive service on each host. To redirect traffic to the first server (ecss1), disable keepalive on the second host (ecss2). In this case, both SIP-VRRP IP addresses, as well as the MySQL-VRRP IP address, will be located on the first host (ecss1). Run the following command:
При обновлении кластера следует обновлять сервера по очереди. Таким образом, при обновлении один из серверов будет всегда запущен и работа сервисов не будет прервана. Для разделения кластера следует использовать инструмент ecss-control на обоих серверах.Блок кода title on
Обмен sip сигнализацией происходит через SIP-VRRP IP адрес. Аналогичным образом, через MySQL-VRRP IP адрес, происходит подключение к MySQL. Этот функционал реализован для возможности миграции Ip адреса на другой хост в случае падения/отключения/техобслуживания основного хоста. Контроль миграции IP адресов осуществляется сервисом keepalive на каждом хосте. Для перевода трафика на первый сервер (ecss1), необходимо выключить keepalive на втором хосте (ecss2). В этом случае оба SIP-VRRP IP адреса, а так же MySQL-VRRP IP адрес, будут находится на первом хосте (ecss1). Выполнить следующую команду:Блок кода title на ecss2 sudo systemctl disable --now keepalived.service
- Командой ifconfig проверить, что все VRRP IP-адреса находятся на Use the ifconfig command to check that all VRRP IP addresses are on ecss1 (VRRP-mysql/VRRP-SIP1/VRRP-SIP2).
Блок кода title на on ecss1 ifconfig
- На ecss1 выполнить разделение SSW на два независимых сервера следующей командойOn ecss1, split the SSW into two independent servers using the following command:
Предупреждение Команда The ecss-control работает со стандартными именами хостов control command works with standard hostnames: ecss1/ecss2.
Проверить статусCheck status:Блок кода title на on ecss1 sudo ecss-control detach
Блок кода title на on ecss1 sudo ecss-control status
Без форматированияcode title РезультатResult: sudo ecss-control detach detach host: ecss2, ip: 10.0.10.82 complete sudo ecss-control status locked ip: 10.0.10.82
Примечание Если после разделения на первом хосте при попытке вызова/регистрации появляется ошибка If, after splitting, a "503 Service Unavailable" . То на проблемном хосте выполните следующие команды: error appears on the first host when attempting to call/register, run the following commands on the problematic host: ecss-attach ecss-pa-sip
Без форматирования ecss-attach ecss-pa-sip ********************************************************************************* ! You attached to systemd-service ecss-pa-sip: sip1@ecss1. ! ! To exit, press Ctrl+C, Ctrl+C. ! ********************************************************************************* Erlang/OTP 21 [erts-10.3.5.10] [source] [64-bit] [smp:8:8] [ds:8:8:10] [async-threads:1] [hipe] Eshell V10.3.5.10 (abort with ^G) (sip1@ecss1)1> sip_config:tring_is_connected(). false (sip1@ecss1)2> sip_config:tring_is_connected(true). ok (sip1@ecss1)3> sip_config:tring_is_connected(). true
- После разделения кластера необходимо замаскировать все ноды на сервере, который будет обновляться первымAfter splitting the cluster, you need to mask all nodes on the server that will be updated first:
Блок кода title на on ecss2 sudo systemctl mask --now ecss-ds ecss-mycelium ecss-mediator ecss-core ecss-pa-sip ecss-sorm
Предупреждение Нода sorm идет одна на кластер. В случае её работы на ecss1, при выполнении приложенной команды будет уведомлениеThere is one sorm node per cluster. If it's running on ecss1, a notification will be sent when the attached command is executed.
Без форматирования Unit /etc/systemd/system/ecss-sorm.service is masked, ignoring.
Данное сообщение не является ошибкой. Продолжать выполнение процедуры.
This message is not an error. Continue with the procedure.
- Perform a backup of the databasesВыполнить резервное копирование баз данных.
Предупреждение title ВАЖНО! Корректность данных в резервной копии IMPORTANT! The data in the backup is correct. Before creating a backup, make sure that the tolltickets table in your database does not contain obsolete fields using the commandПеред созданием резервной копии убедитесь, что в вашей БД таблица tolltickets не содержит устаревших полей командой:
Без форматирования sudo mysql -uroot -p -e "SHOW CREATE TABLE ecss_calls_db.tolltickets\G;" | grep 'ss_info' || echo "Поле не найдено"
Если команда показала If the command shows "`ss_info` text COLLATE latin1_general_ci,", то приведите таблицу к актуальному состоянию командойthen bring the table to the current state with the command:
Без форматирования sudo mysql -uroot -p -e "ALTER TABLE ecss_calls_db.tolltickets DROP COLUMN ss_info;"
Блок кода title на on ecss2 sudo mysqldump -uroot -p --verbose --single-transaction --quote-names --complete-insert --extended-insert --routines --events --triggers --databases ecss_address_book ecss_audit ecss_calls_db ecss_dialer_db ecss_meeting_db ecss_numbers_db ecss_statistics ecss_subscribers ecss_system web_conf history_db > ./all_dump.sql
- Добавить в конфигурацию mysql параметры Add the skip-log-bin и and skip-slave-start на ecss2 (чтобы избежать записи в бинарные логи процесса удаления БД), выполнив команду parameters to the MySQL configuration on ecss2 (to avoid writing the database deletion process to the binary logs) by running the command:
Блок кода title на on ecss2 sudo sed -i '40i\skip-log-bin\nskip-slave-start' /etc/mysql/mysql.conf.d/mysqld.cnf
- Удалить резервный файл конфигурации (чтобы при удаленииDelete the backup configuration file (so that when deleting it, ecss-mysql не загрузил конфигурацию из него does not load the configuration from it):
Блок кода title на on ecss2 sudo rm /var/lib/ecss/ecss-mysql/backup/mysqld.cnf
- Перезапустить Restart ecss-mysql с новой конфигурацией with the new configuration:
Блок кода title на on ecss2 sudo systemctl restart mysql.service
- Для корректной работы репликации после обновления необходимо сохранить конфигурационные файлы To ensure replication works correctly after the update, you need to save the ecss-mysql , поэтому делаем отдельный backup для файлов до обновленияconfiguration files, so we'll create a separate backup for the files before the update:
Блок кода title на on ecss2 sudo cp -a /etc/ecss/ecss-mysql ~/ecss-mysql-etc-backup
- Удалить Delete ecss-web-conf и and ecss-mysql, вместе с конфигурационными файлами (чтобы не было ошибок конфигураций при обновлении along with their configuration files (to avoid configuration errors during the update):
Подсказка В вопросах измените IP MySQL на локальный IP БДIn the questions, change the MySQL IP to the local database IP
Блок кода title на on ecss2 sudo dpkg-reconfigure ecss-web-conf
Блок кода title на on ecss2 sudo apt purge ecss-web-conf
Подсказка На вопросы об удалении БД → положительно отвечаем на вопросы - удалить все базы данныхTo questions about deleting databases → we answer yes to the questions - delete all databases
Блок кода title на on ecss2 sudo apt purge ecss-mysql
- Проверьте, что БД удалены, выполнив команду, в выводе не должно быть других БД кроме системных Check that the databases have been deleted by running the command; the output should not contain any other databases except the system ones ('information_schema','mysql','performance_schema','sys'):
Блок кода title на on ecss2 sudo mysql -uroot -p -e "SHOW DATABASES;"
- Если используется If ecss-call-api и and ecss-elph-api , то их нужно удалить (чтобы не было конфликтов зависимостей при обновленииare used, they should be removed (to avoid dependency conflicts during the update).
Блок кода title на on ecss2 sudo apt-get remove ecss-call-api sudo apt-get remove ecss-elph-api
- Удалить Remove skip-log-bin из файла конфигурации from the configuration file:
Блок кода title на on ecss2 sudo sed -i '/skip-log-bin/d' /etc/mysql/mysql.conf.d/mysqld.cnf
- Зафиксировать пакеты Fix mysql (чтобы пакетный менеджер при обновлении системы не удалил mysqlpackages (to prevent the package manager from deleting mysql when updating the system):
Блок кода title на on ecss2 sudo apt-mark hold mysql-*
- Установить версию пакета nodejs (чтобы корректно было выполнено обновление дистрибутиваInstall the nodejs package version (to ensure the distribution is updated correctly):
Блок кода title на on ecss2 sudo apt install nodejs=8.10.*
2
...
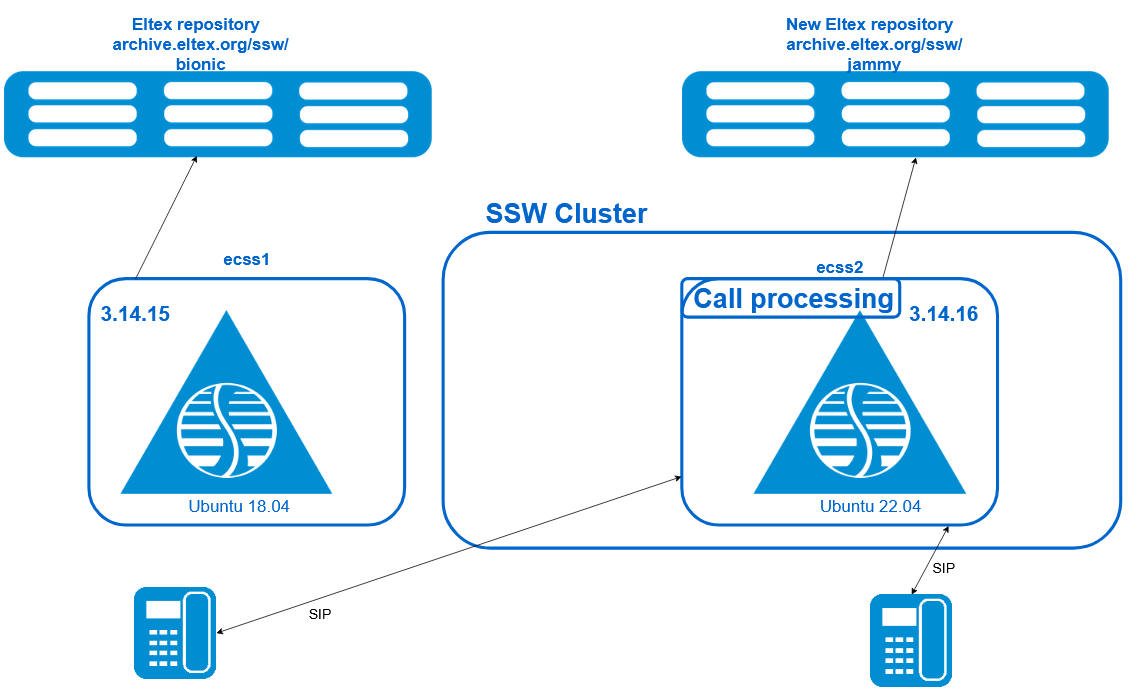
Upgrading the Ubuntu 18.04
...
operating system to ecss2
- Обновление с Upgrading from Ubuntu 18.04 (Bionic) до to Ubuntu 20.04 (Focal)
Блок кода title на on ecss2 do-release-upgrade -m server
Предупреждение title на on ecss2 В случае получения сообщенияIf you receive a message:
Информация Checking for a new Ubuntu release
Please install all available updates for your release before upgrading.выполните следующие командыrun the following commands:
Блок кода title на on ecss2 sudo apt update
Блок кода title на on ecss2 sudo apt upgrade
Блок кода title на on ecss2 sudo apt dist-upgrade
так же может потребоваться обновить пакет You may also need to update the ecss-user следующей командойpackage with the following command:
Блок кода title на on ecss2 sudo apt install ecss-user
и затем повторить команду and then repeat the do-release-upgrade -m server command:
Блок кода title на on ecss2 do-release-upgrade -m server
Подсказка title Ответы на вопросы во время обновления Answers to questions during the update During the upgrade, accept all new ecss package configurationsВо время обновления принять все новые конфигурации пакетов ecss.
Подсказка В процессе выполнения обновления, система может предложить выполнить перезагрузку. Нужно согласится.
During the update process, the system may prompt you to reboot. Accept.
Checking the dnsmasq service.
If the dnsmasq service is not active after the update
Проверка сервиса dnsmasq.
Если после обновления сервис dnsmasq не находится в активном состоянии:
Блок кода title на on ecss2 systemctl is-active dnsmasq
Выполнить следующие команды:Блок кода title примерExample systemctl is-active dnsmasq failed
Удалить оставшийся конфигурационный файлRun the following commands:
Delete the remaining configuration file:
Перезапустить сервис Restart the service dnsmasq :Блок кода title на on ecss2 sudo rm /etc/dnsmasq.d/lxd
Проверить статус сервисаCheck service status:Блок кода title на on ecss2 sudo systemctl restart dnsmasq
Без форматированияcode title примерExample systemctl is-active dnsmasq active
Подсказка После этих действий, сервис должен быть активным и работать без ошибок.
After these steps, the service should be active and work without errors.
Updating mysql packages.
Disable package pinning
Обновление пакетов mysql.
Отключить фиксацию пакетов:
Обновить mysql до версии Update MySQL to version 8.0:Блок кода title на on ecss2 sudo apt-mark unhold mysql-*
Блок кода title на on ecss2 sudo apt install mysql-server
После обновления необходимо актуализировать настройки mysql для версии 8.0:Примечание title Ответы на вопросы пакетного менеджера Answers to questions from the package manager Important! When upgrading MySQL, you must leave the old configuration file Важно! Во время обновления mysql необходимо оставить старую конфигурацию файла /etc/mysql/mysql.conf.d/mysqld.conf , чтобы не потерять выставленные флаги.
After the update, you need to update your MySQL settings for version 8.0.intact to avoid losing the flags you set.
Блок кода title на on ecss2 sudo sed -i -e 's/^max_allowed_packet.*/max_allowed_packet = 64M/' \ -e 's/^thread_stack.*/thread_stack = 256K/' /etc/mysql/mysql.conf.d/mysqld.cnf- Закончить обновление хоста следующей командойFinish updating the host with the following command:
Проверить версию Ubuntu следующей командойCheck your Ubuntu version with the following command:Блок кода title на on ecss2 sudo apt full-upgrade
Блок кода title на on ecss2 lsb_release -a
Блок кода title РезультатResult: lsb_release -a No LSB modules are available. Distributor ID: Ubuntu Description: Ubuntu 20.04.6 LTS Release: 20.04 Codename: focal
- Обновление c Update from Ubuntu 20.04 (Focal) до to Ubuntu 22.04 (Jammy)
Блок кода title на on ecss2 do-release-upgrade -m server
Подсказка При сообщении системыWhen the system reports:
Без форматирования do-release-upgrade -m server Checking for a new Ubuntu release You have not rebooted after updating a package which requires a reboot. Please reboot before upgrading.
выполнить перезагрузку следующей командойperform a reboot with the following command:
Блок кода title на on ecss2 sudo reboot
а затем повторить командуand then repeat the command:
Блок кода title на on ecss2 do-release-upgrade -m server
Подсказка title Ответы на вопросы во время обновления Во время обновления принять все новые конфигурации пакетов ecss.
Подсказка В процессе выполнения обновления система может предложить выполнение перезагрузки. Нужно согласится.
Answers to questions during the update During the upgrade, accept all new ecss package configurations.
Подсказка During the update process, the system may prompt you to reboot. You should agree.
- After the update is complete, run the commandПосле завершения обновления выполнить команду:
Блок кода title на on ecss2 sudo apt autoremove
Подсказка Данный шаг может выполняться достаточно долго
- Обновление с Upgrading from Ubuntu 18.04 (Bionic) до to Ubuntu 20.04 (Focal)
3 Подготовка к обновлению сервисов SSW на ecss2
This step can take quite a long time.
3 Preparing to upgrade SSW services on ecss2
- Perform a split on Выполнить сплит на ecss2:
Предупреждение Команда The ecss-control работает со стандартными именами хостов control command works with standard hostnames: ecss1/ecss2.
Блок кода title на on ecss2 sudo ecss-control detach
- Актуализировать репозиторий Update the ssw repository:
Блок кода title на on ecss2 sudo sh -c "echo deb [arch=amd64] http://archive.eltex.org/ssw/jammy/3.14.16.1 stable main extras external > /etc/apt/sources.list.d/eltex-ecss10-stable.list"
- Временно зафиксировать версию пакетов Temporarily fix the version of ecss-* , на которые надо будет обновитьсяpackages to which you will need to upgrade:
Блок кода title на on ecss2 sudo sh -c "echo 'Package: ecss-*\nPin: version 14.16.1.*\nPin-Priority: 1001\n\nPackage: erlang*\nPin: version 2:24.3.10*\nPin-Priority: 1001' >> /etc/apt/preferences.d/eltex-ecss10"
- Выполнить обновление пакетовPerform package update:
Блок кода title на on ecss2 sudo apt update
- Выключаем nginx сервисDisable nginx service:
Блок кода title на on ecss2 sudo systemctl disable --now nginx
- Perform a split on Выполнить сплит на ecss2:
4
...
Updating SSW
...
services on ecss2
- Обновление пакета Updating the ecss-dns-env package:
Блок кода title на on ecss2 sudo apt install ecss-dns-env
После обновления, нужно актуализировать конфигурацию, выполнив команду. Ответы на вопросы аналогичны процедуре инсталляции:Подсказка При обновлении нужно применить новые конфигурационные файлы (подтверждением When updating, you need to apply new configuration files (confirm with -Y)
After the update, you need to update the configuration by running the command. The answers to the questions are similar to the installation procedureБлок кода title на on ecss2 sudo dpkg-reconfigure ecss-dns-env
Выполнить обновление пакета Update the ecss-user package:
Блок кода title на on ecss2 sudo apt install ecss-user
Обновление пакета Updating the ecss-mysql package:
Примечание Перед обновлением пакета Before updating the ecss-mysql для сохранения совместимости с package to maintain compatibility with mysql v5.7, надо включить в конфигурации mysql, по умолчанию, устаревший плагин you need to enable the deprecated plugin in the mysql configuration by default:
Блок кода title на on ecss2 sudo sh -c "echo '[mysqld]\ndefault_authentication_plugin = mysql_native_password' >> /etc/mysql/conf.d/plugin.cnf"
Перезапустить Restart MySQL:
Блок кода title на on ecss2 sudo systemctl restart mysql
Установить пакет Install the ecss-mysql package:
Блок кода title на on ecss2 sudo apt install ecss-mysql
Подсказка При установке на вопрос When installing, in response to the question "Path for external data-directory, where tables of databases will be created tables of databases" надо указать внешнюю директорию хранения таблиц баз данных, либо принять значение по умолчанию. ", you must specify the external directory for storing database tables, or accept the default value.
Move the backup of ecss-mysql configuration files (saved earlier) backОбратно переместить backup конфигурационных файлов ecss-mysql (сохраненный ранее):
Блок кода title на on ecss2 sudo rm -rf /etc/ecss/ecss-mysql && sudo cp -a ~/ecss-mysql-etc-backup /etc/ecss/ecss-mysql
Проверьте и при необходимости актуализируйте параметры в Check and, if necessary, update the parameters in "/etc/ecss/ecss-mysql/mysql-checker.conf".
Подсказка Переменная The "MASTER_HOST_IP" - это VRRP-адрес для MySQL, определенный в конфигурации keepalived .variable is the VRRP address for MySQL defined in the keepalived configuration.
- Enable Включите ecss-mysql-checker.timer:
Загрузка резервной копии баз данных:Блок кода title на on ecss2 sudo systemctl enable --now ecss-mysql-checker.timer
Перед загрузкой резервной копии необходимо модифицировать его, указав внешнюю директорию хранения Loading a database backup:
Before loading a backup, you must modify it by specifying the external directory where the database tables are stored. Since the ecss-mysql database tables are installed in a separate directory
таблиц баз данных. Так как таблицы баз данных ecss-mysql устанавливаются в отдельной директории(/var/lib/ecss-mysql),
необходимо для всех таблиц в резервной копии указать внешнюю директорию, иначе они будут создаваться в стандартной data-директорииyou must specify the external directory for all tables in the backup; otherwise, they will be created in the default data directory (/var/lib/mysql).
Также при загрузке резервной копии отключаем запись бинарных логовAlso, when loading a backup, disable binary logging.
После загрузки резервной копии сделайте реконфигурирование пакета After downloading the backup, reconfigure the ecss-mysql , чтобы прошли необходимые миграции package to include the necessary v3.14.16 , которые отсутствуют в резервной копииmigrations that are missing from the backup.Блок кода title на on ecss2 sudo sed -E "s/(ENGINE=(MyISAM|InnoDB))/\1 DATA DIRECTORY = '\/var\/lib\/ecss-mysql'/g" all_dump.sql | (echo "SET sql_log_bin = 0;"; cat -) | sudo mysql -uroot -p
Перезапустить репликацию командой и убедится, что slave сервер подтянул все изменения от мастера (дождаться, пока переменная Restart replication with the command and make sure that the slave server has pulled all changes from the master (wait until the "Seconds_Behind_Master" не станет равна variable becomes equal to 0, а значение and the Relay_Master_Log_File должно сойтись со значением value should match the Master_Log_File value).Блок кода title на on ecss2 sudo dpkg-reconfigure ecss-mysql
Блок кода title на on ecss2 sudo mysql -uroot -p -e "START SLAVE;"
Блок кода title на on ecss2 sudo mysql -e 'SHOW SLAVE STATUS \G;' | grep -E "Seconds_Behind_Master|Relay_Master_Log_File|Master_Log_File"
Удалить параметрБез форматированияcode title примерExample sudo mysql -e 'SHOW SLAVE STATUS \G;' | grep -E "Seconds_Behind_Master|Relay_Master_Log_File|Master_Log_File" [sudo] password for abf: Master_Log_File: server-mysql-bin.001152 Relay_Master_Log_File: server-mysql-bin.001152 Seconds_Behind_Master: 0
Remove the skip-slave-start из конфигурации mysql и резервного файлаparameter from the mysql configuration and backup file:Блок кода title на on ecss2 sudo sed -i '/skip-slave-start/d' /etc/mysql/mysql.conf.d/mysqld.cnf sudo sed -i '/skip-slave-start/d' /var/lib/ecss/ecss-mysql/backup/mysqld.cnf
Подсказка Перезапускать mysql не обязательно - данная опция влияет только на состояние SLAVE при старте mysql, а его запустили напрямую.
It is not necessary to restart mysql - this option only affects the state of SLAVE when mysql starts, and it was started directly.
- Updating Erlang and SSW.
Before updating, enable ssw services using the following commands:Обновление Erlang и SSW.
Перед обновлением включить сервисы ssw следующими командами:Блок кода title на on ecss2 sudo systemctl unmask ecss-ds ecss-mycelium ecss-mediator ecss-core ecss-pa-sip ecss-sorm
Перед обновлением, удалить устаревшую версию Erlang. Команда ниже обновит Erlang до версии 24.3, а также обновит до новейшей версии пакеты ecss-node и ecss-utilsБлок кода title на on ecss2 sudo systemctl enable ecss-ds ecss-mycelium ecss-mediator ecss-core ecss-pa-sip ecss-sorm
Before upgrading, uninstall the outdated version of Erlang. The following command will upgrade Erlang to version 24.3 and also upgrade the ecss-node and ecss-utils packages to the latest version:Блок кода title на on ecss2 sudo apt remove erlang-base-hipe
После обновленияПодсказка Если Erlang не обновился, удалением старого пакета, то сначала обновить If Erlang is not updated by removing the old package, first update ecss-node и and ecss-utils, а затем обновить весь and then update the entire Erlang:
Блок кода title на on ecss2 sudo apt install ecss-node ecss-utils
Блок кода title на on ecss2 sudo apt install erlang
After upgrading Erlang демаскировать сервис, который был маскирован при удалении , unmask the service that was masked when erlang-base-hipe was removed:Блок кода title на on ecss2 sudo systemctl unmask epmd.socket epmd.service
- Запуск
Launch SSW
наon ecss2.
Перед запуском изменить имя кластера на отличное от имени кластера указанном на ecss1. Например, добавьте постфикс upd в имя кластера:Before launching, change the cluster name to something different from the cluster name specified on ecss1. For example, add the "upd" suffix to the cluster name:
Подсказка It is required because mycelium1 and mycelium2 find each other and in case of different versions - mycelium on ecss2 crashes.
Подсказка Требуется по причине того, что mycelium1 и mycelium2 находят друг друга и в случае разных версий - mycelium на ecss2 падает.
Блок кода title на on ecss2 sudo nano /etc/ecss/ecss-mycelium/mycelium1.config
запустить следующие сервисыstart the following services:Без форматированияcode title на on ecss2 {mycelium_broker, [ {cluster_name, 'test_cluster_upd'},
ecss-mycelium
ecss-dsБлок кода title на on ecss2 sudo systemctl start ecss-mycelium
ecss-coreБлок кода title на on ecss2 sudo systemctl start ecss-ds
Блок кода title на on ecss2 sudo systemctl start ecss-core
ecss-mediatorПредупреждение !!!ПОКА НЕ ЗАПУСКАЕМ DO NOT LAUNCH PA-SIP YET!!!
Блок кода title на on ecss2 sudo systemctl start ecss-mediatorПодсказка Если лицензия поддерживает СОРМ3, то запустить также сервис ecss-sorm.
Блок кода title на ecss2 sudo systemctl start ecss-sormЕсли сервис ecss-sorm оказался замаскирован, то выполнить следующие команды:
Блок кода title на ecss2 sudo systemctl unmask ecss-sorm sudo systemctl start ecss-sormПодсказка Для корректной работы SORM3 необходимо выполнить коррекцию команды для sorm экстрактора. Данную команду необходимо выполнить для каждого домена в SSW.
Блок кода title выполняется в CoCon /domain/<Имя_домена>/sorm3/set extractor_node sorm1@ecss2панель title Для примера: /domain/test_domain/sorm3/info┌──────────────────┬───────────┬───────────┐│ Property │ Domain │ Value │├──────────────────┼───────────┼───────────┤│adaptation │test_domain│undefined ││enabled │test_domain│false ││entrypoint_profile│test_domain│ ││extractor_ip │test_domain│127.0.0.1 ││extractor_node │test_domain│sorm1@ecss1│└──────────────────┴───────────┴───────────┘/domain/test_domain/sorm3/set extractor_node sorm1@ecss2Property "extractor_node" successfully changed from:sorm1@ecss1tosorm1@ecss2./domain/test_domain/sorm3/info┌──────────────────┬───────────┬───────────┐│ Property │ Domain │ Value │├──────────────────┼───────────┼───────────┤│adaptation │test_domain│undefined ││enabled │test_domain│false ││entrypoint_profile│test_domain│ ││extractor_ip │test_domain│127.0.0.1 ││extractor_node │test_domain│sorm1@ecss2│└──────────────────┴───────────┴───────────┘Команду повторить для всех доменов в SSW
ecss-mediator - To check the status of services, run the system-status command in CoCon:
Проверить статус сервисов, для этого выполнить в CoCon команду system-status:Блок кода title performed in Без форматирования title выполняется в CoCon /system-status Checking... ┌─┬───────────────┬────────────────────────────┬───────────────┬────────────┬──────┐ │ │ Node │ Release │ Erlang nodes │Mnesia nodes│Uptime│ ├─┼───────────────┼────────────────────────────┼───────────────┼────────────┼──────┤ │ │core1@ecss2 │ecss-core-3.14.16.1.130 │core1@ecss2 │not running │2m 27s│ │ │ds1@ecss2 │ecss-ds-3.14.16.1.130 │ds1@ecss2 │ds1@ecss2 │2m 32s│ │ │md1@ecss2 │ecss-mediator-3.14.16.1.130 │md1@ecss2 │md1@ecss2 │2m 16s│ │ │mycelium1@ecss2│ecss-mycelium-3.14.16.1.130 │mycelium1@ecss2│not running │2m 39s│ │ │sorm1@ecss2 │ecss-sorm-3.14.16.1.130 │sorm1@ecss2 │not running │1m 56s│ └─┴───────────────┴────────────────────────────┴───────────────┴────────────┴──────┘ All services are started. Active media resource selected list specific: ┌─────────────┬───────────┬─────────────┬───────────┬───────────┐ │ Node │ MSR │ MSR │ Cc-status │ Cc-uptime │ │ │ │ version │ │ │ ├─────────────┼───────────┼─────────────┼───────────┼───────────┤ │ core1@ecss2 │ msr.ecss1 │ 3.14.15.243 │ connected │ 00:00:10 │ │ │ msr.ecss2 │ 3.14.15.243 │ connected │ 00:00:10 │ └─────────────┴───────────┴─────────────┴───────────┴───────────┘
- Обновление пакета Updating ecss-restfs.
Подсказка Принять все новые конфигурационные файлы, выбирая Accept all new configuration files by selecting Y. Блок кода title на on ecss2 sudo apt install ecss-restfs
- Обновление пакета
Updating the ecss-media-server package.
Предварительно отключить регистрацию на рабочий хост ecss1. Для этого надо закомментировать в конфигурационном файле строку с realm рабочего хоста (в примереFirst, disable registration on the working host ecss1. To do this, comment out the line with the working host's realm in the configuration file (in the example, realm="sip:10.0.20.81:5000")
, следующей командой (добавивwith the following command (adding <!- -
вначале строки , иat the beginning of the line and - ->
в конце строки ), следующей командойat the end of the line):
Блок кода title на on ecss2 sudo nano /etc/ecss/ecss-media-server/conf.d/default.xml
Выполнить обновлениеБез форматированияcode title примерExample <?xml version="1.0"?> <config> <accounts> <!--<dynamic msr_name="msr.ecss2" realm="sip:10.0.20.81:5000" dtmf_mode="rfc+inband+info" auth_name="user" auth_password="password"/>--> <dynamic msr_name="msr.ecss2" realm="sip:10.0.20.82:5000" dtmf_mode="rfc+inband+info" auth_name="user" auth_password="password"/> </accounts> </config>
Perform update:
Актуализировать конфигурациюUpdate configuration:Блок кода title на on ecss2 sudo apt install ecss-media-server
Выполнить проверку, и при необходимости отредактировать файл командой Perform a check and, if necessary, edit the file using the command:Блок кода title на on ecss2 sudo dpkg-reconfigure ecss-media-server
Блок кода title на on ecss2 sudo nano /etc/ecss/ecss-media-server/config.xml
Раскрыть title примерexample Блок кода title примерexample <?xml version="1.0" encoding="utf-8"?> <config date="16:54:35 20.02.2025"> <general log-level="3" log-rotate="yes" max-calls="8192" max-vid-calls="8192" max-in-group="512" load-sensor="media" load-delta="10" calls-delta="100" spool-dir-size="100M" log-name="msr.log" log-path="/var/log/ecss/media-server" use-srtp="disabled" enable-ice-transport="no" ice-update="no" aggressive-ice="yes" stun-server="" suspicious-mode="no"/> <transport bind-addr="10.0.20.80" port="5040" transport="udp+tcp"/> <!-- By default configured public TURN-server --> <turn-server use-turn="no" host="numb.viagenie.ca" user="webrtc@live.com" password="muazkh"/> <media mixer-clock-rate="8000" use-vad="no" cng-level="0" jb-size="60" rtcp-timeout="0" rtp-timeout="350" udp-src-check="no" cn-multiplier="3" port-start="12000" port-range="2048" tias-in-sdp="no" thread-cnt="2" vid-enc-threads="2" vid-dec-threads="2" video-conf-layout="evenly" keyframe-interval="1000" vid-decode-delay="100" silence-threshold="-30" dtmf-flash-disable="no" video-dscp="0" other-dscp="0" dummy-video-src="/usr/share/ecss-media-server/video/dummy_video.yuv" video-enc-width="640" video-enc-height="360" finalsilence="1000" rtcp-stat-dump="yes" dtmf-tg-fpc-loop="10" dtmf-tg-fit="1" dtmf-tg-fot="2" dtmf-tg-volume="12288"/> <codec pcma="1" pcmu="2" ilbc="0" gsm="0" g722="3" g726="0" g729="0" speex="0" l16="0" g7221="0" opus="0" h264="1" h263-1998="2" t38="1" tel-event-pt="0"/> <accounts> <!-- <dynamic msr_name="msr.name" realm="sip:127.0.0.1:5000" dtmf_mode="rfc+inband+info" auth_name="user" auth_password="password" /> --> </accounts> <pbyte> <mcc bind-addr="10.0.20.82" port="5700"/> </pbyte> <conf_dir path="/etc/ecss/ecss-media-server/conf.d"/> <metrics enable="no" msr_name="msr" port="8100"/> <rtp> <auto addr-v4=""/> </rtp> </config> - Обновление пакета Updating the package ecss-media-resources:
Блок кода title на on ecss2 sudo apt install ecss-media-resources
Обновление пакета Updating the packageecss-web-conf
Блок кода title на on ecss2 sudo apt install ecss-web-conf
Раскрыть title Обновление пакетов опциональных сервисов Updating optional service packages Updating the package Обновление пакета ecss-teleconference-ui
Блок кода title на on ecss2 sudo apt install ecss-teleconference-ui
Обновление пакета Updating the package ecss-crm-server
Блок кода title на on ecss2 sudo apt install ecss-crm-server
Обновление пакета Updating the package ecss-cc-ui
Блок кода title на on ecss2 sudo apt install ecss-cc-ui
Обновление пакета Updating the packageecss-call-api
Блок кода title на on ecss2 sudo apt install ecss-call-api
Обновление пакета Updating the package ecss-elph-api
Блок кода title на on ecss2 sudo apt install ecss-elph-api
- Before transferring keepalived to the updated host, you need to copy the current ds database from ecss1 (otherwise, the registration database will be empty). Therefore, first, backup the Mnesia database to ecss1:
Перед переводом keepalived на обновленный хост необходимо скопировать актуальную базу ds с ecss1 (иначе база регистраций будет пустая). Поэтому сначала делаем backup БД Mnesia на ecss1:Блок кода title выполняется в CoCon /node/ds1@ecss1/oasys/backup
Останавливаем ecss-ds на ecss2:Без форматирования /node/ds1@ecss1/oasys/backup Backup was successfully created at the path: "/var/lib/ecss/oasys/Mnesia.ds1@ecss1_20250930081517"
Командой scp копируем backup c ecss1 на Using the scp command, copy the backup from ecss1 to ecss2.Блок кода title на on ecss2 sudo systemctl stop ecss-ds
Выполняем локальную копию текущей конфигурацииWe make a local copy of the current configuration:Блок кода title на on ecss2 scp -r ecss@ecss1:/var/lib/ecss/oasys/Mnesia.ds1@ecss1_20250930081517 /var/lib/ecss/oasys
Заменяем локальную конфигурацию на конфигурацию backup c We replace the local configuration with the backup configuration from ecss1:Блок кода title на on ecss2 sudo cp -a /var/lib/ecss/oasys/Mnesia.ds1@ecss2 /var/lib/ecss/oasys/Mnesia.ds1@ecss2-bkp
Блок кода title на on ecss2 sudo mv /var/lib/ecss/oasys/Mnesia.ds1@ecss1_20250930081517 /var/lib/ecss/oasys/Mnesia.ds1@ecss2
Запустить Run ecss-ds и and ecss-pa-sip (чтобы подгрузились актуальные регистрации абонентовto load current subscriber registrations):Блок кода title на on ecss2 sudo chown -R ssw:ssw /var/lib/ecss/oasys
Блок кода title на on ecss2 sudo systemctl start ecss-ds
Проверить статус сервисов командой Check the status of services with the command /system-status :Блок кода title на on ecss2 sudo systemctl start ecss-pa-sip
Блок кода title выполняется в in CoCon /system-status Checking... ┌─┬───────────────┬────────────────────────────┬───────────────┬────────────┬──────┐ │ │ Node │ Release │ Erlang nodes │Mnesia nodes│Uptime│ ├─┼───────────────┼────────────────────────────┼───────────────┼────────────┼──────┤ │ │core1@ecss2 │ecss-core-3.14.16.1.130 │core1@ecss2 │not running │2m 27s│ │ │ds1@ecss2 │ecss-ds-3.14.16.1.130 │ds1@ecss2 │ds1@ecss2 │2m 32s│ │ │md1@ecss2 │ecss-mediator-3.14.16.1.130 │md1@ecss2 │md1@ecss2 │2m 16s│ │ │mycelium1@ecss2│ecss-mycelium-3.14.16.1.130 │mycelium1@ecss2│not running │2m 39s│ │ │sip1@ecss2 │ecss-pa-sip-3.14.16.1.130 │sip1@ecss2 │sip1@ecss2 │2m 22s│ │ │sorm1@ecss2 │ecss-sorm-3.14.16.1.130 │sorm1@ecss2 │not running │1m 56s│ └─┴───────────────┴────────────────────────────┴───────────────┴────────────┴──────┘ All services are started. Active media resource selected list specific: ┌─────────────┬───────────┬─────────────┬───────────┬───────────┐ │ Node │ MSR │ MSR │ Cc-status │ Cc-uptime │ │ │ │ version │ │ │ ├─────────────┼───────────┼─────────────┼───────────┼───────────┤ │ core1@ecss2 │ msr.ecss1 │ 3.14.15.243 │ connected │ 00:00:10 │ │ │ msr.ecss2 │ 3.14.16.1.0 │ connected │ 00:00:10 │ └─────────────┴───────────┴─────────────┴───────────┴───────────┘
- Запуск сервиса Launching the service keepalived
Блок кода title на on ecss2 sudo systemctl enable --now keepalived
- После обновления сервисов удалить файл фиксации версии sswAfter updating services, delete the ssw version commit file:
Блок кода title на on ecss2 sudo rm /etc/apt/preferences.d/eltex-ecss10
- Обновление пакета Updating the ecss-dns-env package:
5
...
Preparatory steps on ecss1
- Run a full backup.
- Stop MySQL replication (on ecss2). Ensure that the
- Выполнить полный «бэкап» (см. «Регламентное обслуживание и резервное копирование»).
- Остановка репликации MySQL (на ecss2). Убедится, что значения параметров Slave_IO_Running и and Slave_SQL_Running равны parameters are set to No.
Блок кода title на on ecss2 sudo mysql -uroot -p -e 'STOP SLAVE;'
Блок кода title на on ecss2 sudo mysql -uroot -p -e 'SHOW SLAVE STATUS \G;' | grep -E "Slave_IO_Running:|Slave_SQL_Running:"
Без форматированияcode title примерExample sudo mysql -uroot -p -e 'SHOW SLAVE STATUS \G;' | grep -E "Slave_IO_Running:|Slave_SQL_Running:" . . . Slave_IO_Running: No Slave_SQL_Running: No . . . - Подготовить ecss1 к обновлению, для этого, перевести весь трафик на ecss2 (команда выполняется на Prepare ecss1 for upgrade by transferring all traffic to ecss2 (the command is executed on ecss1):
Блок кода title на on ecss1 sudo systemctl disable --now keepalived.service
- Командой ifconfig проверьте, что все VRRP адреса Use the ifconfig command to check that all VRRP addresses (VRRP IP-mysql / VRRP IP-SIP1 / VRRP IP-SIP2) находятся на are on ecss2.
Блок кода title на on ecss2 ifconfig
Примечание Если после переключения на ecss2, при попытке вызова/регистрации появляется ошибка If, after switching to ecss2, you receive a "503 Service Unavailable" . То на проблемном хосте выполните следующие команды: error when attempting to call or register, run the following commands on the problematic host: ecss-attach ecss-pa-sip
Без форматирования ecss-attach ecss-pa-sip ********************************************************************************* ! You attached to systemd-service ecss-pa-sip: sip1@ecss1. ! ! To exit, press Ctrl+C, Ctrl+C. ! ********************************************************************************* Erlang/OTP 21 [erts-10.3.5.10] [source] [64-bit] [smp:8:8] [ds:8:8:10] [async-threads:1] [hipe] Eshell V10.3.5.10 (abort with ^G) (sip1@ecss1)1> sip_config:tring_is_connected(). false (sip1@ecss1)2> sip_config:tring_is_connected(true). ok (sip1@ecss1)3> sip_config:tring_is_connected(). true
- После разделения кластера необходимо выключить все ноды на сервере ecss1After splitting the cluster, you must shut down all nodes on the ecss1 server:
Блок кода title на on ecss1 sudo systemctl mask --now ecss-ds ecss-mycelium ecss-mediator ecss-core ecss-pa-sip ecss-sorm
- Резервное копирование баз данных (на Database backup (on ecss1):
Предупреждение title ВАЖНО! Корректность данных в резервной копии IMPORTANT! correctness of the data in the backup. Before creating a backup, make sure that the tolltickets table in your database does not contain obsolete fields using the commandПеред созданием резервной копии убедитесь, что в вашей БД таблица tolltickets не содержит устаревших полей командой:
Без форматирования sudo mysql -uroot -p -e "SHOW CREATE TABLE ecss_calls_db.tolltickets\G;" | grep 'ss_info' || echo "Поле не найдено"
Если команда показала If the command shows "`ss_info` text COLLATE latin1_general_ci,", то приведите таблицу к актуальному состоянию командойthen bring the table to the current state with the command:
Без форматирования sudo mysql -uroot -p -e "ALTER TABLE ecss_calls_db.tolltickets DROP COLUMN ss_info;"
Блок кода title на on ecss1 sudo mysqldump -uroot -p --verbose --single-transaction --quote-names --complete-insert --extended-insert --routines --events --triggers --databases ecss_address_book ecss_audit ecss_calls_db ecss_dialer_db ecss_meeting_db ecss_numbers_db ecss_statistics ecss_subscribers ecss_system web_conf history_db > ./all_dump.sql
- Добавить в конфигурацию mysql параметры Add the skip-log-bin и and skip-slave-start на ecss1 (чтобы избежать записи в бинарные логи процесса удаления БДparameters to the mysql configuration on ecss1 (to avoid writing the database deletion process to the binary logs):
Блок кода title на on ecss1 sudo sed -i '40i\skip-log-bin\nskip-slave-start' /etc/mysql/mysql.conf.d/mysqld.cnf
- Удалить резервный файл конфигурации (чтобы при удаленииDelete the backup configuration file (so that when deleting it, ecss-mysql не загрузил конфигурацию из негоdoes not load the configuration from it):
Блок кода title на on ecss1 sudo rm /var/lib/ecss/ecss-mysql/backup/mysqld.cnf
- Перезапустить mysql с новой конфигурациейRestart mysql with the new configuration:
Блок кода title на on ecss1 sudo systemctl restart mysql.service
- Для корректной работы репликации после обновления необходимо сохранить конфигурационные файлы To ensure correct replication operation after the upgrade, you must save the ecss-mysql , поэтому создать отдельный backup для файлов до обновленияconfiguration files. Therefore, create a separate backup for the files before the upgrade:
Блок кода title на on ecss1 sudo cp -a /etc/ecss/ecss-mysql ~/ecss-mysql-etc-backup
- Удалить Delete ecss-web-conf и and ecss-mysql вместе с конфигурационными файлами (чтобы не было ошибок конфигураций при обновленииmysql along with their configuration files (to avoid configuration errors during the update):
Подсказка В вопросах измените IP MySQL на локальный IP БДIn the questions, change the MySQL IP to the local database IP
Блок кода title на on ecss1 sudo dpkg-reconfigure ecss-web-conf
Блок кода title на on ecss1 sudo apt purge ecss-web-conf
Подсказка На вопросы об удалении БД → положительно отвечаем на вопросы - удалить все базы данныхTo questions about deleting databases → we answer yes to the questions - delete all databases
Блок кода title на on ecss1 sudo apt purge ecss-mysql
- Проверьте, что БД удалены командойCheck that the databases have been deleted using the command:
Подсказка В выводе не должно быть других БД кроме системных The output should not contain any other databases except system ones ('information_schema', 'mysql', 'performance_schema', 'sys').
Блок кода title на on ecss1 sudo mysql -uroot -p -e "SHOW DATABASES;"
- Если используется If you are using ecss-call-api и and ecss-elph-api, то удалите (чтобы не было конфликтов зависимостей при обновлении remove them (to avoid dependency conflicts during the update):
Блок кода title на on ecss1 sudo apt remove ecss-call-api sudo apt remove ecss-elph-api
- Удалить Remove skip-log-bin из файла конфигурации from the configuration file:
Блок кода title на on ecss1 sudo sed -i '/skip-log-bin/d' /etc/mysql/mysql.conf.d/mysqld.cnf
- Зафиксировать пакеты Fix mysql (чтобы пакетный менеджер при обновлении системы не удалил mysqlpackages (to prevent the package manager from deleting mysql when updating the system):
Блок кода title на on ecss1 sudo apt-mark hold mysql-*
- Установить версию пакета nodejs (чтобы корректно было выполнено обновление дистрибутиваInstall the nodejs package version (to ensure the distribution is updated correctly):
Блок кода title на on ecss1 sudo apt install nodejs=8.10.*
6
...
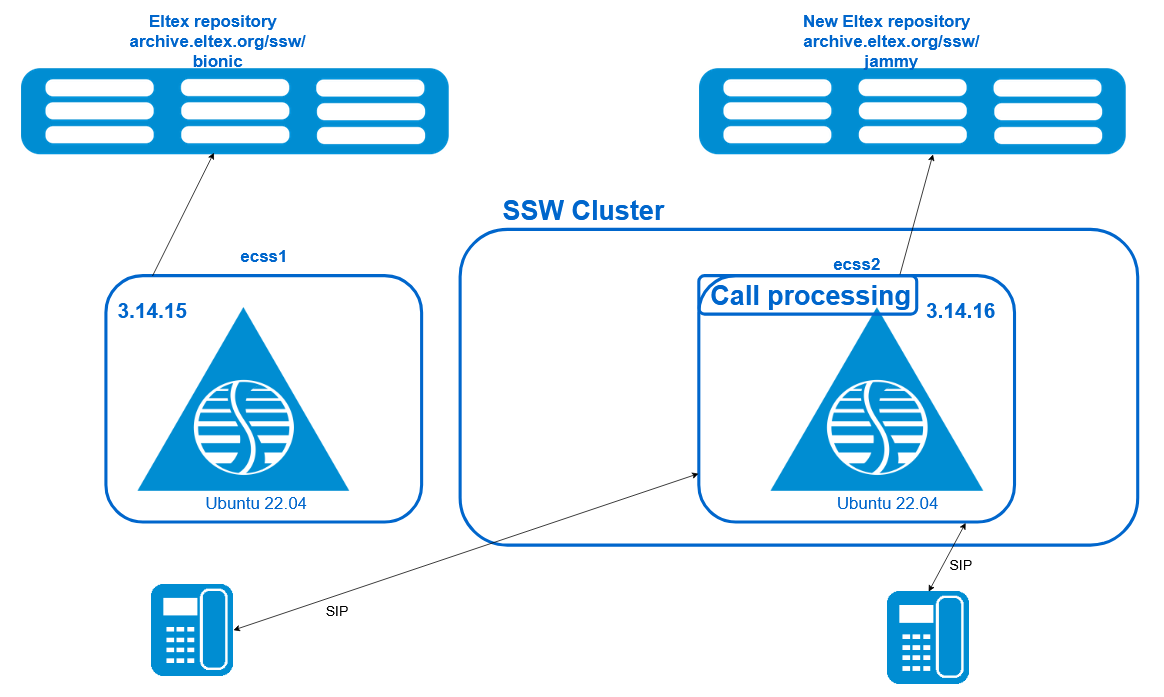
Upgrading the Ubuntu 18.04
...
operating system on ecss1
- Обновление c Upgrading from Ubuntu 18.04 (Bionic) до to Ubuntu 20.04 (Focal)
Блок кода title на on ecss1 do-release-upgrade -m server
Предупреждение В случае получения сообщенияIf you receive a message:
Информация Checking for a new Ubuntu release
Please install all available updates for your release before upgrading.выполните следующие командыrun the following commands:
Блок кода title на on ecss1 sudo apt update
Блок кода title на on ecss1 sudo apt upgrade
Блок кода title на on ecss1 sudo apt dist-upgrade
так же может потребоваться обновить пакет You may also need to update the ecss-user следующей командойpackage with the following command:
Блок кода title на on ecss1 sudo apt install ecss-user
и затем повторить команду and then repeat the command do-release-upgrade -m server:
Блок кода title на on ecss1 do-release-upgrade -m server
Подсказка title Ответы на вопросы во время обновления Answering questions during the update During the upgrade, accept all new ecss package configurationsВо время обновления принять все новые конфигурации пакетов ecss.
Обновление пакетов mysql.панель title Проверка сервиса Checking the dnsmasq service Проверка сервиса Checking the dnsmasq
service
- If the dnsmasq service is not active after the updateЕсли после обновления сервис dnsmasq не находится в активном состоянии :
Блок кода title на on ecss1 systemctl is-active dnsmasq
Раскрыть title выполнить следующие действия Блок кода title примерExample systemctl is-active dnsmasq failed
Run the following commands:
Delete the remaining configuration fileВыполнить следующие команды:
Удалить оставшийся конфигурационный файлБлок кода title на on ecss1 sudo rm /etc/dnsmasq.d/lxd
Перезапустить сервисRestart the service
Блок кода title на on ecss1 sudo systemctl restart dnsmasq
Проверить статус сервисаCheck service status:
Без форматированияcode title примерExample systemctl is-active dnsmasq active
Подсказка После данных шагов, сервис должен быть активным и работать без ошибок.
Убрать фиксацию пакетовAfter these steps, the service should be active and work without errors.
Updating mysql packages.
Unpin packages:
- If the dnsmasq service is not active after the updateЕсли после обновления сервис dnsmasq не находится в активном состоянии :
Обновить mysql до версии Update MySQL to version 8.0:Блок кода title на on ecss1 sudo apt-mark unhold mysql-*
Блок кода title на on ecss1 sudo apt install mysql-server
После обновления необходимо актуализировать настройки mysql для версииПримечание title Ответы на вопросы пакетного менеджера Answers to questions from the package manager Important! When upgrading MySQL, you must leave the old configuration file Важно! Во время обновления mysql необходимо оставить старую конфигурацию файла /etc/mysql/mysql.conf.d/mysqld.conf , чтобы не потерять выставленные флаги.
After the update, you need to update the MySQL settings for version 8.0:intact to avoid losing the flags you set.
Блок кода title на on ecss1 sudo sed -i -e 's/^max_allowed_packet.*/max_allowed_packet = 64M/' \ -e 's/^thread_stack.*/thread_stack = 256K/' /etc/mysql/mysql.conf.d/mysqld.cnf- Закончить обновление хоста командойFinish updating the host with the command:
Блок кода title на on ecss1 sudo apt full-upgrade
- Обновление с Upgrade from Ubuntu 20.04 (Focal) до to Ubuntu 22.04 (Jammy)
Блок кода title на on ecss1 do-release-upgrade -m server
Подсказка title Ответы на вопросы во время обновления Во время обновления принять все новые конфигурации пакетов ecss.
Answers to questions during the update During the upgrade, accept all new ecss package configurations.
- Once the update is complete, runПосле завершения обновления выполните:
Блок кода title на on ecss1 sudo apt autoremove
Подсказка Данный шаг может выполняться достаточно долго
- Обновление c Upgrading from Ubuntu 18.04 (Bionic) до to Ubuntu 20.04 (Focal)
7 Подготовка к обновлению сервисов SSW на ecss1
This step can take quite a long time.
7 Preparing to upgrade SSW services on ecss1
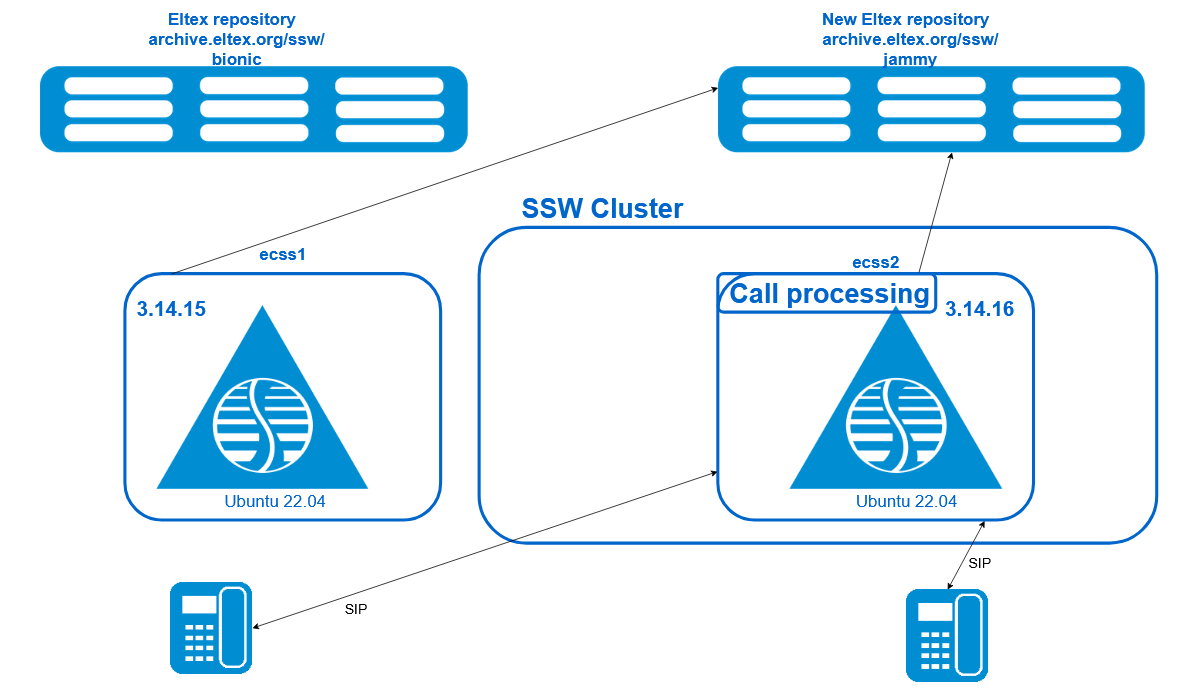
- Before upgrading, update the ssw repositoryПеред обновлением актуализировать репозиторий ssw:
Блок кода title на on ecss1 sudo sh -c "echo deb [arch=amd64] http://archive.eltex.org/ssw/jammy/3.14.16.1 stable main extras external > /etc/apt/sources.list.d/eltex-ecss10-stable.list"
- Временно зафиксировать версию пакетов Temporarily fix the version of ecss-* , на которые надо будет обновитьсяpackages to which you will need to upgrade:
Блок кода title на on ecss1 sudo sh -c "echo 'Package: ecss-*\nPin: version 14.16.1.*\nPin-Priority: 1001\n\nPackage: erlang*\nPin: version 2:24.3.10*\nPin-Priority: 1001' >> /etc/apt/preferences.d/eltex-ecss10"
- Обновить пакеты командойUpdate packages with the command:
Блок кода title на on ecss1 sudo apt update
- Before upgrading, update the ssw repositoryПеред обновлением актуализировать репозиторий ssw:
8
...
Updating SSW
...
services on ecss1
- Обновление пакета Updating the ecss-dns-env package.
Блок кода title на on ecss1 sudo apt install ecss-dns-env
Подсказка При обновлении принимать новые конфигурационные файлы When updating, accept new configuration files -Y.
После обновления актуализировать конфигурацию командойAfter updating, update the configuration with the command:Блок кода title на on ecss1 sudo dpkg-reconfigure ecss-dns-env
- Обновление пакета Updating the package ecss-user:
Блок кода title на on ecss1 sudo apt install ecss-user
- Обновление пакета Updating the package ecss-mysql:
Т.к. оба хоста обновятся до mysql v8.0, надо отключить плагин по умолчанию в конфигурации mysql и поменять плагин пользователей на ecss2. Since both hosts will be updated to MySQL v8.0, you need to disable the default plugin in the MySQL configuration and change the user plugin to ecss2.Блок кода title на on ecss2 sudo rm /etc/mysql/conf.d/plugin.cnf
Блок кода title на on ecss2 sudo mysql -uroot -p -N -e "SELECT CONCAT('ALTER USER \`', user, '\`@\`', host, '\` IDENTIFIED WITH caching_sha2_password;') FROM mysql.user WHERE plugin='mysql_native_password' AND user NOT IN ('root','replica','debian-sys-maint','mysql.session','mysql.sys');" | sudo mysql
Далее установить пакетПредупреждение Ни в коем случае не делать рестарт MySQL сервиса!
Next, install the package ecss-mysql:Do not restart the MySQL service under any circumstances!
Блок кода title на on ecss1 sudo apt install ecss-mysql
Обратно переместить backup конфигурационных файлов ecss-mysql (сохраненный ранее)Подсказка При установке на вопрос When installing, in response to the question "Path for external data-directory, where tables of databases will be created tables of databases" надо указать внешнюю директорию хранения таблиц баз данных, либо принять значение по умолчанию.
Move the backup of ecss-mysql configuration files (saved earlier) back:", specify the external directory for storing database tables, or accept the default value.
Проверьте и при необходимости актуализируйте параметры в Check and, if necessary, update the parameters in "/etc/ecss/ecss-mysql/mysql-checker.conf":Блок кода title на on ecss1 sudo rm -rf /etc/ecss/ecss-mysql && sudo cp -a ~/ecss-mysql-etc-backup /etc/ecss/ecss-mysql
Подсказка Переменная "MASTER_HOST_IP" - это VRRP-адрес для MySQL, определенный в конфигурации keepalived.
- Включить Enable ecss-mysql-checker.timer
Блок кода title на on ecss1 sudo systemctl enable --now ecss-mysql-checker.timer
- Загрузка резервной копии баз данных. Перед загрузкой резервной копии необходимо модифицировать еe, указав внешнюю директорию хранения таблиц баз данных. Так как таблицы баз данных ecss-mysql устанавливаются в отдельной директории Loading a database backup. Before loading the backup, you must modify it by specifying the external directory for storing the database tables. Since the ecss-mysql database tables are installed in a separate directory (/var/lib/ecss-mysql), необходимо для всех таблиц в резервной копии указать внешнюю директорию, иначе они будут создаваться в стандартной data-директории you must specify the external directory for all tables in the backup; otherwise, they will be created in the default data directory (/var/lib/mysql). Также при загрузке резервной копии отключаем запись бинарных логовAlso, when loading the backup, disable binary logging.
После загрузки резервной копии сделайте реконфигурирование пакета After downloading the backup, reconfigure the ecss-mysql , чтобы прошли необходимые миграции package to include the necessary v3.14.16 , которые отсутствуют в резервной копииmigrations that are missing from the backup.Блок кода title на on ecss1 sed -E "s/(ENGINE=(MyISAM|InnoDB))/\1 DATA DIRECTORY = '\/var\/lib\/ecss-mysql'/g" all_dump.sql | (echo "SET sql_log_bin = 0;"; cat -) | sudo mysql -uroot -p
После этого запустить репликацию командой и убедится, что slave подтянул все изменения от мастера After this, start replication with the command and make sure that the slave has pulled all the changes from the master (Seconds_Behind_Master - должна быть равна 0, а значение should be equal to 0, and the value of Relay_Master_Log_File должно сойтись со значением should match the value of Master_Log_File).Блок кода title на on ecss1 sudo dpkg-reconfigure ecss-mysql
Блок кода title на on ecss1 sudo mysql -uroot -p -e "START SLAVE"
Блок кода title на on ecss1 sudo mysql -e 'SHOW SLAVE STATUS \G;' | grep -E "Seconds_Behind_Master|Relay_Master_Log_File|Master_Log_File"
Удалить параметрБез форматированияcode title примерExample sudo mysql -e 'SHOW SLAVE STATUS \G;' | grep -E "Seconds_Behind_Master|Relay_Master_Log_File|Master_Log_File" Master_Log_File: server-mysql-bin.001152 Relay_Master_Log_File: server-mysql-bin.001152 Seconds_Behind_Master: 0
Remove the skip-slave-start из конфигурации mysql и резервного файла parameter from MySQL configuration and the backup file:Блок кода title на on ecss1 sudo sed -i '/skip-slave-start/d' /etc/mysql/mysql.conf.d/mysqld.cnf
Блок кода title на on ecss1 sudo sed -i '/skip-slave-start/d' /var/lib/ecss/ecss-mysql/backup/mysqld.cnf
Подсказка Перезапускать mysql не обязательно - данная опция влияет только на состояние SLAVE при старте mysql, а его запустили напрямую. It is not necessary to restart mysql - this option only affects the state of SLAVE when mysql starts, and it was started directly. - Restore master-master replication by starting replication on ecss2 and make sure that the slave has pulled all changes from the master Восстановить репликацию master-master, запустив репликацию на ecss2 и убедится, что slave подтянул все изменения от мастера (Seconds_Behind_Master - должна быть равна should be equal to 0, а значение and the Relay_Master_Log_File должно сойтись со значением value should match the Master_Log_File value):
Блок кода title на ecss2on ecss1 sudo mysql -uroot -p -e "START SLAVE;"
Блок кода title на ecss2on ecss1 sudo mysql -e 'SHOW SLAVE STATUS \G;' | grep "Seconds_Behind_Master"
Без форматированияcode title примерExample sudo mysql -e 'SHOW SLAVE STATUS \G;' | grep -E "Seconds_Behind_Master|Relay_Master_Log_File|Master_Log_File" Master_Log_File: server-mysql-bin.001152 Relay_Master_Log_File: server-mysql-bin.001152 Seconds_Behind_Master: 0 - Обновление
Updating Erlang
иand SSW.
Перед обновлением включить сервисы ssw: Enable SSW services before upgrading:
Блок кода title на on ecss1 sudo systemctl unmask ecss-ds ecss-mycelium ecss-mediator ecss-core ecss-pa-sip ecss-sorm
Блок кода title на on ecss1 sudo systemctl enable ecss-ds ecss-mycelium ecss-mediator ecss-core ecss-pa-sip ecss-sorm
Для обновления удалить устаревшую версию Erlang. Команда ниже обновит Erlang до версии 24.3, а также обновит до новейшей версии пакеты ecss-node и ecss-utilsTo upgrade, uninstall the outdated version of Erlang. The command below will upgrade Erlang to version 24.3 and also upgrade the ecss-node and ecss-utils packages to the latest version:
Блок кода title на on ecss1 sudo apt remove erlang-base-hipe
Подсказка Если erlang не обновился удалением старого пакета, то сначала обновить If Erlang was not updated by removing the old package, then first update ecss-node и and ecss-utils и далее обновить весь erlang командамиand then update the entire Erlang using the following commands:
Блок кода title на on ecss1 sudo apt install ecss-node ecss-utils
Блок кода title на on ecss1 sudo apt install erlang
После обновления After upgrading Erlang демаскировать сервис, который был маскирован при удалении , unmask the service that was masked when erlang-base-hipe was removed:
Блок кода title на on ecss1 sudo systemctl unmask epmd.socket epmd.service
Launch SSW on the first host.
Before launching, change the cluster name to the same one set on ecss2 in the previous step
Запуск SSW на первом хосте.
Перед запуском изменить имя кластера на то же, которое было установлено на ecss2 на предыдущем шаге.
Блок кода title на on ecss1 sudo nano /etc/ecss/ecss-mycelium/mycelium1.config
Без форматированияcode title на on ecss1 {mycelium_broker, [ {cluster_name, 'test_cluster_upd'},- Сервис Immediately disguise the ecss-sorm на service on ecss1 сразу замаскировать, т.к. у нас заявлена работа ecss-sorm на одном хосте в кластере. , since we intend for ecss-sorm to run on a single host in the cluster.
Блок кода title на on ecss1 sudo systemctl mask ecss-sorm
- Выполнить на ecss2 объединение в кластерPerform cluster merging on ecss2:
Блок кода title на on ecss2 sudo ecss-control attach
- Активация сервиса Service Keepalived activation.
Блок кода title на on ecss1 sudo systemctl enable --now keepalived
- На ecss1 запустите сервис mycelium и в CoCon проверьте, что сервис поднялся и видно ноды mycelium хостов ecss1/ ecss2On ecss1, start the mycelium service and check in CoCon that the service has started and the mycelium nodes of the ecss1/ecss2 hosts are visible:
Блок кода title на on ecss1 sudo systemctl start ecss-mycelium
Без форматированияcode title выполняется в performed in CoCon /system-status Checking... ┌─┬───────────────┬────────────────────────────┬───────────────────────────────┬────────────┬───────┐ │ │ Node │ Release │ Erlang nodes │Mnesia nodes│Uptime │ ├─┼───────────────┼────────────────────────────┼───────────────────────────────┼────────────┼───────┤ │ │core1@ecss2 │ecss-core-3.14.16.1.130 │core1@ecss2 │not running │3h 5m │ │ │ds1@ecss2 │ecss-ds-3.14.16.1.130 │ds1@ecss2 │ds1@ecss2 │3h 5m │ │ │md1@ecss2 │ecss-mediator-3.14.16.1.130 │md1@ecss2 │md1@ecss2 │3h 5m │ │ │mycelium1@ecss1│ecss-mycelium-3.14.16.1.130 │mycelium1@ecss1,mycelium1@ecss2│not running │10m 42s│ │ │mycelium1@ecss2│ecss-mycelium-3.14.16.1.130 │mycelium1@ecss1,mycelium1@ecss2│not running │3h 5m │ │ │sip1@ecss2 │ecss-pa-sip-3.14.16.1.130 │sip1@ecss2 │sip1@ecss2 │3h 5m │ │ │sorm1@ecss2 │ecss-sorm-3.14.16.1.130 │sorm1@ecss2 │not running │3h 5m │ └─┴───────────────┴────────────────────────────┴───────────────────────────────┴────────────┴───────┘ All services are started. Active media resource selected list specific: ┌─────────────┬───────────┬───────────────┬───────────┬───────────┐ │ Node │ MSR │ MSR │ Cc-status │ Cc-uptime │ │ │ │ version │ │ │ ├─────────────┼───────────┼───────────────┼───────────┼───────────┤ │ core1@ecss2 │ msr.ecss1 │ 3.14.15.243 │ connected │ 00:21:09 │ │ │ msr.ecss2 │ 3.14.16.1.0 │ connected │ 00:00:59 │ └─────────────┴───────────┴───────────────┴───────────┴───────────┘
- Перед запуском Before running ecss-ds на ecss1 необходимо сделать backup директории on ecss1, you need to backup the /var/lib/ecss/oasys и удалить ее, для того чтобы с другого хоста загрузить актуальную БД. Сделать это можно переименовав существующую директориюdirectory and delete it in order to load the latest database from another host. You can do this by renaming the existing directory:
Подсказка После этого After this, ecss-ds на хосте ecss1 загрузит БД с хоста on host ecss1 will load the database from host ecss2.
Блок кода title на on ecss1 sudo mv /var/lib/ecss/oasys /var/lib/ecss/oasys-$(date +%Y%m%d-%H_%M)
- На ecss1 запустите сервис ds и в CoCon проверить, что сервис ds доступен на обоих хостах On ecss1, start the ds service and in CoCon check that the ds service is available on both hosts ecss1/ecss2:
Блок кода title на on ecss1 sudo systemctl start ecss-ds
Без форматированияcode title выполняется в performed in CoCon /system-status Checking... ┌─┬───────────────┬────────────────────────────┬───────────────────────────────┬───────────────────┬───────┐ │ │ Node │ Release │ Erlang nodes │ Mnesia nodes │Uptime │ ├─┼───────────────┼────────────────────────────┼───────────────────────────────┼───────────────────┼───────┤ │ │core1@ecss2 │ecss-core-3.14.16.1.130 │core1@ecss2 │not running │3h 13m │ │ │ds1@ecss1 │ecss-ds-3.14.16.1.130 │ds1@ecss1,ds1@ecss2 │ds1@ecss1,ds1@ecss2│12s │ │ │ds1@ecss2 │ecss-ds-3.14.16.1.130 │ds1@ecss1,ds1@ecss2 │ds1@ecss1,ds1@ecss2│3h 13m │ │ │md1@ecss2 │ecss-mediator-3.14.16.1.130 │md1@ecss2 │md1@ecss2 │3h 13m │ │ │mycelium1@ecss1│ecss-mycelium-3.14.16.1.130 │mycelium1@ecss1,mycelium1@ecss2│not running │18m 33s│ │ │mycelium1@ecss2│ecss-mycelium-3.14.16.1.130 │mycelium1@ecss1,mycelium1@ecss2│not running │3h 13m │ │ │sip1@ecss2 │ecss-pa-sip-3.14.16.1.130 │sip1@ecss2 │sip1@ecss2 │3h 13m │ │ │sorm1@ecss2 │ecss-sorm-3.14.16.1.130 │sorm1@ecss2 │not running │3h 12m │ └─┴───────────────┴────────────────────────────┴───────────────────────────────┴───────────────────┴───────┘ All services are started. Active media resource selected list specific: ┌─────────────┬───────────┬───────────────┬───────────┬───────────┐ │ Node │ MSR │ MSR │ Cc-status │ Cc-uptime │ │ │ │ version │ │ │ ├─────────────┼───────────┼───────────────┼───────────┼───────────┤ │ core1@ecss2 │ msr.ecss1 │ 3.14.15.243 │ connected │ 00:29:01 │ │ │ msr.ecss2 │ 3.14.16.1.0 │ connected │ 00:08:50 │ └─────────────┴───────────┴───────────────┴───────────┴───────────┘
- Далее такими же действиями запустить сервисыNext, run the services using the same steps: ecss-mediator, ecss-pa-sip, ecss-core следующими командамиwith the following commands:
Блок кода title на on ecss1 sudo systemctl start ecss-mediator
Блок кода title на on ecss1 sudo systemctl start ecss-pa-sip
Проверить статус в CoComCheck status in CoCon:Блок кода title на on ecss1 sudo systemctl start ecss-core
Без форматированияcode title РезультатResult: /system-status Checking... ┌─┬───────────────┬────────────────────────────┬───────────────────────────────┬─────────────────────┬──────┐ │ │ Node │ Release │ Erlang nodes │ Mnesia nodes │Uptime│ ├─┼───────────────┼────────────────────────────┼───────────────────────────────┼─────────────────────┼──────┤ │ │core1@ecss1 │ecss-core-3.14.16.1.130 │core1@ecss1,core1@ecss2 │not running │3m 50s│ │ │core1@ecss2 │ecss-core-3.14.16.1.130 │core1@ecss1,core1@ecss2 │not running │3h 22m│ │ │ds1@ecss1 │ecss-ds-3.14.16.1.130 │ds1@ecss1,ds1@ecss2 │ds1@ecss1,ds1@ecss2 │9m 42s│ │ │ds1@ecss2 │ecss-ds-3.14.16.1.130 │ds1@ecss1,ds1@ecss2 │ds1@ecss1,ds1@ecss2 │3h 22m│ │ │md1@ecss1 │ecss-mediator-3.14.16.1.130 │md1@ecss1,md1@ecss2 │md1@ecss1,md1@ecss2 │5m 22s│ │ │md1@ecss2 │ecss-mediator-3.14.16.1.130 │md1@ecss1,md1@ecss2 │md1@ecss1,md1@ecss2 │3h 22m│ │ │mycelium1@ecss1│ecss-mycelium-3.14.16.1.130 │mycelium1@ecss1,mycelium1@ecss2│not running │28m 4s│ │ │mycelium1@ecss2│ecss-mycelium-3.14.16.1.130 │mycelium1@ecss1,mycelium1@ecss2│not running │3h 23m│ │ │sip1@ecss1 │ecss-pa-sip-3.14.16.1.130 │sip1@ecss1,sip1@ecss2 │sip1@ecss1,sip1@ecss2│4m 40s│ │ │sip1@ecss2 │ecss-pa-sip-3.14.16.1.130 │sip1@ecss1,sip1@ecss2 │sip1@ecss1,sip1@ecss2│3h 22m│ │ │sorm1@ecss2 │ecss-sorm-3.14.16.1.130 │sorm1@ecss2 │not running │3h 22m│ └─┴───────────────┴────────────────────────────┴───────────────────────────────┴─────────────────────┴──────┘ All services are started. Active media resource selected list specific: ┌─────────────┬───────────┬───────────────┬───────────┬───────────┐ │ Node │ MSR │ MSR │ Cc-status │ Cc-uptime │ │ │ │ version │ │ │ ├─────────────┼───────────┼───────────────┼───────────┼───────────┤ │ core1@ecss1 │ msr.ecss1 │ 3.14.15.243 │ connected │ 00:02:37 │ │ core1@ecss2 │ msr.ecss1 │ 3.14.15.243 │ connected │ 00:38:31 │ │ │ msr.ecss2 │ 3.14.16.1.0 │ connected │ 00:18:20 │ └─────────────┴───────────┴───────────────┴───────────┴───────────┘
- Обновление пакета Updating the package ecss-restfs:
Блок кода title на on ecss1 sudo apt install ecss-restfs
- Обновление пакета Updating the package ecss-media-server:
Актуализировать конфигурациюUpdate configuration:Блок кода title на on ecss1 sudo apt install ecss-media-server
Проверить и при необходимости исправить вручную файл Check and, if necessary, manually correct the file → /etc/ecss/ecss-media-server/config.xmlБлок кода title на on ecss1 sudo dpkg-reconfigure ecss-media-server
Так же, для регистрации media-server`a с ecss2 на ecss1 надо убрать ранее добавленные комментирование из файлаРаскрыть title примерExample Без форматированияcode title на on ecss1 <?xml version="1.0" encoding="utf-8"?> <config date="05:27:38 07.12.2024"> <general log-level="3" log-rotate="yes" max-calls="8192" max-vid-calls="8192" max-in-group="512" load-sensor="media" load-delta="10" calls-delta="100" spool-dir-size="100M" log-name="msr.log" log-path="/var/log/ecss/media-server" use-srtp="disabled" enable-ice-transport="no" ice-update="no" aggressive-ice="yes" stun-server="" suspicious-mode="no"/> <transport bind-addr="10.0.20.82" port="5040" transport="udp+tcp"/> <!-- By default configured public TURN-server --> <turn-server use-turn="no" host="numb.viagenie.ca" user="webrtc@live.com" password="muazkh"/> <media mixer-clock-rate="8000" use-vad="no" cng-level="0" jb-size="60" rtcp-timeout="0" rtp-timeout="350" udp-src-check="no" cn-multiplier="3" port-start="12000" port-range="2048" tias-in-sdp="no" thread-cnt="2" vid-enc-threads="2" vid-dec-threads="2" video-conf-layout="evenly" keyframe-interval="1000" vid-decode-delay="100" silence-threshold="-30" dtmf-flash-disable="no" video-dscp="0" other-dscp="0" dummy-video-src="/usr/share/ecss-media-server/video/dummy_video.yuv" video-enc-width="640" video-enc-height="360" finalsilence="1000" rtcp-stat-dump="yes" dtmf-tg-fpc-loop="10" dtmf-tg-fit="1" dtmf-tg-fot="2" dtmf-tg-volume="12288"/> <codec pcma="3" pcmu="2" ilbc="0" gsm="0" g722="3" g729="1" speex="5" l16="0" g7221="6" opus="0" h264="1" h263-1998="2" t38="1" tel-event-pt="0"/> <accounts> <!-- <dynamic msr_name="msr.name" realm="sip:127.0.0.1:5000" dtmf_mode="rfc+inband+info" auth_name="user" auth_password="password" /> --> </accounts> <pbyte> <mcc bind-addr="10.0.20.82" port="5700"/> </pbyte> <conf_dir path="/etc/ecss/ecss-media-server/conf.d"/> <metrics enable="no"/> <rtp> <auto addr-v4=""/> </rtp> </config>Also, to register a media server from ecss2 to ecss1, it is needed to remove the previously added comments from the file /etc/ecss/ecss-media-server/conf.d/default.xml
наon ecss2:
После чего перезапустить сервисThen restart the service:Раскрыть title на on ecss2 <?xml version="1.0"?> <config> <accounts> <!--<dynamic msr_name="msr.ecss2" realm="sip:10.0.20.81:5000" dtmf_mode="rfc+inband+info" auth_name="user" auth_password="password"/>--> <dynamic msr_name="msr.ecss2" realm="sip:10.0.20.82:5000" dtmf_mode="rfc+inband+info" auth_name="user" auth_password="password"/> </accounts> </config>Блок кода title на on ecss2 sudo systemctl restart ecss-media-server.service
- Обновление пакета Updating the package ecss-media-resources:
Блок кода title на on ecss1 sudo apt install ecss-media-resources
- Обновление пакета Updating the package ecss-web-conf:
Блок кода title на on ecss1 sudo apt install ecss-web-conf
Раскрыть title Обновление пакетов опциональных сервисов Updating optional service packages Updating the package Обновление пакета ecss-teleconference-ui
Блок кода title на on ecss1 sudo apt install ecss-teleconference-ui
Обновление пакета Updating the package ecss-crm-server
Блок кода title на on ecss1 sudo apt install ecss-crm-server
Обновление пакета Updating the package ecss-cc-ui
Блок кода title на on ecss1 sudo apt install ecss-cc-ui
- После обновления сервисов удалить файл фиксации версии sswAfter updating services, delete the ssw version commit file:
Блок кода title на on ecss1 sudo rm /etc/apt/preferences.d/eltex-ecss10
- Обновление пакета Updating the ecss-dns-env package.