This section describes steps of the initial ECSS configuration before checking basic functionality.
Before starting configuring, make sure the following:
For productive systems, ECSS-10 configuring consists of the following steps:
In order to isolate the MSR media server from the rest of the system, it is necessary to allocate separate processor cores for it. To allocate individual processor cores, perform the following steps:
Correct the grab file:
sudo nano /etc/default/grub |
bring the GRUB_CMDLINE_LINUX="" parameter to the following form:
GRUB_CMDLINE_LINUX="isolcpus=0-4" |
Update the grub configuration. To do this, run the command:
sudo update-grub |
Restart the system.
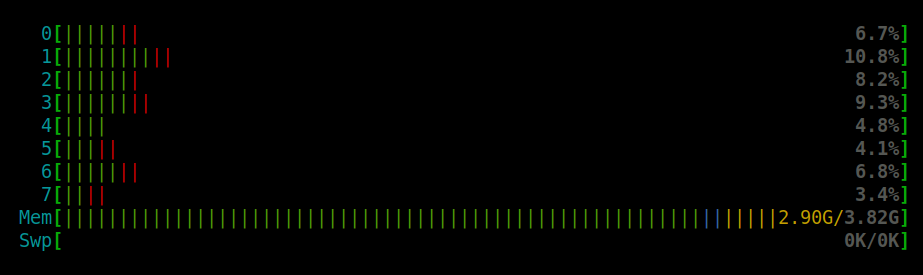
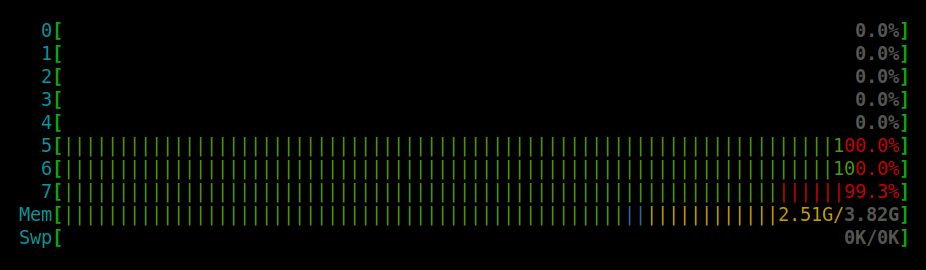
If everything is done correctly, then after a reboot htop will show zero load on isolated cores.
Example (Before / After):
By default, Ubuntu has five processor profiles:
Profile description:
Use utility cpufrequtils.
sudo apt install cpufrequtils |
By default, after installation, Ubuntu uses the "ondemand" mode (CPU performance is based on application requests, saving power, but lower performance):
cat /etc/init.d/cpufrequtils | grep GOVERNOR= |
| # GOVERNOR="ondemand" GOVERNOR="ondemand" |
Set the mode to efficiency/performance - in the file /etc/init.d/cpufrequtils, replace the value "ondemand" with "performance"
sudo nano /etc/init.d/cpufrequtils |
Restart utility:
sudo /etc/init.d/cpufrequtils restart |
Then run the command:
sudo systemctl daemon-reload |
For MSR to run on separate processor cores, it is necessary:
1. to enable MSR instance:
systemctl enable ecss-media-server@msr.service systemctl edit ecss-media-server@msr.service |
2. to bring the /etc/systemd/system/ecss-media-server.service.d/override.conf file to the following format:
[Service] CPUAffinity=8-11 CPUSchedulingPolicy=rr |
To view which cores the service has started on, you can use htop. It is necessary to add a Processor column in it.
In this example, MSR is running on cores 8, 9, 10, 11. CPUSchedulingPolicy is required only if isolcpus is specified.
MSR configuring is described in more detail on the page Configuring the software media server.
In order for processor cores to be used correctly, it is necessary to adjust the startup parameters of erlang nodes on productive systems.
To do this, a scheme for placing nodes on cores is being developed. The scheme is developed according to the following rules:
The distribution of cores on the example of a dual-processor HP BL660 server with two Intel Xeon E5-4657L processors with 12 cores and hyperthreading support, which can form 8 virtual cores:
myc 0-3 ds 4-7 core 8-23 sip 24-31 md 32-35 rest 36-39 sp 40-43 msr 44-47 |
To implement this distribution, it is necessary to enable a mode of using only the required number of cores on the erlang node.
To do this, edit the vm.args file of each node located at the path /usr/lib/ecss/ECSS- SERVICE-NAME/releases/VERSION/.
For example, for ecss-core, edit the file:
sudo nano /usr/lib/ecss/ecss-core/releases/3.14.2.29/vm.args |
Add options to this file that specify the use of the required number of logical processor cores and the number of active schedulers.
For 16 cores, this is:
+sct L0-15c0-15 +sbt db +S16:16 |
For 8 cores:
+sct L0-7c0-7 +sbt db +S8:8 |
For 4 cores:
+sct L0-3c0-3 +sbt db +S4:4 |
For 2 cores:
+sct L0-1c0-1 +sbt db +S2:2 |
The next task is to install the service on the selected cores. This is done in the same way as described for MSR.
Run the command:
sudo systemctl edit ECSS-SERVICE-NAME |
Adding parameters:
[Service] CPUAffinity=0-3 |
where CPUAffinity value specifies the cores on which the service processes should be started.
Example of ecss-core configuration according to the above scheme:
> sudo systemctl edit ecss-core.service [Service] CPUAffinity=8-23 |
After configuring the CPUAffinity parameters for all services, restart the service configuration with the command:
sudo systemctl daemon-reload |
Restart services:
sudo systemctl restart ecss.slice |
To make sure that the services are correctly linked to the cores, use the htop utility by enabling the display of the PROCESSOR column.
First, you must perform the general configuration for the entire system:
Next, you must declare and configure the following services:
Additional services are configured last.
It is recommended to perform the initial configuration in the order listed below.
Procedure for configuring the software media server (MSR):
There are two ways of SIP adapter configuring:
Without first creating an IP set, the Domain/Trunk/Subscriber creation commands will not work. For these objects to work, it is necessary to know which IP addresses (ports) will be used for signaling information exchange. An IP set can be either individual for each domain or shared across all SSW domains, depending on the project. It is also possible to assign individual ports to different domains (for example, Domain A uses port 5061, and Domain B uses port 5062) on the same IP addresses (10.0.10.91/92). |
/cluster/adapter/sip1/sip/network/set ip_set test_set node-ip node = sip1@ecss1 ip = 10.0.10.91/cluster/adapter/sip1/sip/network/set ip_set test_set node-ip node = sip1@ecss2 ip = 10.0.10.92/cluster/adapter/sip1/sip/network/set ip_set test_set listen-ports list = [5060]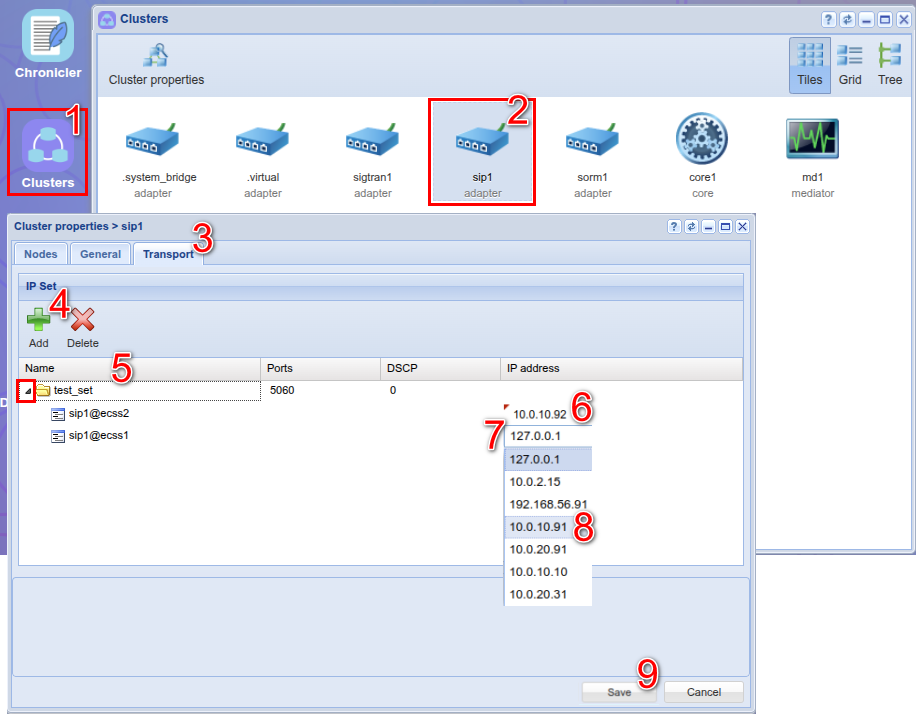
This step includes the process of creating virtual PBX, setting up call routing rules, trunks, subscribers, subscriber service rules.
It is necessary to create a domain for each of the projected domains (Virtual PBX).
You can create a domain in one of two ways:
/domain/declare test_test --add-domain-admin-privileges --add-domain-user-privileges/domain/test_test/sip/network/set ip_set [test_set]/cluster/storage/ds1/ss/access-list add test_domain */domain/test_test/ss/licence/politics/declare new_sub/domain/test_test/ss/licence/politics/package-add new_sub ECSS-FULL+/domain/test_test/ss/licence/politics/activate new_sub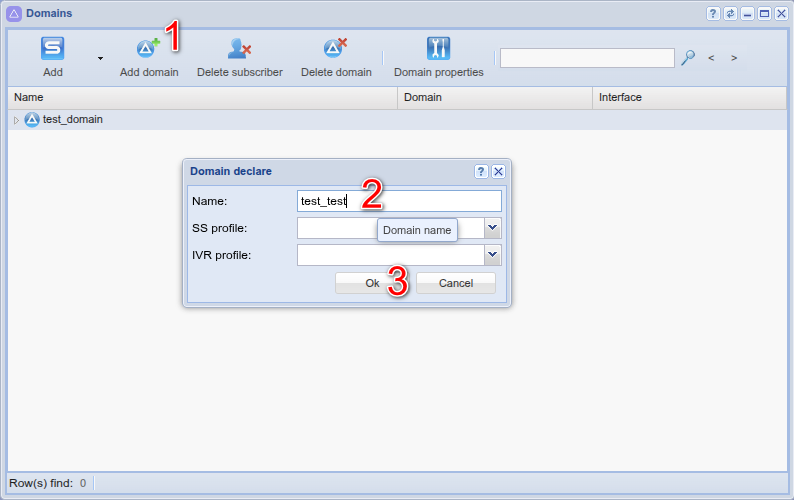
Select a domain (in this example, "test_test");
Select "Domain Properties";
Select "SIP/SIP Transport";
Select the IP set that will serve this domain from the drop-down list;
Save.
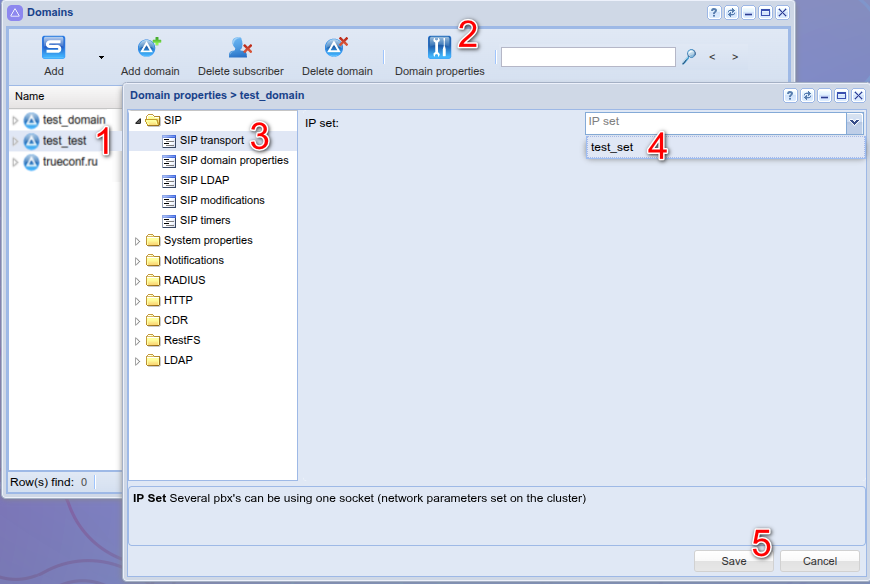
Configure services for a new domain in the CLI.
After creating domains, the necessary domain-level directories will be automatically created in the file system.
For example:
/var/lib/ecss/modification/ctx/src/DomainName
/var/lib/ecss/routing/ctx/src/DomainName
/var/lib/ecss/cdDomainName
etc.
Routing of telephone calls — process of determining the destination interface for a specific call based on information about the interface of the call source, information about the caller's and called subscriber's phone number, caller category, time of day and day of the week. The routing context — set of routing rules unique in the routing domain, within which the interface of the called subscriber is defined. |
Description of the call routing process in the ECSS-10 system is given in the section "Virtual PBX. Telephone call routing v2".
In accordance with the project, it is necessary to create call routing contexts that will be used in the domain settings in the future.
There are several ways to do this:
Further, if it is defined in the project, it is necessary to prepare modification and adaptation contexts also for each domain.
Routing contexts must be assigned for the system:ivr and system:teleconference interfaces. Settings are made using CLI commands. The path of the commands is /domain/<DOMAIN>/system-iface/.
In accordance with the project, create the required number of subscribers in the domains. It can be done using the CLI command /domain/<DOMAIN>/sip/user/declare or using web configurator application Subscriber card.
When creating a subscriber, assign a number, a group, a routing context, a CDR group, an authorization method and authorization data. You can also immediately assign a set of necessary services for each subscriber and configure the necessary restrictions.
Subscribers in the domain is an optional condition, there may be purely transit domains in the system, on which the appropriate rules for passing calls are configured.
|
The declaration and configuration of trunks is carried out:
Then, if necessary, supplementary services are configured on the trunks.
Bridge is a virtual trunk that allows to connect two virtual PBX within one ECSS-10 system. |
If there is more than one domain in the system, then communication between them is carried out using bridges.
Bridges are created and configured:
For each domain, it is possible to set different kinds of restrictions within the licence.
Description of general properties of virtual PBX
| Property name | Default value | Description |
|---|---|---|
| alias_limit | infinity (limited by license) | Total number of subscribers (including virtual ones) in this virtual PBX. |
| call_limit | infinity (limited by license) | Total number of simultaneously active calls for this virtual PBX. |
| virtual_alias_limit | infinity (limited by license) | Total number of virtual subscribers in this virtual PBX. |
| digitmap | List of the set masks by which aliases will be validated when created, parameters are described on the page / domain/ — commands for managing virtual PBX. | |
| failover | true | The need to reserve calls on this virtual PBX. This parameter is used only in redundant systems. Since the use of the backup increases the consumption of system resources (processor, RAM, etc.), the exclusion of a virtual PBX from the redundancy scheme allows saving some resources and direct the saved resources to call processing. In the regular operation of the system, this allows increasing productivity at the expense of reliability. |
| callcenter\enabled | true | Access to the contact center for this virtual PBX. |
| callcenter\active_agents | infinity (limited by license) | Maximum number of connected Call center agents for a domain. |
| callcenter\active_supervisors | infinity (limited by license) | Maximum number of connected Call center supervisors for a domain. |
tc\active_conferences | infinity (limited by license) | Maximum number of active conferences for a domain. |
| tc_count_active_channels | infinity (limited by license) | Maximum number of connected subscribers to the conference of the Teleconference service for a domain. |
| ivr\enabled | true | Access to the IVR and dialer functions for this virtual PBX. |
| ivr\incoming_script\enabled | true | Use the default_incoming_call script for incoming trunks as the IVR routing context. |
| teleconference\enabled | true | Access to the Selector communication service for this virtual PBX. |
| tsmn\concurrent_calls | 0 | Total number of simultaneously active calls for the TSMN system on the main trunk. |
| tsmn\concurrent_calls\redundancy | 0 | Total number of simultaneously active calls for the TSMN system on the backup trunk. |
| add_on_conferences_limit | infinity (limited by license) | Total number of simultaneously active conferences for this virtual PBX. |
| meet_me_limit | infinity (limited by license) | Total number of active users of "meet me" rooms for this virtual PBX. |
| chat_room_limit | infinity (limited by license) | Total number of active conference rooms for this virtual PBX. |
| dialer\channels | 0 (limited by license) | Number of simultaneous calls for calling campaigns. |
| recorder\voice\channels | 0 (limited by license) | Number of simultaneous channels for recording conversations. |
| ss_package | 0 (limited by license) | Number of licensed service packages. |
| elph\member\limi | infinity (limited by license) | Number of active Eltex Elph client registrations. |
If the virtual PBX has the vats_type property set to transit or transit_offroad, calls will not be passed to the IVR. |
Restrictions are configured according to the project:
Additional IVR scenarios can be configured for each virtual PBX, if they are immediately provided by the project. Scripts are created in the web configurator application IVR editor. Scripts can also be managed using CLI commands. See /domain/<DOMAIN>/ivr/ — IVR script management commands.
If necessary, restrictions for IVR operation can be configured for each domain:
If provided for by the project, additional services are also configured at the initial stage.
A description and configuration of interaction with the AAA (Authentication, Authorization, Accounting) subsystem are provided in the "Configuring Dynamic Subscribers and the RADIUS System" section.
The procedure for configuring interaction with AAA servers:
Contact technical support for consultation on configuring.