Initial data Integration of the ECSS-10 Class 5 software switch (SSW) on 1 physical server with support for SIP with the following parameters per load:
|
According to the technical specification, it is required to determine the hardware platform.
Table 1. Recommended hardware solutions
Requirements for SSW servers | Hardware product series | ||||
|---|---|---|---|---|---|
| Light | Light+ | Midi | Heavy | Super Heavy | |
System specifications | |||||
Maximum number of subscribers | 3000 | 5000 | 10000 | 20000 | 40000 |
Maximum load of simultaneous connections class 5 | 500 | 800 | 1500 | 3000 | 6000 |
Maximum load of simultaneous connections class 4 | 1500 | 2400 | 4500 | 9000 | 20000 |
Server specifications | |||||
Model | HP (Lenovo) | HP (Lenovo) | HP (Lenovo) | HP (Lenovo) | HP (Lenovo) |
Series | DL20 Gen10 (SR250) | DL20 Gen10 (SR250)/DL 360 Gen10 (SR530) | DL360 Gen10 (SR530/SR630) | DL360 Gen10 (SR630) | DL 360 Gen10 (SR630) |
Processor | Intel Xeon E-2236 | Intel Xeon E-2276G/Intel Xeon 4214 | Intel Xeon 5220 | Intel Xeon 6240 | Intel Xeon 8268 |
Number of processors | 1 | 1 | 1 | 2 | 2 |
RAM | 8 GB | 12 GB | 16 GB | 24 GB | 64 GB |
HDD | from 3X500 SATA (from 7200 rpm) | from 3X500 SATA | from 3x300 GB SAS (from 10000 rpm) | from 3x600 GB SAS | from 6x800 GB SSD, 2x300 GB M.2 SSD |
RAID | no raid board | no raid board | HW Raid, from 1 GB cache+battery | HW Raid, from 1 GB cache+battery | HW Raid, from 2GB Flash cache, RAID-5 |
| Additional server components (not included in the basic set) | |||||
Remote management license | optional | optional | + | + | + |
Redundant power supply | optional | optional | + | + | + |
Conversation records storage | additional HDD combined to RAID-5 | additional HDD combined to RAID-5 | HW Raid license with RAID-5 support, additional HDD for storing records | HW Raid license with RAID-5 support, additional HDD for storing records | HW Raid license with RAID-5 support, additional HDD for storing records |
Table 2. Example of drafting hardware requirements
Device | Required resource | Hardware product series | |
|---|---|---|---|
MCL | MUL | ||
Server 1 | 2000 | 15000 | Heavy |
| Server 2 | |||
After determining the requirements of the project, create a preliminary network map.
Table 3. An example of components allocation in the address space for a single node
Server name (host) | Role | Interface | Address | Port |
|---|---|---|---|---|
Static addresses of the software switch | ||||
| ecss1 | Server management interface (port 2000 ssh) | net.10 | 10.0.10.11/24 | 2000 |
| ecss2 | Server management interface (port 2000 ssh) | net.10 | 10.0.10.12/24 | 2000 |
ecss1 | Core addres (ecss-core) | net.20 | 10.0.20.11/24 | 5000 |
ecss2 | Core addres (ecss-core) | net.20 | 10.0.20.12/24 | 5000 |
| ecss1, ecss2 | Gateway address | net.10 | 10.0.10.1 | - |
| ecss1, ecss2 | DNS server addresses | net.10 | 10.0.10.1, 8.8.8.8 | - |
| ecss1, ecss2 | NTP server addresses | net.10 | 10.136.16.211, 10.136.16.212 | 123 |
Internal addresses of the software switch | ||||
| ecss1 | virtual address of eccs1 host software adapter | net.20:SIP1 | 10.0.20.31/24 | - |
| ecss2 | virtual address of eccs2 host software adapter | net.20:SIP2 | 10.0.20.32/24 | - |
| ecss1 | backup virtual address of eccs2 host software adapter on eccs1 host | net.20:SIP2 | 10.0.20.32/24 | - |
| ecss2 | backup virtual address of eccs1 host software adapter on eccs2 host | net.20:SIP1 | 10.0.20.31/24 | - |
| ecss1, ecss2 | MySQL database virtual address (ecss-mysql) | net.10:MYSQL | 10.0.10.10/24 | 3306 |
The topology of connecting the server to the network to ensure redundancy is recommended to be done using 2 switches.
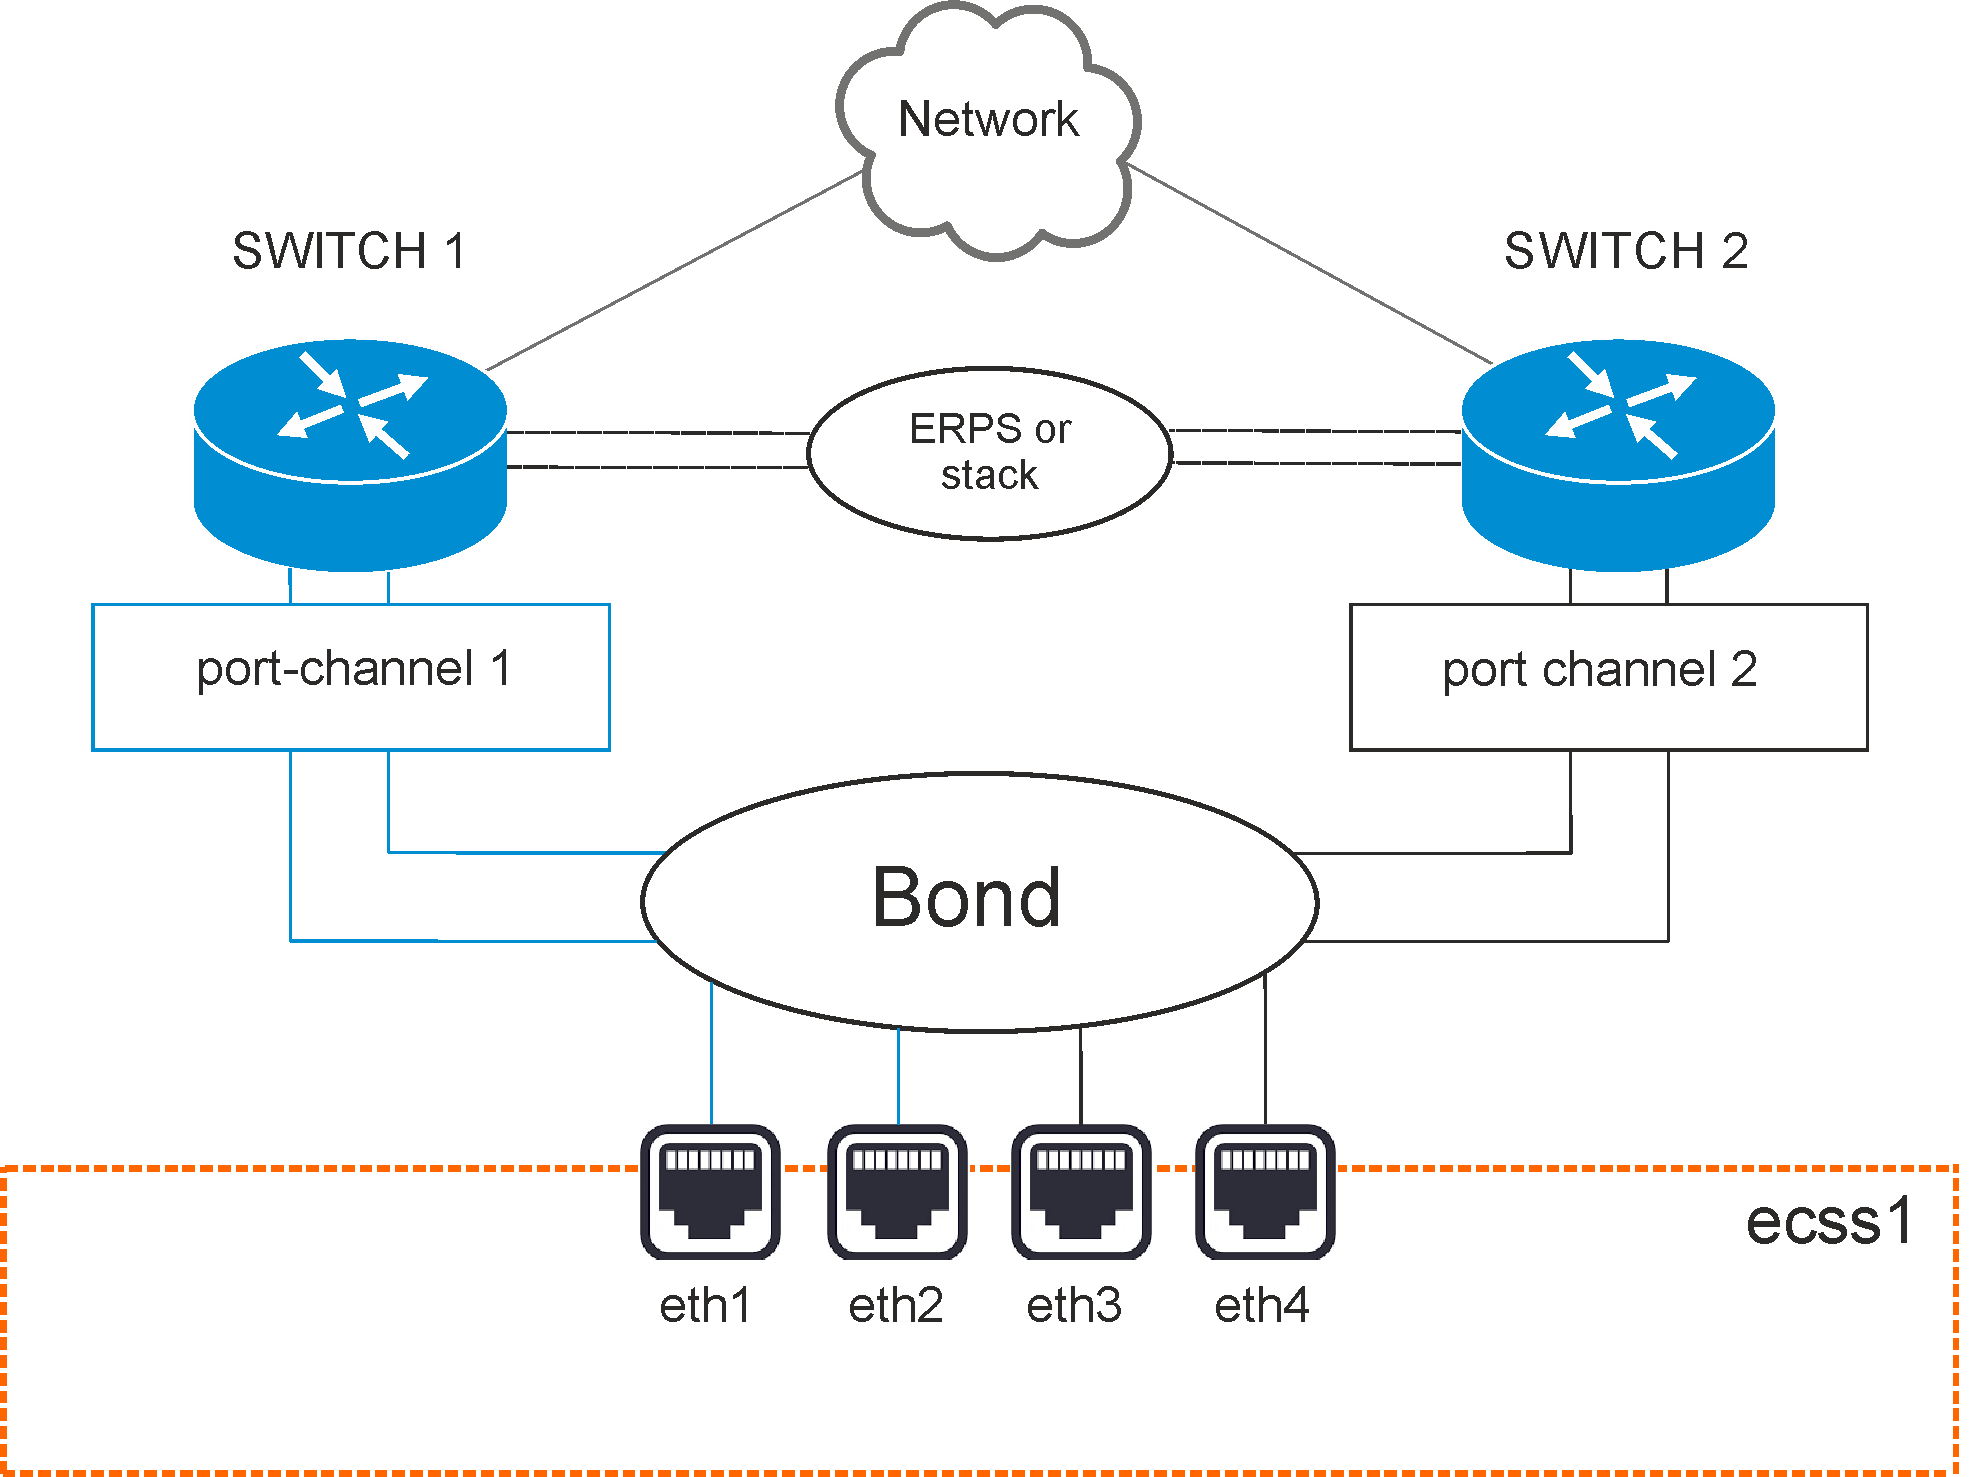
Figure 1 — Network connection diagram
Option 1. Active-backup
The switches are connected in erps ring.
All 4 physical network interfaces are connected into 1 aggregated link (bond). Server port aggregation is configured in active-backup mode, i.e. there is always only 1 network interface in operation. Server network interfaces are included in pairs in switches, on which port aggregation (port-channel) is also configured in active-backup mode. For example, eth0 and eth1 are included in the first switch, and eth2 and eth3 are included in the second.
Option 2. LACP
The switches are connected in stack. The stack must logically operate as a single switch, capable of providing port aggregation between different physical switches in LACP mode. MES-3124 with specialized firmware can be an example.
All 4 physical network interfaces are connected into 1 aggregated link (bond). Server port aggregation is configured in 802.3ad mode. Network cards aggregated groups with same rate and duplex are created. With such a combination, the transmission uses all channels in active aggregation according to the IEEE802.3ad standard. The choice on which interface to send a packet is determined by policy. By default, it is XOR policy, also xmit_hash policy can be used. For more information, see Netplan section.
Requirements:
Server network interfaces are also included in pairs in switches, on which port aggregation (port-channel) is configured in LACP mode. For example, eth0 and eth1 are included to first switch (port-channel 1), and eth2 and eth3 — to the second (port-channel 2).
Install the software switch according to the parameters specified in the technical specification. In this example, it is assumed that the required operating system is already installed.
It is recommended to split traffic used for different purposes. For example, management traffic and VoIP traffic. To do this, 2 or more VLANs are created. In the minimum case and with a small load, one VLAN can be enough. Hovewer, it will cause inconvenience in the future at traffic dump and its analysis. According to the technical specification, host IP adresses, gateways, DNS, routing and other parameters are configured on VLAN.
According to the technical specification, the following addresses are used in a given example:
10.0.10.10/24 — for management, vlan 10;
10.0.20.10/24 — for VoIP.
There is an address structure inside the server platform and internal addresses are used for interaction between subsystems (nodes) in the cluster. For example, the internal address for a cluster on one server is 127.0.0.1, while the kernel (ecss-core) interacts with the multimedia data processing server (ecss-media-server). Their interaction takes place using the same address, but each software part has its own transport port: ecss-core — 5000, ecss-msr — 5040.
A single address for accessing the MySQL database is defined for all cluster nodes, for example, the ecss-mysql address 127.0.0.1. Thus, the uniformity condition is fulfilled, in which all cluster nodes have completely identical data about the current state of the dynamic components of the software switch (for example, call history).
According to the technical specification, the system has 4 network interfaces. Information about their status can be viewed using the ifconfig or ip a command:
| eth0: flags=6211<UP,BROADCAST,RUNNING,SLAVE,MULTICAST> mtu 1500 ether 36:10:28:73:63:01 txqueuelen 1000 (Ethernet) eth1: flags=6211<UP,BROADCAST,RUNNING,SLAVE,MULTICAST> mtu 1500 ether 36:10:28:73:63:01 txqueuelen 1000 (Ethernet) eth2: flags=6211<UP,BROADCAST,RUNNING,SLAVE,MULTICAST> mtu 1500 ether be:77:ea:52:4d:39 txqueuelen 1000 (Ethernet) eth3: flags=6211<UP,BROADCAST,RUNNING,SLAVE,MULTICAST> mtu 1500 ether be:77:ea:52:4d:39 txqueuelen 1000 (Ethernet) lo: flags=73<UP,LOOPBACK,RUNNING> mtu 65536 inet 127.0.0.1 netmask 255.0.0.0 |
First, the network interfaces are configured. Ubuntu18 uses the netplan utility to configure.
This utility is meant for configuring the network and then uploading it to the system using the network manager networkd or NetworkManager.
sudo nano /etc/netplan/ecss_netplan.yaml |
The rest of files from this directory should be moved to another place or be romoved. |
In the configurations for each host, first of all, declare the ethernets section, which describes existing in the system Ethernet interfaces that will be used in the future. It is important to disable the use of dynamic address allocation (DHCP) for each interface.
The next section describes aggregated channels — bonds. Depending on chosen network connection option, 1:1 (active - backup) or LACP (802.3ad) backup mode is configured.
Optionally, gateways for communication with the outside world and DNS server addresses are defined, as well as IP addresses for each interface.
Note that while editing netplan, you must follow the YAML markup rules:
→ Section |network → Subsection |_'_'bonds: → Subsection of the bonds section description |_'_'_'_'bonded_one: → etc. |_'_'_'_'...
|
Example of configuring ecss-netplan.yaml file for active-backup connection option:
# Netplan for the ecss1 host of the test software switch
- eth0 - eth1 - eth2 - eth3 network.10: # Management interface |
Apply parameters with the command:
sudo netplan apply |
Operating system software update
Add the ELTEX repository to install the ECSS-10 system:
sudo sh -c "echo 'deb [arch=amd64] http://archive.eltex.org/ssw/bionic/3.14 stable main extras external' > /etc/apt/sources.list.d/eltex-ecss10-stable.list" |
Note that it is required to specify the correct version of the operating system when adding the ELTEX repository. If installing on Ubuntu 18.04, specify bionic, as shown in the example above. However, if ECSS-10 is installed on Astra Linux, then specify the appropriate smolensk repositories:
|
Next, import the key with the following command:
sudo apt-key adv --keyserver keyserver.ubuntu.com --recv-keys 33CB2B750F8BB6A5 |
Before starting the installation, update the OS:
sudo apt update sudo apt upgrade |
| Do NOT install the packages as ssw user. |
Install all the proposed packages:
sudo apt install aptitude atop ethtool htop iotop mc minicom mtr-tiny nmap pptpd pv screen ssh tftpd vim sngrep tshark cpanminus gnuplot libgraph-easy-perl debconf-utils |
The installation begins with the deployment of the MySQL server and the integration of the ecss-mysql database.
To install, run the command:
sudo apt install ecss-mysql |
Before installing the ecss-mysql package, you will be prompted to configure environment variables for services in dnsmasq. Configuration manager will prompt to select the sections to configure, do not select anything.
When installing the package, the following data will be requested:
| Questions | Answers |
|---|---|
| Address mask for MySQL (IP pattern for MySQL permission) | 127.0.0.% |
| User login (Login for MySQL root) | root |
| MySQL user password (Password for MySQL root) | PASSWORD |
Changing the default path — agree to change the configuration file to enter the path to the ecss-mysql databases by entering "Y".
MySQL databases used by the ECSS-10 system will be stored under the path /var/lib/ecss-mysql after installation. Check for files in the folder:
ls -l /var/lib/ecss-mysql/ |
Check that the server is running:
sudo systemctl status mysql ● mysql.service - MySQL Community Server |
Installing the ecss-node package:
sudo apt install ecss-node |
During the package installation ssw user is created, on whose behalf all ecss services are launched*. The necessary directories are being created, DNS is being configured, SSL certificates are being configured. During the installation, 8 questions necessary for the formation of configuration files will be asked.
| Questions | Answers |
|---|---|
| Do you want to turn off apt-daily update? | Yes |
| Set DB config to default? | Yes |
| Set alarm true when MYSQL DB overloads | Yes |
| NTP: Do you want use settings for cluster? | No |
| External NTP servers through a space | ntp.ubuntu.com (by default). Enter one or more space-separated servers used on the site |
| NTP: Do you want use local server? | No |
| NTP: Addresses and Masks of Network, which must have access to the ntp through a space | 192.168.0.0|255.255.0.0 (by default) Enter a list of subnets from which this NTP server will be accessible, for example 10.10.0.0|255.255.255.0 |
| Install utilities for working with cdr | No |
To generate certificates, select manual method. All questions can be answered as suggested by default.
Next, ecss-media-server, ecss-media-resources, ecss-restf, ecss-web-conf and other packages are installed in any order:
sudo apt install ecss-media-server ecss-media-resources |
For the media server (ecss-media-server / MSR), initial configuration is possible with parameters recorded to the configuration file, it is required to perform the configuration without selecting any items:
| ecss-media-server questions | Answers for ecss1 |
|---|---|
| Set default settings | yes |
| Enter name (Enter) | msr.ecss1 |
| Enter address (Entrer) | 127.0.0.1 |
| Enter port (Entrer) | 5000 |
After forming the default configurations, go to the directory where the configurations are located and check them:
cd /etc/ecss/ecss-media-server/ cat config.xml cat conf.d/default.xml |
There is a configuration for msr: config.xml, the conf.d directory contains the configuration default.xml. At its core, default.xml is an addition to config.xml, which defines the accounts section. This is done in order for this configuration to remain unchanged after package updates.
Example of config.xml:
<?xml version="1.0" encoding="utf-8"?>
<config date="10:48:15 21.02.2022">
  <general log-level="3" log-rotate="yes" max-calls="8192" max-in-group="512" load-sensor="media" load-delta="10" calls-delta="100" spool-dir-size="100M" log-name="msr.log" log-path="/var/log/ecss/media-server" use-srtp="disabled" suspicious-mode="no"/>
  <transport bind-addr="192.168.2.21" port="5040" transport="udp+tcp"/>
  <!-- By default configured public TURN-server -->
  <turn-server use-turn="no" host="numb.viagenie.ca" user="webrtc@live.com" password="muazkh"/>
  <media mixer-clock-rate="8000" use-vad="no" cng-level="0" jb-size="60" rtcp-timeout="0" rtp-timeout="350" udp-src-check="no" cn-multiplier="3" port-start="12000" port-range="2048" tias-in-sdp="no" thread-cnt="2" silence-threshold="-30" dtmf-flash-disable="no" video-dscp="0" other-dscp="0" dummy-video-src="/usr/share/ecss-media-server/video/dummy_video.yuv" video-enc-width="1280" video-enc-height="720" finalsilence="1000" rtcp-stat-dump="yes"/>
  <codec pcma="1" pcmu="2" ilbc="0" gsm="0" g722="3" g729="0" speex="0" l16="0" g7221="0" opus="0" h264="1" h263-1998="2" t38="1" tel-event-pt="0"/>
  <accounts>
    <!-- <dynamic msr_name="msr.name"
            realm="sip:127.0.0.1:5000"
            dtmf_mode="rfc+inband+info"
            auth_name="user"
            auth_password="password" /> -->
  </accounts>
  <pbyte>
    <mcc bind-addr="192.168.2.21" port="5700"/>
  </pbyte>
  <conf_dir path="/etc/ecss/ecss-media-server/conf.d"/>
  <rtp>
    <auto addr-v4=""/>
  </rtp>
</config> |
Example of accounts section (default.xml file):
<?xml version="1.0"?>
<config>
      <accounts>
            <dynamic msr_name="msr.ecss1" realm="sip:127.0.0.1:5000" dtmf_mode="rfc+inband+info" auth_name="user" auth_password="password"/>
      </accounts>
</config> |
It contains current settings according to which the msr is registered on core.
The main parameters are: msr_name and realm.
msr_name is a parameter that defines the name of the msr. (it is recommended to set the name of the msr. and the host to which it belongs, for example, msr.ecss1);
realm — defines the address for registration on the core. Default entry point: port 5000, address: 127.0.0.1.
sudo apt install ecss-restfs |
When installing, you will be prompted to set up the configuration:
| Questions | Answers |
|---|---|
Use TTS service | No |
Configure phone book | No |
Configure speech recognition service | No |
Choose nothing | Ok |
sudo apt install ecss-web-conf |
When installing, you will be prompted to set up the configuration:
| Questions | Answers |
|---|---|
| Input IP address or hostname of MySQL db for web-conf DB | 127.0.0.1 |
Input port of MySQL db for web-conf DB | 3306 |
Input IP address or hostname for ECSS-10 with http_terminal | 127.0.0.1 |
Input port SSW http_terminal | 9999 |
| Input login for SSW http_terminal | admin |
Input password for SSW http_terminal | password |
Configuring SSH server:
sudo nano /etc/ssh/sshd_config |
In the configuration file specify the port and address where you can access the server:
| Configuring ssh for ecss1(/etc/ssh/sshd_config) |
|---|
# This is the sshd server system-wide configuration file. See # This sshd was compiled with PATH=/usr/bin:/bin:/usr/sbin:/sbin # The strategy used for options in the default sshd_config shipped with Port 2000 <...> |
Restart ssh:
sudo systemctl restart ssh.service |
Start the necessary services.
Before starting, check Token availability in the system. |
Run the ecss-mycelium and ecss-ds packages on the first host:
sudo systemctl start ecss-mycelium sudo systemctl start ecss-ds |
Go to the CLI:
ssh admin@localhost -p 8023 password: password |
Check system status:
admin@mycelium1@ecss1$ system-status Checking... ┌─┬───────────────┬────────────────────────┬───────────────┬────────────┬──────┐ │ │ Node │ Release │ Erlang nodes │Mnesia nodes│Uptime│ ├─┼───────────────┼────────────────────────┼───────────────┼────────────┼──────┤ │ │ds1@ecss1 │ecss-ds-3.14.10.91 │ds1@ecss1 │ds1@ecss1 │8m 9s │ │ │mycelium1@ecss1│ecss-mycelium-3.14.10.91│mycelium1@ecss1│not running │8m 10s│ └─┴───────────────┴────────────────────────┴───────────────┴────────────┴──────┘ All services are started. |
Next, install passport and licenses to the system:
admin@[mycelium1@ecss1]:/$ cluster/storage/ds1/licence/set-passport <passport> admin@[mycelium1@ecss1]:/$ cluster/storage/ds1/licence/add <license> |
Exit the CoCon, reboot the ecss-mycelium and ecss-ds subsystems, and then connect the remaining subsystems in the following order: ecss-core, ecss-pa-sip, ecss-media-server, ecss-restfs, ecss-mediator, ecss-web-conf.
sudo systemctl start ecss-core ecss-pa-sip ecss-mediator ecss-media-server ecss-restfs ecss-web-conf |
Return to the CoCon.
After that, the MSR- and Core-subsystems are connected. To do this, use the following command:
admin@[mycelium1@ecss1]:/$ /system/media/resource/declare core1@ecss1 iface msr.ecss1 bond1_ecss1_pa default local true |
To check, run system-status command and see the output:
admin@mycelium1@ecss1$ system-status Checking... ┌─┬───────────────┬────────────────────────┬───────────────┬────────────┬──────┐ │ │ Node │ Release │ Erlang nodes │Mnesia nodes│Uptime│ ├─┼───────────────┼────────────────────────┼───────────────┼────────────┼──────┤ │ │core1@ecss1 │ecss-core-3.14.10.91 │core1@ecss1 │not running │1m 59s│ │ │ds1@ecss1 │ecss-ds-3.14.10.91 │ds1@ecss1 │ds1@ecss1 │4h │ │ │md1@ecss1 │ecss-mediator-3.14.10.91│md1@ecss1 │md1@ecss1 │1m 59s│ │ │mycelium1@ecss1│ecss-mycelium-3.14.10.91│mycelium1@ecss1│not running │4h │ │ │sip1@ecss1 │ecss-pa-sip-3.14.10.91 │sip1@ecss1 │sip1@ecss1 │1m 59s│ └─┴───────────────┴────────────────────────┴───────────────┴────────────┴──────┘ All services are started. Active media resource selected list specific: ┌─────────────┬───────────┬────────────┬───────────┬───────────┐ │ Node │ MSR │ MSR │ Cc-status │ Cc-uptime │ │ │ │ version │ │ │ ├─────────────┼───────────┼────────────┼───────────┼───────────┤ │ core1@ecss1 │ msr.ecss1 │ 3.14.10.42 │ connected │ 00:01:31 │ └─────────────┴───────────┴────────────┴───────────┴───────────┘ |
Configure the SIP adapter according to the technical specification. Define a group of IP addresses (IP-set):
admin@[mycelium1@ecss1]:/$ /cluster/adapter/sip1/sip/network/set ip_set test_set node-ip node = sip1@ecss1 ip = 10.0.3.238


Property "ip_set" successfully changed from:


to
test_set: no ports set
test_set: sip1@ecss1 10.0.3.238
test_set: dscp 0. |
Next, create a domain and assign to it the created group (IP-set) of the SIP adapter settings:
admin@[mycelium1@ecss1]:/$ domain/declare test_domain --add-domain-admin-privileges --add-domain-user-privileges
New domain test_domain is declared


domain/test_domain/sip/network/set ip_set [test_set] Property "ip_set" successfully changed from:


[] to ["test_set"]. |
After creating the domain, configure: