Monitoring. Firmware version 1.13.0
Netflow configuration
Netflow is a network protocol designed for traffic accounting and analysis. Netflow allows transmitting traffic information (source and destination address, port, quantity of information) from the network equipment (sensor) to the collector. Common server may serve as a collector.
Configuration algorithm
Step | Description | Command | Keys |
|---|---|---|---|
1 | Specify Netflow protocol version. | esr(config)# netflow version <VERSION> | <VERSION> – Netflow protocol version: 5, 9 and 10. |
2 | Set the maximum amount of observed sessions. | esr(config)# netflow max-flows <COUNT> | <COUNT> – amount of observed sessions, takes values of [10000..2000000]. Default value: 512000. |
3 | Set the interval after which the information on outdated sessions is exported to the collector. | esr(config)# netflow inactive-timeout <TIMEOUT> | <TIMEOUT> – delay before sending outdated sessions information, set in seconds, takes the value of [0..240]. Default value: 15 seconds. |
4 | Set the rate of the statistics sending to a Netflow collector. | esr(config)# netflow refresh-rate <RATE> | <RATE> – rate of the statistics sending, set in packets/flow, takes the value of [1..10000]. Default value: 10. |
5 | Enable Netflow on the router. | esr(config)# netflow enable | |
6 | Create the Netflow collector and switch to its configuration mode. | esr(config)# netflow collector <ADDR> | <ADDR> – collector IP address, defined as AAA.BBB.CCC.DDD where each part takes values of [0..255]. |
7 | Set the Netflow service port on the statistics collection server. | esr(config-netflow-host)# port <PORT> | <PORT> – UDP port number in the range of [1..65535]. Default value: 2055. |
8 | Enable statistics sending to the Netflow server in the interface/tunnel/network bridge configuration mode. | esr(config-if-gi)# ip netflow export |
Configuration example
Objective:
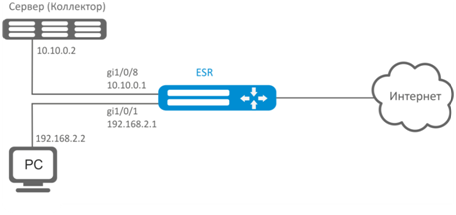
Establish accounting for traffic from gi1/0/1 interface to be sent to the server via gi1/0/8 interface for processing purposes.
Solution:
First, do the following:
- For gi1/0/1, gi1/0/8 interfaces disable firewall with 'ip firewall disable' command.
- Assign IP address to ports.
Main configuration step:
Specify collector IP address:
esr(config)# netflow collector 10.10.0.2Enable netflow statistics export collection for gi1/0/1 network interface:
esr(config)# interface gigabitethernet 1/0/1
esr(config-if-gi)# ip netflow exportEnable netflow on the router:
еsr(config)# netflow enableTo view the Netflow statistics, use the following command:
esr# show netflow statisticsNetflow configuration for traffic accounting between zones is performed by analogy to sFlow configuration; for description, see Section sFlow configuration.
sFlow configuration
Sflow is a computer network, wireless network and network device monitoring standard designed for traffic accounting and analysis.
Configuration algorithm
Step | Description | Command | Keys |
|---|---|---|---|
1 | Set the rate of sending the unchanged user traffic packets to sFlow collector. | esr(config)# sflow sampling-rate <RATE> | <RATE> – rate of sending the user traffic packets to the collector, takes the value of [1..10000000]. If the rate value is 10, one of ten packets will be sent to the collector. Default value: 1000. |
2 | Set the interval after which the information on the network interface counters is obtained | esr(config)# sflow poll-interval <TIMEOUT> | <TIMEOUT> – interval after which the information on the network interface counters is obtained, takes values of [1..10000]. Default value: 10 seconds. |
3 | Enable sFlow on the router. | esr(config)# sflow enable | |
4 | Create the sFlow collector and switch to its configuration mode. | esr(config)# sflow collector <ADDR> | <ADDR> – collector IP address, defined as AAA.BBB.CCC.DDD where each part takes values of [0..255]. |
5 | Enable statistics sending to the sFlow server in the interface/tunnel/network bridge configuration mode. | esr(config-if-gi)# ip sflow export |
Configuration example
Objective:
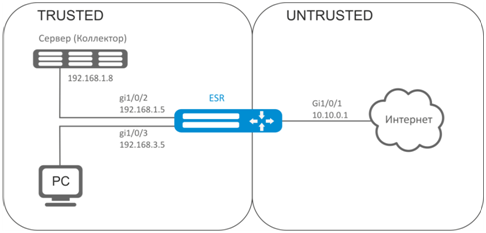
Establish accounting for traffic between 'trusted' and 'untrusted' zones.
Solution:
Create two security zones for ESR networks:
esr# configure
esr(config)# security zone TRUSTED
esr(config-zone)# exit
esr(config)# security zone UNTRUSTED
esr(config-zone)# exitConfigure network interfaces and identify their inherence to security zones:
esr(config)# interface gi1/0/1
esr(config-if-gi)# security-zone UNTRUSTED
esr(config-if-gi)# ip address 10.10.0.1/24
esr(config-if-gi)# exit
esr(config)# interface gi1/0/2-3
esr(config-if-gi)# security-zone TRUSTED
esr(config-if-gi)# exit
esr(config)# interface gi1/0/2
esr(config-if-gi)# ip address 192.168.1.5/24
esr(config-if-gi)# exit
esr(config)# interface gi1/0/3
esr(config-if-gi)# ip address 192.168.3.5/24
esr(config-if-gi)# exit Specify collector IP address:
esr(config)# sflow collector 192.168.1.8Enable sFlow protocol statistics export for all traffic within 'rule1' for TRUSTED-UNTRUSTED direction:
esr(config)# security zone-pair TRUSTED UNTRUSTED
esr(config-zone-pair)# rule 1
esr(config-zone-pair-rule)# action sflow-sample
esr(config-zone-pair-rule)# match protocol any
esr(config-zone-pair-rule)# match source-address any
esr(config-zone-pair-rule)# match destination-address any
esr(config-zone-pair-rule)# enableEnable sFlow on the router:
еsr(config)# sflow enableSFlow configuration for traffic accounting from the interface is performed by analogy to Netflow configuration.
SNMP configuration
SNMP (Simple Network Management Protocol) is a protocol designed for device management in IP networks featuring TCP/UDP architecture. SNMP provides management data as variables that describe the configuration of a system being managed.
Configuration algorithm
Step | Description | Command | Keys |
|---|---|---|---|
1 | Enable SNMP server | esr(config)# snmp-server | |
2 | Specify community for the access via SNMPv2c. | esr(config)# snmp-server community <COMMUNITY> [ <TYPE> ] | <COMMUNITY> – community for the access via SNMP; <TYPE> – access level:
<IP-ADDR> – IP address of the client provided with the access, defined as AAA.BBB.CCC.DDD where each part takes values of [0..255]; <IPV6-ADDR> – client IPv6 address, defined as X:X:X:X::X where each part takes values in hexadecimal format [0..FFFF]; <OBJ-GROUP-NETWORK-NAME> – profile name of IP addresses, from which snmp requests are processing, set by the string of up to 31 characters; <VERSION> – the snmp version supported by this community takes the values v1 or v2c; <VIEW-NAME> – SNMP view profile name, set by the string of up to 31 characters; <VRF> – VRF instance name, set by the string of up to 31 characters, for which access will be granted. |
3 | Set the value of SNMP variable that contains contact information | esr(config)# snmp-server contact <CONTACT> | <CONTACT> – contact information, sets by string with 255 characters length. |
4 | Set the DSCP code value for the use in IP headers of SNMP server egress packets (optionally). | esr(config)# snmp-server dscp <DSCP> | <DSCP> – DSCP code value, takes values in the range of [0..63]. Default value: 63. |
5 | Enable router reboot by using snmp messages (optionally) | esr(config)# snmp-server system-shutdown | |
6 | Create SNMPv3 user. | esr(config)# snmp-server user <NAME> | <NAME> – user name, set by the string of up to 31 characters. |
7 | Set the value of SNMP value that contains the information on the device location | esr(config)# snmp-server location <LOCATION> | <LOCATION> – information about equipment location, set by the string up to 255 characters. |
8 | Specify user access level via SNMPv3. | esr(config-snmp-user)# access <TYPE> | <TYPE> – access level:
|
9 | Specify user security mode via SNMPv3. | esr(config-snmp-user)# authentication access <TYPE> | <TYPE> – security mode:
|
10 | Specify SNMPv3 queries authentication algorithm. | esr(config-snmp-user)# authentication algorithm <ALGORITHM> | <ALGORITHM> – encryption algorithm:
|
11 | Set the password for SNMPv3 queries authentication. | esr(config-snmp-user)# authentication key ascii-text | <CLEAR-TEXT> – password, set by the string of 8 to 16 characters;
<ENCRYPTED-TEXT> – encrypted password of 8 to 16 bytes (from 16 to 32 characters) in hexadecimal format (0xYYYY ...) or (YYYY ...). |
12 | Enable filtration and set the profile of IP addresses from which SNMPv3 packets with the given SNMPv3 user name can be received. | esr(config-snmp-user)# client-list <NAME> | <NAME> – name of the previously conscious object-group, specified in a string of up to 31 characters. |
13 | Enable filtration and set IPv4/IPv6 address which is provided with the access to the router as the given SNMPv3 user. | esr(config-snmp-user)# ip address <ADDR> | <ADDR> – IP address of the client provided with the access, defined as AAA.BBB.CCC.DDD where each part takes values of [0..255]. |
esr(config-snmp-user)# ipv6 address <ADDR> | <IPV6-ADDR> – client IPv6 address, defined as X:X:X:X::X where each part takes values in hexadecimal format [0..FFFF]. | ||
14 | Enable SNMPv3 user. | esr(config-snmp-user)# enable | Default value: process is disabled. |
15 | Specify the transmitted data encryption algorithm. | esr(config-snmp-user)# privacy algorithm <ALGORITHM> | <ALGORITHM> – encryption algorithm:
|
16 | Set password for the transmitted data encryption. | esr(config-snmp-user)# privacy key ascii-text | <CLEAR-TEXT> – password, set by the string of 8 to 16 characters; <ENCRYPTED-TEXT> – encrypted password of 8 to 16 bytes (from 16 to 32 characters) in hexadecimal format (0xYYYY ...) or (YYYY ...). |
Set the snmp view profile permitting or denying the access to one or another OID for user. | esr(config-snmp-user)# view <VIEW-NAME> | <VIEW-NAME> – name of SNMP view profile, on which based access to OID, set by the string up to 31 characters. | |
17 | Enable SNMP notifications transmission to the specified IP address and switch to SNMP notifications configuration mode. | esr(config)# snmp-server host | <IP-ADDR> – IP address, defined as AAA.BBB.CCC.DDD where each part takes values of [0..255]. <IPV6-ADDR> – IPv6 address, defined as X:X:X:X::X where each part takes values in hexadecimal format [0..FFFF]; <VRF> – VRF instance name, set by the string of up to 31 characters, which contains SNMP notification collector. |
18 | Define the port of SNMP notifications collector on the remote server (optionally). | esr(config-snmp-host)# port <PORT> | <PORT> – UDP port number in the range of [1..65535]. Default value: 162. |
19 | Allow different types of SNMP notifications to be sent. | esr(config)# snmp-server enable traps <TYPE> | <TYPE> – type of filtered messages. May take the following values: config, entry, entry-sensor, environment, envmon, files-operations, flash, flash-operations, interfaces, links, ports, screens, snmp, syslog. Additional parameters depend on the filter type. See ESR-Series CLI command reference guide. |
20 | Create the snmp view profile permitting or denying the access to one or another OID for community (SNMPv2) and user (SNMPv3). | esr(config)# snmp-server enable traps <TYPE> | <VIEW-NAME> – SNMP view profile name, set by the string of up to 31 characters. |
Configuration example
Objective:
Configure SNMPv3 server with authentication and data encryption for 'admin' user. ESR router IP address: 192.168.52.8, Syslog server IP address: 192.168.52.41.

Solution:
First, do the following:
- Specify zone for gi1/0/1 interface;
- Configure IP address for gi1/0/1 interface.
Main configuration step:
Enable SNMP server:
esr(config)# snmp-serverCreate SNMPv3 user:
esr(config)# snmp-server user adminSpecify security mode:
esr(snmp-user)# authentication access privSpecify authentication algorithm for SNMPv3 requests:
esr(snmp-user)# authentication algorithm md5Set the password for SNMPv3 request authentication:
esr(snmp-user)# authentication key ascii-text 123456789 Specify the transmitted data encryption algorithm:
esr(snmp-user)# privacy algorithm aes128Set password for the transmitted data encryption:
esr(snmp-user)# privacy key ascii-text 123456789Enable SNMPv3 user:
esr(snmp-user)# enableDefine receiver-server of Trap-PDU messages:
esr(config)# snmp-server host 192.168.52.41Zabbix-agent/proxy configuration
Zabbix-agent – agent designed to monitor the device, as well as execute remote commands from the Zabbix server. The agent can operate in two modes: passive and active. To operate in passive mode, by default, you need an allow rule in the firewall – tcp protocol, port 10050. For active mode – tcp protocol, port 10051.
A Zabbix proxy is a process capable of collecting monitoring data from one or more monitored devices and sending this information to a Zabbix server.
Configuration algorithm
Step | Description | Command | Keys |
|---|---|---|---|
1 | Switch to the agent/proxy configuration context. | esr(config)# zabbix-agent esr(config)# zabbix-proxy | |
2 | Specify the host name (optionally). For active mode, the name must match the host name on the zabbix server. | esr(config-zabbix)# hostname <WORD> esr(config-zabbix-proxy)# hostname <WORD> | <WORD> – host name, set by the string of up to 255 characters. |
3 | Specify the address of the zabbix server. | esr(config-zabbix)# server <ADDR> esr(config-zabbix-proxy)# server <ADDR> | <ADDR> – server IP address, defined as AAA.BBB.CCC.DDD where each part takes values of [0..255]. |
4 | Specify the server address for active checks (when using active mode). | esr(config-zabbix)# active-server <ADDR> <PORT> esr(config-zabbix-proxy)# active-server <ADDR> <PORT> | <ADDR> – server IP address, defined as AAA.BBB.CCC.DDD where each part takes values of [0..255]. <PORT> – server port, set in the range of [1..65535]. Default value: 10051. |
5 | Specify the port that will be listened by the agent/proxy (optional). | esr(config-zabbix)# port <PORT> esr(config-zabbix-proxy)# port <PORT> | <PORT> – port that will be listened by zabbix agent/proxy, may take values in the range of [1..65535]. Default value: 10050. |
6 | Allow remote commands execution by zabbix agent/proxy (when using active mode). | esr(config-zabbix)# remote-commands esr(config-zabbix-proxy)# remote-commands | |
7 | Specify the address from which the server will interact (optionally). | esr(config-zabbix)# source-address <ADDR> esr(config-zabbix-proxy)# source-address <ADDR> | <ADDR> – server IP address, defined as AAA.BBB.CCC.DDD where each part takes values of [0..255]. |
8 | Specify the processing time for remote commands (optionally). | esr(config-zabbix)# timeout <TIME> esr(config-zabbix-proxy)# timeout <TIME> | <TIME> – timeout, takes value in seconds [1..30]. Default value: 3. It is recommended to set the maximum value since some commands may take longer than the default. If the command is not completed within the specified time, processing of the command will be terminated. |
9 | Enable agent/proxy functionality | esr(config-zabbix)# enable esr(config-zabbix-proxy)# enable | |
10 | Allow access to the router (to the self zone) on TCP ports 10050, 10051 from the appropriate firewall security zone. See Firewall configuration | ||
Zabbix-agent configuration example

Objective:
Configure the interaction between the agent and the server to execute remote commands from the server.
Solution:
In the context of the agent settings, specify the address of the Zabbix server, and the address from which the server will interact:
esr(config-zabbix)# server 192.168.32.101
esr(config-zabbix)# source-address 192.168.39.170To activate the active mode, specify hostname, active-server, and also enable the execution of remote commands.
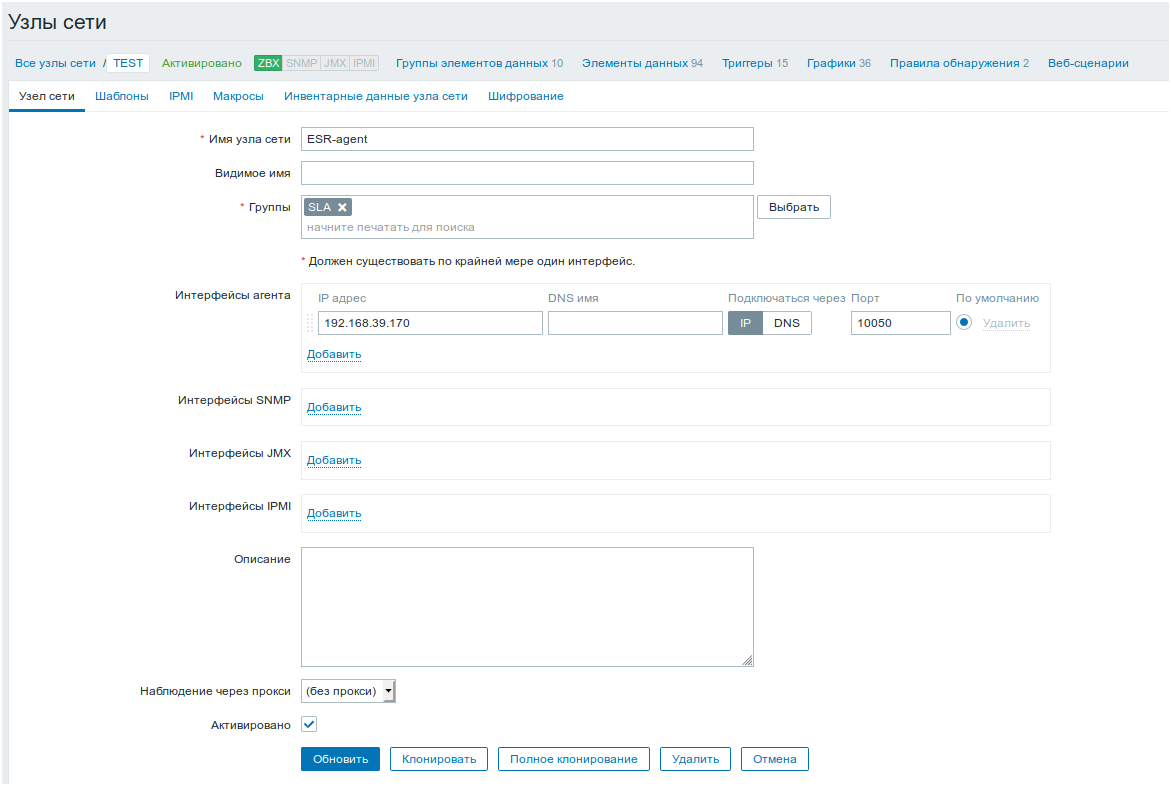
esr(config-zabbix)# hostname ESR-agent
esr(config-zabbix)# active-server 192.168.32.101
esr(config-zabbix)# remote-commandsSet the execution time of the remote commands, and activate the agent’s functionality.
esr(config-zabbix)# timeout 30
esr(config-zabbix)# enable Zabbix-server configuration example
Create the host:
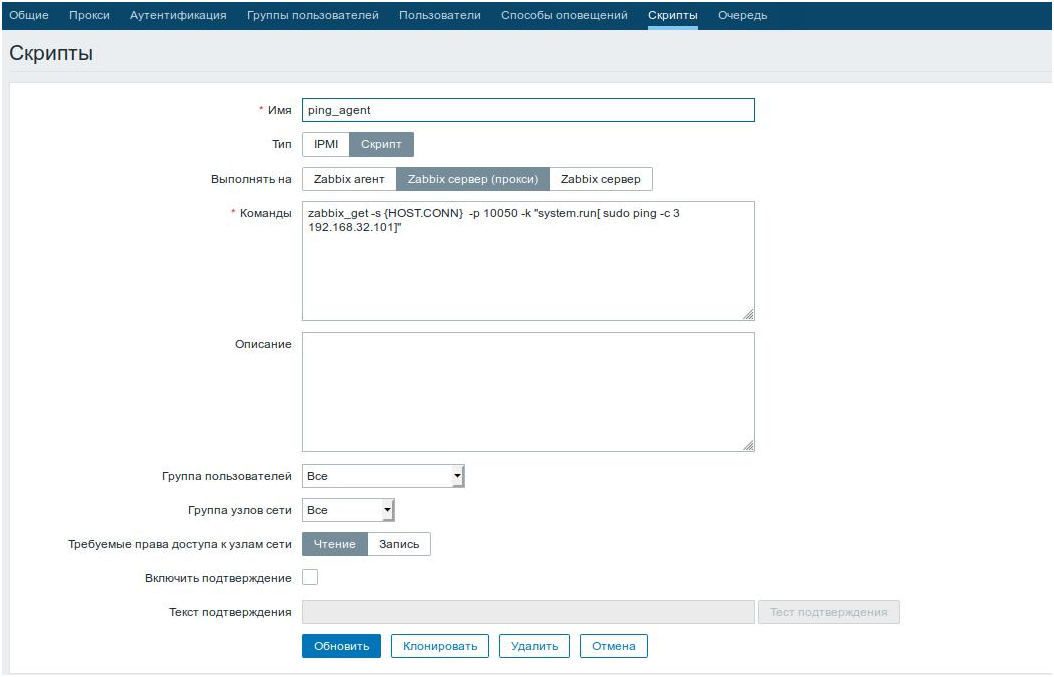
Create the script (Administration -> Scripts-> Create Script)
ESR routers support execution of the following priveleged commands:
Ping:
zabbix_get -s {HOST.CONN} -p 10050 -k "system.run[ sudo ping -c 3 192.168.32.101]"CODEThe client (ESR) that received this command from the server will execute ping command to the specified host (in our example, up to 192.168.32.101) and return the result to the server.
Using the «-c» key with the number of packets in the test is mandatory. Without this key, the ping command will not stop on its own and the test will not be considered complete.
Ping in VRF:
zabbix_get -s {HOST.CONN} -p 10050 -k "system.run[sudo netns -exec -n backup sudo ping 192.168.32.101 -c 5 -W 2 ]"CODEThe command above will be executed in the specified VRF with backup name.
Fping
zabbix_get -s {HOST.CONN} -p 10050 -k "system.run[ sudo fping 192.168.32.101]"CODEThe client (ESR) that received this command from the server will execute fping command to the specified host (in our example, up to 192.168.32.101) and return the result to the server.
Fping in VRF
zabbix_get -s {HOST.CONN} -p 10050 -k "system.run[sudo netns-exec -n backup sudo fping 192.168.32.101 ]"CODETraceroute
zabbix_get -s {HOST.CONN} -p 10050 -k "system.run[ sudo traceroute 192.168.32.101]CODEThe client (ESR) that received this command from the server will execute traceroute command to the specified host (in our example, up to 192.168.32.101) and return the result to the server.
Traceroute in VRF
zabbix_get -s {HOST.CONN} -p 10050 -k "system.run[ sudo netns-exec -n backup sudo traceroute 192.168.32.179]"CODEIperf
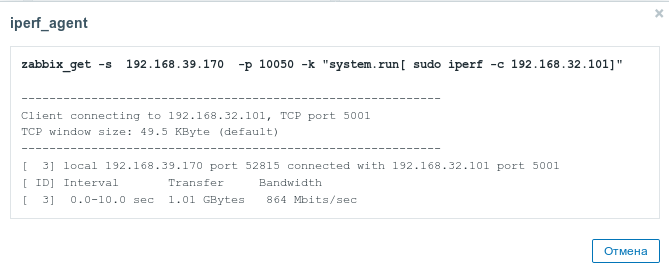
zabbix_get -s {HOST.CONN} -p 10050 -k "system.run[ sudo iperf -c 192.168.32.101 -u -b 100K -i 1 -t 600]"CODEThe client (ESR) that received this command from the server will execute iperf command to the specified server (in our example, up to 192.168.32.101) and return the result to the server.
Iperf in VRF
zabbix_get -s {HOST.CONN} -p 10050 -k "system.run[ sudo netns-exec -n backup sudo iperf -c 192.168.32.101 -u -b 100K -i 1 -t 600]"CODENslookup
zabbix_get -s {HOST.CONN} -p 10050 -k "system.run[sudo nslookup ya.ru ]"CODEThe client (ESR) that received this command from the server will execute nslookup command and return the result to the server.
Nslookup in VRF
zabbix_get -s {HOST.CONN} -p 10050 -k "system.run[sudo netns-exec sudo nslookup ya.ru ]"CODEIperf command execution example:
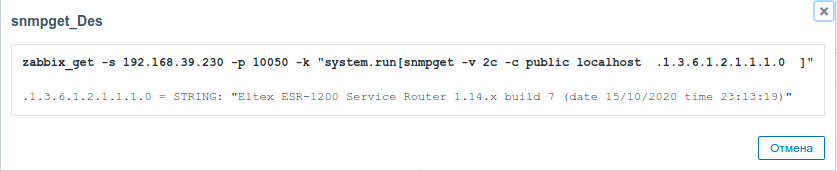
It is also possible to execute commands that do not require privileges, such as: snmpget, cat, pwd, wget and others.
Example of the snmpget command execution
Syslog configuration
Syslog (system log) – standard for sending and registering messages about events occurring in the system is used in networks operating over IP.
Configuration algorithm
Step | Description | Command | Keys |
|---|---|---|---|
1 | Set the level of syslog messages that will be sent to the snmp server in the form of snmp-trap. | esr(config)# syslog snmp <SEVERITY> | <SEVERITY> – message importance level, takes values (in order of decreasing importance):
|
2 | Set the level of syslog messages that will be displayed during remote connections (Telnet, SSH) (optionally) | esr(config)# syslog monitor <SEVERITY> | |
3 | Enable the process of logging user commands entered to the local syslog server (optionally) | esr(config)# syslog cli-commands | |
4 | Enable the saving of syslog messages of a specified level of importance to the specified log file | esr(config)# syslog file <NAME> <SEVERITY> | <NAME> – name of the file to which messages of a given level will be recorded, specified by the string up to 31 characters; <SEVERITY> is described in syslog snmp command. |
5 | Specify the maximum size of the log file (optionally) | esr(config)# syslog file-size <SIZE> | <SIZE> – file size, takes the value [10..10000000] KB |
6 | Set the maximum number of files saved during rotation (optionally) | esr(config)# syslog max-files <NUM> | <NUM> – maximal numberf of files , takes values [1 .. 1000] |
7 | Enable the sending of syslog messages of a specified level of importance to a remote syslog server | esr(config)#syslog host <HOSTNAME> <ADDR> | <HOSTNAME> – syslog server name, set by the string of up to 31 characters. Used only to identify the server during configuration. The value 'all' is used in the no syslog host command to delete all syslog servers; <ADDR> – IP address, defined as AAA.BBB.CCC.DDD where each part takes values of [0..255]; <SEVERITY> – importance level of the message, optional parameter, possible values are given in section Syslog configuration example; <TRANSPORT> – data transfer protocol, optional parameter, takes values:
<PORT> – number of TCP/UDP port, optional parameter, takes values of [1..65535], default value is 514 |
8 | Enable debugging output during device boot (optionally) | esr(config)#syslog reload debugging | |
9 | Enable message enumeration (optionally) | esr(config)#syslog sequence-numbers | |
10 | Enable message date accuracy of up to milliseconds (optionally). | esr(config)#syslog timestamp msec | |
11 | Enable registration of failed authentications (optionally). | esr(config)#logging login on-failure | |
12 | Enable registration of changes to the audit system settings(optionally). | esr(config)#logging syslog configuration | |
13 | Enable registration of changes to the user settings (optionally). | esr(config)#logging userinfo |
Configuration example
Objective:
Configure message sending for the following system events:
- failed user authentication;
- changes to the configuration of logging system events;
- start/stop of the system process;
- changes are made to the user profile.
ESR router IP address: 192.168.52.8, Syslog server IP address: 192.168.52.41. Use default settings for sending messages – UDP protocol, port 514.

Solution:
First, do the following:
- Specify zone for gi1/0/1 interface;
- Configure IP address for gi1/0/1 interface.
Main configuration step:
Create a file on the router for syslog, the level of messages for logging – info:
esr(config)# syslog file ESR infoSpecify the IP address and parameters of the remote Syslog server:
esr(config)# syslog host SERVER 192.168.17.30 info udp 514Set the logging of failed authentication attempts:
esr(config)# logging login on-failureSet the logging of syslog configuration changes:
esr(config)# logging syslog configurationSet the logging of start/stop of the system process:
esr(config)# logging service start-stopSet the logging of changes to the user profile:
esr(config)# logging userinfoThe configuration changes come into effect after applying the following commands:
esr# commit
Configuration has been successfully committed
esr# confirm
Configuration has been successfully confirmedView the current syslog configuration:
esr# show syslog configurationView the syslog entries:
esr# show syslog ESRIntegrity check
Integrity check involves checking the integrity of stored executable files.
Configuration process
Step | Description | Command | Keys |
|---|---|---|---|
1 | Launch system integrity check | esr# verify filesystem <detailed> | detailed – detailed information output to the console. |
Configuration example
Objective:
Check file system integrity:
Solution:
Launch integrity check
esr# verify filesystem
Filesystem Successfully VerifiedRouter configuration file archiving
ESR routers have the option of local and/or remote configuration file copying by timer or when applying the configuration.
Configuration process
Step | Description | Command | Keys |
|---|---|---|---|
1 | Switch to the configuration file backup mode. | esr(config)# archive | |
2 | Set router configuration backup type | esr(config-ahchive)# type <TYPE> | <TYPE> – type of the router configuration backup. Takes the following values:
Default value: remote |
3 | Enable timer configuration backup mode | esr(config-ahchive)# auto | |
4 | Enable configuration backup after each successful configuration application mode | esr(config-ahchive)# by-commit | |
5 | Specify a path for remote copying of the router configuration | esr(config-ahchive)# path <PATH> | <PATH> – defines the protocol, server address, location and prefix of the file name on the server |
6 | Set a period of time for automatic configuration backup (optional, relevant only for auto mode) | esr(config-ahchive)# time-period <TIME> | <TIME> – periodicity of automatic redundancy of the configuration, takes the value in minutes [1..35791394]. Default value: 720 minutes |
7 | Set the maximum number of locally saved configuration backups | esr(config-ahchive)# count-backup <NUM> | <NUM> – set the maximum number of locally saved configuration backups. Takes values in the range of [1..100]. Default value: 1 |
Configuration example
Objective:
Configure local and remote backup of the router configuration once a day and upon successful configuration change. Remote copies should be sent to the tftp server 172.16.252.77 in the esr-example subfolder. The maximum number of local copies is 30.
Solution:
For successful operation of remote configuration archiving, IP connectivity should be established between the router and the server, permissions for the passage of tftp traffic over the network and saving files on the server should be configured.
Main configuration step:
Switch to the configuration backup mode:
esr# configure
esr(config)# archiveSet local and remote configuration backup mode:
esr(config)# type bothConfigure the path for remote configuration backups and the maximum number of local backups:
esr(config-archive)# path tftp://172.16.252.77:/esr-example/esr-example.cfg
esr(config-archive)# count-backup 30Set the interval for the configuration backup if there are no changes:
esr(config-archive)# time-period 1440Enable archiving of router configuration by timer and upon successful configuration change:
esr(config-archive)# auto
esr(config-archive)# by-commitAfter applying this configuration once a day and with each successful change of the router configuration, a configuration file with the 'esr-exampleYYYYMMDD_HHMMSS.cfg' name will be sent to the tftp server. Also, on the router itself, in the flash:backup/ section, a file with the 'config_YYYYMMDD_HHMMSS' name will be created. When 30 files are accumulated in the flash:backup/ section, the oldest one will be deleted when creating a new one.