Introduction
No matter how good modern access points are, the situation with insufficient coverage is still relevant. There are several solutions, and one of the easiest in terms of installation and configuration is the use of special network devices — repeaters. RR-10 is a device that is designed to expand the coverage area of wireless networks and enhance Wi-Fi signal. RR-10 allows you to eliminate blind spots of networks in private homes, multi-room apartments, and small offices.
This manual describes the purpose, main technical characteristics, design, installation procedure, rules for configuring, monitoring, and changing the software of the RR-10 wireless signal repeater.
Conventions
Notes and warnings
Notes contain important information, tips, or recommendations for using and configuring your device.
Warnings inform the user on situations that can harm the device or a person, lead to incorrect operation of the device or loss of data.
Product description
Purpose
RR-10 is a wireless signal repeater designed to extend the coverage area of wireless networks and enhance Wi-Fi signal. The device allows you to eliminate blind spots and optimize the performance of your Wi-Fi network. With support for IEEE 802.11n/ac standards, RR-10 repeater provides high data transfer rates and is capable to provide high-quality multimedia transmission of 4K content. The use of MIMO technology and internal antennas makes RR-10 a universal solution for expanding your home network.
Device characteristic
The device is powered through an external 5.3 V adapter from a 220 V network.
Interfaces:
- LAN: 1 Ethernet port 10/100/1000BASE-T (RJ-45);
- WLAN: IEEE 802.11b/g/n 2.4 GHz and 802.11a/n/ac 5 GHz.
Functions:
- Support for WPA/WPA2 encryption standards;
- WMM;
- WPS;
- Wireless Multicast Forwarding;
- Support WiFi IEEE 802.11a/b/g/n/ac;
- MIMO 2x2 technology support.
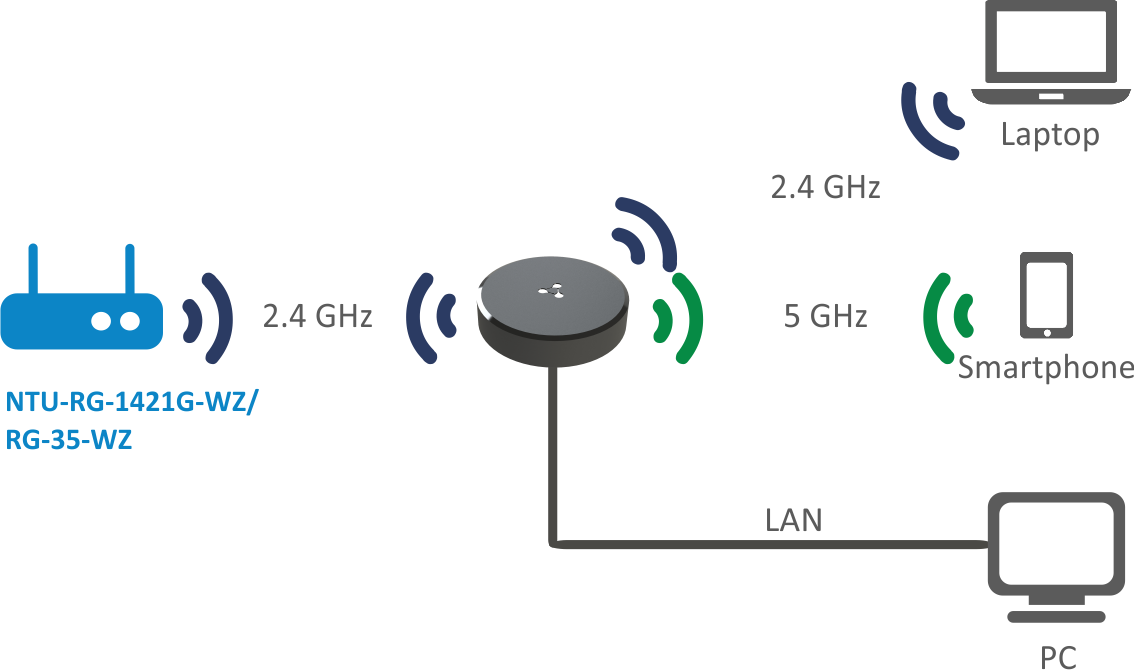
Connection diagrams for RR-10
2.4 GHz repeater:
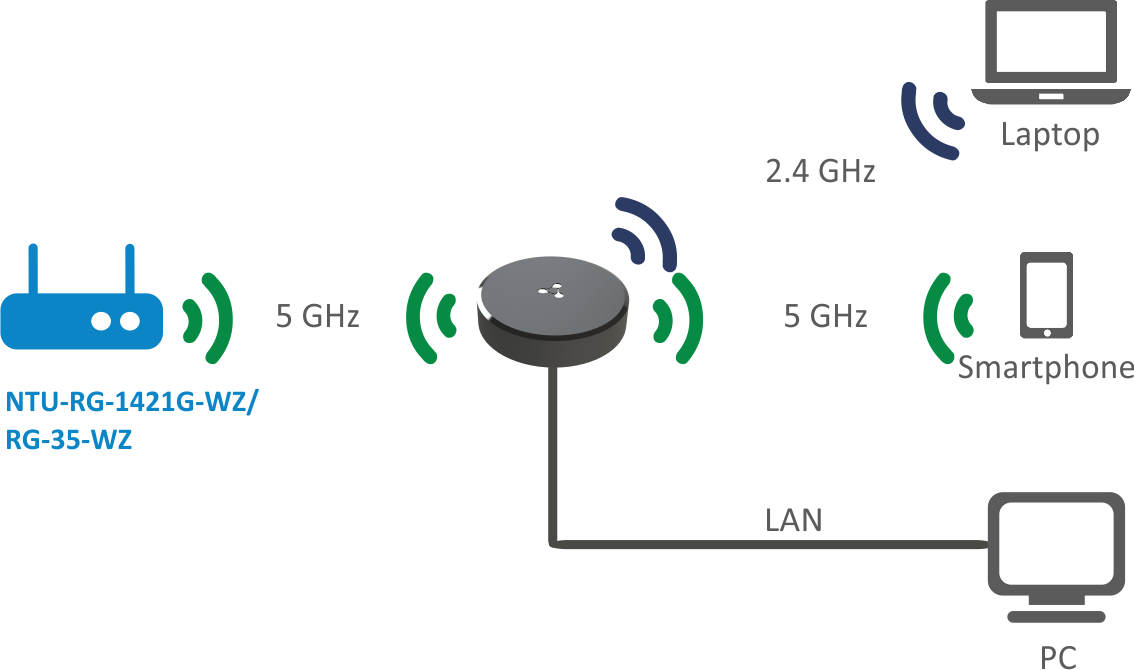
5 GHz repeater:
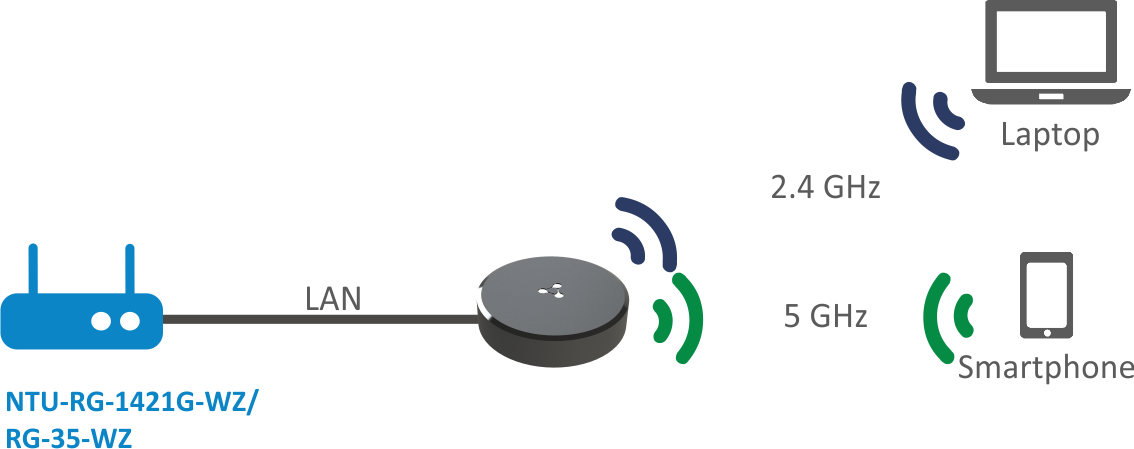
Access point:
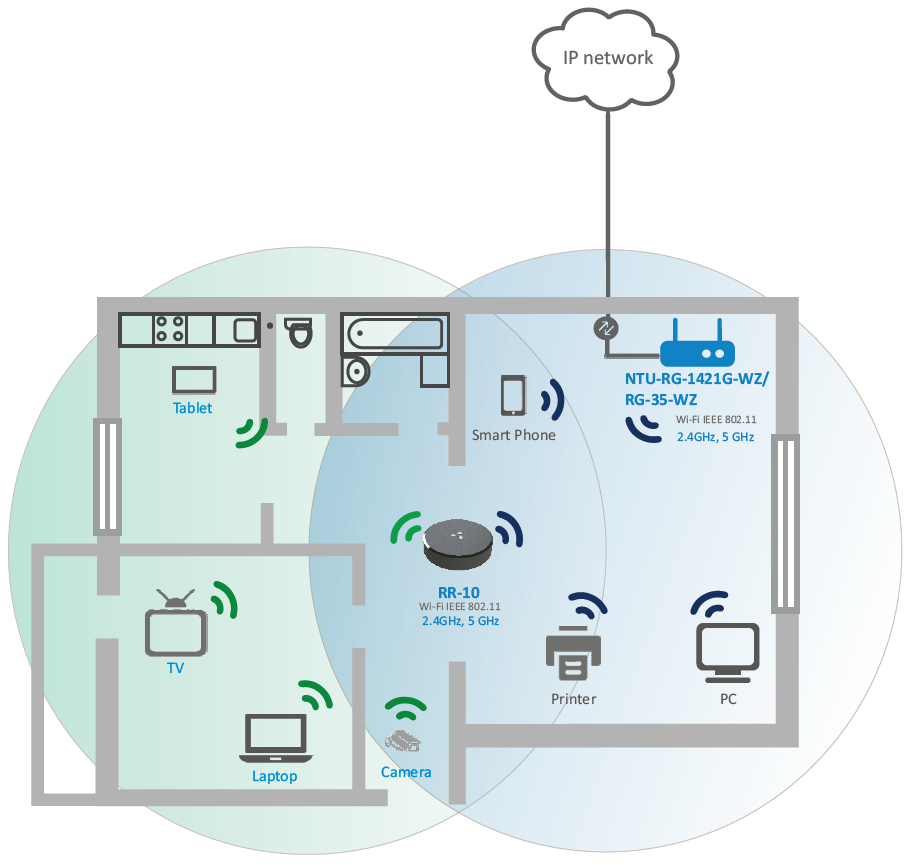
Use case
Main technical parameters
General parameters | |
|---|---|
Processor | Realtek RTL8197FS-VG |
Clock frequency | 1 GHz |
RAM | 128 MB |
ROM (system memory) | 16 MB |
Operating system | Linux 3.10 |
Ethernet LAN interface parameters | |
Number of interfaces | 1 |
Connector type | RJ-45 |
Data rate, Mbps | 10/100/1000, auto-negotiation |
Standards supported | BASE-T |
Wireless interface parameters | |
Number of antennas | 2 |
Antennas type | internal |
Standards | 802.11a/b/g/n/ac |
Frequency range | 2412–2472 MHz, |
MIMO | 2.4 GHz 2x2 |
Modulation | 2.4 GHz: DSSS, CCK, BPSK, QPSK, 16QAM, 64QAM |
Data rate | 802.11b up to 11 Mbps |
Maximum output power of the transmitter | 2.4 GHz: -20 dBm |
Receiver sensitivity | 2.4 GHz: -93 dBm |
Security | WEP, WPA (TKIP+AES), WPA2 (TKIP+AES), WPA/WPA2 (TKIP+AES) |
Management | |
Remote management | web interface |
Access restriction | by password |
Physical specifications and ambient parameters | |
Power supply | external power adapter 5.3 V DC, 2A |
Power consumption | no more than 4 W |
Operating temperature range | from +5 to +40°C |
Operating relevant humidity at 25°C | up to 80% |
Dimensions (Diameter x Height) | 100 x 23 mm |
Weight | 85 g |
Form-factor
RR-10 wireless signal repeater is implemented in a plastic case with dimensions of Ø100 x 23 mm.
Front panel of the device. State indication

Front panel of RR-10
Description of front panel indicator
Indicator | Indicator status | Device status | |
|---|---|---|---|
1 | LED shows the device operation status | Solid red | The device is launching (no more than 1 minute) |
Flashing red | The device is updating/reseting | ||
Solid yellow | The device is turned on, there is no connection to the access point or the Internet | ||
Flashing yellow | The device is connecting to an access point through WPS technology | ||
Solid green | The device has been connected to an access point and has access to the Internet | ||
Rear panel of the device. LAN connection indication

Rear panel of RR-10
Rear panel element | Description | |
|---|---|---|
1 | | Button for connecting clients via WPS protocol |
2 | LAN | 10/100/1000BASE-T port (RJ-45 connector) for connection to a network |
3 | LED | LAN connector indicators |
4 | 5 VDC | Power adapter connector |
LAN connector indication
| LAN indicators state | LAN connection state |
|---|---|
Only green lights | The connection is established at 10/100 Mbps |
Green and orange lights | The connection is established at 1000 Mbps |
Flashes | The process of packet data transmission over the LAN interface |
Bottom panel of the device

Bottom panel of RR-10
Description of bottom panel controls
Bottom panel element | Description | |
|---|---|---|
1 | F | Button for reseting to factory settings |
Resetting to factory settings
To reset the device to factory settings, press and hold the «F» button for more than 3 seconds until the indicator on the front panel flashes red. The device will automatically restart within 5 seconds, and the indicator will light up red. When the device is ready, the indicator lights yellow.
By default, the DHCP server is running on all interfaces;
LAN interface address is 192.168.0.1;
the subnet mask is 255.255.255.0;
the username/password for access via the web interface: admin/password.
Supply package
The basic package of RR-10 includes:
- RR-10 wireless signal repeater;
- 220/5.3V 2.0A power adapter;
- Quick guide for installing and primary setup.
Installation
Safety instructions
- Do not install the device near heat sources or in places with ambient temperature below 5°C or above 40°C.
- Do not use the device in areas with high humidity.
- Do not expose the device to smoke, dust, water, mechanical vibrations, or shock.
- Do not open the device case. There are no user-serviceable items inside the device.
In order to prevent overheating of the device components and disruption of its operation, it is forbidden to place objects on the surface of the equipment.
Installation recommendations
- Before installing and turning on the device, check the device for visible mechanical damage. If there is damage, stop installing the device, draw up a report and contact the supplier.
- If the device has been kept at a low temperature for a long time, it should be kept at room temperature for two hours before turning on and starting operation. After a long stay of the device in high humidity conditions, keep it under normal conditions for at least 12 hours before turning on.
- The device is installed in a horizontal position, following the safety instructions.
- When placing your device to provide the best Wi-Fi coverage, consider the following rules:
- Install the device in the area of the router's wireless network;
- Minimize the number of barriers (walls, ceilings, furniture, etc.) between RR-10, the router and other wireless network devices;
- Do not install the device near (about 2 m) electrical or radio devices;
- It is not recommended to use radiotelephones and other equipment operating at the frequency of 2.4 GHz, 5 GHz, within the range of a Wi-Fi network;
- Obstacles in the form of glass/metal structures, brick/concrete walls, as well as water tanks and mirrors can significantly reduce the coverage of the Wi-Fi network.
Connecting RR-10 to a network
To extend Wi-Fi coverage area, connect RR-10 to the network of your router (or access point).
Method 1. Using WPS button
- Connect RR-10 to 220V power network through the power adapter near the Wi-Fi router (or access point) you want to connect to.
- Press WPS button on the Wi-Fi router.
- Press and hold WPS button on RR-10 untill the indicator on the front panel start flashing yellow. When RR-10 is connected to the Internet, the indicator turns green.
Usually, you have 2 minutes after pressing WPS button on the router to press WPS on RR-10 for successful connection.
The way of WPS connection may vary for different routers. Please, read the manual for your router.
Method 2. Via the web interface
- Connect RR-10 to 220V power network through the power adapter near the Wi-Fi router (or access point) you want to connect to.
- Connect to RR-10 using smartphone or PC through Wi-Fi or Ethernet cable:
- Through Wi-Fi: connect PC or smartphone to a Wi-Fi network of RR-10 — RR-WiFi-XXXX, where XXXX is the last 4 characters of RR-10 MAC address, the MAC address is written on the label on the device case.
- Through Ethernet cable (only for PC): connect LAN port of RR-10 to LAN port of your PC using Ethernet cable.
- Open a web browser and type the address of the device to URL bar — http://rr.loc/ or http://192.168.0.1
- Enter username and password to the authorization window. Default username and password are admin and password correspondingly. Click «Log in».
- Go to «Wi-Fi» tab, select needed frequency band and click «Wireless Scanner».
- Select your Wi-Fi network in the displayed list and click on it. Use the password of your Wi-Fi network to connect to it. Click «Apply».
Device management via the web interface
Default data for accessing the web interface
Address to enter to a URL bar: http://rr.loc/ or http://192.168.0.1
Username: admin
Password: password
Device control panel
All changes to the device settings are made using the «control panel» tabs located at the top of the web interface and links to pages located on the left side of the web interface.
Main elements of the web interface

Navigation and control elements of the web interface
- Top horizontal tab menu.
- Button for changing a web interface language.
- Buttons for restarting the device and exiting the web interface.
- The left vertical menu of the selected tab.
- The main device settings field corresponding to the selected page from field 4.
- Buttons for applying or cancelling configuration changes on the page.
«Status» tab
This tab displays information on the device's wireless interfaces.

«Status» tab
The «Network» section contains information on the networks which the repeater might be connected to. The «Extended network» block contains information on access points of the repeater. Repeater clients connect to this network.
- Information on connecting to an access point in the 5 GHz band.
- Information on connecting to an access point in the 2.4 GHz band.
- Basic information on the "Extended network" parameters in the 5 GHz band.
- Basic information on the "Extended network" parameters in the 2.4 GHz band.
- List of the device's wireless clients.
«Wi-Fi» tab
«Connect to Network» page
On «Connect to Network» page, you can configure RR-10 to connect to an access point.

«Connect to the Network» page
Connecting to the access point network
Select the required band.

After selecting the necessary band, the other band becomes unavailable for selecting.
- To search for wireless networks, click the «Wireless scanner» button. After clicking, a table listing the available Wi-Fi networks and their parameters for the selected band will be displayed.

Select necessary Wi-Fi network and enter the password for that network. The SSID and network encryption type fields will be filled in automatically. If your Wi-Fi network uses the SSID hiding feature, fill in the «SSID», «Security», and «Password» fields manually.

If your Wi-Fi network uses the hidden SSID feature, fill in the «SSID», «Security», and «Password» fields manually.
- Click the «Apply» button to save and apply the settings, or the «Cancel» button to return to the saved device settings.
To avoid failures of device operation, it is not recommended to turn off the device while settings are being applied.
«Advanced network» page
On the «Advanced Network» page, you can change the basic settings for RR-10 wireless interfaces.

«Advanced network» page
- Advanced Network 5GHz — when checked, the Wi-Fi network for 5 GHz frequency band is enabled;
- Advanced Network 2.4 GHz — when checked, the Wi-Fi network for 2.4 GHz frequency band is enabled;
- SSID — a name of the wireless network used to connect to the device. The maximum length of the name is 32 characters, with case-sensitive keyboard input. This parameter can consist of numbers, Latin letters, spaces, and symbols"-", "_", ".","!", ";", "#", in this case, the characters"!" ,";", "#"and a space cannot be placed first;
- Copy Network SSID button helps to copy the SSID of the network which the RR-10 is connected to;
- Hide SSID — if selected, the extended network will not be detected by devices. You will be able to connect to this network only by specifying the SSID manually;
- Security — network authentication type. The following authentication types are available:
- Off — open authentication, without using encryption and password;
- WEP — authentication with a shared key using WEP encryption;
- WPA — WPA authentication using PSK key and TKIP+AES encryption;
- WPA2 — WPA2 authentication using PSK key and TKIP+AES encryption;
- WPA/WPA2 (Mixed) — mixed authentication type. When this value is selected, devices that use WPA or WPA2 authentication type can connect to the wireless network.
- Channel — the channel number for the wireless network. When «Auto» is selected, the channel with less interference is automatically detected;
- Channel Bandwidth — the bandwidth of the channel on which RR-10 extended network operates, it takes values of 20, 20/40 MHz at 2.4 GHz or 20, 40, 80 MHz at 5 GHz.
It is recommended to use WPA2 and WPA/WPA2 (Mixed) security modes as the most secure.
«Network» tab
The «Network» tab contains the device's local network settings.

«Network» tab
- DHCP — select the operation mode of the device interface;
- IP address — the device's local IP address. By default — 192.168.0.1;
- Netmask — the value of LAN subnet mask. By default — 255.255.255.0;
- Default gateway — IP address of the gateway on the network.
The «DHCP server» option is available in the default settings only. After connecting the device to an access point, this item becomes unavailable.
Connecting to the access point network
- Select «Attain IP address automatically» and click «Apply».
- Connect the repeater to the router using an Ethernet cable.
«System» tab
«Admin account» page
On the «Admin account» page, you may set login and password for accessing the device's web interface.

- Username — field to change the username. By default: admin;
- Password — a field for entering a new password for the device. By default: password;
- Confirm password — enter the new password again to confirm.
To apply new settings, click the «Apply» button. To cancel changes, leave the page without saving the changes, or click the «Cancel» button.
For security reasons, we recommend to change your username and password.
«Firmware upgrade» page
The «Firmware upgrade» page is used to update the device's control firmware.

«Firmware upgrade» page
- Active version — the version of the software installed on the device;
- Firmware image — a button to select the firmware update file. Current firmware can be downloaded from the website https://eltex-co.com.
Do not turn off the device or restart it during the firmware update process.
Problems and solutions
Problem | Possible cause | Solution |
|---|---|---|
It is not possible to access the device's web interface by addresses http://rr.loc or http://192.168.0.1 | The device has not been launched, the indicator is red | Wait for the device to launch. If it takes more than 2 minutes to launch, restart the device. |
The IP address of the device was received from the DHCP server in the access point network, the indicator is green. | Use the address given to the device by the DHCP server to access the web interface. | |
When connecting via Wi-Fi, another network is used. | Make sure that your device is connected to the SSID «RR-WiFi-XXXX» (where XXXX is the last 4 characters of the RR-10 MAC address) and the «Cellular data» function (if available) is disabled. | |
When connecting via LAN, the client uses static network settings. | Make sure that the computer is connected to the repeater using an Ethernet cable, and that its network settings are set to «Obtain IP address automatically» and «Obtain DNS server address automatically». | |
Device failures | Reset the repeater to factory settings and try again. | |
Wi-Fi network of the needed router is not displayed after clicking the «Wireless Scanner» button. | The Wi-Fi network uses a hidden SSID. | Fill in the parameters manually. |
The signal strength of the Wi-Fi network is too weak. | Increase the Wi-Fi signal level of your router, or install the device closer to the router according to the installation recommendations. |