LTP-8X, LTP-4X optical line terminals
EasyMode manual
Firmware version 3.38.2 (20.05.2020)
Notes and warnings
Notes contain important information, tips, or recommendations on device operation and setup.
Warnings are used to inform the user about harmful situations for the device and the user alike, which could cause malfunction or data loss.
LTP-X EasyMode description
EasyMode is a function set of LTP optical terminals. EasyMode is dedicated to fast GPON deployment according to realized service model. EasyMode allows providers to configure Triple-Play services promptly.
EasyMode can be used for:
- Acquaintance with GPON technology and Eltex equipment;
- Fast testing of the main capabilities of the equipment;
- Automatic configuring of the equipment on a network.
Software and hardware requirements
The EasyMode is supported by the hardware of B and C revisions and by NTU terminals. For EasyMade operation, it is necessary to use the software no below than:
For LTP-8X(4X) | 3.26.1 |
For NTU-1 | 3.24.0 |
For NTU-2W | 3.25.1 |
For NTU-2V(C), NTU-RG-1402G-W | 3.25.2 |
For NTU-RG-1421(31)G-Wac | 3.28.1 |
Installation and connection
To familiarize yourself with the hardware of the device, the installation and connection procedure, refer to the 'LTP Operation Manual', which you can find at the linkhttps://eltex-co.com/catalog/olt_gpon/.
Connection to the terminal
Connection to LTP is possible either with a console cable or with an Ethernet cable to the GE port.
Console cable connection
For LTP rev.B, the RS-232 cable DB9(F) – DB9(F), which is included in the delivery, is used. The port is located on the left side of the front panel, as shown in Figure 1 – Front panel of the LTP rev.B.

Figure 1 – Front panel of the LTP rev.B
For LTP rev.C, the RS-232 cable RJ-45 – DB9(F), which is included in the delivery, is used. The port is located on the left side of the front panel, as shown in Figure 2 – Front panel of the LTP rev.C.

Figure 2 – Front panel of the LTP rev.C
Table 1 – Description of connectors, LEDs and controls located on the front panel of LTP rev.B
# | Front panel element | Description | |
|---|---|---|---|
1 | Console | RS-232 console port for local control of the device | |
2 | GE Port 0..3 | 4 RJ-45 connectors of 10/100/1000Base-T Gigabit uplink interfaces for connection to IP networks (for LTP-8X) | |
3 | Combo GE | 0..3 | 4 chassis for SFP modules of 1000Base-X uplink interface for connection to IP networks (for LTP-4X) |
4 RJ-45 connectors of 10/100/1000Base-T Gigabit uplink interfaces for connection to IP networks (for LTP-4X) | |||
4..7 | 4 chassis for SFP modules of 1000Base-X uplink interface for connection to IP networks (for LTP-8X) | ||
4 RJ-45 connectors of 10/100/1000Base-T Gigabit uplink interfaces for connection to IP networks (for LTP-8X) | |||
4 | 10G/1G 0..1 | 2 chassis for SFP modules of 10GBase/1000Base-X uplink interface for connection to IP networks | |
5 | PON | 4 chassis for SFP modules of xPON 2.5 G (for LTP-4X) | |
8 chassis for SFP modules of xPON 2.5 G (for LTP-8X) | |||
6 | Power | Device power LED | |
7 | Status | Device operation indicator | |
8 | F | Functional key that reboots the device and resets it to factory default configuration:
Configuring the response to a button click is done in the CLI of the terminal. | |
Table 2 lists connectors, LEDs and controls located on the front panel of LTP rev.C.
Table 2 – Description of the connectors, LEDs, and controls located on the front panel of LTP rev.C
# | Front panel element | Description | |
|---|---|---|---|
1 | Power | Device power LED | |
2 | Status | Device operation indicator | |
3 | Fan | Fan operation LED. | |
4 | RPS | Redundant power supply LED. | |
5 | Console | Console port for local management of the device. · not used · not used · RX · GND · GND · TX · not used · not used · not used | |
6 | F | Functional key that reboots the device and resets it to factory default configuration: · pressing the key for less than 10 seconds reboots the device; · pressing the key for more than 10 seconds resets the device to factory default configuration. Configuring the response to a button click is done in the CLI of the terminal. | |
7 | GE Port 0..3 | 4 RJ-45 connectors of 10/100/1000Base-T Gigabit uplink interfaces for connection to IP networks (for LTP-8X) | |
8 | Combo GE | 0..3 | 4 chassis for SFP modules of 1000Base-X uplink interface for connection to IP networks (for LTP-4X) |
4 RJ-45 connectors of 10/100/1000Base-T Gigabit uplink interfaces for connection to IP networks (for LTP-4X) | |||
4..7 | 4 chassis for SFP modules of 1000Base-X uplink interface for connection to IP networks (for LTP-8X) | ||
4 RJ-45 connectors of 10/100/1000Base-T Gigabit uplink interfaces for connection to IP networks (for LTP-8X) | |||
9 | 10G/1G 0..1 | 2 chassis for SFP modules of 10GBase/1000Base-X uplink interface for connection to IP networks | |
10 | PON | 4 chassis for SFP modules of xPON 2.5 G (for LTP-4X) | |
8 chassis for SFP modules of xPON 2.5 G (for LTP-8X) | |||
Connect the cable and configure the following connection parameters:
Baud rate | 115200 |
Data bits | 8 |
Parity | none |
Stop bits | 1 |
Flow Control | none |
For SecureCRT, the settings will be like in Figure 3.

Figure 3 – SecureCRT connection cofiguration
If the connection is successful, you will see a prompt to enter:
********************************************
*    Optical line terminal LTP-4X rev.B    *
********************************************
LTP-4X login:
Default login and password: admin/password.
Connection via Telnet/SSH
Connect the Ethernet cable to any of the GE/ComboGE ports. By default, the IP address of the LTP management interface – 192.168.1.2/24. Configure an address 192.168.1.1 on your computer and subnet mask 255.255.255.0 as it shown in Figure 4.

Figure 4 – IP address configuration
Connect via telnet/ssh to 192.168.1.2 and you will see a prompt for input.
********************************************
*    Optical line terminal LTP-4X rev.B    *
********************************************
LTP-4X login:
Default login and password: admin/password.
Service model in EasyMode
The EasyMode includes a prepared configuration for the network, a diagram of which is shown in Figure 5.
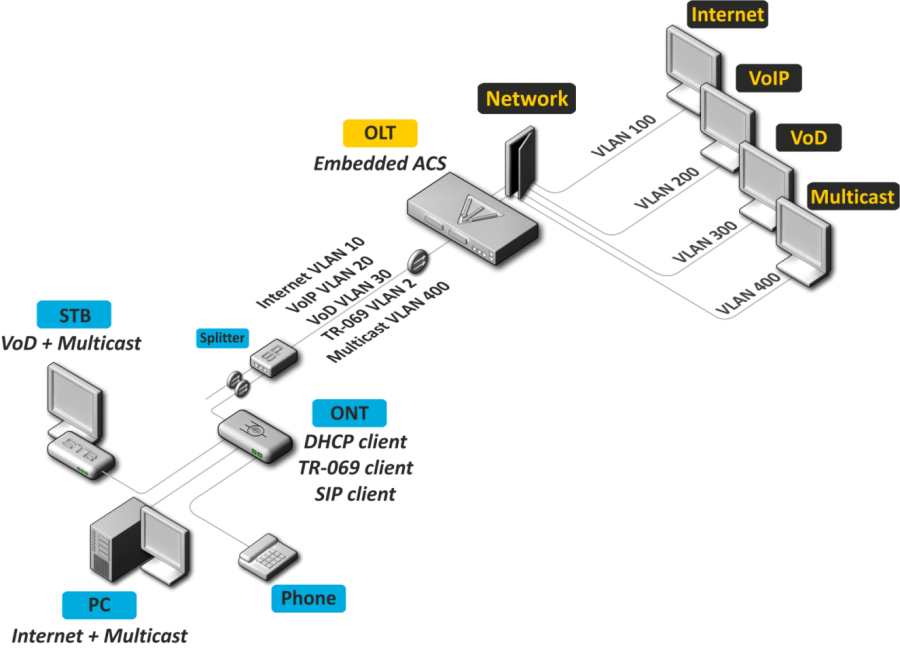
Figure 5 – EasyMode network diagram
Service model of this network:
- Internet service using IPoE technology. It is possible to add option 82 specified by you to DHCP packets.
- VLAN-on-service model. Subscribers of one service are in the same vlan.
- User isolation There is no connectivity between subscribers at the channel level.
- Dedicated multicast vlan. Unicast services: IPTV (Video-On-Demand, VoD) are spaced from multicast traffic.
- Multicast traffic is available for all ports of subscriber terminal.
EasyMode enabling and configuration
Enabling EasyMode will lose the current configuration. Save it if you may need it later.
EasyMode can be used with the values you specify or with default values.
Default configuration
Parameters to be applied by default:
IP address for LTP management | 192.168.1.2 |
Subnet mask | 255.255.255.0 |
Management VLAN | 1 |
Gateway in management network | none |
ACS VLAN (built-in TR-069 server) | 2 |
Internet VLAN | 100 |
VoIP VLAN | 200 |
VoD VLAN | 300 |
Multicast VLAN | 400 |
Option82 Circuit-Id | none |
Option82 Remote-Id | none |
To enable EasyMode with default values, you need to execute the easy-mode command. After that, a warning will be displayed stating that the current configuration of the device will be lost.
Please make sure that your access settings for the device match those that will be applied, or you have a connection using the console cable.
LTP-4X# easy-mode
    Enabling easy-mode will delete current configuration. Are you sure? (y/n)  y
    Configured easy-mode...
    Easy mode enable successfully
LTP-4X#
After that, you can proceed to sections 6.3 and 7 of this manual.
Custom configuration
You can change the settings of the LTP management interface, service VLANs and DHCP options of option 82 using the Wizard. In addition, you can quickly add already connected subscriber terminals and after completing the configuration, get a network ready for operation.
To start working with Wizard, you need to execute the easy-mode wizard command. After that, a warning will be displayed stating that the current configuration of the device will be lost.
LTP-4X# easy-mode wizard
    Enabling easy-mode will delete current configuration. Are you sure? (y/n)  y
Customize easy-mode configuration:
< … >
VLAN configuration
Specify the VLANs you want to use for the services. VLAN data will be automatically registered tagged to all Ethernet ports, with the exception of VLANs for the built-in ACS server.
If you are satisfied with all the default values, you can refuse the change by responding N to the invitation to change. If you are satisfied with the default value for a single service, you can skip input by simply pressing <Enter>.
As an example, change the VLAN as follows:
ACS VLAN | 2 (without change) |
Internet VLAN | 1001 |
VoIP VLAN | 1002 |
VoD VLAN | 1003 |
Multicast VLAN | 3 |
Current VLAN configuration:
 ACS VLAN ID: 2
 Internet VLAN ID: 100
 VoIP VLAN ID: 200
 VoD VLAN ID: 300
 Multicast VLAN ID: 400
Do you want to change VLAN configuration? (y/N):   y
        Enter ACS service VLAN ID (leave blank for default) [2]:
        Enter Internet service VLAN ID (leave blank for default) [100]: 1001
        Enter VoIP service VLAN ID (leave blank for default) [200]: 1002
        Enter VoD service VLAN ID (leave blank for default) [300]: 1003
        Enter Multicast VLAN ID (leave blank for default) [400]: 3
Configuration of the LTP management interface
In the next section, you can change the access settings for LTP. If you are satisfied with the default value, reply N to the change prompt. If you are satisfied with the default value for a single parameter, you can skip input by simply pressing <Enter>.
As an example, change the management settings as follows:
Management IP | 10.189.55.19 |
Management mask | 255.255.255.0 |
Management gateway | 10.189.55.254 |
Management vid | 189 |
Current management settings:
 IP: 192.168.1.2
 Mask: 255.255.255.0
 Gateway: 0.0.0.0
 Management VLAN ID: 1
Do you want to change management configuration?
Attention, it may cause disconnection from remote sessions! (y/N):   y
Enter management IP (leave blank for default) [192.168.1.2]: 10.189.55.19
Enter management mask (leave blank for default) [255.255.255.0]:
Enter management gateway (leave blank for default) [0.0.0.0]: 10.189.55.254
Enter management VLAN ID (leave blank for default) [1]: 189
It is not allowed to use one VLAN for device management and for the built-in ACS server. When you try to configure this, a warning will be displayed:
Error: ACS VLAN intersects with management VLAN. Try again.
In this case, you need to select a different VLAN number.
It is not allowed to use one subnet IP for the device management and for the built-in ACS server.
The built-in ACS uses the address 192.168.200.1/21. When you try to configure this, a warning will be displayed:
Error: ACS network intersects with management network. Try again.
In this case, you need to select a different IP subnet.
DHCP Relay Agent (option 82) configuration
The last configuration step – DHCP option 82 configuration for substitution into packets from subscribers. By default, option substitution is disabled. If option 82 is not used on your network, you can skip configuring it by answering N to the prompt to change.
When enabling option expansion, the following values of the Circuit-Id and Remote-Id suboptions are used:
Circuit-Id | %HOSTNAME%%PONSERIAL%%VLAN0% |
Remote-Id | - |
When configuring the values of options, tokens are used, in place of which the corresponding values will be substituted. The rest of the text will be left unchanged. Tokens used:
%HOSTNAME% | LTP terminal name |
%MNGIP% | Mangement IP address |
%GPON-PORT% | ONT GPON port number |
%ONTID% | ONT number on GPON port |
%PONSERIAL% | ONT serial number |
%GEMID% | GEM port number |
%VLAN0% | External (or single) Vlan |
%VLAN1% | Internal (or single) Vlan |
%MAC% | MAC address |
%OLTMAC% | OLT`s MAC address |
%OPT60% | Option 60 from the original packet |
%OPT82_CID% | Circuit-Id of the option 82 from the original packet |
%OPT82_RID% | Remote-Id of the option 82 from the original packet |
%DESCR% | ONT description from configuration |
If the default values of the Circuit-Id and Remote-Id suboptions suit you, refuse to make changes by replying to N at the invitation to change.
As an example, suppose that the LTP IP address is 10.189.55.19, ONT is connected to 1 GPON port with ID 15. Set the settings in such a way as to obtain the following values:
Circuit-Id | 1-15 |
Remote-Id | 10.189.55.19 |
Do you want to use option 82? (y/N):   y
Current configuration dhcp-ra overwrite-option 82:
 Circuit id: %HOSTNAME%-%PONSERIAL%-%VLAN0%
 Remote id: -
        Do you want to setup Option 82 format?
  (answer No for default option) (y/N):   y
        Enter Circuit ID (leave blank for empty option): %GPON-PORT%-%ONTID%
        Enter Remote ID (leave blank for empty option): %MNGIP%
Saving configuration
After applying the new configuration, you will see a message:
Configured easy-mode...
Easy mode enable successfully
Save the configuration changes by executing the save command. After that, the configuration will be saved in non-volatile memory.
LTP-4X# save
........
Configuration successfully saved to file
Adding new ONTs
Automatic ONT activation configuration
In the simplified setup mode, the ONT auto-activation mode is enabled, and the required ONT configuration is applied automatically from the corresponding auto-activation template. These templates were created when EasyMode was enabled. For NTU-1, which are controlled using OMCI protocol only, the easy-ONT template is used. For all other ONTs, the easy-RG template is used.
LTP-8X# show running-config gpon olt
configure terminal
gpon olt auto-activation ont enable
gpon olt auto-activation ont default template "easy-RG"
gpon olt auto-activation ont type NTU-1 template "easy-ONT"
exit
commit
LTP-8X#
Manual ONT activation
After enabling and configuring EasyMode to add new connected ONTs to the configuration, you need to:
Disable ONT auto-activation
LTP-8X(config)# no gpon olt auto-activation ont enable
Find out the ONT serial numbers, their types, and the GPON port numbers to which they are connected. If during the setup process you want to immediately activate the connected subscriber terminals, you will need a list of their serial numbers and the GPON ports to which they are connected. You can get a list of all inactive ONTs using the show interface ont 0-7 unactivated command (for LTP-4X, use show interface ont 0-3 unactivated).
LTP-4X# show interface ont 0-3 unactivated

GPON-port 0 has no unactivated ONTs
GPON-port 1 has no unactivated ONTs
-----------------------------------
GPON-port 2 ONT unactivated list
-----------------------------------

    ##        Serial 		 ONT ID GPON-port     Status    	...
     1  454C545862000100     n/a      2  		UNACTIVATED  	...
     2  454C545866000101     n/a      2  		UNACTIVATED  	...

GPON-port 3 has no unactivated ONTs
Define free ONT IDs for this GPON port. To do this, run the show interface ont 2 unconfigured command.
LTP-4X# show interface ont 2 unconfigured

GPON-port 2 ONT unconfigured list: 2-127
Total ONT count: 126
LTP-4X#
Switch to the configuration mode. For this use the configure terminal command.
LTP-4X# configure terminal
LTP-4X(config)#
Select one of the free ONT IDs and switch to the ONT configuration mode. For this, execute the interface ont 2/2 command.
LTP-4X(config)# interface ont 2/2
LTP-4X(config)(if-ont-2/2)#
Specify the serial number of the custom ONT and the template used for it: easy-ONT for NTU-1 and easy-RG for all other. Then exit the ONT configuration mode.
LTP-4X(config)(if-ont-2/2)# serial 454C545862000100
LTP-4X(config)(if-ont-2/2)# template easy-ONT
LTP-4X(config)(if-ont-2/2)# exit
LTP-4X(config)#
Repeat steps 4-5 for all remaining ONTs.
LTP-4X(config)# interface ont 2/3
LTP-4X(config)(if-ont-2/3)# serial 454C545866000101
LTP-4X(config)(if-ont-2/3)# template easy-RG
LTP-4X(config)(if-ont-2/3)# exit
Exit the configuration mode, apply the changes made with the commit command and save them in non-volatile memory with the save command.
LTP-4X(config)# exit
LTP-4X# commit
Changes successfully commited (2 chunks)
LTP-4X# save
........
Configuration successfully saved to file
LTP-4X#
After applying the configuration, the subscriber terminals will reboot with the new configuration. The old one will be deleted.
Configuration of VoIP on the ONT
Consider configuring RG ONT parameters using the internal ACS using the example of VoIP settings. For more information about working with ACS, refer to the 'Eltex ACS User manual', which can be found at https://eltex-co.com/catalog/management/.
Configure for the ONT 454C545866000101 the number 101 with the secret password on the sip server sip.test.pon. For this, do the following:
Execute acs command to operate with the built-in ACS server.
LTP-4X# acs
LTP-4X(acs)#
Switch to the ONT configuration mode and select the desired ONT by serial number using the ont and ont 454C545866000101 commands.
LTP-4X(acs)#ont
LTP-4X(acs-ont)#ont 454C545866000101
LTP-4X(acs-ont-sn='454C545866000101')#
Set private parameters for enabling the phone line, SIP server address, numbers and passwords:
LTP-4X(acs-ont-sn='454C545866000101')#set private sip_proxy sip.test.pon
Host property has been updated: 'InternetGatewayDevice.Services.VoiceService.1.VoiceProfile.1.SIP.UserAgentDomain' = 'sip.test.pon'
Host property has been updated: 'InternetGatewayDevice.Services.VoiceService.1.VoiceProfile.1.SIP.RegistrarServer' = 'sip.test.pon'
Host property has been updated: 'InternetGatewayDevice.Services.VoiceService.1.VoiceProfile.1.SIP.ProxyServer' = 'sip.test.pon'
Host property has been updated: 'InternetGatewayDevice.Services.VoiceService.1.VoiceProfile.1.SIP.OutboundProxy' = 'sip.test.pon'
Ok
LTP-4X(acs-ont-sn='454C545866000101')#set private voice1_enable TRUE
Host property has been updated: 'InternetGatewayDevice.Services.VoiceService.1.VoiceProfile.1.Line.1.Enable' = 'TRUE'
Ok
LTP-4X(acs-ont-sn='454C545866000101')#set private voice1_number 101
Host property has been updated: 'InternetGatewayDevice.Services.VoiceService.1.VoiceProfile.1.Line.1.SIP.AuthUserName' = '101'
Host property has been updated: 'InternetGatewayDevice.Services.VoiceService.1.VoiceProfile.1.Line.1.DirectoryNumber' = '101'
Host property has been updated: 'InternetGatewayDevice.Services.VoiceService.1.VoiceProfile.1.Line.1.CallingFeatures.CallerIDName' = '101'
Host property has been updated: 'InternetGatewayDevice.Services.VoiceService.1.VoiceProfile.1.Line.1.SIP.URI' = '101'
Ok
LTP-4X(acs-ont-sn='454C545866000101')#set private voice1_password secret
Host property has been updated: 'InternetGatewayDevice.Services.VoiceService.1.VoiceProfile.1.Line.1.SIP.AuthPassword' = 'secret'
Ok
Apply the changes with the commit command and reconfigure the ONT with the reconfigure command.
LTP-4X(acs-ont-sn='454C545866000101')#commit
LTP-4X(acs-ont-sn='454C545866000101')#reconfigure
Ok
LTP-4X(acs-ont-sn='454C545866000101')#
Exit the ACS mode using the exit command.
LTP-4X(acs-ont-sn='454C545866000101')#exit
LTP-4X(acs-ont)#exit
LTP-4X(acs)#exit
LTP-4X#
Using a predefined ONT configuration without using EasyMode
If you are not satisfied with the proposed EasyMode service model, you can only use the predefined ONT configuration by configuring LTP by yourself, according to your needs.
The predefined configuration includes:
- Internet service
IPoE interface in u-VLAN 10 with DHCP client and IGMP proxy. By the LAN side: ports 1 and 2 for ONT with 4 ports (NTU-RG), or port 1 for ONT with 2 ports (NTU-2V(C), NTU-2W). This interface will be the default route for clients connected to LAN ports. Upstream IGMP reports will also be sent in this VLAN. To send them to the multicast VLAN use the ip igmp proxy command on LTP.
- VoIP service
IPoE interface in u-VLAN 20. The built-in SIP client operates from this interface.
- VoD service
Bridge between u-VLAN 30 and LAN ports 3, 4 for ONT with 4 ports (NTU-RG), or port 2 for ONT with 2 ports (NTU-2V (C), NTU-2W).
To activate a predefined configuration, you must add the easy-mode command to the ONT settings or to the template used.
LTP-4X# configure terminal
LTP-4X(config)# interface ont 2/2
LTP-4X(config)(if-ont-2/2)# easy-mode
LTP-4X(config)(if-ont-2/2)# exit
LTP-4X(config)# exit
LTP-4X# commit
Changes successfully commited (1 chunk)
After that, the subscriber terminal will reboot with a predefined configuration. The old one will be deleted.
To roll back the configuration to the factory settings, you must execute the no easy-mode command and then reset to the factory settings with the send omci restore interface ont command.
LTP-4X# configure terminal
LTP-4X(config)# interface ont 2/2
LTP-4X(config)(if-ont-2/2)# no easy-mode
LTP-4X(config)(if-ont-2/2)# exit
LTP-4X(config)# exit
LTP-4X# commit
    Changes successfully commited (1 chunk)
LTP-4X# send omci restore interface ont 2/2
    [ONT2/2] was successfully restored to default config and rebooted