General information
Wi-Fi B2B Admin Panel is a part of the Wi-Fi Platform (SoftWLC). According to the provider's level scenario, the Wi-Fi B2B Admin Panel allows delegating the service setting to provider's clients (legal entities), And in particular obtaining statistical information on a service provided and everything about W-Fi users' accounts. The program is based on a client-server technology and allows performing remote access using a browser and classic unique login-password pairs.
Entering the system
To enter the interface of Wi-Fi B2B Admin Panel, open your browser and specify a server address and a service name in an address bar according to the following form: http://<server's IP address>:8080/wifi-cab/
For authentication in the program, fill in corresponding fields with a login and a password. Then click " Login " or press <Enter>.
After installing a new system, it is possible to access it under the login "admin" with a password "password".
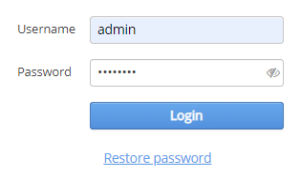
After entering the Admin Panel, the tab "Start page" is opened by default. To log out from the system, the button "Logout" located in the bottom part of the navigation bar is used.
Interface description
Navigation
Navigation is implemented with the help of a bar located in the left part of the screen. The navigation bar helps to choose a configuration/monitoring section. A subsection (tab) is selected in the horizontal navigation element called "Tabs" and located in the upper part of the screen. Tabs set depends on a parent section. In the right and the main part of the interface elements for viewing and editing objects of a current tab are located.
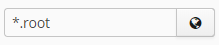
Using filters
In some tabs, displayed data can be filtered. Despite differences between filter parameters and displayed data, the same principle of interaction with the interface is applied to all cases. When a page with no filters set is accessed, the program displays information for the last day (this period can be changed in settings). It is done to reduce the load on a database server.
Click the button " Reload " after any change of filter parameters. To reset all fields of a filter, use the button " Clear ". After this operation, a page is updated automatically.
Selecting a domain

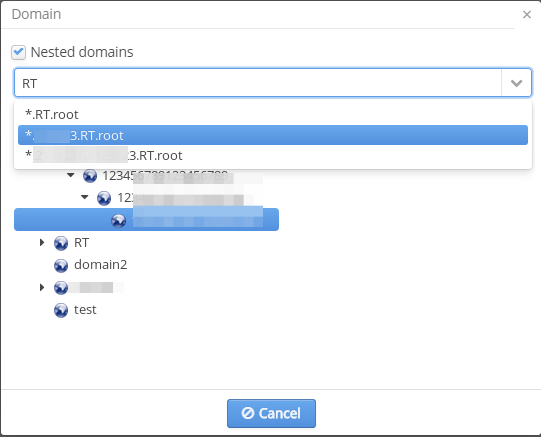
To select a domain on which data filtering for displaying statistics in the form of different tables and diagrams is implemented, a special widget is used.
In the widget window, the checkbox "Nested domains" that allows performing search and filtering within a certain domain and its subdomains can be found.
A field for text search of domains is located below. When symbols are entered to this field, a search is started immediately. All domains containing a symbol sequence specified in the field will be offered to a user in a drop-down menu. When one of the suggested domains is clicked with the left mouse button, its value will be saved to a filter, and the window will be closed.
A domain tree that helps to find a required domain in the structure is located under the search field. When a domain is clicked with the left mouse button, its value will be saved to a filter, and the window will be closed.
Click the button "Cancel" to save a previously selected value and close a window.
Click the button "Clear" to delete a previously selected value and close a window.
Export of information
The Admin Panel interface provides an opportunity to export data displayed on the screen to a PDF file and to save it to a local computer of a system operator (administrator). To start writing a report file, click the button "Export ".
When file writing is started, a new task is created. Its status can be seen in the lower right corner of the screen. When a report is generated, it can be downloaded. Generated reports and information on them can be viewed in the corresponding section.
Reports are downloaded as .csv files (this format can be opened with Microsoft Excel).
Restricting control elements visibility
Wi-Fi B2B Admin Panel is a multi-user system. That implies that different users have different rights (privileges) and different visibility area. Detailed description is given in the sections "System roles" and "System users" in the section "Admin Panel administration". Availability of certain sections and tabs depends on a user's rights. A user can also be permitted to perform only read operations or read and write operations.
If a user can perform only read operations, all control elements that allow data changing (for example, the following buttons: " Add ", " Delete" and others) will be switched to the inactive mode.
Managing expanded statistics modal dialogs
In some sections, expanded statistics and other information are put into modal dialogs displayed over the program main interface. The main control elements of such dialogs are described below:
- Click the icon "+" to spread a window to full screen;
- Click "-" to return a window size to initial state;
- Click "x" in the right upper corner to close a window.
Working with tables
In the program interface, some information is displayed in tabular form. Some tables are intended to display information (e.g., statistics), other tables allow data management (e.g., Wi-Fi users lists). Depending on a table type, functional features for table management are different for different tabs.
Configuring table content
Click the button  in the right upper corner of the table to edit its content. The functionality gives an opportunity to specify which columns should be displayed.
Table navigation
The number of entries displayed on a page simultaneously is specified in the field" Items per page ", a page number is specified in the field "Page" . To navigate between pages, the arrows on the right and on the left from the field "Page" are used. A single arrow is for moving to the next/previous page, a double one is to display the first/the last page.
Selecting entries
Entries for editing are selected by checking a corresponding checkbox in the first column of the table. If a checkbox in the table header is checked, all entries displayed on the screen will be selected.
Admin Panel menu
Start page

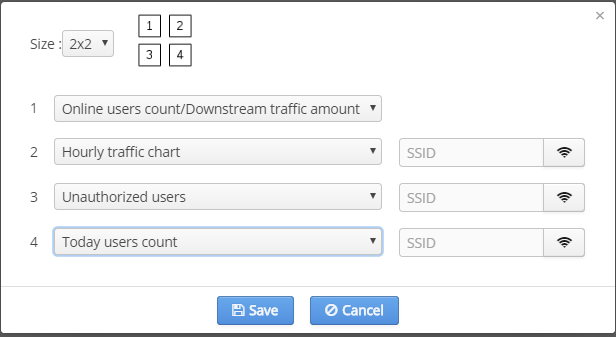
The section contains product operation statistics. Statistics type can be customized by a user, as a contents of the page can be changed. To select diagrams that will be displayed on the Start page and specify diagram types, click the button "Settings".
Notifications

The tab contains the list of critical notifications on system events. The tab is displayed only for accounts with super user rights.
To obtain more detailed information, select an entry and click "More".
An example of a notification on modules failures.
Statistic of a provider
The section contains statistics on the whole Platform.
Quotas
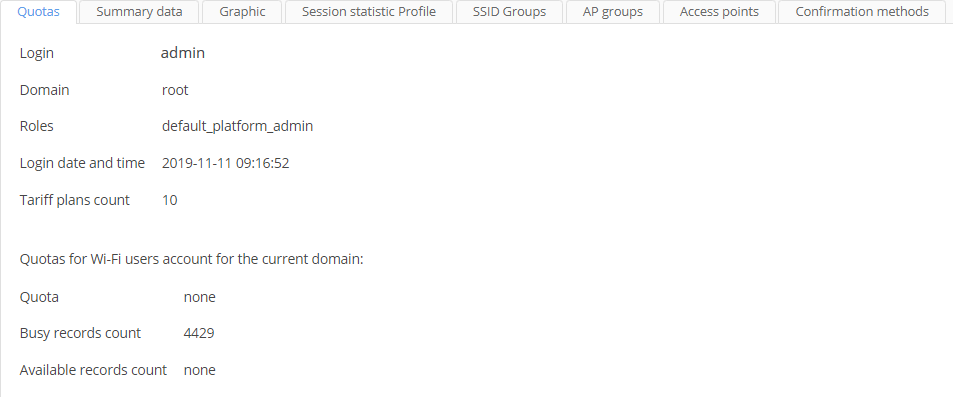
The tab contains information on a current user's account:
- Login
- Domain
- Roles
- Login date and time
- Tariff plans count
- Quotas for Wi-Fi users accounts
- Busy records count
- Available records count
Summary data
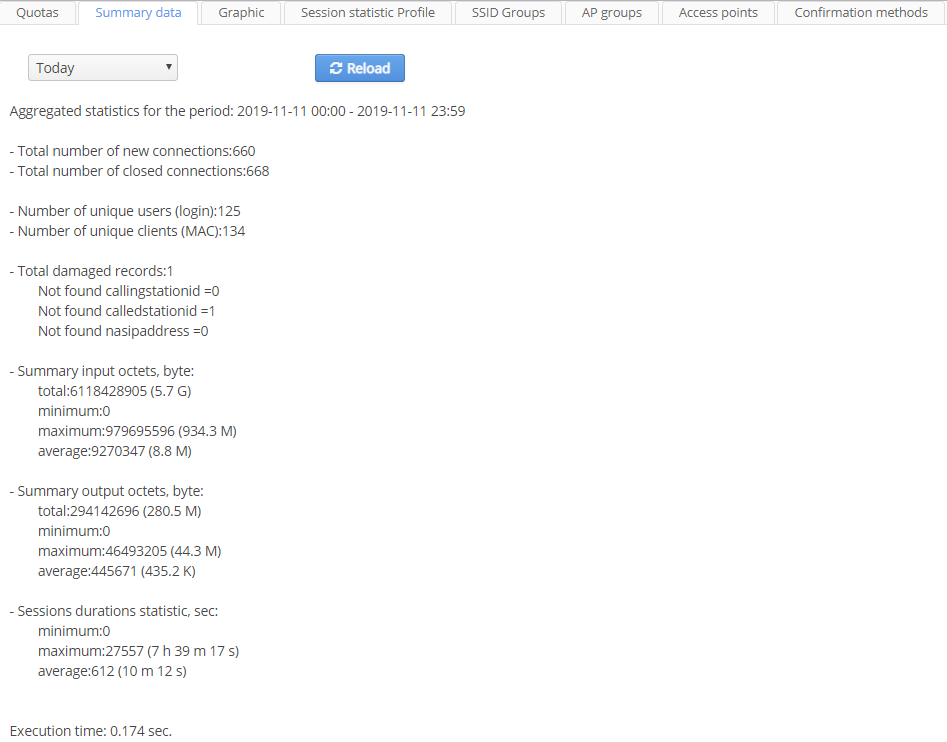
The tab contains a summary report on the "Wi-Fi Platform" operation in terms of providing end users with Wi-Fi service. Accounting (billing) information from the RADIUS service is taken into consideration. The report is generated considering a user's domain. Thus, the report will contain information on all domain and subdomain users (i.e. the main division and subsidiaries, if any) of a client's organization. The basic parameters of a summary report:
- Total number of new connections;
- Total number of closed connections;
- Number of unique users (login);
- Number of unique clients (MAC);
- total and average input octets (for Wi-Fi users);
- total and average output octets (for Wi-Fi users);
- Execution time — data on duration of sessions.
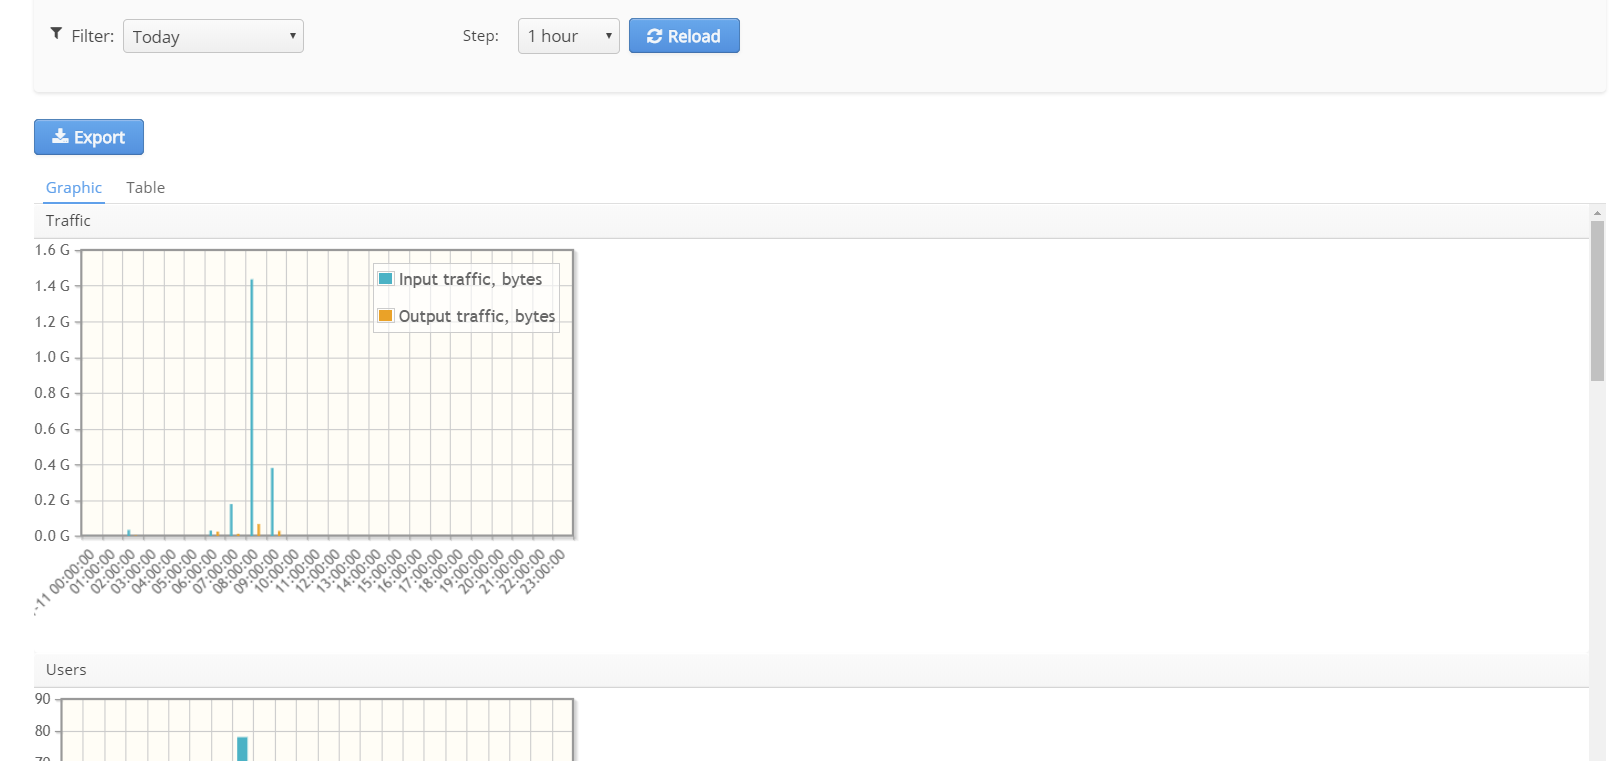
Graphic
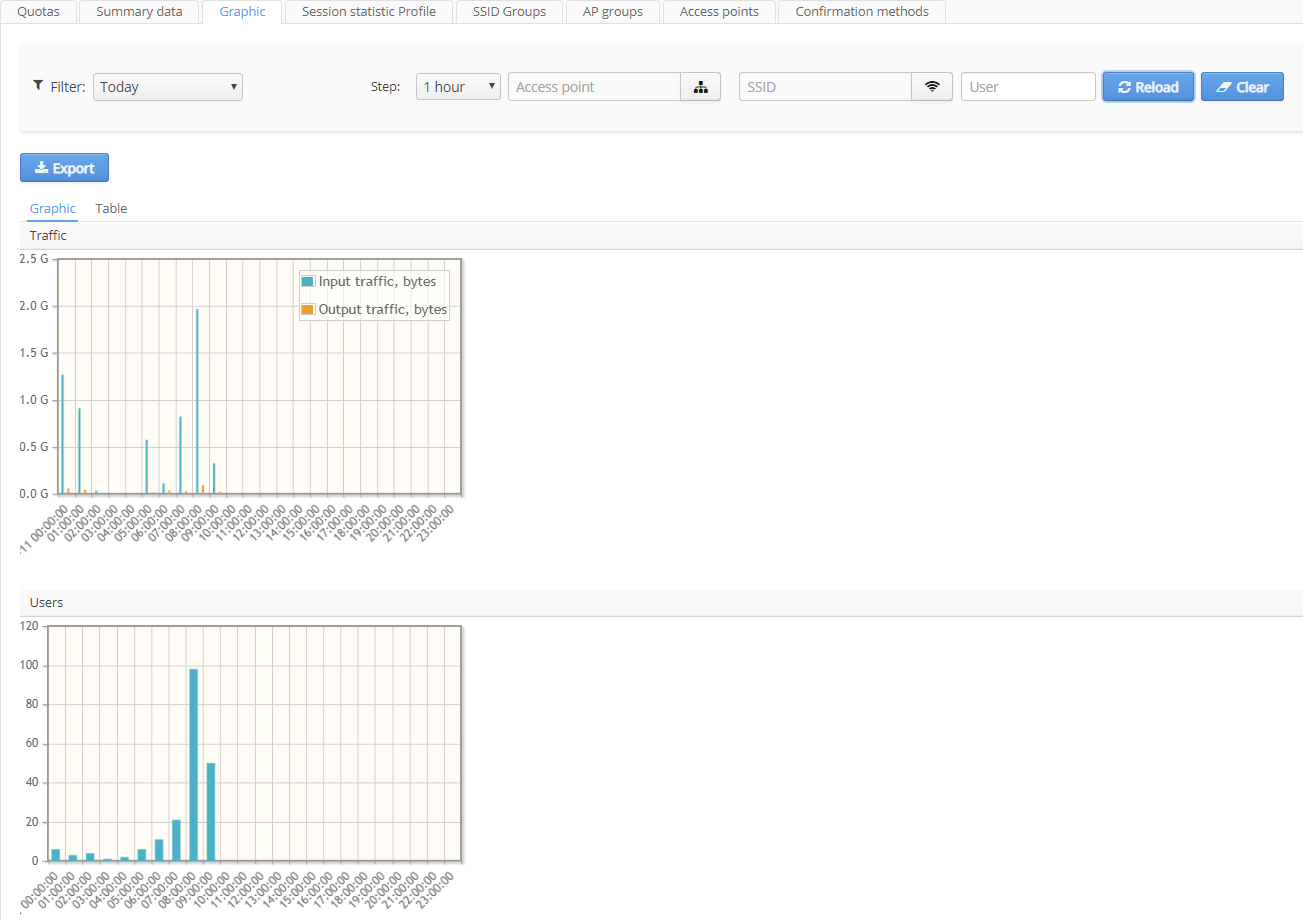
On this tab, different statistics on Wi-Fi Platform operation is displayed in graphic form for different time frames. Information can also be displayed in a tabular form.
When a diagram is generated, the system automatically counts the number of sections and does not allow performing requests with certain accuracy exceeded. For example, it is impossible to perform a request with hourly statistics for a month period.Diagrams contain the following information:
- Session time – average session time;
- Traffic – the volume of incoming and outgoing traffic;
- Connections– the number of connections;
- Users – the number of unique users (login);
- Devices – the number of unique devices (MAC addresses).
Session statistic Profile
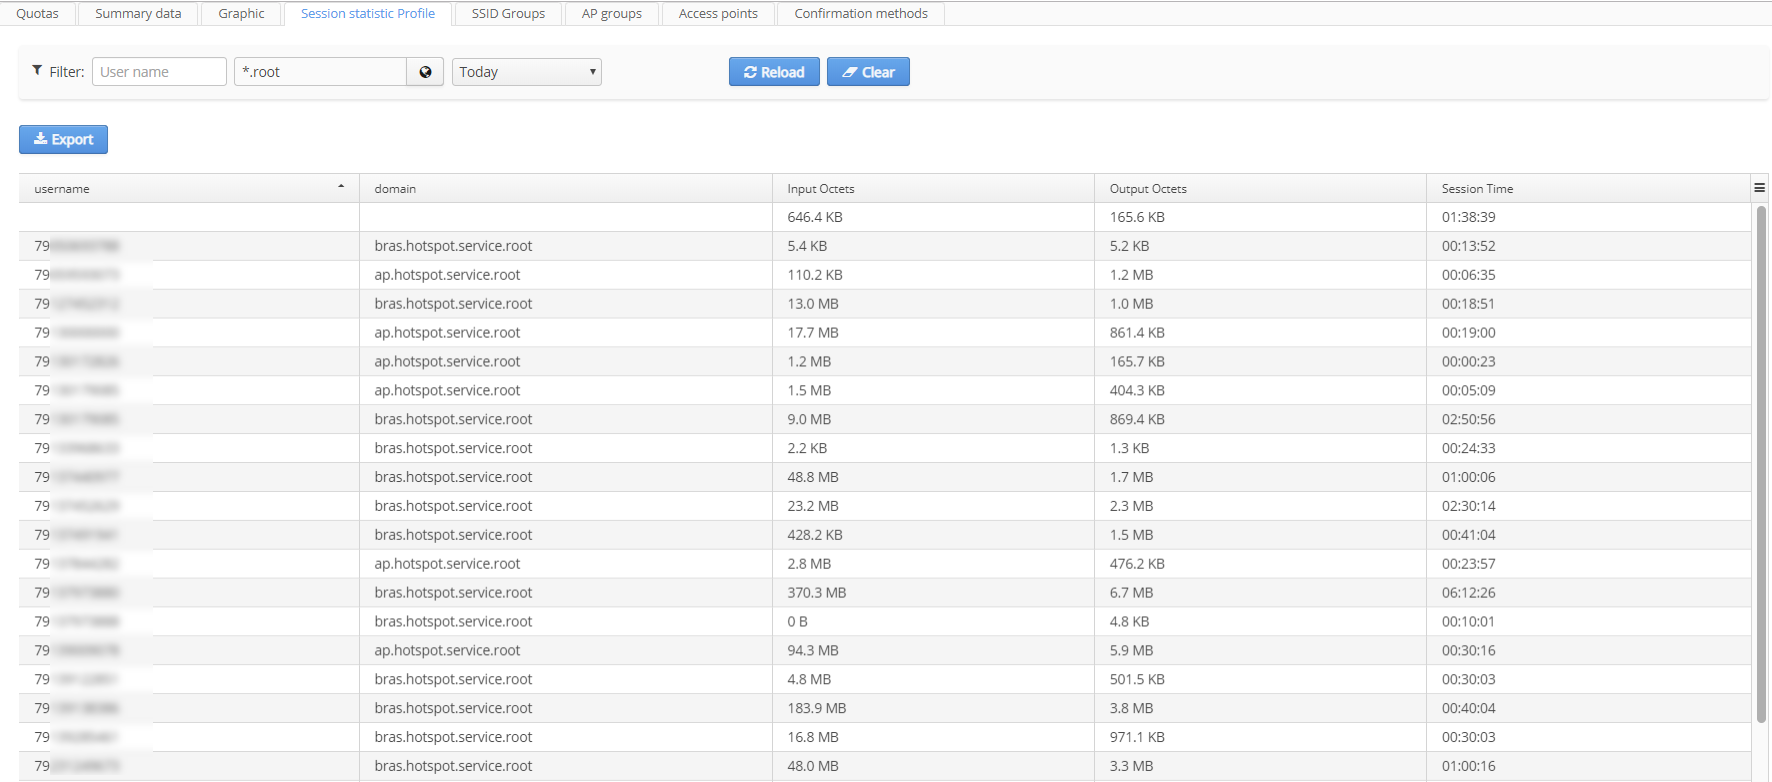
There is a table with user sessions on the tab. The table contains the following tabs:
- Username
- Domain
- Input Octets
- Output Octets
- Session Time
SSID Groups
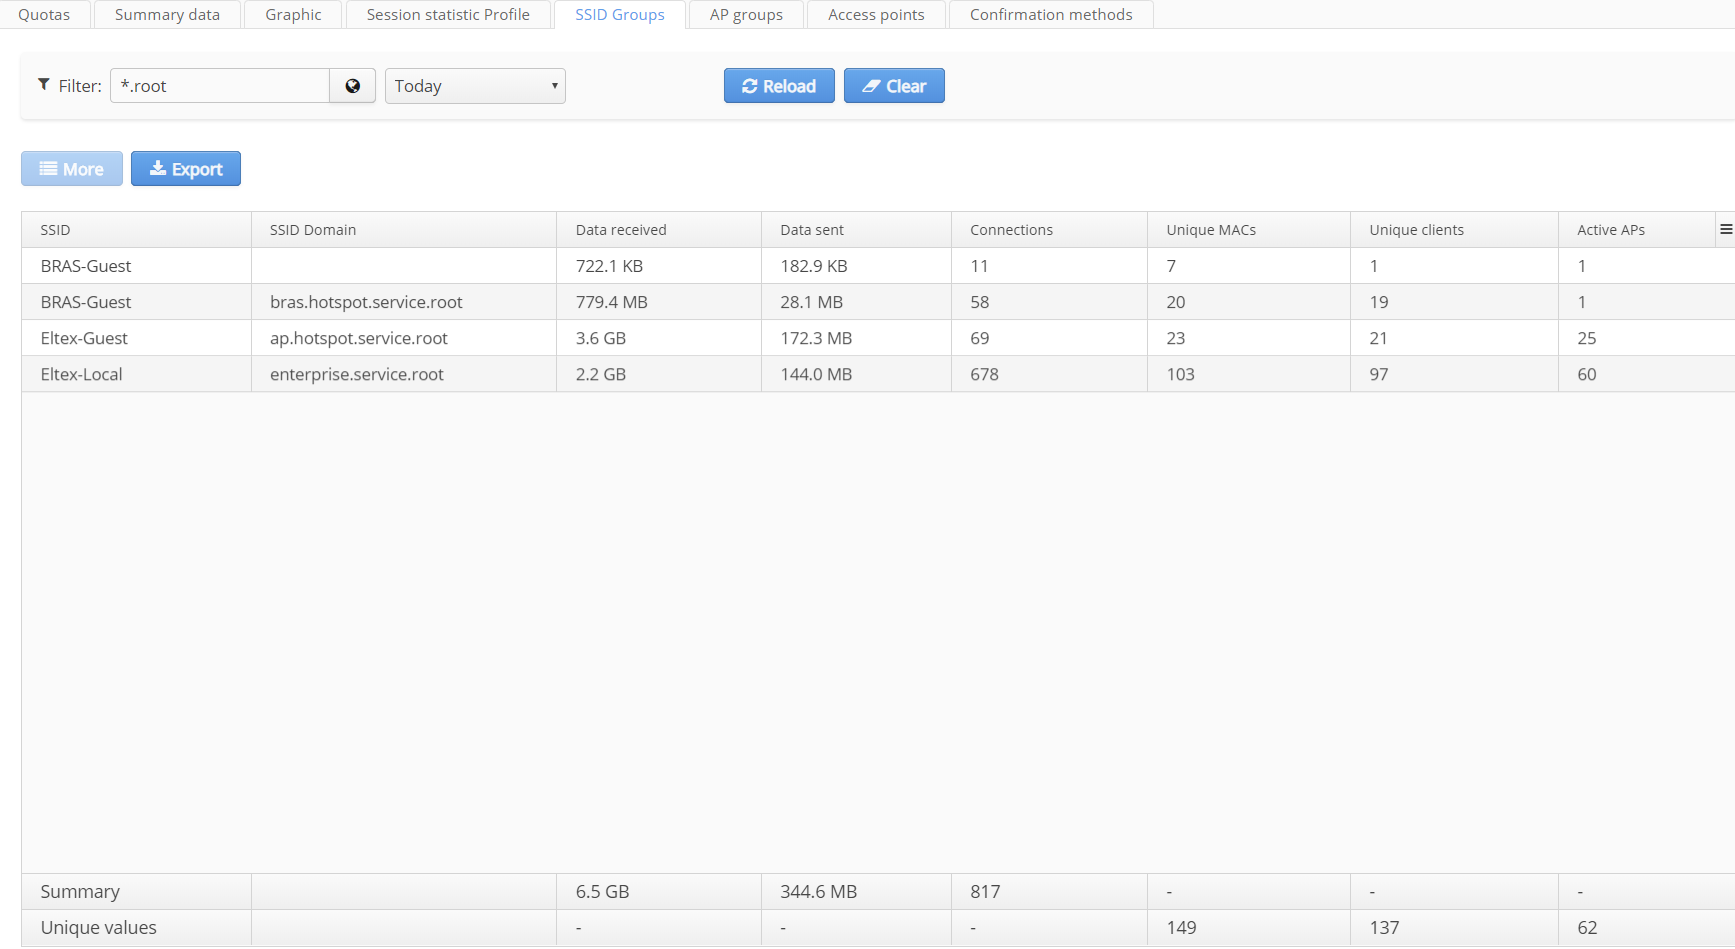
The tab "SSID Groups" allows obtaining statistics on the whole network from the perspective of SSID. The tab contains filters on the domain and on the date.The summary table includes the following information:
- SSID;
- SSID Domain;
- Data received, in bytes (for clients of service);
- Data sent, in bytes (for clients of service);
- Connections (to SSID);
- Unique clients (login);
- Unique MACs (devices);
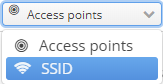
- Active APs (the number of access points really used for providing a service to a corresponding SSID).
The total number of elements is displayed in the row "Summary" for the columns for which this parameter has physical sense.The row "Unique values" contains the total number of unique values for all SSIDs that satisfy the sampling condition.
The row "Unique values" is necessary because some access points have several SSIDs. At the same time, some user devices (MAC) can get a service in several SSIDs. As a consequence, the simple summation of cell values will lead to wrong results.
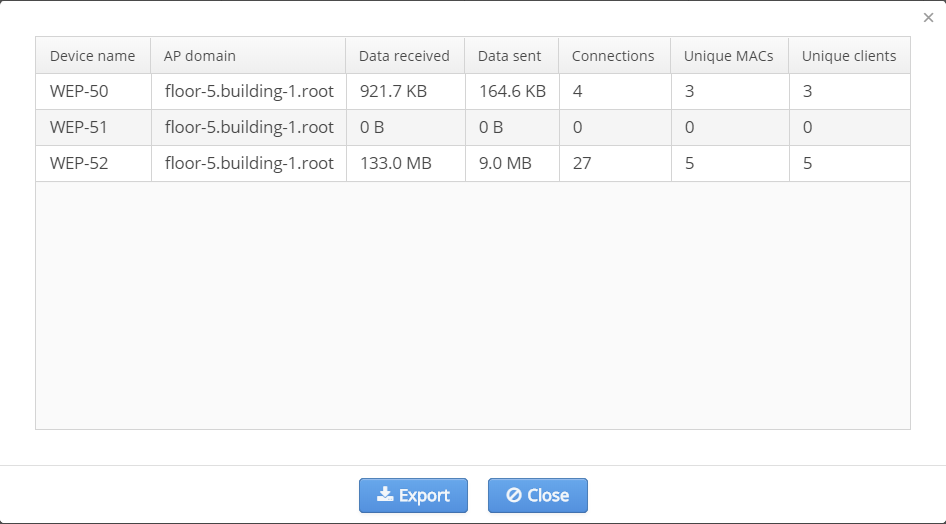
Statistics can be displayed for each SSID (cell). To view statistics, click on the required row with the left button and then click  . A modal dialog with detailed information will be displayed.
AP groups
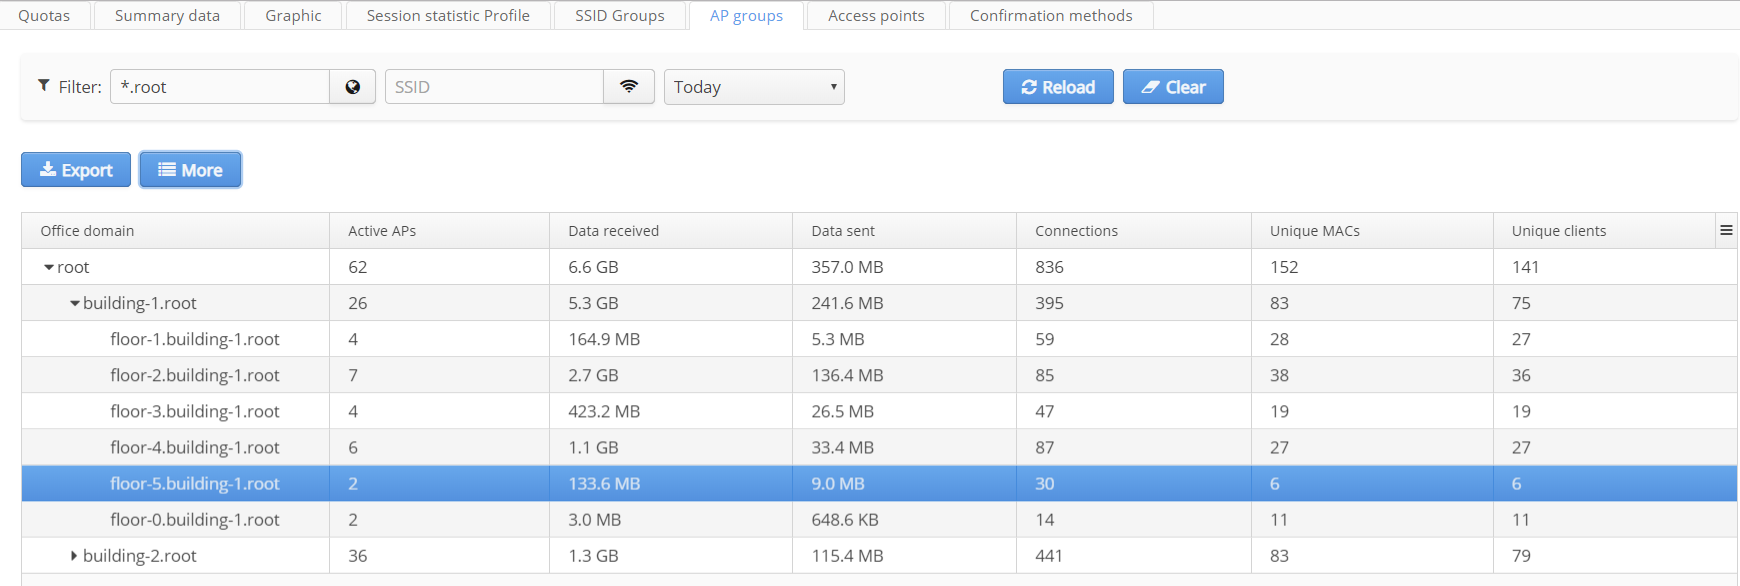
The tab "AP Groups" allows getting statistics on AP groups. Access points are grouped by a domain (i.e. according to organization and location).Information shown for each group:
- Office domain;
- Active APs;
- Data received, bytes (incoming traffic for Wi-Fi users);
- Data sent, bytes (outgoing traffic for Wi-Fi users);
- Connections (for all SSIDs on the AP);
- Unique MACs (the total number of unique subscriber devices served by the AP on all SSIDs);
- Unique clients (the total number of unique user accounts "login" served by the AP on all SSIDs);
To obtain more detailed information on AP clients, select a domain in which access points are located (statistics is not obtained for nested domains) and click the button  .
.
Access points

The tab "Access points" contains information on status of access points installed in the network.
The following AP parameters are displayed in the table:
- Name
- Domain
- MAC address
- Type
- IP address
- FW version
- Current state:
- Wi-Fi users
- Total received (received traffic, MB)
- Transmitted (sent traffic, GB)
- Avg and Summ rate (average and summary transfer rate. Kb/s)
- Work time, seconds
- Full name
- Account number
- City Street
- House
- Building Floor
- Office
The following columns are filled in after activating the checkbox "Show SSIDs". When it is checked, SSIDs and information on them are displayed in corresponding cells of the table for each access point.
- SSID
- SSID domain
- VAP state
- Security mode
- Radio mode
- Portal
- Portal tariffs
The list of displayed access points can be filtered with the help of the following filters:
- by domain
- by name
- by IP address
- by MAC
- by FW version
When the checkbox "Only problem APs" is checked, access points to which connection was lost can be filtered.
Confirmation methods
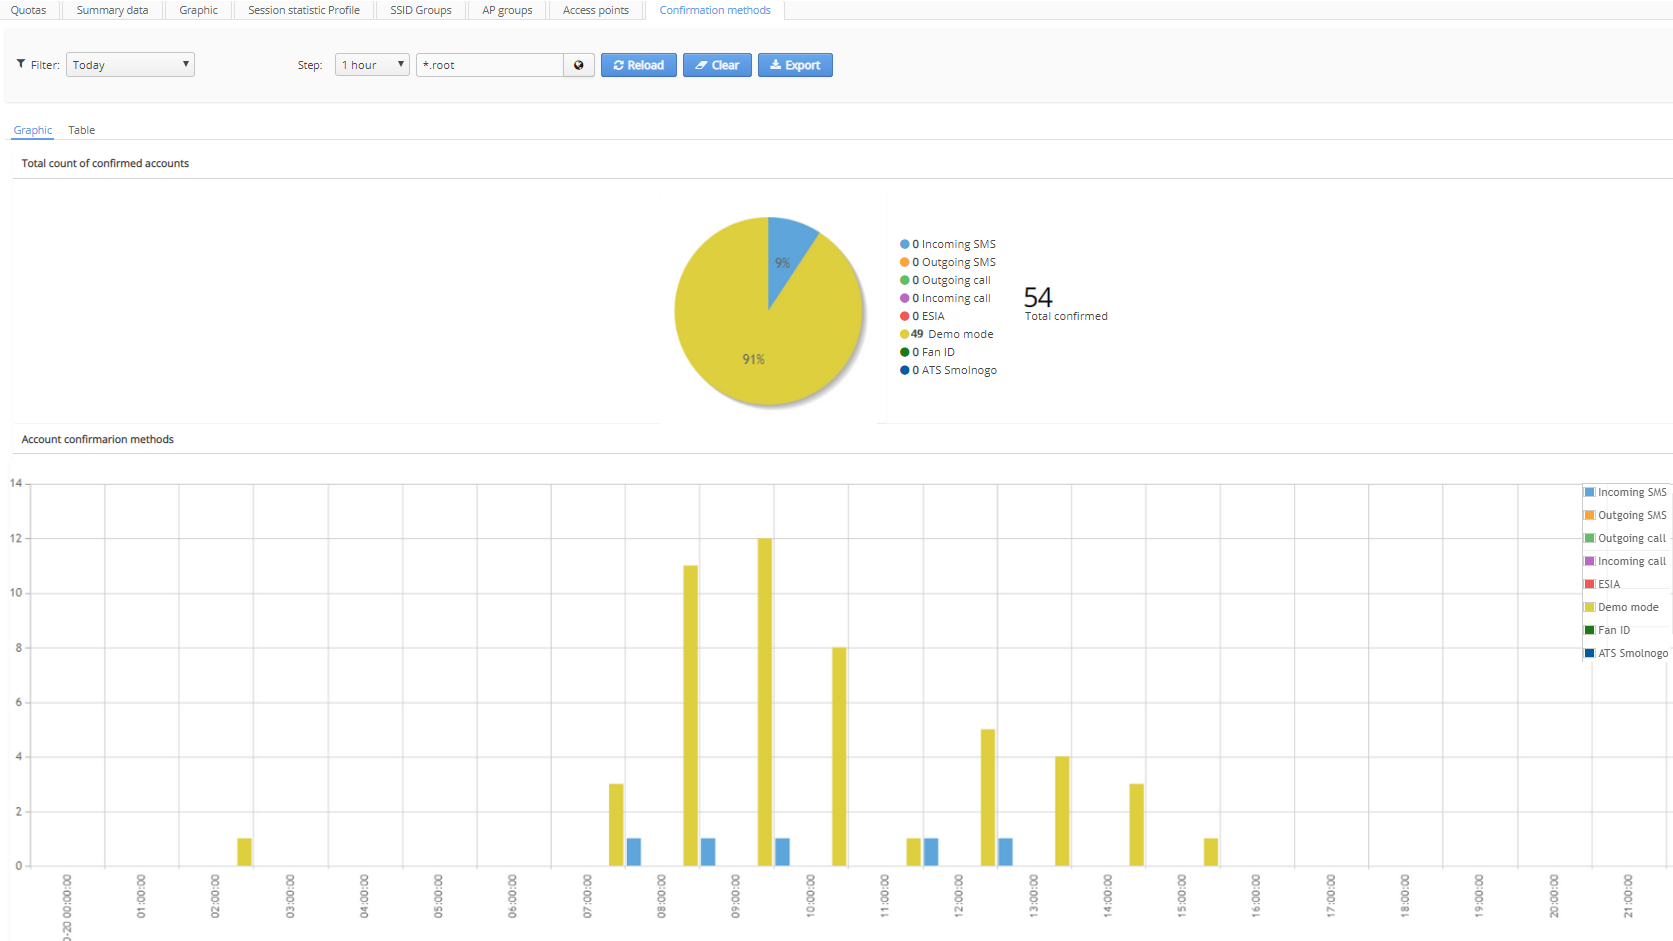
In this tab, statistics is displayed as charts on subscriber authentication methods (methods of phone numbers confirmation). There are 8 account confirmation methods:
- Incoming SMS
- Outgoing SMS
- Outgoing/Incoming call
- ESIA
- Demo mode
- Fan ID
- ATS Smolnogo
A pie chart showing percentage of account confirmation methods for all time and a bar chart showing distribution of authentication methods during a certain time period can be found on the tab. The same statistics can be also displayed in the tabular form.
SMS Statistic
In this section, statistics on SMS messages sent to subscribers by the system via an SMS gateway during portal authorization.
SMS statistic by time
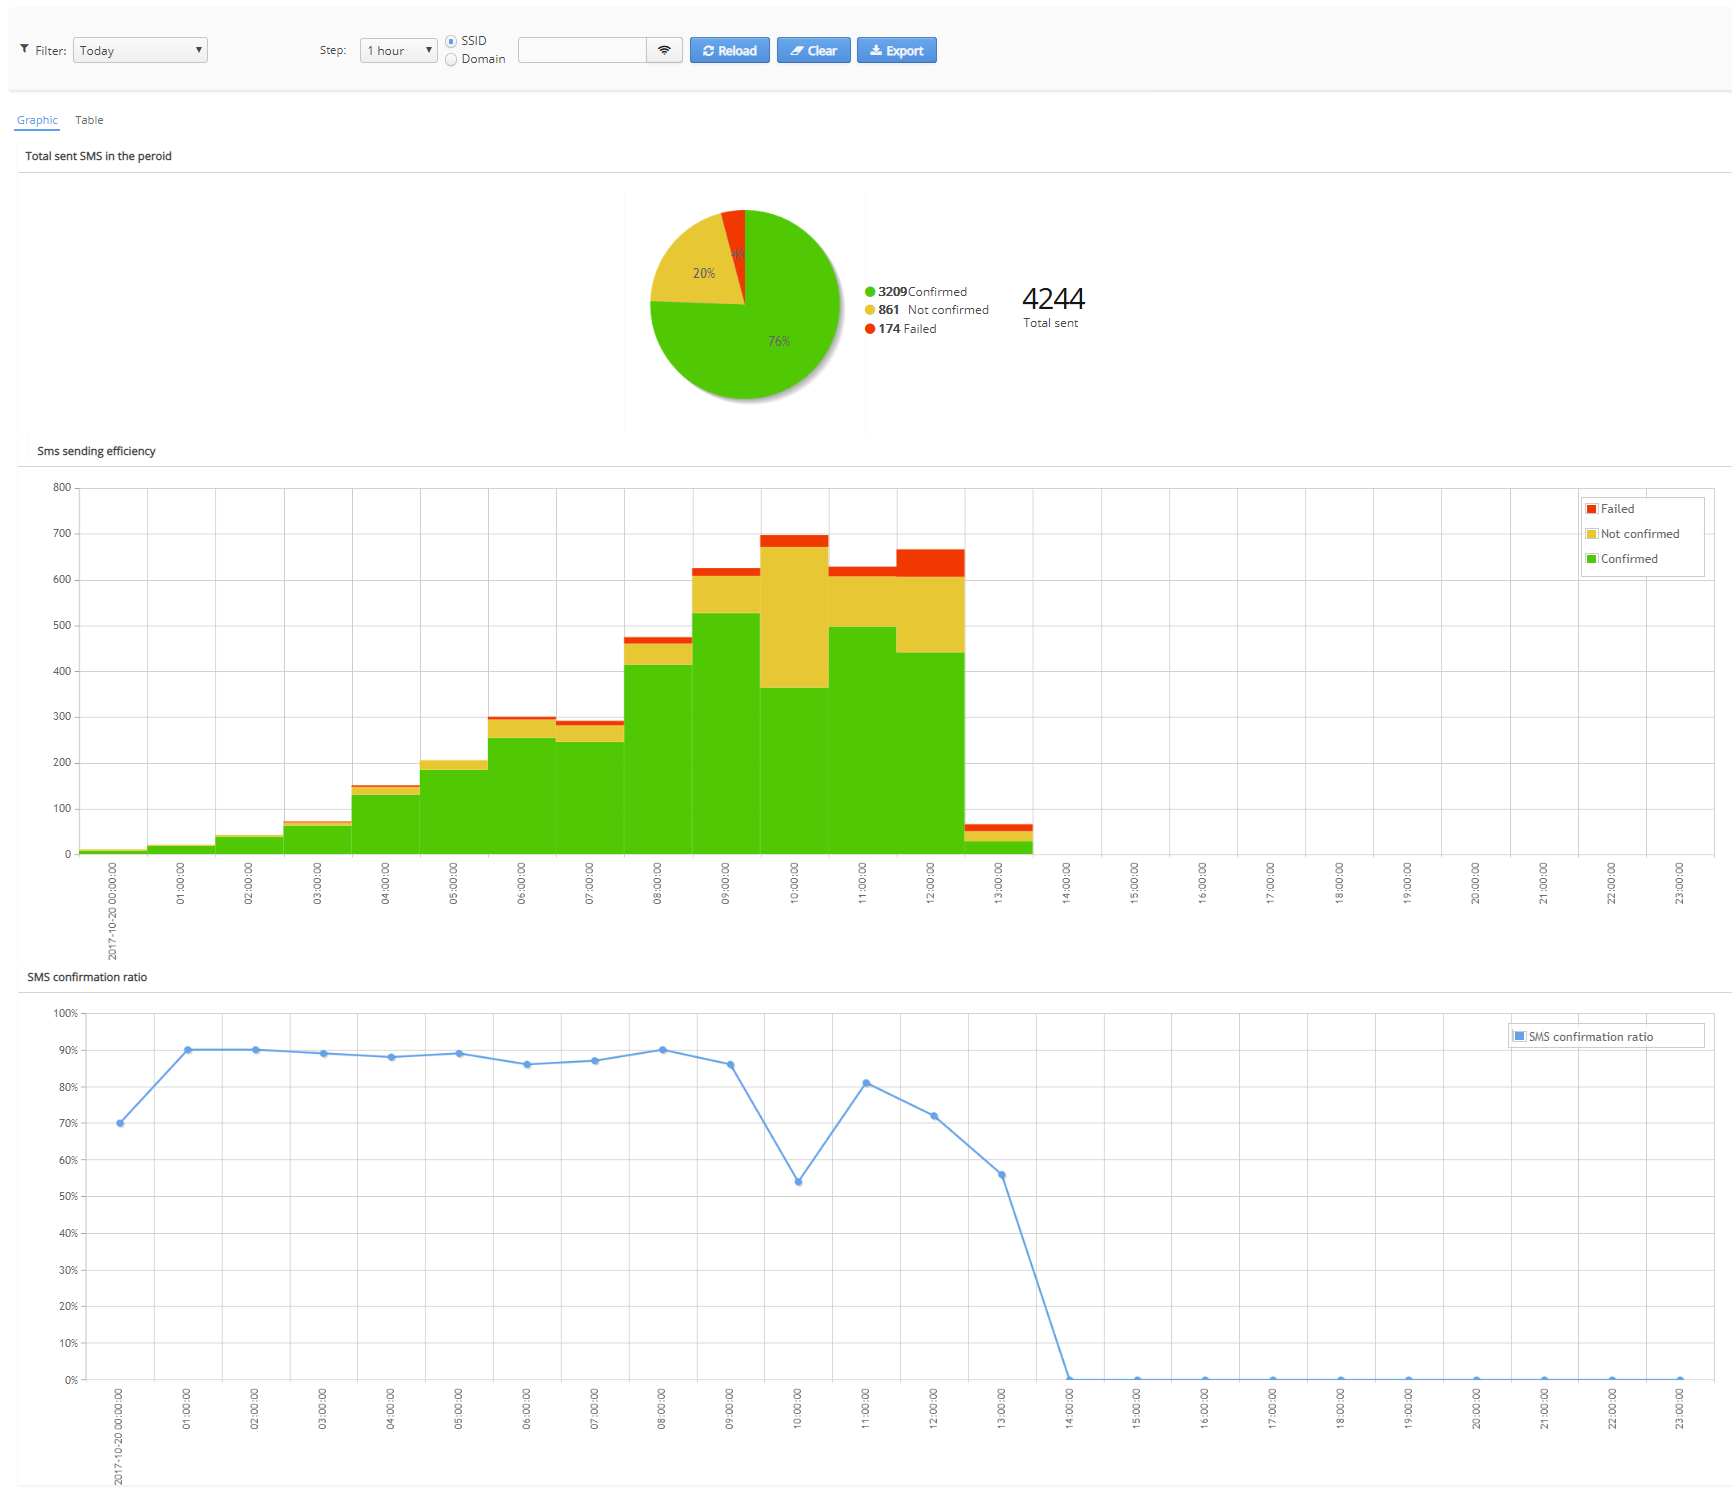
This tab contains charts showing statistics on SMS sent during a certain period of time:
- Total sent SMS in the period (the number of confirmed, not confirmed, failed SMS during the whole period shown as a pie chart)
- SMS sending efficiency (the number of confirmed, not confirmed, failed SMS during the whole period shown as a pie chart)
SMS confirmation ratio (percentage of SMS after sending which a user has confirmed his account and authorized on the portal)
There are filters on the time, the SSID or the domain on the page. If the checkbox "SSID" is selected, it is possible to set a filter on the SSID, if "Domain" is selected, it is possible to set a filter on the domain.
SMS statistic by group
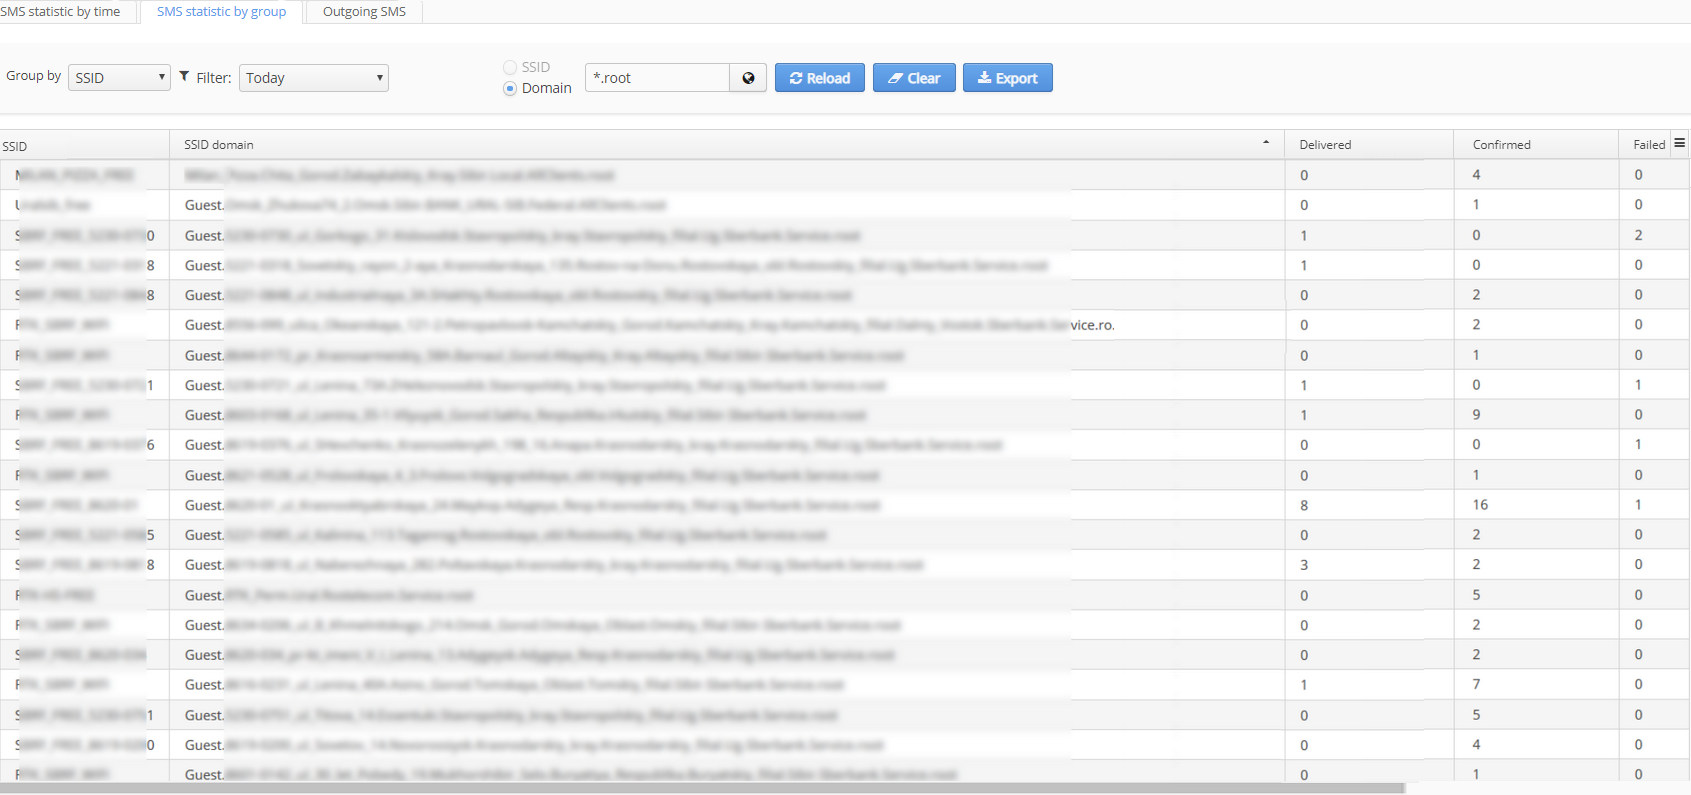
In this tab, there is a table containing statistics on sent SMS with and opportunity to filter them on:
- SSID
- Time (set by the corresponding checkbox)
- Domain (set by the corresponding checkbox)
Results displayed in the table can be grouped by:
- SSID
- Domain
- Geodomain
- Portal
The table contains the following information:
- SSID
- SSID domain
- Delivered (the number of SMS delivered to a subscriber)
- Confirmed (the number of SMS after receiving of which a subscriber confirmed his account on the portal)
- Failed (the number of SMS that has not been delivered)
Outgoing SMS
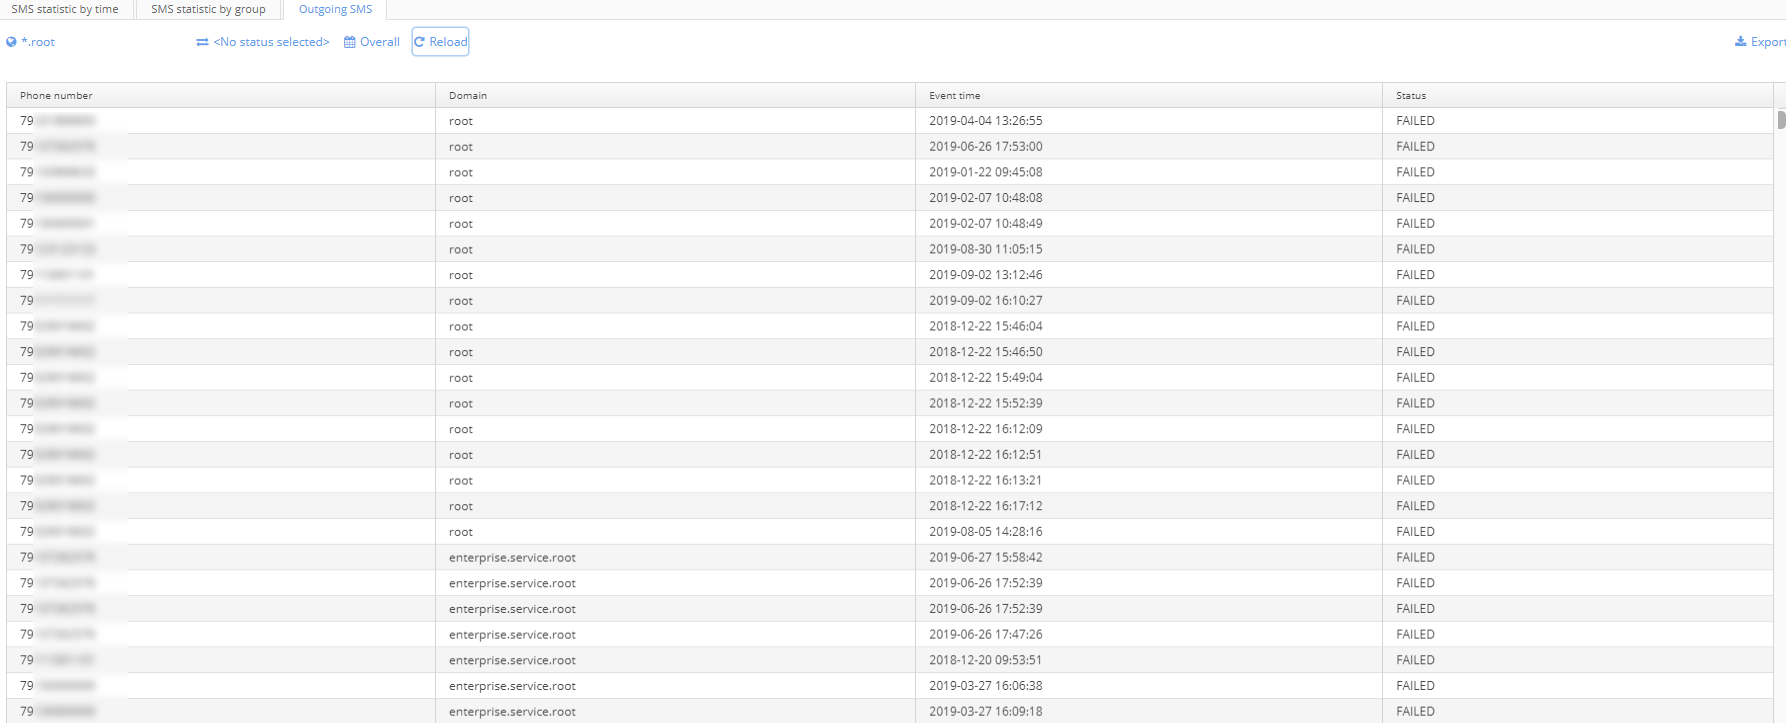
The table contains a list of all sent SMS. The following data is displayed:
- Phone number (to which an SMS was sent)
- Domain (in which a user is registered)
- Event time (date of sending)
- Status:
- "SENT" — a message was sent to a gateway, and is accepted for processing.
- "CONFIRMED" — a message was sent, and a user passed authorization with a temporary password.
- "FAILED" — an attempt to send a message failed (a gateway denied a request, or a timeout was exceeded).
Hotspot/Enterprise statistics
The sections contain statistics on authorization, Hotspot - SSID services with portal authorization and Enterprise - SSID services with RADIUS (EAP) authorization.
For users with RADIUS authorization data on traffic and sessions only is displayed. For users with portal authorization data on more parameters is available.
Control elements

The tabs "Users", "Service", "Traffic" and "Re-visits" have similar control elements.
- Filter — a time period for sampling
- Step — an interval for histogram construction
- Domain — a domain within which data sampling is performed
- Access point — sampling data on a certain access point.
- Reload — read data from a database using new filter settings
Users
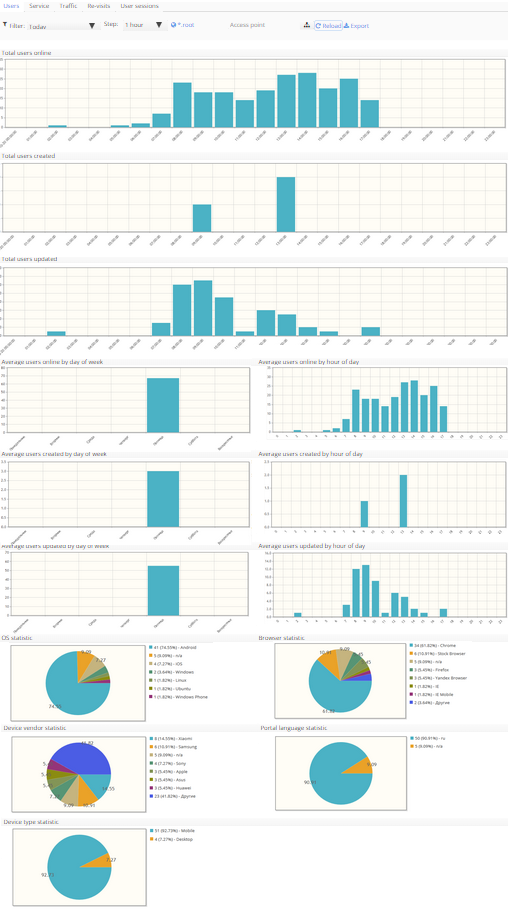
This tab contains the following diagrams:
- Total users online
- Total users created
- Total users updated
- Average users online by day of week
- Average users online by hour of day
- Average users created by day of week
- Average users created by hour of day
- Average users updated by day of week
- Average users updated by hour of day
- OS statistic
- Browser statistic
- Device vendor statistic
- Portal language statistic
- Device type statistic
Data filtering by the time and the domain is available.
Service
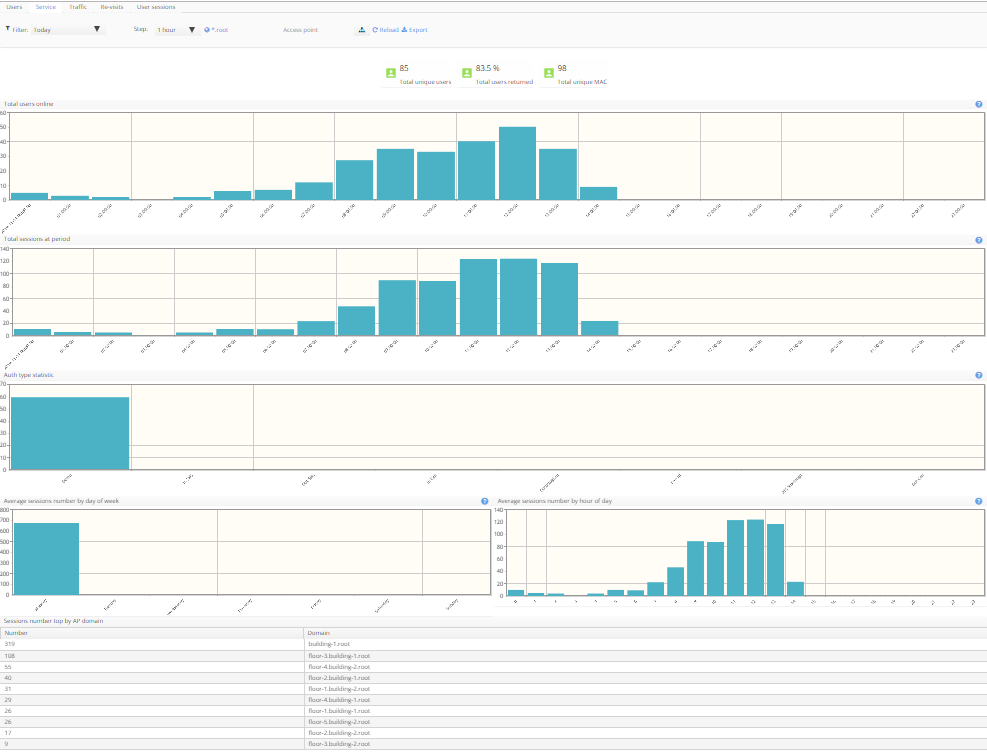
This tab contains the following diagrams:
- Total users online
- Total sessions at period
- Auth type statistic
- Average sessions number by day of week
- Average sessions number by hour of day
- The table "Sessions number top by AP domain" The table contains:
- Domains
- Number of sessions in each domain
Data filtering by the time and the domain is available.
Traffic (Hotspot/Enterprise)
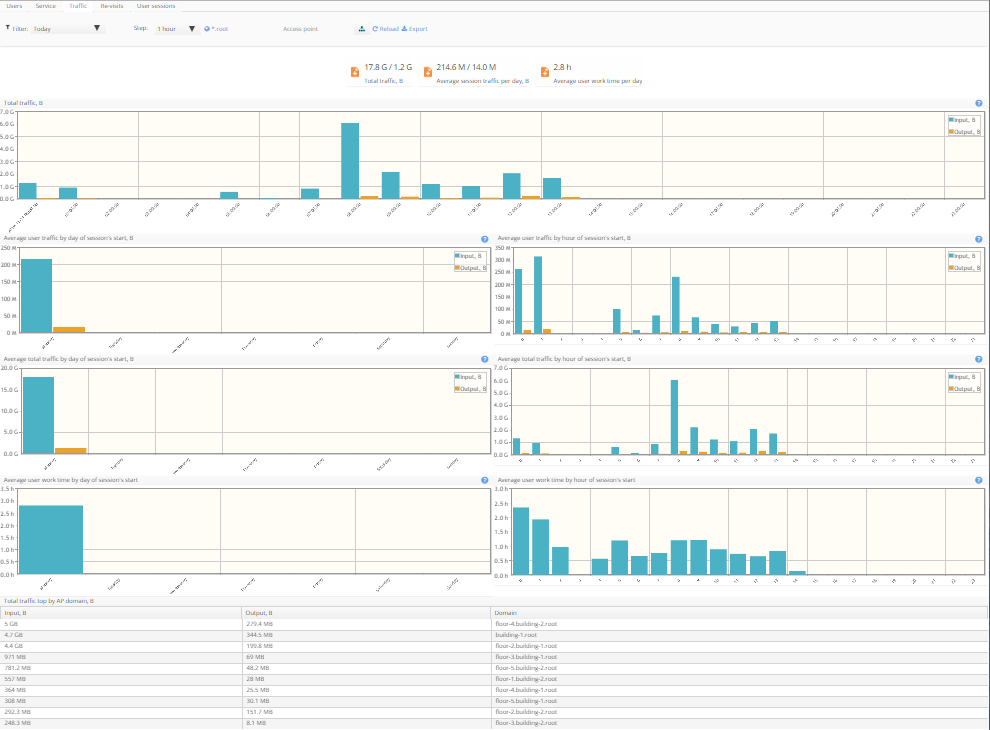
This tab contains the following diagrams:
- Total traffic
- Average user traffic by day of session's start
- Average user traffic by hour of session's start
- Average total traffic by hour of session's start
- Average total traffic by hour of session's start
- Average user work time by day of session's start
- Average user work time by hour of session's start
- The table "Total traffic top by AP domain"
Data filtering by the time and the domain is available.
Re-visits
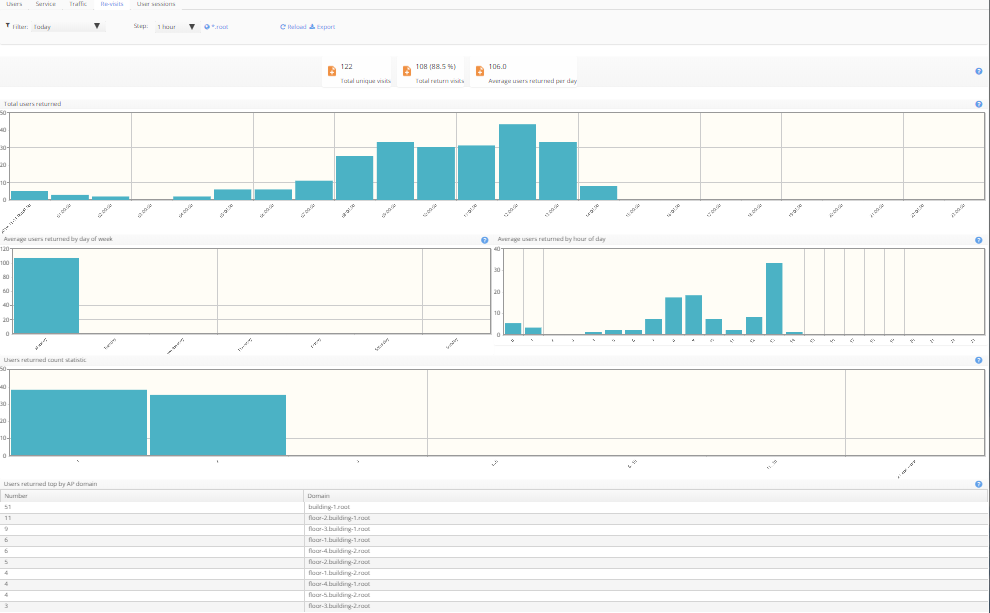
This tab contains the following diagrams:
- Total users returned
- Average users returned by day of week
- Average users returned by hour of day
- Users returned count statistic
- The table "Users returned top by AP domain"
Data filtering by the time and the domain is available.
User sessions (Hotspot/Enterprise)
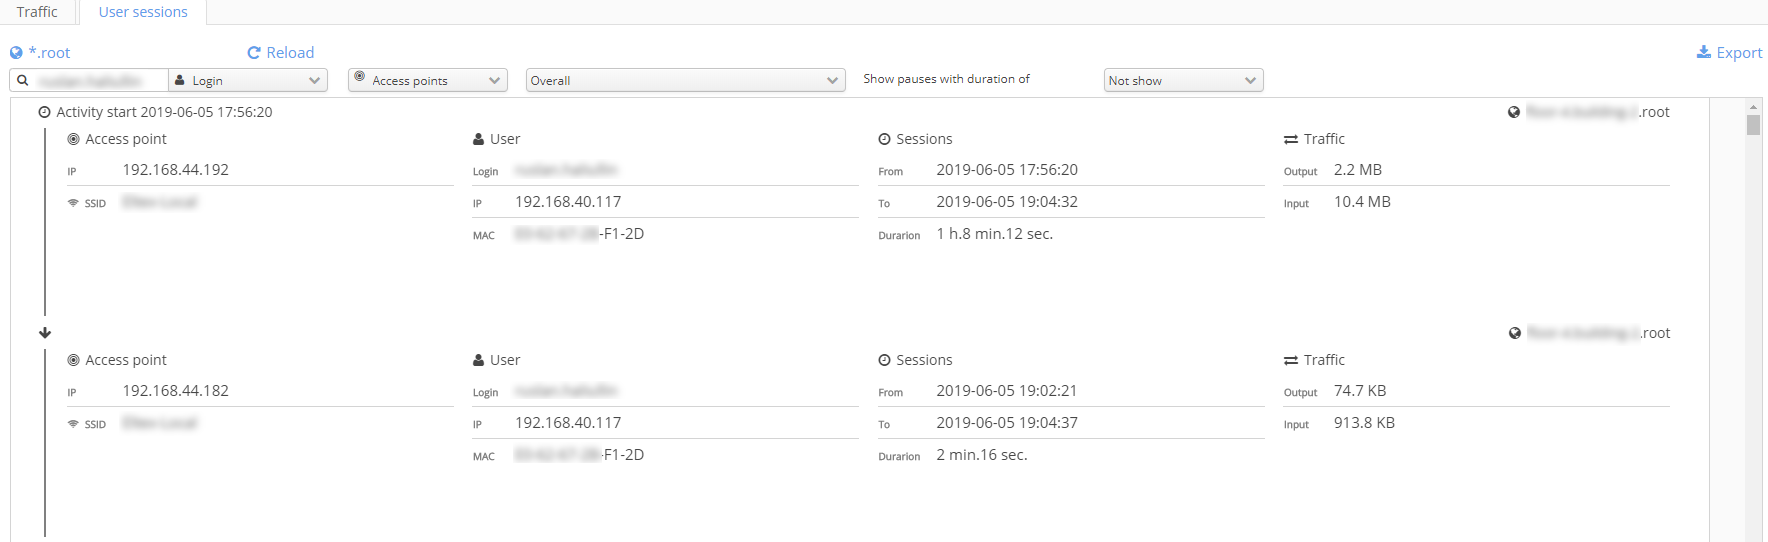
The table is intended to display data on Wi-Fi users' sessions and allows tracking users' movements with the time of their connection to access points and disconnection from them.
Displayed data:
- Domain
- Access points
- IP
- SSID
- User
- Login
- IP
- MAC
- Sessions
- From
- To
- Traffic
- Input
- Output
Standard control elements:
- Domain — define a domain within which a search for sessions will be carried out.
- Reload — make a request to a database again to reflect filter changes.
- Export — export obtained data to .csv.
The table also has a special set of filters and display modes.
Searching for user sessions
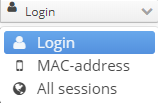
There are several modes to search user sessions:
- By login. In this mode, the filter looks like:
 . A search for an expression specified in the field will be performed.
 - By MAC address. In this mode, the filter looks like:
 . A search will be performed on MAC address specified as hexadecimal numbers divided by colons.
 - All sessions. In this mode, the filter looks like:
 . In this mode, all sessions from a domain specified in the filter will be displayed.
Grouping mode
The following modes of grouping the results are available:
- Access points — user sessions will be grouped by access points. This mode should be used if it is necessary to obtain exact information on what access points a user connected to.
- SSID — sessions will be grouped by SSID. In this mode information on SSIDs to which a user was connected is given.
Sampling dates range
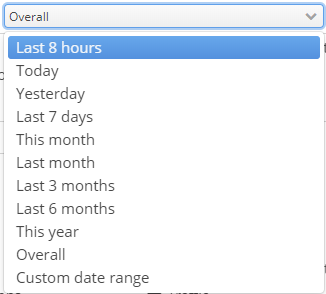
Specifying a time range for which a search will be performed. Select one of the proposed time templates:
Or specify a required interval by selecting "Custom date range":

Merging sessions

Each user session starts with authorization and ends with disconnection from an access point. However, connection and disconnection processes may occur frequently and often invisibly for users, for example when a device enters a sleeping mode to save energy and then returns back. A new session is created during any such cycle. For data to be displayed in the table in a readable form, it is possible to merge several sessions created by the same user on the same access point and SSID into one session if their time interval is lower than some threshold. To configure this option, the parameter "Show pauses with duration of" is used.
One of the following modes can be selected:
- Show all — each session will be displayed separately.
- 1 hour, 6 hours, 12 hours, 1 day — an interval between sessions upon exceeding of which sessions are not grouped.
- Not show — merge all user sessions on one access point and one SSID.
Services and tariffs
Tariffs
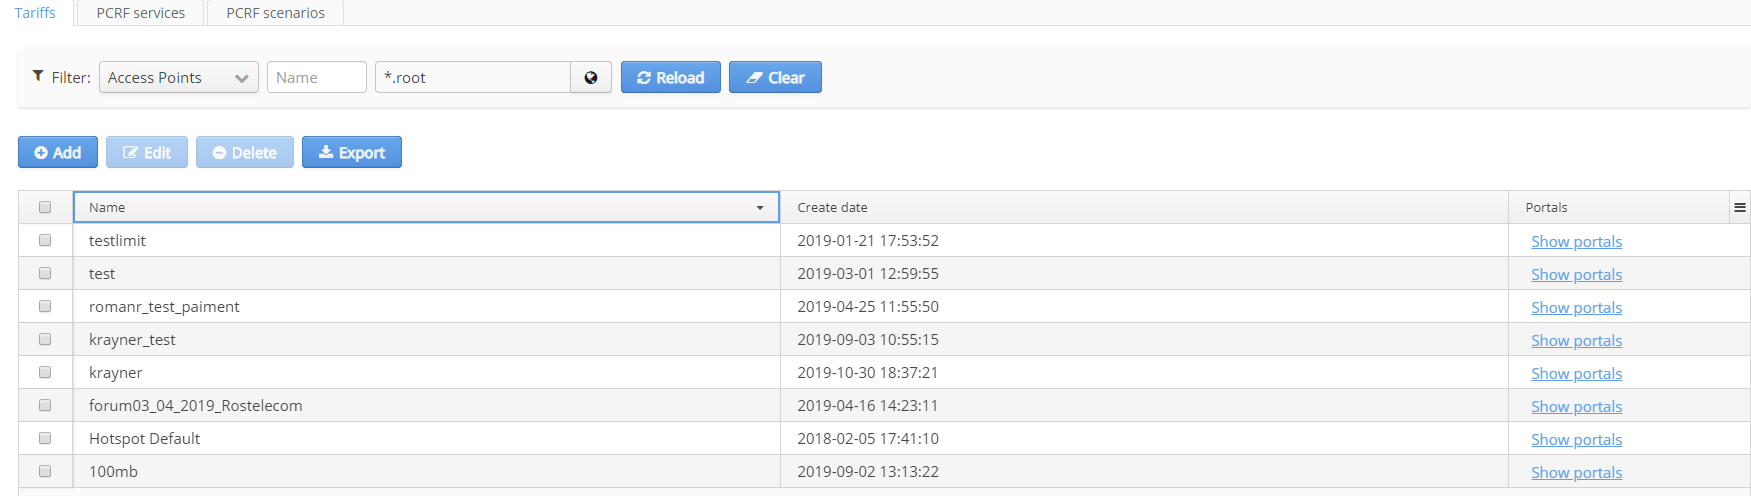
In this section, tariffs for Wi-Fi users' access to the network are configured.
Tariffs are splitted into the two groups:
- PCRF/BRAS — authorization is carried out on BRAS with any vendors' access points.
- Access points — authorization is made on Eltex access points. Access points tariffs are in turn splitted into:
- Enterprise access points — for RADIUS authorization
- Portal authorization — for authorization via Eltex Portal
In the tab "Tariffs" there is a table with the following fields:
- Name — tariff name
- Code — unique tariff code
- Domain — tariff domain
- Create date — date of tariff creation
- Description — tariff description in free-form text
- Users — user accounts related to a tariff under consideration
- Portals — portals related to a tariff under consideration (if this column is not displayed, enable it via table properties by clicking a button in the upper right corner of the table).
Tariffs for access points
Enterprise tariffs
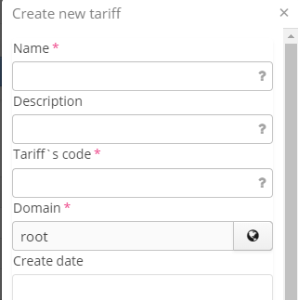
Enterprise tariffs are used to specify limitations for sessions of users authorized via RADIUS in WPA-enterprise mode.
- Name – tariff name;
- Description – tariff description;
- Tariff's code – tariff code;
- Domain – tariff domain;
- Create date – tariff creation date (set automatically);
- Deactivation – disable authorization of users with a certain tariff and user account until this account and relevant statistics is removed from a database;
- SSID – name of a Wi-Fi network to which a user will be able to connect;
- Access restriction – the number of client devices that can be authorized under the same account;
- Max Bandwidth Down/Up, kbps – downstream and upstream transfer rate limitation for a user;
- Profile Policy Down/Up – Policy profile for a certain user. Policy profile is created in the Client QoS menu of an access point;
- The duration of the state, min – user session duration;
- Traffic limit, MB – downstream traffic limitation for a user;
- Time limit, min – time limitation for all user sessions;
- Validity period – the period of time during which a user account will be accepted. The period of time is calculated from an account creation date;
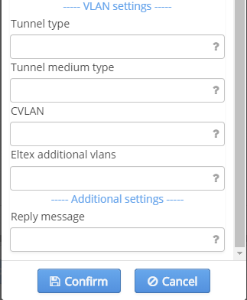
- CVLAN for transmitting user traffic to operator network via a separate VLAN (the attributes Tunnel-Type and Tunnel-Medium-Type with default values "13" and "6" respectively should be enabled).
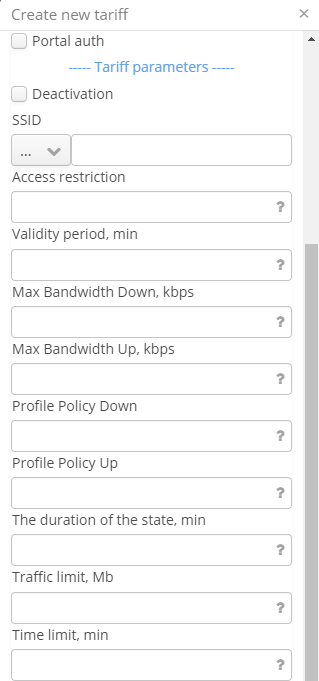
Tariffs for portal authorization using Eltex access points
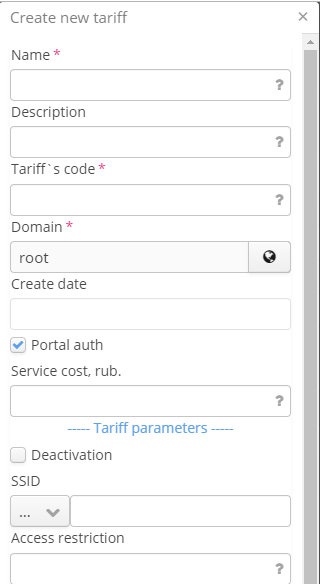
Tariffs of this type relate to creating access scenarios for users registered via Eltex access points with portal authorization configured. A tariff can have several access scenarios according to which a user is given full or limited Internet access.
Name – tariff name;
Description – tariff description;
Tariff's code – tariff code;
Domain – tariff domain;
Create date – tariff creation date (set automatically);
Price – the cost of using a certain tariff;
Deactivation – disable authorization of users with a certain tariff and user account until this account and relevant statistics is removed from a database;
SSID – name of a Wi-Fi network to which a user will be able to connect;
Access restriction – the number of client devices that can be authorized under the same account;
Validity period – the period of time during which a user account will be accepted. The period of time is calculated from an account creation date;
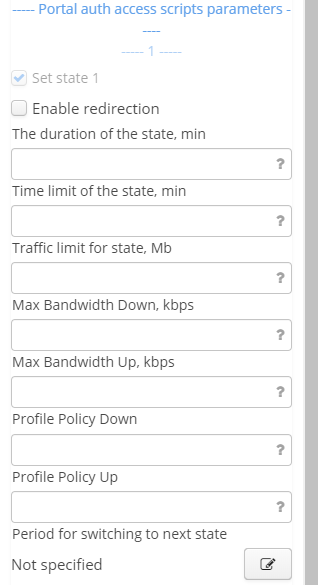
Set state N – enable state N (the first one is always enabled by default);
External URL – URL address for user redirection after portal registration;
Start session before redirect — when the checkbox is set, a session starts before redirection to an external URL address;
The duration of the state — the maximum duration of state N in minutes;
Time quota of the state — common quota for all user sessions within state N in minutes;
Traffic quota of the state — common quota for user downstream traffic within state N in megabytes;
Max Bandwidth Down/Up, kbps — bandwidth limit for user downstream and upstream traffic within state N in kbps;
Profile Policy Down/Up — Policy profile for a certain downstream user within state N;
Permitted hosts and IP addresses – the list of dns and IP addresses that are accessible without portal authorization. Permitted addresses should be separated by a comma.
- Period for switching to next state — a cron expression at which the switch to a next state happens.
PCRF/BRAS
Tariffs of this type define rules according to which a user with portal authorization will act in the scheme with BRAS
- Name — an arbitrary name;
- Description — a tariff description;
- Tariff's code — a tariff unique identifier;
- Domain — a domain in which a tariff will be created;
- Time of session life — session lifetime;
- Time of session life if a user is inactive — session lifetime when idle;
- Composition of services — the set of available scenarios and services.
PCRF services
Service — a policy applied to a user. For PCRF services to work in service router configuration, relevant access control lists (ACL) should be created. ACL name should be consistent with traffic class in service configuration. WELCOME service is used for user re-authorization. This service is obligatory, and it should be located in the root domain.
- Service's name — an arbitrary name that should not match a scenario's name;
- Domain — a domain in which a service will be located;
- Time's quota — time during which a service will work;
- Traffic's quota — volume of traffic available for a user;
- Account interim interval — interval between account information updating (radius interim-update);
- Ability transition of IP flows — approval or prohibition on traffic transmission in some direction;
- Default action — an action that will be applied to the service. The parameter can accept values: permit, deny, redirect;
- Default URL — a URL to which a user will be redirected when "redirect" action is selected. A URL should be specified in the filter with "permit" action;
- Name of filter — a filter that allows or denies access to a URL. For each filter a URL list should be specified. Each service may have up to 4 filters;
- Action — an action applied to a filter. Can accept values: permit, deny, redirect, redirect-without-parameters (no information needed in the field "URL" for redirection);
- URL — a URL to which a user will be redirected when the action redirect or redirect-without-parameters is selected.
PCRF scenarios
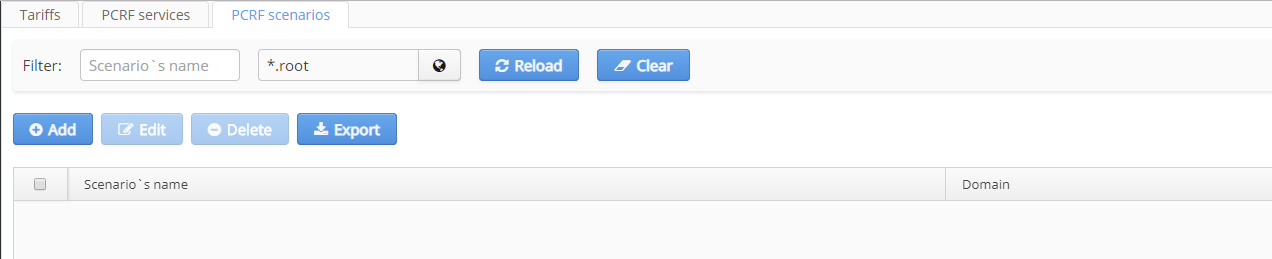
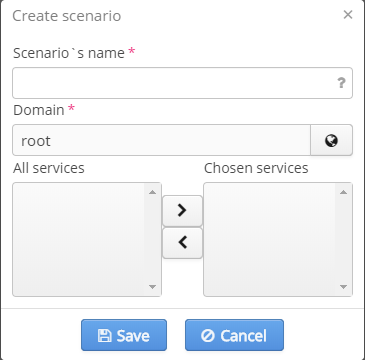
Scenario — a set of services merged into one entity. The reserved word "again" is used for a scenario to move back to the first step. For example, a scenario consists of INTERNET, LAN, again. When connected, a user will get the service INTERNET, then move to LAN. After that, a user will return to INTERNET on again command, then move to LAN etc. To use scenarios, a corresponding license is required.
- Scenario's name — an arbitrary name that should not match a service's name;
- Domain — a domain in which a scenario will be located;
- All services - the list of all services;
- Chosen services — the list of selected services.
Wi-Fi users
The section "Wi-Fi users"allows viewing and editing Wi-Fi users lists. The section has three subsections (tabs) that allow working with different groups of service recipients independently.
Each tab has structure similar to other tabs but differs from them in some specific control elements.
At the top of pages filters and control buttons are located. Under them a table containing information on Wi-Fi users can be found. The common elements are: a filter bar, buttons for creating/removing entries and a table with user accounts.
Each user account should have a set of mandatory attributes and a set of optional attributes. Mandatory attributes are:
- login;
- password;
- domain.
Other attributes are optional and can be ignored when an entry is created. A set of optional attributes depends on user account type.
There are three types of user accounts in the Wi-Fi Platform:
- Enterprise;
- Hotspot;
- Vouchers.
Enterprise
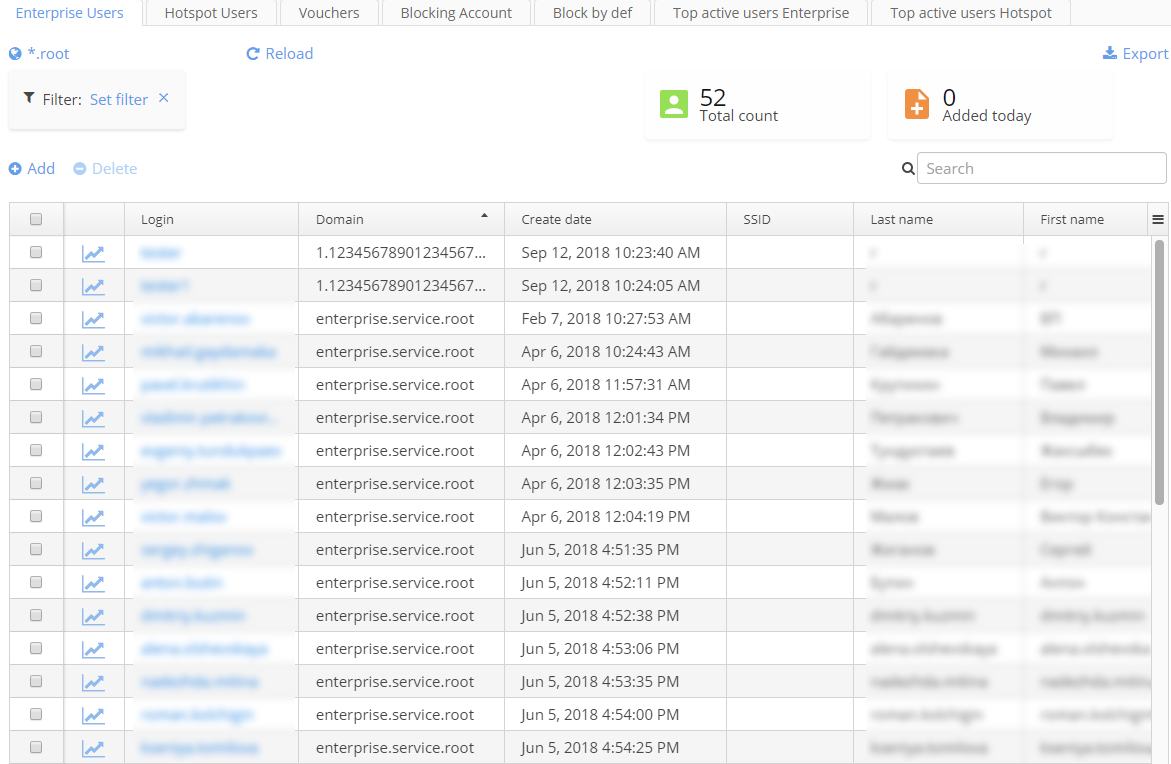
This tab is intended for creating user accounts that will receive logins and passwords for authorization in secure enterprise networks. Such user accounts are usually created for all company employees having access to Wi-Fi. Each user account has a login, a password and several optional parameters. A list of MAC addresses from which an enterprise user can enter an enterprise network can be specified too.
Entries filtering
Entries can be filtered by login, tariff or user status.
Adding and editing an entry
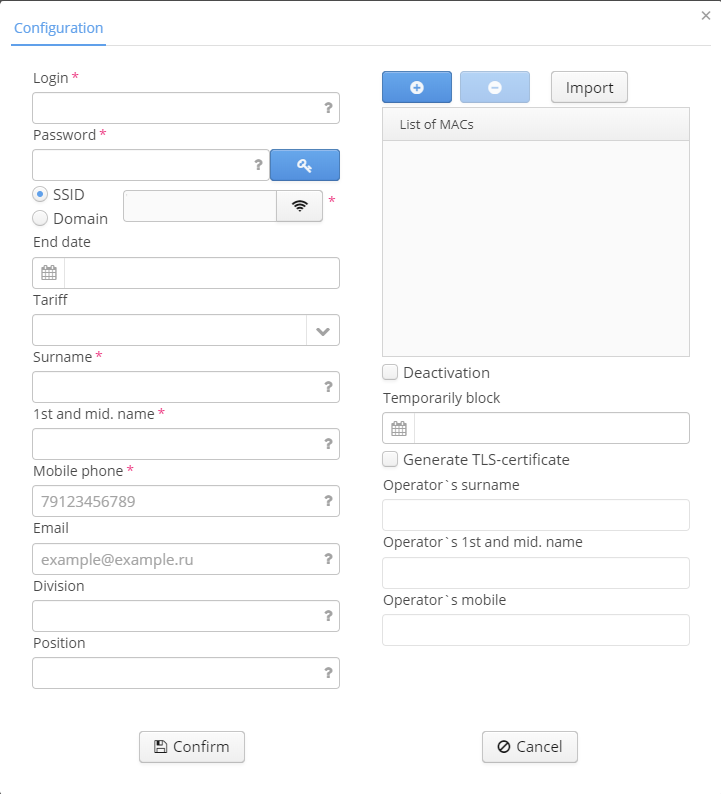
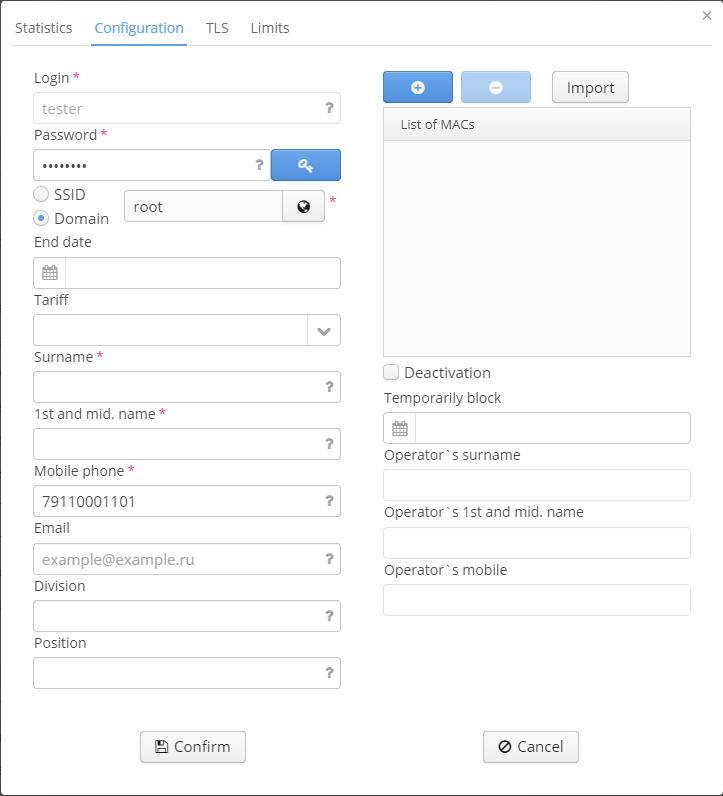
When the button "Add" is clicked, an edit window containing a fixed set of parameters is opened. Fields marked with "*" are obligatory. An attempt to save an entry with empty or incorrectly filled obligatory fields will be rejected. Empty or incorrectly filled fields are highlighted in red. When a mouse is moved over a field, a tip with rules on completing this field is displayed.The fields "Login", "Domain" and "Password" are obligatory in all scenarios. Other fields are optional in basic configuration. If it is necessary to make an optional field obligatory to be filled in, an administrator of the Wi-Fi B2B Admin Panel should specify it in system settings .User account parameters:
- Login (obligatory);
- Password (obligatory);
- Domain (obligatory);
- End date;
- Tariff;
- Surname;
- 1st and mid.name;
- Mobile phone;
- E-mail;
- Division;
- Position;
- MAC address;
- Deactivation;
The following control buttons are available in user account configuration window:
- Create a password – generate a user password according to rules of password generation specified in the menu "Settings";
- Confirm – create an entry and save the changes;
- Cancel — cancel the changes.
When an account is added, an operator's full name and phone number are registered. Data is taken from an operator's account. If data is not completed, adding an entry is not allowed.
To view and edit an account, click on the name of a corresponding entry. A window containing 3 sections will be opened. The main tab is "Configuration". Here the elements edited during account creating are available for editing too (see above). When an account is added, an operator's full name and phone number are registered. Data is taken from an operator's account. Data should be completed.
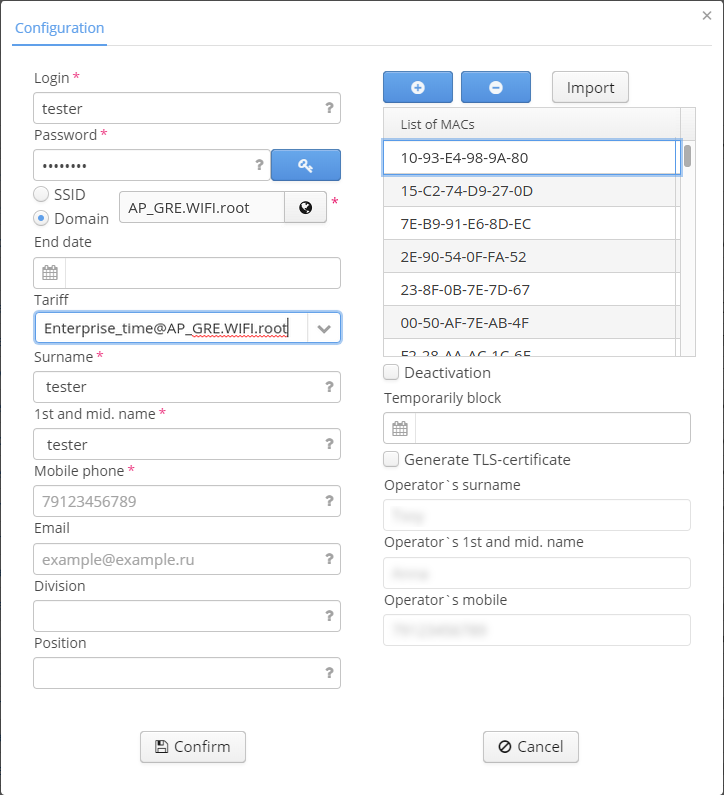
Up to 50 MAC addresses can be assigned to each WPA enterprise account. A MAC address list serves as a white list: Only MAC addresses specified in the list will be able to enter under an account.
To add a MAC address, click the icon "plus" and enter an address in the highlighted field of "List of MACs". To add the following MAC address, repeat the same actions or specify a list consisting of several MAC addresses. To do this, click "Import" and specify a pre-defined list.
MAC addresses should be specified as follows: "00-12-34-56-78-ab". To import a list, format it in advance and specify all MAC addresses in the following form: "00-12-34-56-78-ab".
Viewing statistics and getting a TLS certificate
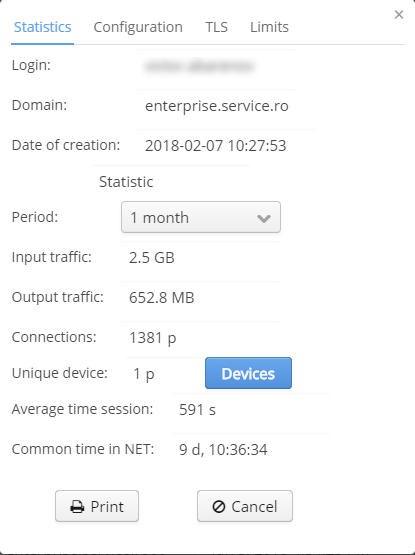
In the tab "Statistics", basic statistics on an account under consideration is located. The following parameters can be set:
- Period (a time period for which statistics is displayed)
- Input traffic, B
- Output traffic, B
- Connections
- Unique device (the number of unique devices that used an account under consideration)
- A list of devices that used an account under consideration
- Average time session, s
- Common time in NET (total time spent by users on the network under an account considered)
- There is an opportunity to download statistics in PDF format for print (the button "Print")
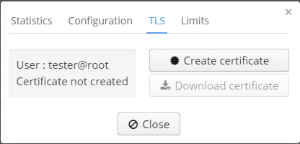
In the tab "TLS" a TLS certificate for a user can be created and downloaded
Viewing and changing quotas
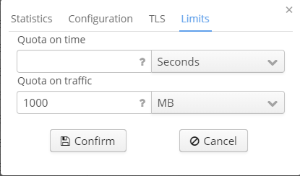
In the tab "Limits" information on time and traffic quotas is displayed. There is an opportunity to edit both time and traffic quota.
Available measurement units for "Time quota":
- Seconds
- Minutes
- Hours
- Days
- Years
Available measurement units for "Traffic quota":
- Byte
- kB
- MB
- GB
- TB
- PB
Deleting entries
To delete an entry, check a corresponding checkbox and click "Delete".
Hotspot users
The interface "Hotspot users" for user accounts monitoring is similar to the interface of the tab "Enterprise users". The main difference between the tabs "Hotspot users" and "Enterprise users" is that types of accounts they work with are different. Although they are similar, one type of accounts is used in private enterprise networks (usually WPA2 Enterprise), and another one is used in networks with portal authorization (Open SSID + Captive Portal).The tab "Hotspot users" can be used when providing guest access to an open network with portal authorization.
Guest self-registration on the portal
When enterprise guests perform authorization on the Platform portal themselves (for example, using SMS confirmation), administration do not need to edit such accounts. Although these interface elements are available, it is not recommended to perform any modifications. In this scenario, the tab is used as an element for monitoring and gathering information on users for marketing purposes. For example, exporting a file with users' e-mail addresses. It is permissible if a service agreement says that an organization providing Wi-Fi can officially use data for marketing purposes. To encourage users to enter e-mail, a corresponding field on the Platform portal can be made obligatory.
User accounts prior creation

When enterprise guests should be authorized on the portal, but self-registration is prohibited (there is such a mode on the portal) it is necessary to create user accounts manually. In this case, staff that creates user accounts should perform actions for the tab "Enterprise". The tab "Hotspot users" is used to create users for two scenarios:
- Registration on the Hotspot portal via "Eltex" access points. User accounts have the following set of parameters:
- Login (obligatory). Field format: length from 1 to 50, only Latin symbols, lowercase and uppercase characters, digits, special symbols: '_', '.', '-';
- Password (obligatory). Field format: length from 4 to 253, only Latin symbols, lowercase and uppercase characters, digits, special symbols: '_', '.', '-', space, '!';
- Domain or SSID (obligatory);
- End date;
- Tariff;
- Surname;
- 1st and mid.name;
- Mobile phone;
- E-mail;
- Division;
- Position;
- MAC address;
- Deactivation;
- Temporary block.
- Registration on the Hotspot portal via access points of other vendors (BRAS). User accounts have the following set of parameters:
- Login (obligatory). Field format: length from 1 to 50, only Latin symbols, lowercase and uppercase characters, digits, special symbols: '_', '.', '-';
- Password (obligatory). Field format: length from 4 to 253, only Latin symbols, lowercase and uppercase characters, digits, special symbols: '_', '.', '-', space, '!';
- Domain (obligatory);
- End date;
- Tariff;
- Surname;
- 1st and mid.name;
- Mobile phone;
- E-mail;
- Division;
- Position;
- MAC address;
- Deactivation;
- Temporary block.
"Eltex" AP users and PCRF users have different tariffs, so a user created for authorization via "Eltex" AP will not be able to perform portal authorization via BRAS and vice versa.
Hotspot users' traffic and time quotas
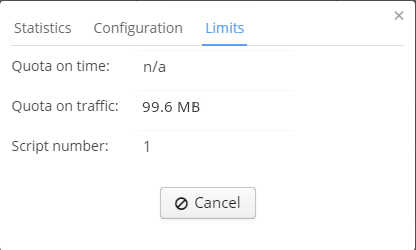
The tab "Limits" contains information on time quota, traffic quota and the number of current scenario.
Time and traffic quota for Hotspot BRAS users
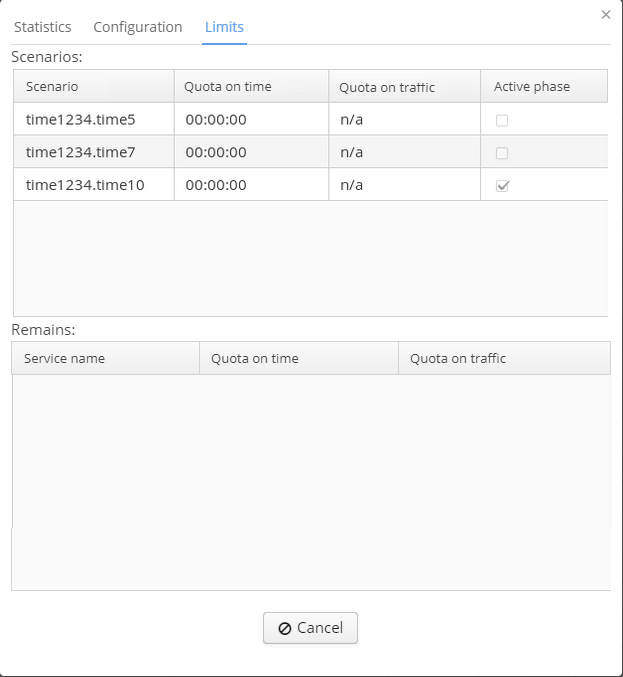
The tab "Limits" for BRAS users contains information on time and traffic quota. The column "Scenario" contains information on a current scenario and a service included into it. Each service added to a scenario is displayed in a separate row. The columns "Time quota" and "Traffic quota" contain information on quotas for each service. "Active phase" — a service that is active.
Vouchers
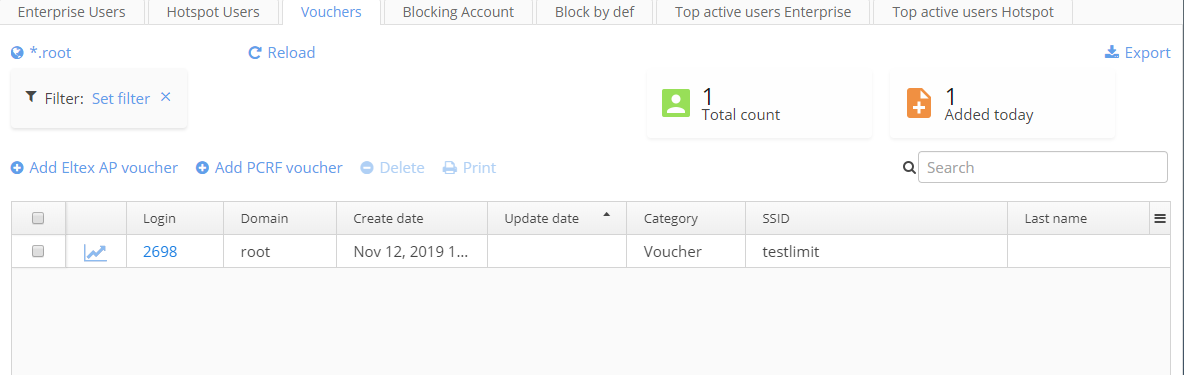
The tab "Vouchers" is intended for mass creation of user accounts. There is an opportunity to generate a specified number of user accounts with random logins and passwords and to assign them to users.
This option can be used in organisations where a temporary access to a service is required, for example, in hotels.
Hotel staff should put information on receiving a voucher by a guest to other hotel management systems (full names and passport data of clients/guests are stored in business process management programs). Beginning with the version 1.8, each "Voucher" entry has additional fields. This fields can be filled in with full name, mobile phone, e-mail and passport data of a client. Wi-Fi B2B Admin Panel stores data on an account under which a user who created or edited an entry entered the system.
Adding a pool of entries
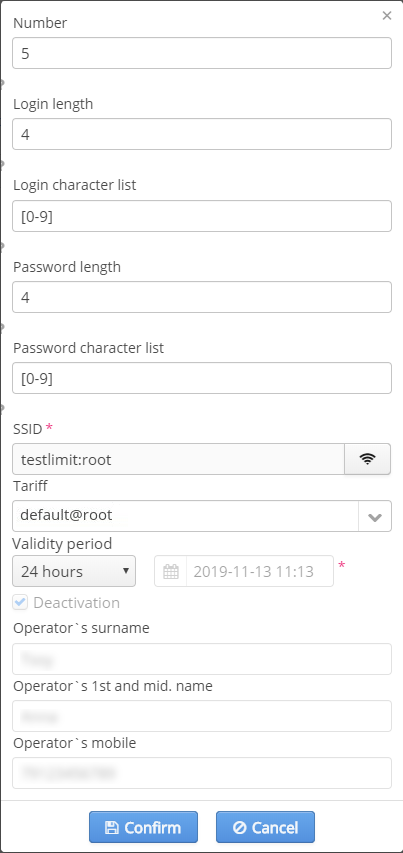
To create a pool of entries, click "Add". A program will display a dialog window where some parameters should be set. These parameters are:
- number;
- password length;
- Domain and SSID;
- tariff;
- validity period.
Set the parameters and click "Confirm". The number of created user accounts will be equal to one specified in the field "Number". Logins and passwords contain only digits and Latin symbols. Password length is specified in the window. All accounts will be created in a specified domain (obligatory parameter) and with specified parameters. Validity period — date and time after which it will be impossible to connect to the network.
If the option "Auto activating voucher after creation" is not enabled in the Admin Panel settings, all created vouchers are initially blocked. A voucher can be activated by the Admin Panel administrator.
Enabling vouchers
All created entries will be initially blocked. To unblock an entry, enter a full name, mobile phone and passport data of a user. If an option "Auto activating voucher after creation" is enabled, all vouchers (options after activating) will be enabled automatically after their creation, but if only one of obligatory fields is filled in, a voucher will be blocked. To fill in the remaining fields:
- Surname;
- 1st and mid.name;
- Mobile phone;
- Email;
- Passport data;
click on the login. A window with optional fields will be opened.
Accounts of "Voucher" type can be created only for an open network with portal authorization (except for a scheme with BRAS).
Printing vouchers
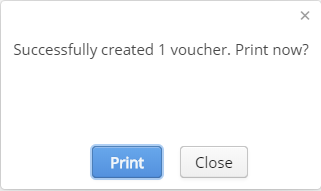
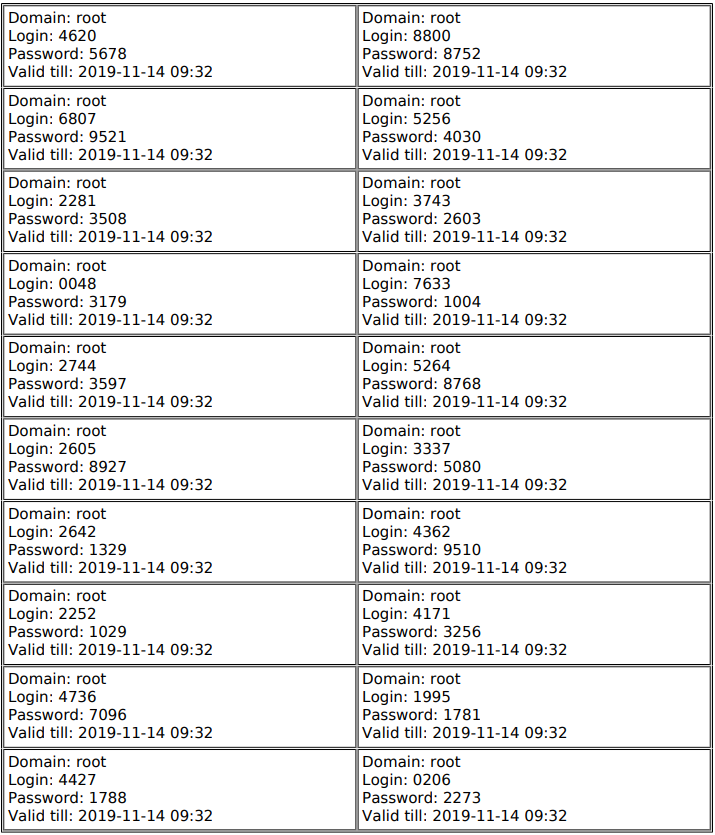
To print created vouchers, select corresponding rows in the table and click "Print". The program will generate a .pdf file ready for print and show its preview in a modal window. If a printer is set up in a user's operating system, vouchers can be directly printed.
Data for logging into a network (vouchers) are printed 20 per one A4 sheet with portrait orientation and lines used. It allows printing a large number of vouchers in the convenient format in order to give them to guests at check in.
Deleting a pool
Overdue entries deleting is performed manually by selecting required entries and clicking the button "Delete". If an operator deletes a currently used voucher, connection will not be lost.
A user will not be able to pass authorization again after closing a connection.
Blocking Account
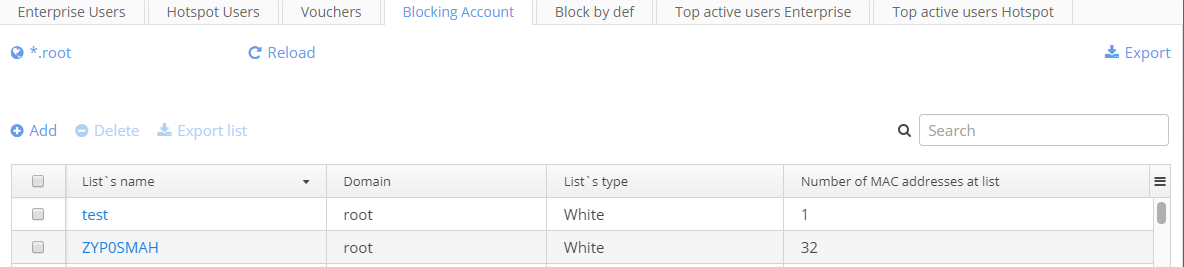
This tab is intended for MAC address lists creation. Such lists are used to restrict access to the Hotspot portal. There are two types of lists:
- White lists — all addresses contained in them have access to the portal while others do not;
- Black lists — all addresses have access to the portal while addresses included into a list do not.
To enable filtering by MAC address on the Hotspot portal, create a list and link it to the portal via the Portal Constructor.
Filtering lists
Entries can be filtered by domain, name or type. To find a list in which a certain MAC address is contained, enter this address in the following format: "11:22:33:aa:bb:cc".
Adding a list

After clicking the button "Add" a modal window for adding a MAC address list will appear. A defined set of parameters can be configured in special fields. Fields marked with "*" are obligatory. An attempt to save an entry with empty or incorrectly filled obligatory fields will be rejected. Empty or incorrectly filled fields are highlighted in red. When a mouse is moved over a field, a tip with rules on completing this field is displayed.
The following control elements are available:
- "+" — add a new entry to the table;
- "-" — delete a selected entry from the table;
- Import from file — import a list from a text file.
- Search bar — search for a MAC address in the list.
Viewing and editing a list
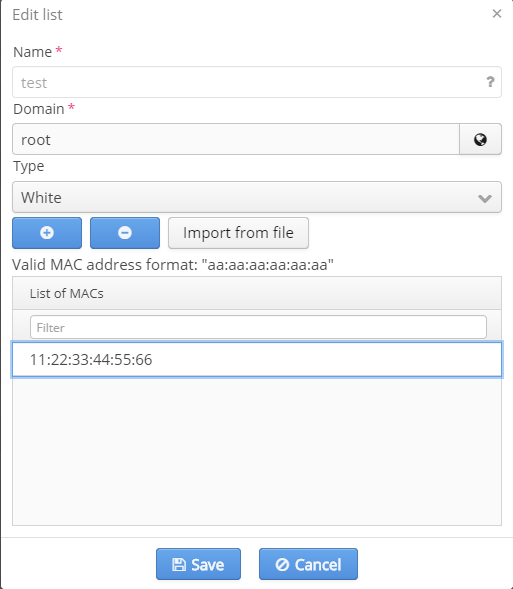
To view and edit a MAC address list, click on its name. A modal window for list editing will be opened.
Deleting a list
To delete a list, set a checkbox in a corresponding row and click the button "-".
Block by def
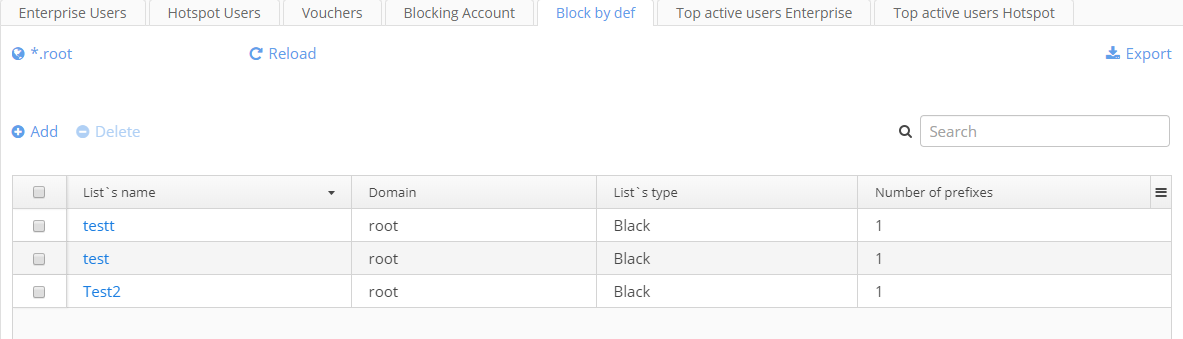
The tab "Block by def" is used for creating black and white lists containing number prefixes (DEF) or full numbers. These lists are used to restrict access to the Hotspot portal. Blocking by phone number is similar to blocking by MAC address, but subscribers' phone numbers are specified instead of MAC. There are two types of lists:
- White lists — all addresses contained in them have access to the portal while others do not;
- Black lists — all addresses have access to the portal while addresses included into a list do not.
How does it work
- Assume it is necessary to block users whose phone numbers start with 7654. Then create a list, enter a number part 7654, select the type "black" and link the list to the portal. Now all users whose number starts with 7654 will not be able to enter the system.
- If one number or several different numbers should be blocked: create a list, select the type "black", enter a whole number (example: 76543562293). If necessary, add a few more numbers by clicking the icon
 , save the results. Only a user whose phone number is 76543562293 will not be able to pass authorization on the Hotspot portal.
 - The last way is creating a white list. To do this, create a new list, select the type "white" and enter a number prefix or a whole number. Now only subscribers having phone numbers from the white list will be able to access the Hotspot portal.
Списки можно отфильтровать как по домену так и по имени.
Creating a list
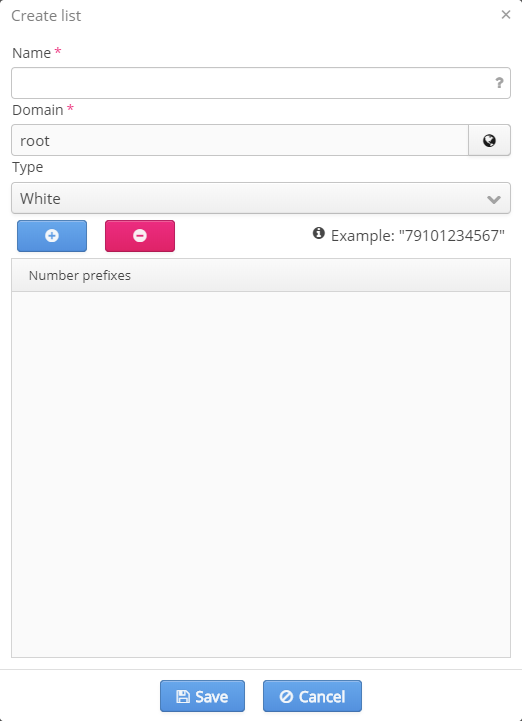
- Name — a unique name of a list;
- Domain — a domain to which a list will belong;
- Type — a pull-down menu where a list type is selected;
- The icon
 — when the icon is clicked, an empty row to which a number or its part should be entered appears in the table.
 - The icon
 — when the icon is clicked, a selected row can be deleted.
Top active users Enterprise

The table "Top active users Enterprise" contains information on enterprise users with the highest traffic consumption and is required to block and unblock users temporarily or permanently.
By default, users with higher total traffic are displayed first in the table. There is an opportunity to filter users by Total, Outgoing or Incoming traffic.
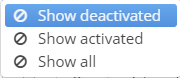
Suggested filters allow displaying activated, deactivated or all users. Filtering is enabled via clicking a corresponding icon.
Blocking operations
To block a user permanently, click the icon  . The blocking state indicator
  will change its colour from grey to red , and a user will be blocked. To block a user temporarily, click the icon
  in the column "Temporarily block". The window "Temporarily block" will be opened.
Two tabs are available in the window: The tab "For period" where the time period during which a user will be blocked may be set only to 1 hour, 2 hours, 6 hours or 1 day. The tab "For exact time" where any time period may be flexibly set.
For example, to block a user for 2 days, open the section "Temporarily block", select the tab "Exact time" and click the icon  . In the opened calendar, select date and time for a user to be unblocked. Click
  . A user is successfully blocked. Unblocking date and time are specified in the column "Temporarily block".
Group actions for blocking

To block several users at the same time, group operations are available. When less than two users are selected, the widget "Group actions" cannot be clicked. When two or more users are selected, the widget "Group activities" becomes available. When the icon  is clicked, a drop-down list will be opened with the following operations available: Deactivate selected, Activate selected and Deactivate temporarily. Operations for blocking a group of users are similar to operations for blocking one user.
To quickly select several users, left-click the checkbox  opposite the first user and move your mouse down to the required entry. Release the mouse button.
Top active users Hotspot
The table "Top active users Hotspot" contains information on Hotspot users with high traffic consumption. A type of blocking is specified here (temporary or permanent). A phone number used for authorization, a user account created via the Admin Panel (or in other ways) will be displayed in the column "Login". Each entry contains blocking state (is a user blocked or not) and blocking time (if a user is blocked temporarily). Total, Outgoing and Incoming traffic.
Blocking and unblocking operations are similar to ones in the tab "Top active users Enterprise".
By default, users with higher total traffic are displayed first in the table. There is an opportunity to filter users by Total, Outgoing or Incoming traffic.
Access points
The section is intended for viewing basic data on device operation (access points and client esr-10).
Devices
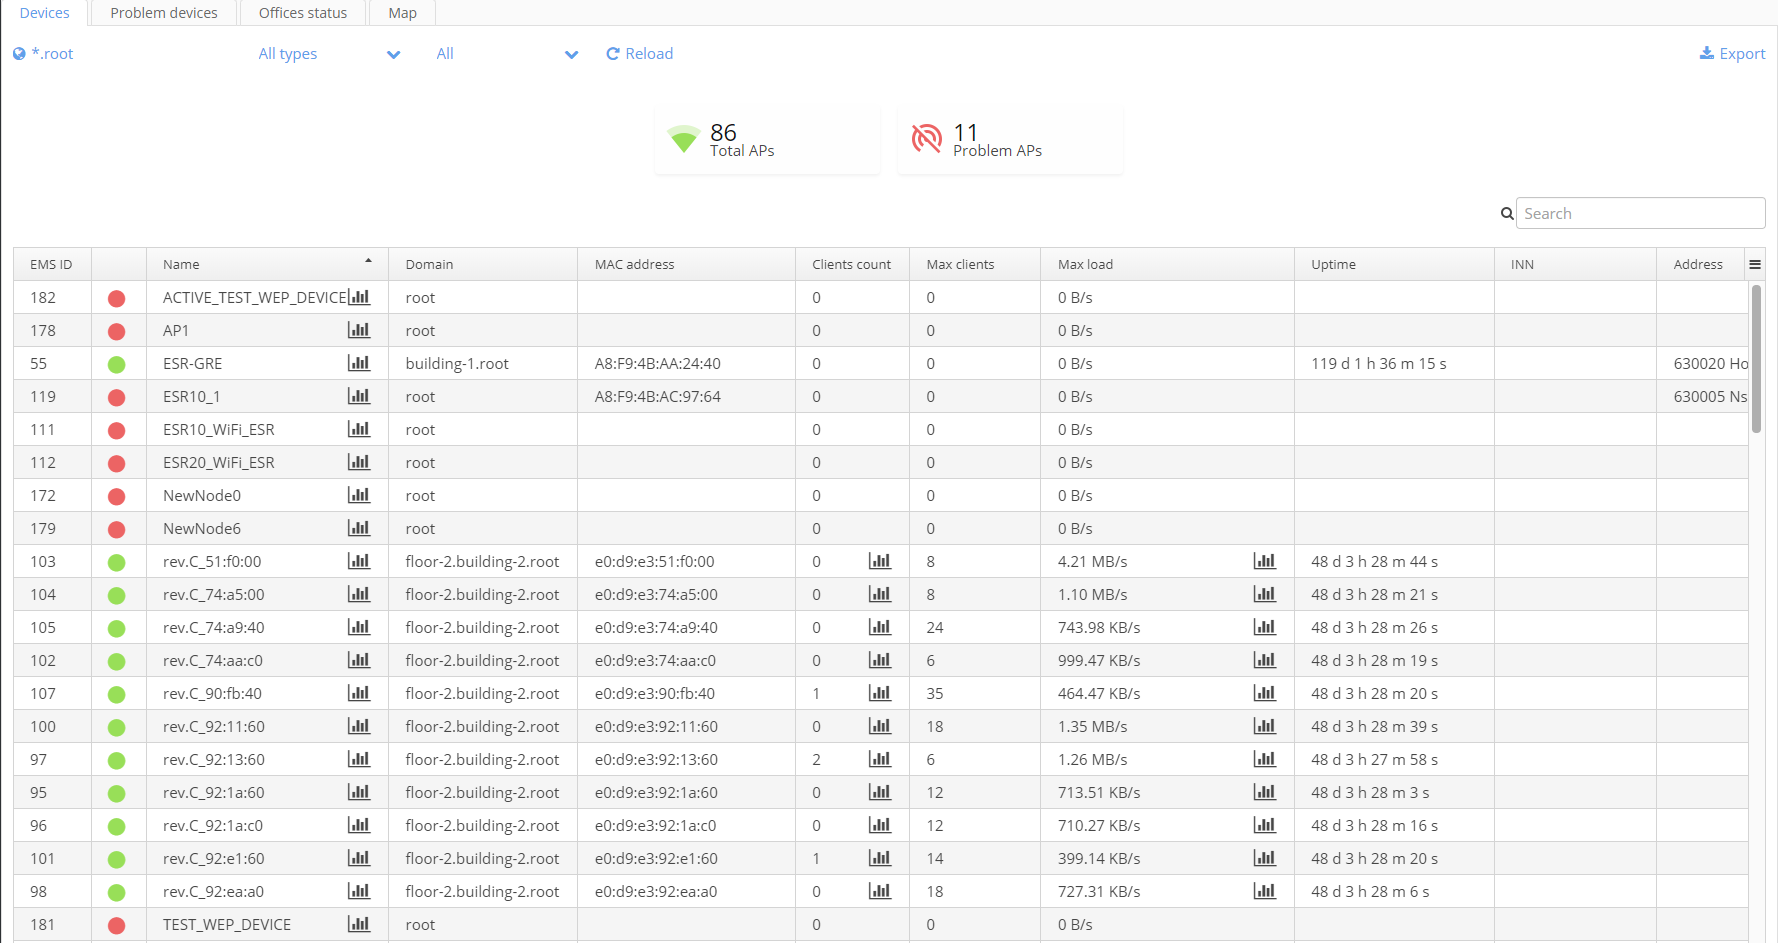
The tab "Devices" contains a table with information on devices:
- EMS_ID — an access point's number in the management system;
- Access point state — a color state indicator:
- green — access point is all right;
- yellow — access point is operating, but an error has occurred on it;
- red — an access point is unreachable from the management system;
- grey — an access point is taken out of service (not pinged).
- Name — access point name in the management system;
- Domain;
- MAC address — access point MAC address;
- Clients count — the number of clients connected to an AP;
- Uptime — access point operating time;
- Address — device address;
- Max load — maximum traffic load of a network interface.
When any cell of the column "Max load" is clicked, a window with a chart showing an AP network interface load will be opened.
The two counters are located above the table. The first counter indicates the total number of access points, and the second one — the number of inaccessible access points (marked as problem APs).
To perform filtering by the domain, specify it in the upper left corner.
To perform filtering by the device type, specify it in the upper left corner.
To perform filtering by OTT attribute, specify OTT it in the upper left corner:
- ALL — all devices;
- Not OTT — all devices without OTT configured;
- OTT Connected (Client) — client devices with OTT configured;
- OTT ServiceProvider — devices to which client OTT devices establish IPSec tunnels;
To perform a search by MAC address, location (address) or name, the field "Search" can be used.
To export data in .csv format, click the button "Export".
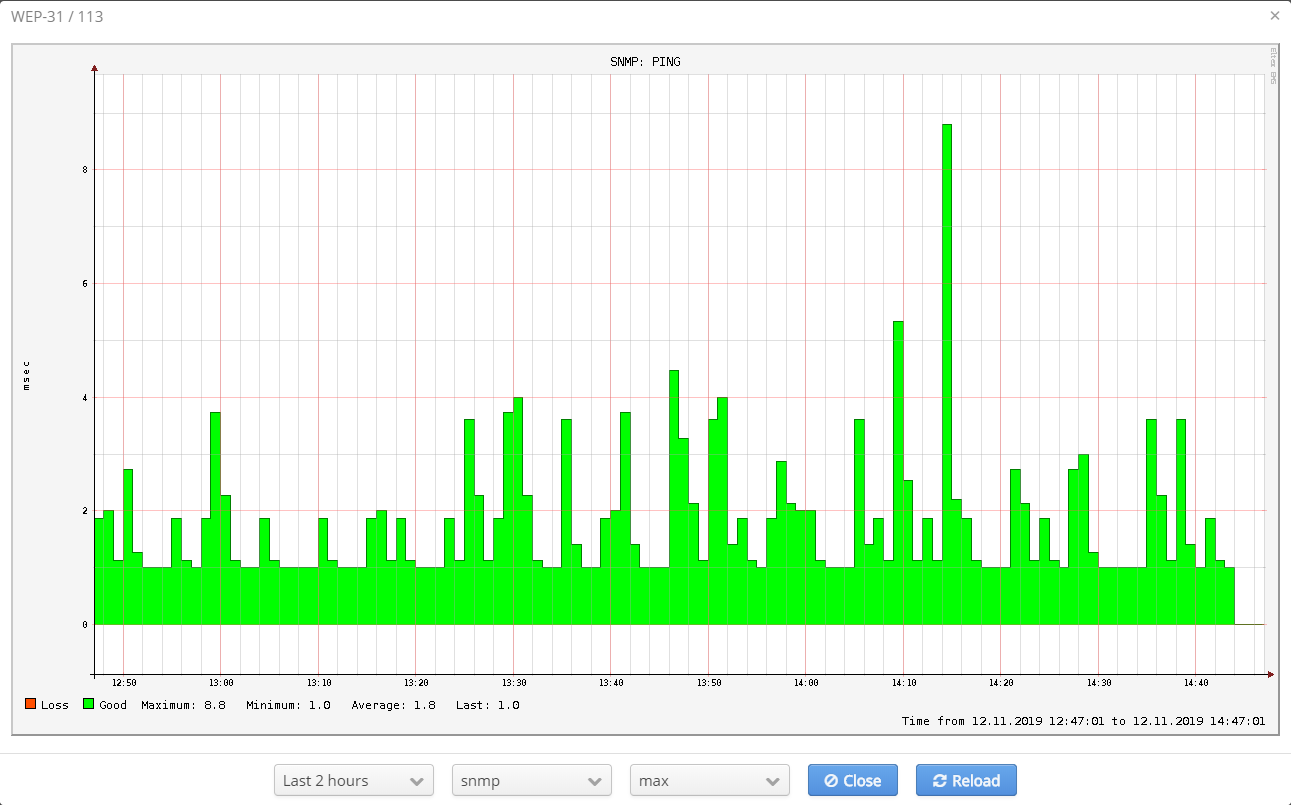
When an access point's name is clicked, a window with a device reachability test chart will be displayed.
Time period for which data will be displayed, ping type (SNMP/ICMP) and data aggregation type (min/max) can be selected in the window.
To display all cases of losing connection to a device, select the "min" aggregation type.
Problem devices
The table located on the tab "Problem devices" is similar to one located on the previous tab, but only devices in "Unreachable" state are displayed in it. A filter by the domain is also located on the page.
Offices status
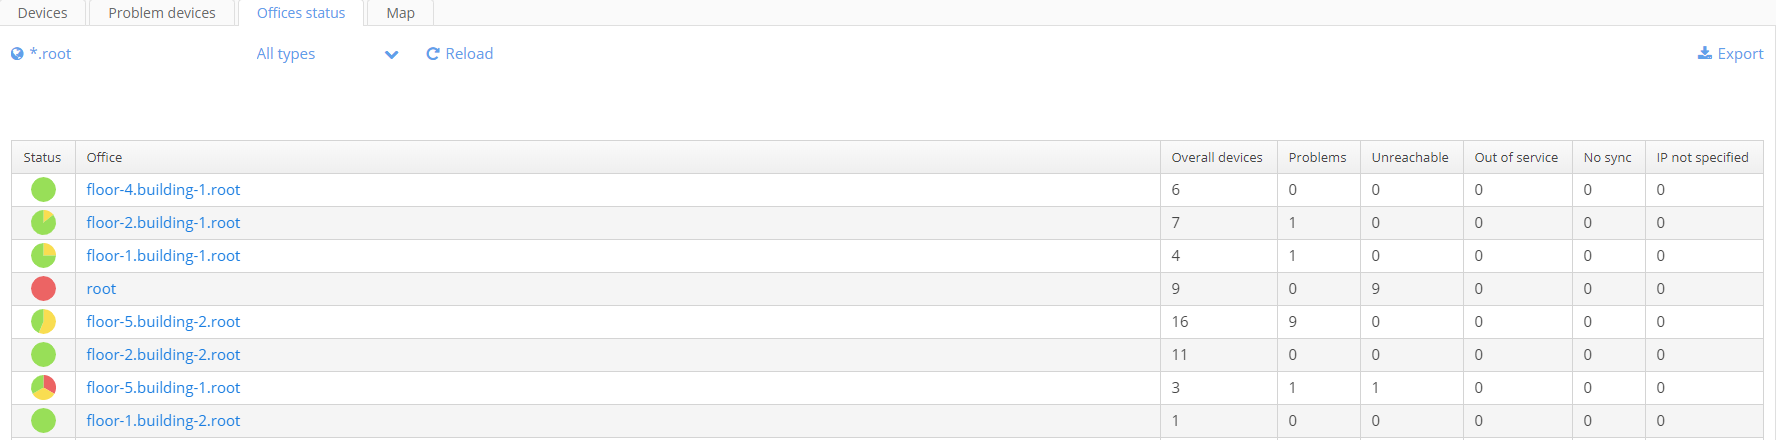
On this tab, information on devices grouped into domains is displayed. For each group of devices, information is displayed in the form of a pie chart showing operating and problem devices (the column "Status"). Other columns contain information on the number of problem, unreachable devices and devices out of service. The filter by the domain is also located on the tab.
Map

Devices are displayed on the map according to locations specified in each device's configuration.
Filters:
- by domains
- by device availability (availability is defined by results of ICMP and SNMP pings in EMS. A device is considered as unavailable if both pings were lost).
- by device type
- by frequency range (if "All range" is selected, all access points are displayed. If a certain range (2.4GHz or 5GHz) is selected, only those access points that have a SSID in this range will be displayed).
After changing a filter, click "Reload" to apply the changes.
The button  is used for moving to a user's location.
Geolocation is available only when HTTPS is used. If the Admin Panel is accessed via HTTP, geolocation will be disabled due to browsers' security policies. To successfully define where an AP is located, grant geolocation rights to a browser.


Functioning access points are displayed as green circles. Access points, access to which has been lost are red circles. Access points having the same address are grouped together. Next to a group of access points consolidated information is displayed (the number of access points in a group and the number of connected users in square brackets). If there is at least one unavailable access point, a group will be highlighted red.
When you zoom in, the closest access points are grouped together. A subtle displacement of AP groups displayed near screen edges is possible.
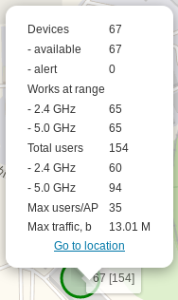
When an object is selected, information on the number of devices and clients is displayed for this object. Follow the link "Go to location" to open a list of devices connected to the object.
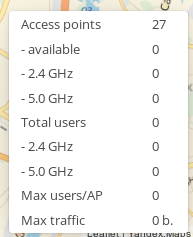
In the lower part of the screen consolidated information is displayed:
- Devices available — the number of displayed access points (considering filters and coordinates of the selected area)
- Devices 2.4GHz, 5.0GHz — the number of corresponding SSIDs
- Total users 2.4GHz, 5.0GHz — the number of users in the ranges
- Max users/AP — the maximum number of users connected to one access point
- Max traffic — the maximum volume of current traffic
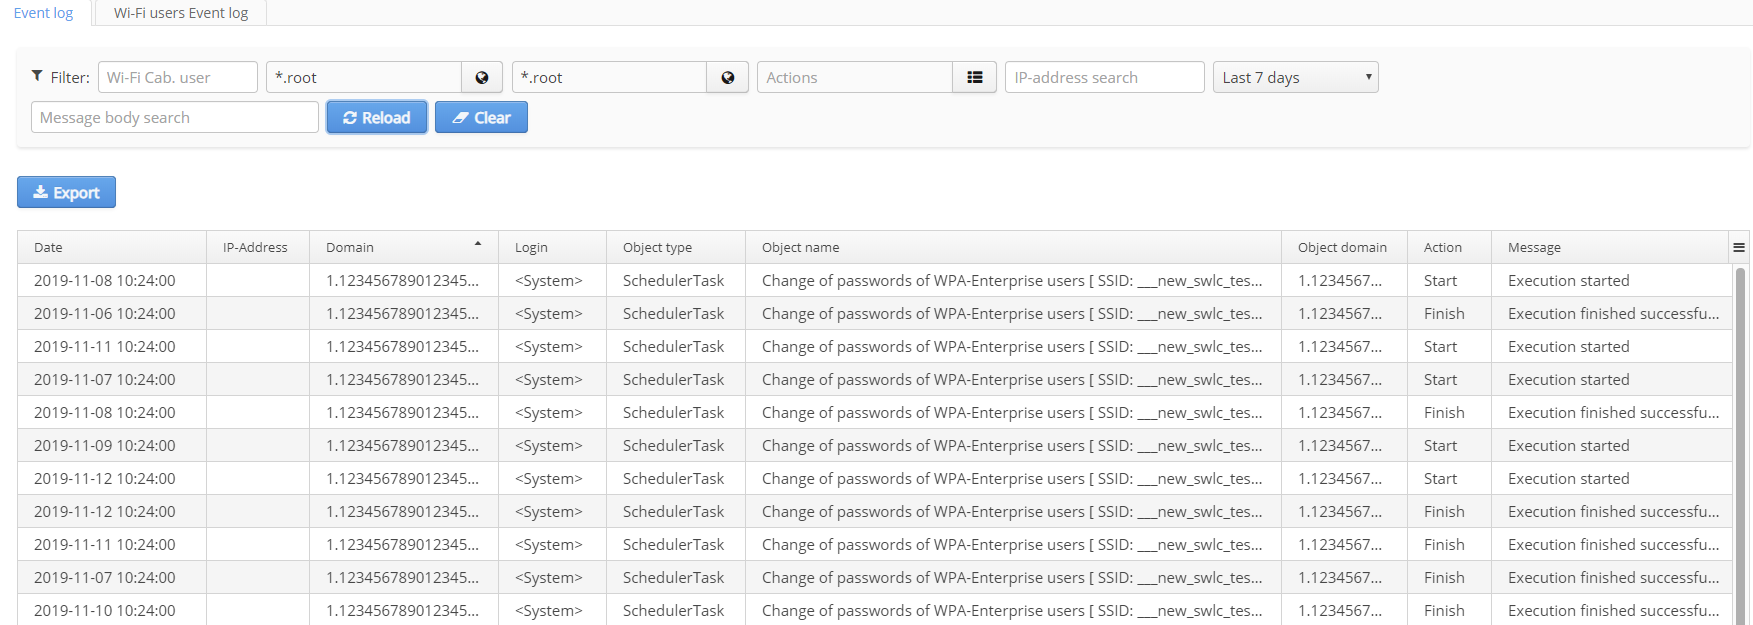
Event log
The section "Event log" contains two tabs: "Event log" and "Wi-Fi users Event log".
All changes made by system operators are added to event logs. List of operations:
- creating entries;
- deleting entries;
- updating entries;
- starting/reloading.
System-wide information is also stored in the event logs.
Entries contain the following fields:
- date and time of an event (server time);
- IP address of a host from which an operation was performed (if available);
- login and domain of a user performing an operation (if available);
- name of an object modified;
- action code: Launch, Create, Delete, Edit;
- interpretive message.
To view details on any entry of event logs, left-click on it. A modal dialog with full information will be opened. To close a dialog, click "OK".
The button "Export" allows exporting entries displayed on the screen (selected by a current filter) as a text file to a user's PC.
Access to event viewing depends on a user's role and domain.
Event log
The tab "Event log" is used to display a log of system events and a log of system parameters changes.The following events are stored in the log:
- updating Wi-Fi B2B Admin Panel system settings;
- updating Admin Panel system roles;
- updating Admin Panel system users (operators);
- updating domains;
- updating firmware;
- stopping, starting and restarting a server.
Wi-Fi users event log

The tab "Wi-Fi users event log" is used to display a full change log for Wi-Fi user accounts. The tab allows viewing all actions on accounts, from creating an account to deleting it.
The column "Message" is used for the system to store names and contents of updated fields.
Passwords given to users are replaced with * in logs.
Wireless networks
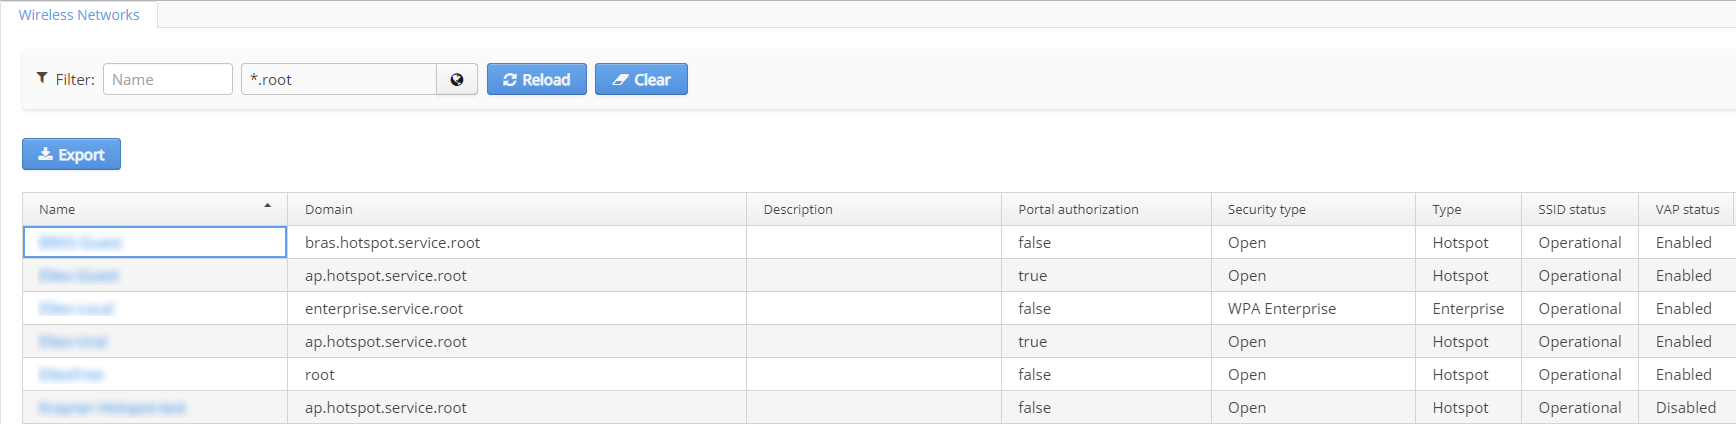
The section "Wireless networks" contains general information on main SSID parameters user in the system and their state. The table on the tab "Wireless networks" contains information:
- SSID name
- SSID domain
- SSID description
- Portal authorization status
- Security type
- SSID status
The filter by domain is available on the tab.
Editing wireless networks
Editing networks with portal authorization
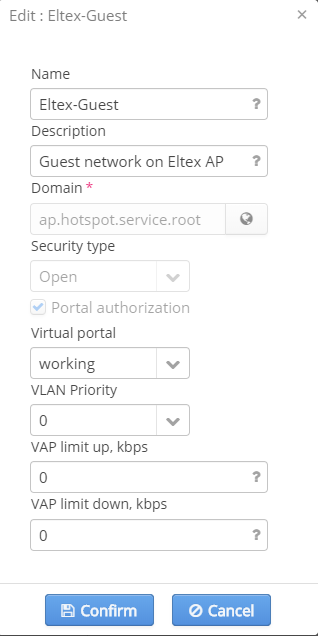
In networks with WPA-personal authorization, there is an opportunity to configure a WPA key used for authorization in this network and also to create a task for its automatic replacement.
The following parameters can also be edited:
- Name — SSID name
- Description — a comment for a SSID administrator
- SSID status — whether a SSID is operating or not
- VLAN Priority — setting a priority mark to a VLAN used for SSID
- VAP limit up — uplink speed limit for VAP (common for all connected users)
- VAP limit down — downlink speed limit for VAP (common for all connected users)
Editing networks with WPA-personal authorization
In networks with WPA-personal authorization, there is an opportunity to configure a WPA key used for authorization in this network and also to create a task for its automatic replacement.
The following parameters can also be edited:
- Name — SSID name
- Description — a comment for a SSID administrator
- SSID status — whether a SSID is operating or not
- VLAN Priority — setting a priority mark to a VLAN used for SSID
- VAP limit up — uplink speed limit for VAP (common for all connected users)
- VAP limit down — downlink speed limit for VAP (common for all connected users)
Editing networks with WPA-enterprise authorization
In networks with WPA-enterprise authorization, an administrator can create a task for automatic change of a certain SSID users' passwords.
The following parameters can also be edited:
- Name — SSID name
- Description — a comment for a SSID administrator
- SSID status — whether a SSID is operating or not
- VLAN Priority — setting a priority mark to a VLAN used for SSID
- VAP limit up — uplink speed limit for VAP (common for all connected users)
- VAP limit down — downlink speed limit for VAP (common for all connected users)
Creating tasks for automatic password changing
The Admin Panel allows creating tasks for changing passwords in encrypted networks. The list of created tasks can be seen in the section "Scheduler". Information on task execution is saved in the "Event log".
Mechanisms for password generation are different for different types of authorization, so they will be considered separately.
Creating a task for password changing in networks with WPA-enterprise authorization
To create a task for password changing in a network with WPA-enterprise authorization, check the checkbox "Change user passwords periodically" in the window for SSID editing.
As tasks for scheduled password changing are initiated considering a timezone, one for SSID domain is specified in the field "Timezone". The parameter cannot be modified and is displayed for information.
After checking the checkbox, options for task configuration will be displayed in the window. The following parameters should be specified:
- Schedule – a task initiation schedule, launch time is specified according to a SSID domain's timezone
- Password generation mode (Random password or Password by template):
- If the mode "Random password" is selected, a length of a generated password is specified in the field "Length" (a password will contain digits and Latin symbols)
- If the mode "Password by template" is selected, a template is specified in the corresponding field. Tagged expressions (for example, %MM%, %DD%) are specified according to a SSID domain's timezone.
New passwords will be sent to SSID Wi-Fi users via e-mail or SMS, so either e-mail address or phone number should be specified in a user's account for him to receive the password. A user's SSID is specified on the tab "Enterprise users". To check if a user belongs to a SSID, see the parameters "Domain" and "SSID".
A task will be initiated at the specified time according to a SSID domain's timezone. Task initiation time according to a server's timezone can be seen in the section "Schedule".
Creating a task for password changing in networks with WPA-personal authorization
To create a task for password changing in a network with WPA-personal authorization, check the checkbox "Change user passwords periodically" in the window for SSID editing.
As tasks for scheduled password changing are initiated considering a timezone, one for SSID domain is specified in the field "Timezone". The parameter cannot be modified and is displayed for information.
After checking the checkbox, options for task configuration will be displayed in the window. The following parameters should be specified:
- Schedule – a schedule for task initiation, an interface is similar to one for enterprise authorization. Start time is specified according to a SSID domain's timezone
- Password generation mode (Random password or Password by template):
- If the mode "Random password" is selected, a length of a generated password is specified in the field "Length" (a password will contain digits and Latin symbols)
- If the mode "Password by template" is selected, a template is specified in the corresponding field. Tagged expressions (for example, %MM%, %DD%) are specified according to a SSID domain's timezone.
- Users to notify – system users to whom notifications on password changes will be sent via e-mail or SMS (e-mail or phone number should be specified in user settings
A task will be initiated at the specified time according to a SSID domain's timezone. Task initiation time according to a server's timezone can be seen in the section "Schedule".
Configuring a schedule
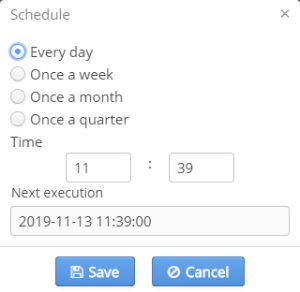
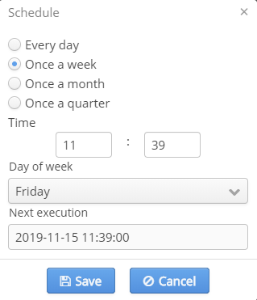
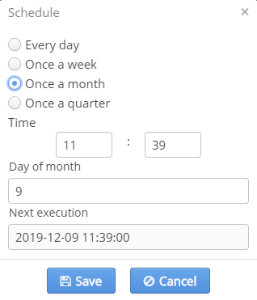
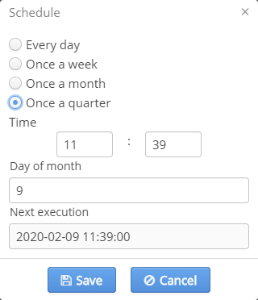
To configure a schedule, select a launch period depending on which the additional parameters will be required:
- Every day — launch time.
- Once a week — day of the week and launch time.
- Once a month — day (date) of the month and launch time.
- Once a quarter — day (date) of the first quarter and launch time.
In the field "Next execution" the date of the next initiation of the task defined according to new settings and SSID domain's timezone will be displayed.
Configuring templates for key generation
The ability to generate template-based keys is implemented in the password (key) generator. In this case, a key will consist of previously defined elements. Templates are sets of digits, Latin symbols and tags whose values will be defined during password generation:
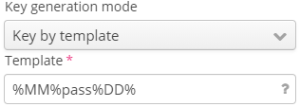
A template should match the following requirements:
- Password length: from 8 to 63 symbols.
- Valid characters: digits, Latin uppercase and lowercase letters, special characters: '-', '_', space and '.'.
- Tagged expressions:
- %MM% — month number (including leading zeros).
- %DD% — day number (date) (including leading zeros).
- %SSID#4% — take last 4 symbols from the SSID name.
The untagged part of a password will not be changed.
Tagged expressions are specified according to the SSID domain's timezone.
Scheduler

Data on scheduled tasks executed automatically, without user involvement. Information on task initiation and execution is saved to the event log.
Control buttons:
- Start/stop — enable/disable automatic task execution (operations are not deleted).
- Run — run operations manually at the present time.
It is possible to perform actions both on one and on several operations with the same activity status. When operations with different status are selected, the button "Start" becomes inactive. Initiation of tasks being executed is unavailable. If there is an attempt to click the button "Run" during task execution, an error occurs.
Time is displayed according to a timezone of a server specified near the task initiation time.
Task type | Description |
Change of WPA-Personal key on SSID | Instruction |
Notification on license expiration via e-mail | Notifies administrators 90 days prior to license expiration. Also notifies on demo-license usage. |
Clearing the event log | Deletes old events from the event log upon exceeding 1000000 entries |
Clearing reports repository | Deletes irrelevant reports |
Sending notifications on SSID password change |
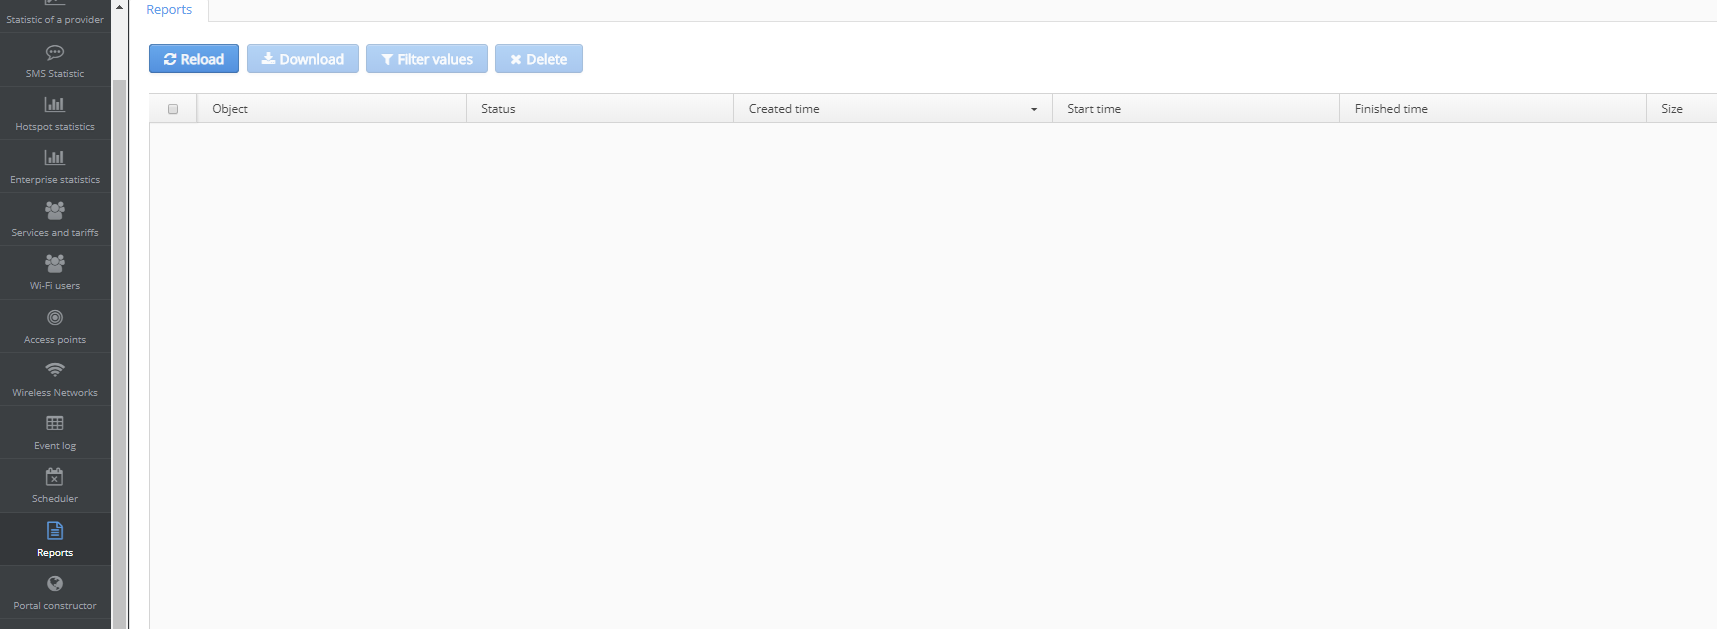
Reports

The section contains reports commissioned by a user.
Reports are generated as pdf files.
To export a report, click the button "Download".
Advertising platform
A link to an advertisement provider's website to implement integration.
Settings
Details on the section "Settings" are given in documentation on the Admin Panel administration.
PCRF settings
The section "PCRF settings" contains basic PCRF settings and allows creating L2 subnetworks, viewing information on the number of BRAS sessions, checking a CoA log and displaying information on stored MAC addresses.
There are 5 tabs in the section:
- "L2 subnets";
- "PCRF info";
- "CoA log";
- "MAC bonds";
- "URL lists".
L2 subnets
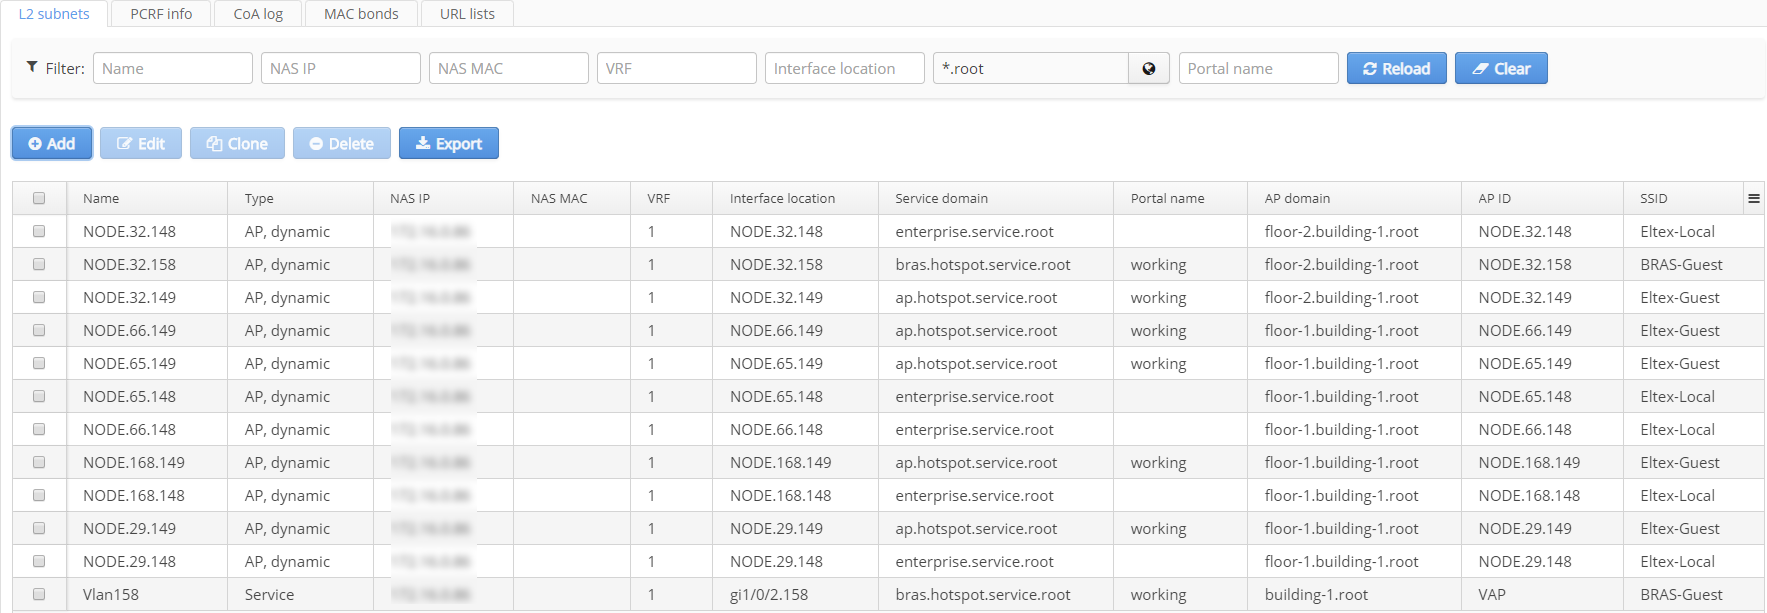
On this tab, L2 subnetworks are created and configured.
There are two types of subnetworks:
- A subnetwork for portal selection
- A subnetwork responsible for statistics, MAC authorization and shapers
Fields for subnetwork configuration:
- Name — an arbitrary name;
- NAS IP — ESR address, IP address of an interface directed to SoftWLC;
- VRF — VRF value;
- Interface location — the parameter contains location from ESR interface or L2 interface's name;
- Name — portal name in the Portal Constructor;
- AP domain — a domain in which and AP is located, i.e. a client's office;
- AP ID — an access point's identifier;
- SSID — SSID name.
PCRF info
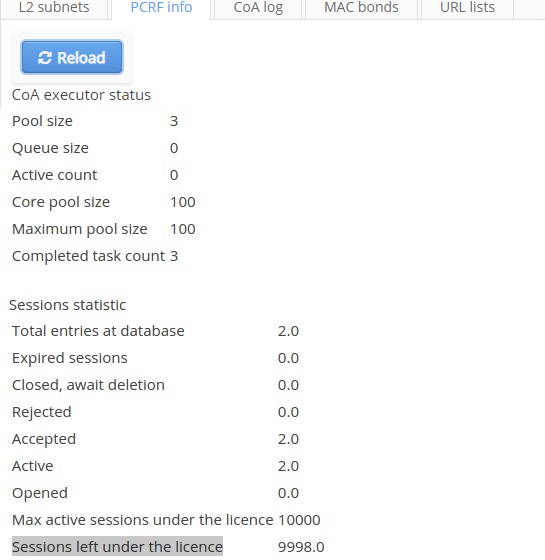
On this tab, information on CoA executor status and statistics on BRAS sessions can be viewed in real time.
BRAS sessions' statuses can be the following:
- Opened — the number of opened sessions without authorization;
- Accepted — the number of accepted sessions;
- Rejected — the number of rejected sessions;
- Closed, await detection — the number of sessions awaiting termination;
- Total stored — the total number of sessions;
- Active — the number of authorized sessions;
- Expired — the number of expired sessions;
- Max active sessions under the licence — the total number of PCRF licenses;
- Sessions left under the licence — the number of available PCRF licenses.
CoA log
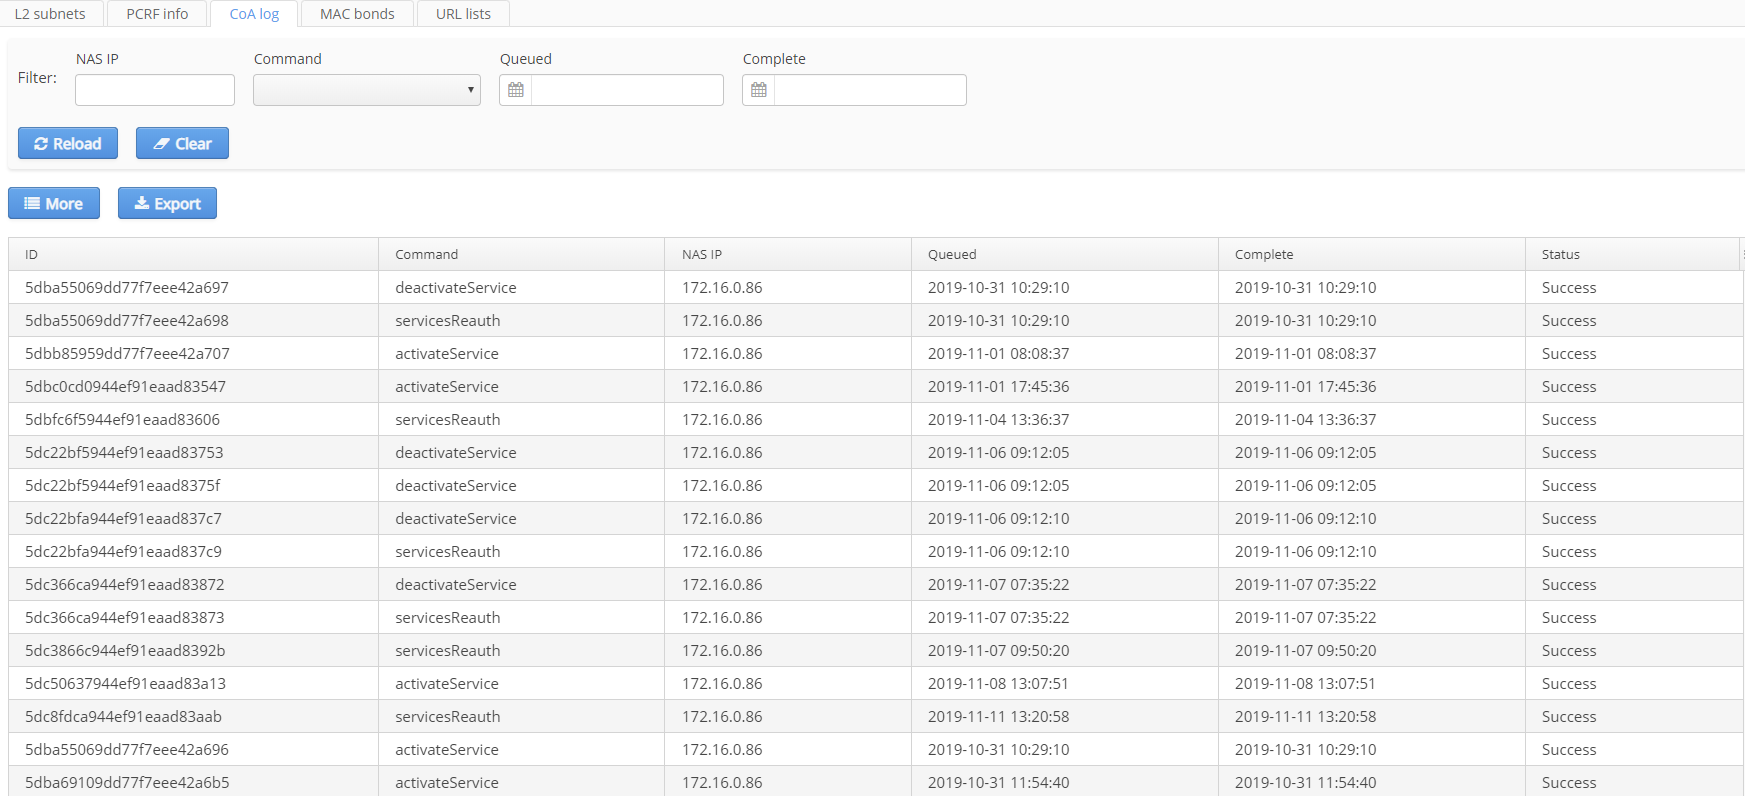
Information on the status of CoA requests between PCRF and BRAS is displayed on this tab. Entries can be filtered by NAS IP, command type, request (Queued) and execution (Complete) date.
CoA request logs for the following commands are available:
- URL list requery;
- Services requery;
- Data tunnel establishment;
- Domain properties update;
- Service activation;
- Service deactivation;
- Session termination.
MAC bonds

On this tab, information on SoftWLC Hotspot subscribers' MAC addresses is displayed. Entries can be sorted by: last activity time, login, domain or subscriber's MAC address.
MAC addresses are used during MAC-based authorization of Hotspot users. Mac address storage time is specified in portal settings of the Portal Constructor. A user will not have to pass authorization on the portal during this period.
The following parameters are available on the tab:
- Username — a subscriber's login;
- Domain — a subscriber's domain;
- MAC address — a subscriber's MAC address;
- Vendor — a device manufacturer;
- Expires — an entry's expiration time.
URL lists

URL list for BRAS are created on this tab.
A list may contain:
- URL addresses, data format: http://eltex-co.com/;
- Templates (regular expressions), data format: ^((https|http):\/\/)(.+\.)?eltex-co\.ru;
- IP/MASK, data format: 192.168.0.0/24;
- IP/MASK (TCP), data format: 192.168.0.0/24. Used for applications operating on HTTP/HTTPS ports but do not transfer HTTP/HTTPS data.
A list has the limitations:
- no more than 5000 entries
- no more than 255 characters in a string
Reference
Contact technical support

The tab "Contact technical support" contains a form with obligatory fields to report a problem to a technical support.
Feedback/claims
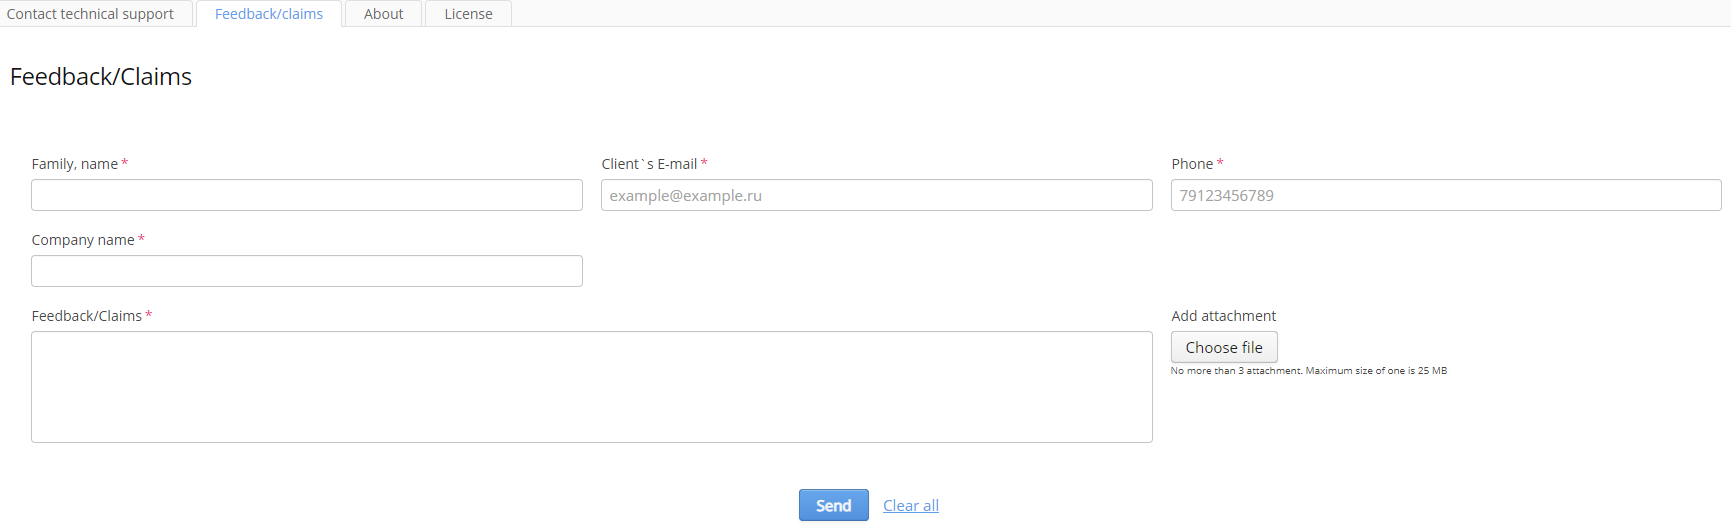
The tab "Feedback/claims" contains a form with obligatory fields to send a feedback/a claim to a technical support.
About
The tab "About" contains information on the Wi-Fi B2B Admin Panel version and contacts of a technical support service.
By default, contacts of a device vendor (i.e. ELTEX) are displayed. But in the provider's level scheme, contacts of a provider can be specified for its clients (providers working with legal entities) to address the provider instead of the vendor. This can be done on the tab "System" -> "Client" of the "Settings" section. A provider should put data in the field "Technical support data".
License
This section contains information on licenses for the system "Wi-Fi B2B Admin Panel" and PCRF.
Law information
Legal information can be placed in this section.