...
| Scroll pdf ignore | ||||||
|---|---|---|---|---|---|---|
|
Terms and Definitions
CBR Constant bitrate
...
| Предупреждение |
|---|
Warnings are used to inform the user about harmful situations for the device and the user alike, which could cause malfunction or data loss. |
General information
Introduction
A GPON is a network of passive optical networks (PON) type. It is one of the most effective state-of-the-art solutions for the 'last mile' issue that significantly reduces the required amount of cable and provides data transfer with downstream rate up to 2.5 Gbps and upstream rate up to 1.25 Gbps. Being used in access networks, GPON-based solutions allow end users to have access to new services based on IP protocol in addition to more common ones.
...
This user manual describes purpose, main technical specifications, installation order, rules of configuration, monitoring, and software update for the devices.
Purpose
The LTP-16N(T) optical line terminal is designed to establish connection with upstream equipment and provide broadband access across passive optical networks. Ethernet connection is established through Gigabit uplink and 10G Base-X interfaces; GPON interfaces are used to connect to optical networks. Each PON interface allows connection of up to 128 subscriber optical terminals through one fibre and supports dynamic bandwidth allocation (DBA).
...
- dynamic bandwidth allocation (DBA);
- security functions;
- remote ONT management;
- power measurement support for signals received from each ONT (RSSI);
- VLAN organisation (VLAN ID range: 1–4094);
- support for IGMP snooping v1/2/3, IGMP proxy;
- support for PPPoE intermediate agent;
- support for DHCP Snooping, DHCP option 82.
Delivery Package
The standard delivery package includes:
- LTP-16N/16NT optical line terminal;
- Mounting set for 19'' rack.
- RJ-45 – DB9(F) console cable;
- CD with Operation Manual and Quick Configuration Guide (optional);
- Power cable (if equipped with 220V power supply);
- Informational leaflet;
- Declaration of conformity;
- Technical passport.
Technical specifications
Table 1 – Main specifications of the line terminal
...
Control | ||
|---|---|---|
Local control | CLI – command line interface | |
Remote management | CLI (SSH, Telnet), SNMP | |
Monitoring | CLI, SNMP | |
Access restriction | by password, by privelege level | |
General parameters | ||
Power supply | AC: 150..250V, 50 Hz | |
Maximum power consumption | LTP-16N/LTP-16NT | 75 W |
Operating temperature range | from -5 to +40°C | |
Relative humidity | Up to 80% | |
Dimensions (WxHxD) | 19", 1U | |
Dimensions with an installed power module: | ||
430x42x305 mm | ||
Weight | Complete set | |
LTP-16N/LTP-16NT | 3.5 kg | |
Modules | ||
Power module | 0.5 kg | |
| Scroll Pagebreak |
|---|
Compatible SFP transceivers
Correct and error-free operation of GPON interface requires exact parameters to be chosen and set for each transceiver type. This can be done only under laboratory conditions by the terminal vendor. Table 2 lists SFP transceivers for which seamless terminal operation is guaranteed.
...
Vendor | SFP transceiver module | Class | DDMI |
|---|---|---|---|
NEOPHOTONICS | PTB38J0-6538E-SC | B+ | + |
NEOPHOTONICS | 38J0-6537E-STH1+ | C+ HP | + |
NEOPHOTONICS | 38J0-6537E-STH2+ | C+ HP | + |
NEOPHOTONICS | 38J0-6537E-STH3+ | C+ HP | + |
Ligent Photonics | LTE3680M-BC | B+ | + |
Ligent Photonics | LTE3680M-BH | B+ | + |
Ligent Photonics | LTE3680P-BC | C+ | + |
| Ligent Photonics | LTE3680P-BC+1 | C+ | + |
Ligent Photonics | LTE3680P-BH | C+ | + |
Ligent Photonics | LTE3680P-BC2 | C+ HP | + |
| Hisense | LTE3680M-BC+ | B+ | + |
| Hisense | LTE3680M-BC+2 | C+ | + |
| Scroll Pagebreak |
|---|
Design
Front panel
The devices have a metal housing available for 19” form-factor rack mount; housing size is 1U. The front panel layout is shown in figures 1 and 2. Tables 3 and 4 list connectors, LEDs and controls located on the front panel of the terminal.
...
# | Front panel element | Description |
|---|---|---|
1 | PS2 | Redundant power supply indicator |
2 | PS1 | Primary power supply indicator |
3 | Status | Device operation indicator |
4 | Power | Device power indicator |
5 | SSD | SSD operation indicator |
6 | FAN | Ventilation panels operation indicator |
7 | F | Functional key that reboots the device and resets it to factory default configuration:
|
8 | Console | DB9F — RJ45 console port |
9 | Sync | Synchronization operation indicator |
10 | Alarm | Alarm indicator |
11 | Sync ports | Synchronization interfaces |
12 | USB | USB port |
13 | OOB | Port for connection the board via network |
14 | PON 1..16 | GPON interfaces. 16 chassis for installing xPON 2.5G SFP modules |
15 | 10/1GE | Uplink interfaces. 8 chassis for installing 10G-BASE-X SFP modules |
Rear panel
The rear panel of the device is shown in Figure 3.
...
Rear panel element | Description |
|---|---|
160..250 VAC, 50Hz, max 1A; 36..72 VDC, max 5A | Connectors for AC/DC power supply |
Earth bonding point | Earth bonding point |
Fan1, Fan2 | Ventilation units |
Scroll Pagebreak
LED Indication
The indicators located on the front panel show the status of the terminal. Table 6 provides possible statuses of the LEDs.
...
LED name | Indicator State | Device state |
|---|---|---|
Power | Solid green | Power is on, normal device operation |
Off | Power is off | |
Red | Primary power supply failure | |
Status | Solid green | Normal operation |
Solid red | Operation failures | |
Fan | Solid green | All fans are operational |
Flashing red | One or more fans are failed | |
PS1 | Solid green | Primary power supply is connected and operates correctly |
Disabled | Primary power supply is not connected | |
Red | Primary power supply is missing or failed. | |
PS2 | Solid green | Redundant power supply is connected and operates correctly |
Disabled | Redundant power supply is not connected | |
Red | The primary source of the redundant power supply is unavailable or the redundant power supply failed | |
Alarm | Green | Correct device operation |
Flashing red | Alarm | |
SSD | Disabled | Cannot reach the drive |
Flashing green | The drive is being accessed | |
Sync | Solid green | Synchronization is in process |
Disabled | Synchronization is disabled |
Temperature sensors
4 temperature sensors are used to measure temperature inside the terminal case: 3 external and 1 into switch.
...
Rear panel element | Description |
|---|---|
Temperature sensor 1 | PON-ports SFP 1 |
Temperature sensor 2 | PON-ports SFP 2 |
Temperature sensor 3 | Front-ports SFP |
Temperature sensor 4 | Switch |
Ventilation system
There are ventilation openings on the device rear, front and side panels that serve to remove heat. There are two ventilation units on the rear panel (Figure 3).
Air flows in through the perforated front and side panels, circulates through all internal components, cools them down, and then is removed by fans located on the perforated rear panel.
The device contains two blocks of two fans each. The ventilation units are detachable. The procedure for dismantlement and installation is described in Ventilation Units Replacement.
Safety rules and Installation procedure
Introduction
This section describes safety measures and installation of the terminal into a rack and connection to a power supply.
Safety requirements
General requirements
Any operations with the equipment should comply to the Safety Rules for Operation of Customers' Electrical Installations.
...
- Prior to connecting the device to a power source, ensure that the equipment case is grounded with an earth bonding point. The earthing wire should be securely connected to the earth bonding point. The resistance between the earth bonding point and earthing busbar should be less than 0,1 Ω. PC and measurement instruments should be grounded prior to connection to the terminal. The potential difference between the equipment case and the cases of the instruments should be less than 1V.
- Prior to turning the device on, ensure that all cables are undamaged and securely connected.
- Make sure the device is off, when installing or removing the case.
- Follow the instructions given in SFP transceivers replacement to install or remove SFP transceivers. This operation does not require the terminal to be turned off.
Terminal installation
| Якорь | ||||
|---|---|---|---|---|
|
Check the device for visible mechanical damage before installing and turning it on. In case of any damage, stop the installation, fill in a corresponding document and contact your supplier. If the terminal was exposed to low temperatures for a long time before installation, leave it for 2 hours at ambient temperature prior to operation. If the device was exposed to high humidity for a long time, leave it for at least 12 hours in normal conditions prior to turning it on.
...
- Step 1. Install the power module into the socket shown in Figure 7 or Figure 8.
- Step 2. Screw the module to the case.
- Step 3. Follow the instructions in Terminal installation to power on.
The device installation order:
- Step 1. Mount the device. In case of installation to a 19" form-factor rack, mount the support brackets from the delivery package to the rack.
- Step 2. Ground the case of the device. This should be done prior to connecting the device to the power supply. An insulated multiconductor wire should be used for earthing. The device grounding and the earthing wire section should comply with Electric Installation Code. The ground terminal is on the rear panel, Figure 3.
- Step 3. If you intend to connect a PC or another device to the switch console port, the device must be properly grounded as well.
- Step 4. Connect the power supply cable to the device.
- Step 5. Turn the device on and check the front panel LEDs to make sure the terminal is in normal operating conditions.
Getting Started with the terminal
Connecting to the Terminal CLI
Introduction
This section describes various connection methods for Command Line Interface (CLI) of the terminal.
...
| Якорь | ||||
|---|---|---|---|---|
|
Connecting to CLI via COM port
This type of connection requires PC either to have an integrated COM port or to be supplied with an USB-COM adapter cable. The PC should also have a terminal program installed, e. g. Hyperterminal.
...
Step 2. Launch the terminal program and create a new connection. Select the corresponding COM port in the Connect to drop-down list. Assign the port settings according to the table below. Click <OK>.
Table 8 – Port specificationsSpeed
115200
Data bits
8
Parity
No
Stop bits
1
Flow control
None
Scroll Pagebreak Step 3. Press <Enter>. Log into the terminal CLI.
Примечание Factory default authorization settings:
login: admin, password: password.Блок кода language xml ******************************************** * Optical line terminal LTP-16N * ******************************************** LTP-16N login: admin Password: LTP-16N#
Connecting to CLI via Telnet protocol
The Telnet protocol connection is more flexible than the connection via COM port. Connection to CLI can be established directly at the terminal location or via an IP network with the help of a remote desktop.
This section considers direct connection to CLI at the terminal location. Remote connection is similar, but requires changes in the terminal IP address that will be considered in detail in the Network Settings section.
In order to be connected to the terminal, a PC should have a Network Interface Card (NIC). The connection will additionally require the sufficient amount of network cable (Patching Cord RJ45) as it is not included in the delivery package.
...
Step 4. Log into the terminal CLI.
Примечание Factory authorization settings:
login: admin, password: password.Блок кода language xml Trying 192.168.1.2... Connected to 192.168.1.2. Escape character is ’^]’. ******************************************** * Optical line terminal LTP-16N * ******************************************** LTP-16N login: admin Password: LTP-16N#
Connecting to CLI via Secure Shell protocol
Secure Shell connection (SSH) has functionality similar to the Telnet protocol. However, as opposed to Telnet, Secure Shell encrypts all traffic data, including passwords. This enables secure remote connection via public IP networks.
This section considers direct connection to CLI at the terminal location. Remote connection is similar, but requires changes in the terminal IP address that will be considered in detail in the Network Settings section.
In order to be connected to the terminal, a PC should have a Network Interface Card (NIC). The PC should have an SSH client installed, e. g. PuTTY. The connection will additionally require the sufficient amount of network cable (Patch Cord RJ-45) as it is not included in the delivery package.
- Step 1. Perform steps 1 and 2 from the Connecting to CLI via COM port
- Step 2. Run PuTTY. Enter IP address of the terminal. The factory setting for the IP address is 168.1.2. Select port 22 and SSH protocol type. Click <Open>.
Step 3. Log into the terminal CLI. Factory authorization settings:
login: admin, password: password.Блок кода language xml login: admin Password: ******** LTP-16N#
Getting Started with terminal CLI
Introduction
CLI is the main means of communication between user and the terminal. This section describes general CLI procedures, with information on grouping, autocomplete options, and command history.
CLI views hierarchy
The command system of the LTP-16N command line interface is divided into view sections. The transition between sections is performed by commands. The exit command is used to return to the previous level. Some views are an array where a unique index must be used to access a specific object.
...
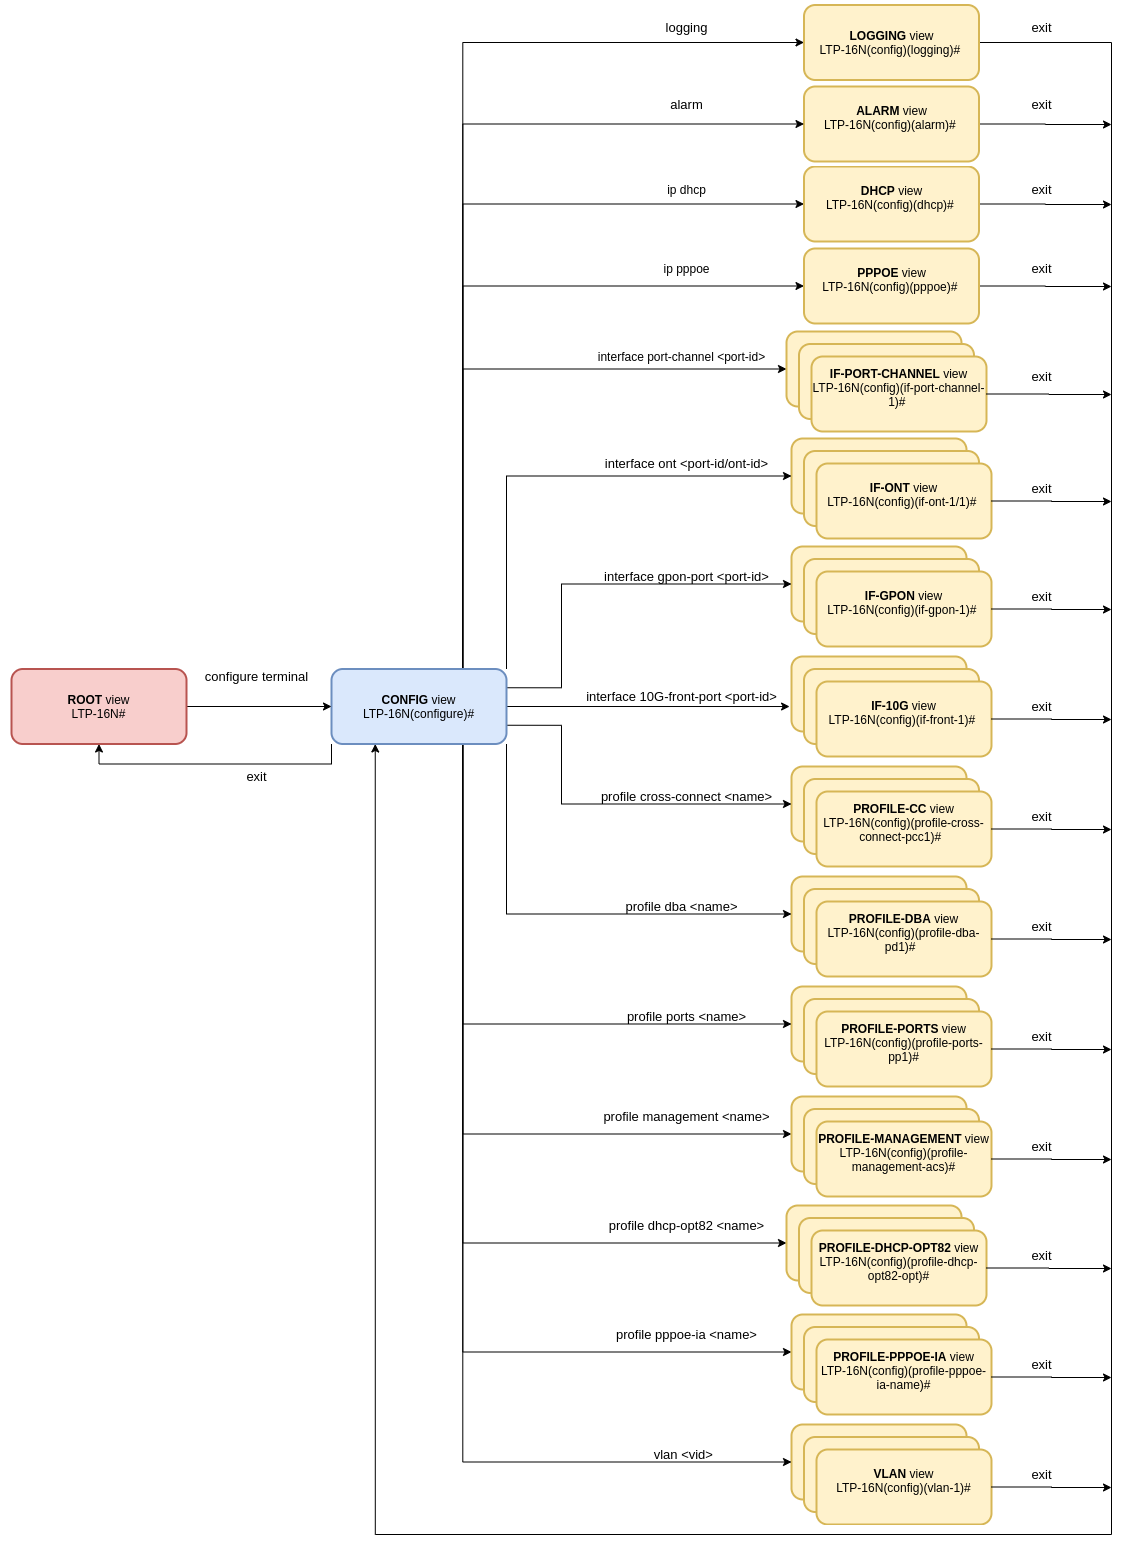
Figure 13 – CLI views hierarchy
| Scroll Pagebreak |
|---|
CLI hotkeys
In order to speed up the operations with the command line, the following hotkeys have been added:
...
Hotkey | Result |
|---|---|
Ctrl+A | Transition to the beginning of line |
Ctrl+D | In a nested command mode – exit to the previous command mode (exit command), in a root command mode – exit from CLI |
Ctrl+E | Transition to the end of line |
Ctrl+L | Screen clearing |
Ctrl+U | Removal of characters to the left of a cursor |
Ctrl+W | Removal of a word to the left of a cursor |
Ctrl+K | Removal of characters to the right of a cursor |
Ctrl+C | Line clearing, command execution interruption |
CLI automatic code completion
To simplify the use of the command line, the interface supports automatic command completion. This function is activated when the command is incomplete and the <Tab> character is entered.
...
| Блок кода | ||
|---|---|---|
| ||
LTP-16N# co<Tab> commit configure copy LTP-16N# con<Tab> LTP-16N# configure |
| Scroll Pagebreak |
|---|
Group operations
Group operations can be performed on such terminal configuration objects as interfaces and ONT. It is especially convenient, when you have to apply the same actions to multiple objects.
...
| Блок кода | ||
|---|---|---|
| ||
LTP-16N# show interface ont 1-3 online GPON-port 1 has no online ONTs GPON-port 2 has no online ONTs GPON-port 3 has no online ONTs Total ONT count: 0 |
Configuring the terminal
Terminal configuration
Introduction
A collection of all terminal settings is referred to as configuration. This section provides information on the parts which configuration consists of. It also defines lifecycle of configuration and describes main operations, which can be performed.
Configuration lifecycle
The terminal configuration may have the following states:
...
| Якорь | ||||
|---|---|---|---|---|
|
Creating a configuration backup
Configuration backups allow the terminal operation to be quickly restored after abnormal situations or replacement. Regular manual backups of the configuration are recommended.
...
| Блок кода | ||
|---|---|---|
| ||
LTP-16N# copy fs://config tftp://192.168.1.1/config Upload backup file to TFTP-server.. |
Configuration restore
The terminal configuration is restored from a TFTP server which is available in the management network. The copy command is used to restore the data. Define source URI as parameter and fs://config as restored configuration.
| Блок кода | ||
|---|---|---|
| ||
LTP-16N# copy tftp://10.0.105.1/config fs://config Download file from TFTP-server.. Reading of the configuration file.. Configuration have been successfully restored (all not saved changes was lost) |
Configuration reset
To reset a terminal configuration to factory settings, use the default command. After running the command, the default configuration is applied as a Candidate and must be applied using the commit command.
...
| Якорь | ||||
|---|---|---|---|---|
|
Network settings
Introduction
This section describes adjustment of network settings for the terminal. Adjusting network settings enables remote control and integration with OSS/BSS systems.
Network parameters configuration
It is recommended to adjust network settings via COM port connection. This will prevent issues with connection loss upstream the terminal being adjusted. Be very careful when using remote adjustment.
Step 1. Use the show running-config management command to view the current network settings.
Блок кода language xml LTP-16N# show running-config management all management ip 192.168.1.2 management mask 255.255.255.0 management gateway 0.0.0.0 management vid 1
Step 2. Switch to the configure view. Set the terminal name by using the hostname command.
Блок кода language xml LTP-16N# configure terminal LTP-16N(configure)# system hostname LTP-16N-test
Step 3. Set the terminal IP address by using the management ip command.
Блок кода language xml LTP-16N(configure)# management ip 10.0.0.1
Step 4. Set the subnet mask by using the management netmask command.
Блок кода language xml LTP-16N(configure)# management mask 255.0.0.0
Step 5. Set the default gateway by using the management gateway command.
Блок кода language xml LTP-16N(configure)# management gateway 10.0.0.254
Step 6. Set the management VLAN of the terminal by using the management vid command if necessary.
Блок кода language xml LTP-16N(configure)# management vid 10
Примечание To operate with the device over the management interface via uplink ports, you must allow the management vid on the necessary ports.
Предупреждение Please note, if you connect to the OOB and uplink port at the same time, a loop can be formed in management.
Step 7. The network settings will change as soon as the configuration is applied. No terminal reboot is needed.
Блок кода language xml LTP-16N(configure)# do commit
Scroll Pagebreak
User management
Introduction
This section is devoted to management of the terminal users.
...
Step 1.The default privilege allocation can be viewed by using the show running-config privilege all command.
Блок кода language xml LLTP-16N# show running-config privilege all privilege 1 view-interface-ont privilege 2 view-interface-ont privilege 2 commands-interface-ont privilege 4 view-interface-ont privilege 4 config-general privilege 4 config-interface-ont privilege 4 commands-interface-ont privilege 4 commands-configuration privilege 5 view-interface-ont privilege 5 config-general privilege 5 config-interface-ont privilege 5 config-interface-ont-profile privilege 5 commands-interface-ont privilege 5 commands-configuration privilege 6 view-interface-ont privilege 6 config-general privilege 6 config-interface-gpon-port privilege 6 config-interface-ont privilege 6 config-interface-ont-profile
Блок кода language xml privilege 6 commands-interface-ont privilege 6 commands-configuration privilege 6 commands-interface-gpon-port privilege 6 commands-interface-front-port privilege 7 view-igmp privilege 7 view-dhcp privilege 7 view-pppoe privilege 7 view-interface-ont privilege 7 view-interface-front-port privilege 7 view-configuration privilege 7 config-general privilege 8 view-igmp privilege 8 view-dhcp privilege 8 view-pppoe privilege 8 view-interface-front-port privilege 8 view-configuration privilege 8 config-vlan privilege 8 config-general privilege 8 config-interface-front-port privilege 8 commands-configuration privilege 9 view-igmp privilege 9 view-dhcp privilege 9 view-pppoe privilege 9 view-interface-ont privilege 9 view-interface-front-port privilege 9 view-configuration privilege 9 config-vlan privilege 9 config-general privilege 9 config-interface-gpon-port privilege 9 config-interface-ont privilege 9 config-interface-ont-profile privilege 9 config-interface-front-port privilege 9 commands-interface-ont privilege 9 commands-configuration privilege 9 commands-interface-gpon-port privilege 9 commands-interface-front-port privilege 10 view-igmp privilege 10 view-dhcp privilege 10 view-pppoe privilege 10 view-alarm privilege 10 view-system privilege 10 view-interface-ont privilege 10 view-interface-front-port privilege 10 view-configuration privilege 10 config-general privilege 11 view-igmp privilege 11 view-dhcp privilege 11 view-pppoe privilege 11 view-alarm privilege 11 view-system privilege 11 view-interface-ont privilege 11 view-interface-front-port privilege 11 view-configuration privilege 11 config-alarm privilege 11 config-general privilege 11 config-logging privilege 11 config-access privilege 11 config-cli privilege 11 commands-configuration privilege 12 view-igmp privilege 12 view-dhcp privilege 12 view-pppoe privilege 12 view-alarm privilege 12 view-system privilege 12 view-interface-ont privilege 12 view-interface-front-port privilege 12 view-configuration privilege 12 view-firmware privilege 12 config-vlan privilege 12 config-igmp privilege 12 config-dhcp privilege 12 config-pppoe privilege 12 config-alarm privilege 12 config-general privilege 12 config-logging privilege 12 config-interface-front-port privilege 12 config-access privilege 12 config-cli privilege 12 config-management privilege 12 commands-configuration privilege 13 view-igmp privilege 13 view-dhcp privilege 13 view-pppoe privilege 13 view-alarm privilege 13 view-system privilege 13 view-interface-ont privilege 13 view-interface-front-port privilege 13 view-configuration privilege 13 view-firmware privilege 13 config-vlan privilege 13 config-igmp privilege 13 config-dhcp privilege 13 config-pppoe privilege 13 config-alarm privilege 13 config-system privilege 13 config-general privilege 13 config-logging privilege 13 config-interface-gpon-port privilege 13 config-interface-ont privilege 13 config-interface-ont-profile privilege 13 config-interface-front-port privilege 13 config-access privilege 13 config-cli privilege 13 config-management privilege 13 commands-interface-ont privilege 13 commands-configuration privilege 13 commands-interface-gpon-port privilege 13 commands-general privilege 13 commands-interface-front-port privilege 15 view-igmp privilege 15 view-dhcp privilege 15 view-pppoe privilege 15 view-alarm privilege 15 view-system privilege 15 view-interface-ont privilege 15 view-interface-front-port privilege 15 view-configuration privilege 15 view-firmware privilege 15 config-vlan privilege 15 config-igmp privilege 15 config-dhcp privilege 15 config-pppoe privilege 15 config-alarm privilege 15 config-system privilege 15 config-general privilege 15 config-logging privilege 15 config-interface-gpon-port privilege 15 config-interface-ont privilege 15 config-interface-ont-profile privilege 15 config-interface-front-port privilege 15 config-access privilege 15 config-cli privilege 15 config-management privilege 15 config-user privilege 15 commands-interface-ont privilege 15 commands-configuration privilege 15 commands-copy privilege 15 commands-firmware privilege 15 commands-interface-gpon-port privilege 15 commands-license privilege 15 commands-general privilege 15 commands-system privilege 15 commands-interface-front-port
Step 2. Switch to the configure view. Set the required permissions corresponding to the level by using the privilege command, e. g. set permissions allowing Level 1 to view configuration of the ONT:
Блок кода language xml LTP-16N# configure terminal LTP-16N(configure)# privilege 1 view-interface-ont
Step 3. Settings of privileges will be applied immediately. No terminal reboot is needed.
Блок кода language xml LTP-16N(configure)# do commit
User list preview
To view the list of terminal users, enter the show running-config user all command:
...
The admin and root users always exist and cannot be deleted or duplicated. The terminal supports up to 16 users.
Adding a new user
In order to operate effectively and safely, the terminal, as a rule, requires one or several additional users. To add a new user, enter the user command in the configure view:
...
Pass the name of the new user as a parameter to the user command. The name should not be longer than 32 characters. The name should not contain special characters.
Changing user password
To change user password, enter the user command. Pass the user name and a new password as parameters. Default password is password.In the configuration, the password is stored in encrypted form.
...
The password should not be longer than 31 characters and shorter than 8 characters. If the password contains a space, use quotations for the password.
Viewing and changing user access rights
To manage user access rights, a user priority system is implemented. A newly created user is granted with a minimal set of permissions:
...
| Блок кода | ||
|---|---|---|
| ||
LTP-16N(configure)# user operator privilege 15
    User operator successfully changed privilege
LTP-16N(configure)# do show running-config user
 user operator encrypted_password $6$mIwyhgRA$jaxkx6dATExGeT82pzqJME/eEbZI6c9rKWJoXfxLmWXx7mQYiRY0pRNdCupFsg/1gqPfWmqgc1yuR8J1g.IH20
user operator privilege 15 |
Scroll Pagebreak
Deleting a user
To delete a user, enter the no user command in the configure view. Pass the user name as a parameter:
| Блок кода | ||
|---|---|---|
| ||
LTP-16N# configure terminal
LTP-16N(configure)# no user operator
User operator successfully deleted |
Services configuration
Introduction
This section describes configuration of integrated terminal services.
SNMPD configuration
For the terminal to work via SNMP, the appropriate service should be enabled.
...
| Примечание |
|---|
The types and purpose of SNMP traps are closely connected with the log of active alarms. |
LOGD configuration
System log collects terminal history data and allows its further display. Adjustment of system log operates with such terms as module, filter level, and output device.
...
The log is saved in non-volatile memory by default. The system has 3 log rotated files of 1M each.
Module configuration
Consider the configuration using the dna module and the ont sub-module, which is responsible for displaying logs for the ONT. Other modules have similar configuration process.
Step 1. Switch to the logging view.
Блок кода language xml LTP-16N(configure)# logging
Scroll Pagebreak Step 2. Set the level of log display with the ONT index for which the logs will be displayed. To do this use the module dna <port-id>[/ont-id] loglevel command.
Блок кода language xml LTP-16N(config)(logging)# module dna ont 1/1 loglevel debug
Step 3. Apply the configuration by using the commit command.
Блок кода language xml LTP-16N(config)(logging)# do commit
Configuring the log storage
Use the following command to record logs to non-volatile memory:
...
If you enter «no» before the command, the logs will be recorded to RAM. In this case, the logs will be erased after reboot.
System log configuration
Step 1. Use the buffer command to specify the memory size in bytes to be used for system log storage.
Блок кода language xml LTP-16N(config)(logging)# buffer 30000
Step 2. If necessary, use the remote server ip command to specify the IP address of the remote SYSLOG server to be used to display system log.
Блок кода language xml LTP-16N(config)(logging)# remote server ip 192.168.1.43
Step 3. Configure the output devices by using the logging command.
Информация Each output device may have its own filtering level or have the output disabled.
For example, enable the display of debug messages to a file and to a remote service:
Блок кода language xml LTP-16N(config)(logging)# remote loglevel debug LTP-16N(config)(logging)# file loglevel debug
Step 5. Apply the configuration by using the commit command.
Блок кода language xml LTP-16N(config)(logging)# do commit
Scroll Pagebreak Step 6. To view SYSLOG configuration information, use the do show running-config logging command .
Блок кода language xml LTP-16N(config)(logging)# do show running-config logging logging module dna ont 1/1 loglevel debug permanent buffer 30000 file loglevel debug remote server ip 192.168.1.43 remote loglevel debug exit
ALARMD configuration
ALARMD is a terminal alarms manager. Alarms manager enables troubleshooting and provides information about important events related to terminal operation.
...
Token | Description |
|---|---|
severity | Describes event severity. Has four states: |
in | Specifies whether an SNMP trap should be sent when an event is added to the log. Has two states: |
out | Specifies whether an SNMP trap should be sent when an event is deleted from the log (normalization). Has two states: |
Active alarms log configuration
Step 1. To configure the active alarm log, go to configure view and then to alarm view.
Блок кода language xml LTP-16N# configure terminal LTP-16N(configure)# alarm LTP-16N(config)(alarm)#
Step 2. For example, configure the alarm system-fan. To do this use the system-fan command. The other alarms are configured similarly.
Блок кода language xml LTP-16N(config)(alarm)# system-fan min-rpm 5000 LTP-16N(config)(alarm)# system-fan severity critical LTP-16N(config)(alarm)# system-fan in true
Step 3. Apply the changes by using the do commit command.
Блок кода language xml LTP-16N(config)(alarm)# do commit
Якорь Настройка VLAN Настройка VLAN
VLAN Configuration
| Настройка VLAN | |
| Настройка VLAN |
Introduction
This section describes VLAN configuration.
VLAN ( Virtual Local Area Network) is a group of devices, which communicate on the channel level and are combined into a virtual network, connected to one or more network devices (GPON terminals or switches). VLAN is a very important tool for creating a flexible and configurable logical network topology over the physical topology of a GPON network.
| Scroll Pagebreak |
|---|
VLAN Configuration
Step 1. To configure VLAN, go to the configure view.
Блок кода language xml LTP-16N# configure terminal LTP-16N(configure)#
Step 2. Switch to the VLAN configuration mode with the vlan command. Pass VID as a parameter.
Блок кода language xml LTP-16N(configure)# vlan 5 LTP-16N(config)(vlan-5)#
| Якорь | ||||
|---|---|---|---|---|
|
| Информация |
|---|
To configure VLAN permission on interfaces, see Interface configuration. |
Step 1. For convenience, specify a VLAN name by using the name command. To clear the name, use the no name command.
Блок кода language xml LTP-16N(config)(vlan-5)# name IpTV
Step 2. If you need to process IGMP packets on a specified VLAN, use the ip igmp snooping enable command to enable IGMP-snooping.
Блок кода language xml LTP-16N(config)(vlan-5)# ip igmp snooping enable
Step 3. Configure the IGMP querier if needed. It can be enabled with the help of the ip igmp snooping querier enable command.
The fast-leave mode is enabled by means of the ip igmp snooping querier fast-leave command. By default, this mode is disabled.
DSCP and 802.1P marking for IGMP query is configured by means of the ip igmp snooping querier user-prio and ip igmp snooping querier dscp commands.Блок кода language xml LTP-16N(config)(vlan-5)# ip igmp snooping querier enable LTP-16N(config)(vlan-5)# ip igmp snooping querier fast-leave LTP-16N(config)(vlan-5)# ip igmp snooping querier dscp 40
Step 4. Configure IGMP if needed.
Compatible versions (v1, v2, v3, or their combination):
Блок кода language xml LTP-16N(config)(vlan-5)# ip igmp version v2-v3
Interval between queries:
Блок кода language xml LTP-16N(config)(vlan-5)# ip igmp query-interval 125
Maximum query response time:Scroll Pagebreak Блок кода language xml LTP-16N(config)(vlan-5)# ip igmp query-response-interval 10
Interval between Group-Specific Queries:
Блок кода language xml LTP-16N(config)(vlan-5)# ip igmp last-member-query-interval 1
Robustness:
Блок кода language xml LTP-16N(config)(vlan-5)# ip igmp robustness 2
Step 11. Apply the configuration by using the commit command.
Блок кода language xml LTP-16N(config)(vlan-5)# do commit
VLAN Deletion
Step 1. Delete a VLAN by using the no vlan command. Pass VID (or its range) as a parameter.
Блок кода language xml LTP-16N(configure)# no vlan 5
IGMP configuration
Introduction
This section describes general IGMP configuration.
Enabling snooping
Step 1. The global snooping configuration is performed in the configure view.
Блок кода language xml LTP-16N# configure terminal LTP-16N(configure)#
Step 2. Enable IGMP snooping by using the ip igmp snooping command.
Блок кода language xml LTP-16N(configure)# ip igmp snooping enable
Report proxying
| Примечание |
|---|
On LTP-16N proxying report is always based on ONT services. |
DHCP Configuration
Introduction
This section describes the procedure for operating the terminal with the DHCP. The operation of the protocol can be divided into two blocks:
- DHCP snooping. Used to intercept DHCP traffic, control and monitor sessions.
- DHCP opt82. Functionality to insert service option 82 in DHCP packets.
DHCP snooping
This functionality is used to intercept and process traffic on the terminal CPU.
Currently, this functionality must be enabled if you want to control and monitor DHCP sessions and to operate with option 82 in DHCP packets.
DHCP snooping enabling
Step 1. The global snooping configuration is performed in the ip dhcp view, section configure view.
Блок кода language xml LTP-16N# configure terminal LTP-16N(configure)# ip dhcp LTP-16N(config)(dhcp)#
Step 2. Enable DHCP snooping using the snooping enable command.
Блок кода language xml LTP-16N(config)(dhcp)# snooping enable
DHCP option 82
DHCP opt82 is used to provide a DHCP server with additional information about a received DHCP request. This may include information about the terminal running DHCP opt82 as well as information about the ONT, which sent the DHCP request. DHCP packets are modified by interception and further processing in the terminal CPU, i.e. DHCP snooping must be enabled.
...
Token | Description |
|---|---|
%HOSTNAME% | Terminal network name |
%MNGIP% | Terminal IP address |
%GPON-PORT% | Number of the OLT channel the DHCP request arrived from |
%ONTID% | ID of the ONT, which sent the DHCP request |
%PONSERIAL% | Serial number of the ONT, which sent the DHCP request |
%GEMID% | ID of the GEM port the DHCP request arrived to |
%VLAN0% | External VID |
%VLAN1% | Internal VID |
%MAC% | MAC address of the ONT, which sent the request |
%OLTMAC% | OLT`s MAC address |
%OPT60% | DHCP option 60 received from the ONT |
%OPT82_CID% | Circuit ID received from the ONT |
%OPT82_RID% | Remote ID received from the ONT |
%DESCR% | First 20 characters of ONT description |
DHCP option 82 management
The DHCP option 82 is configured via the profile system – profile dhcp-opt82. The system allows to create several different profiles and assign them not only globally to all DHCP packets in general, but also to separate profiles by VLAN.
Step 1.Create DHCP option 82 profile using the profile dhcp-opt82 command. Pass profile name as a parameter.
Блок кода language xml LTP-16N# configure terminal LTP-16N(configure)# profile dhcp-opt82 test LTP-16N(config)(profile-dhcp-opt82-test)#
Step 2. Assign the global profile, using the opt82 profile command in ip dhcp view.
Блок кода language xml LTP-16N(configure)# ip dhcp LTP-16N(config)(dhcp)# opt82 profile test
Step 3. Assign another profile to the VLAN if needed.
Блок кода language xml LTP-16N(config)(dhcp)# opt82 profile test_vlan_100 vid 100
Step 4. Enable DHCP packet capture using the snooping enable command.
Блок кода language xml LTP-16N(config)(dhcp)# snooping enable
Step 5. Apply the configuration using the commit command.
Блок кода language xml LTP-16N(config)(dhcp)# do commit
DHCP option 82 profile configuration
Step 1.Create or switch to dhcp-opt82 profile.
Блок кода language xml LTP-16N# configure terminal LTP-16N(configure)# profile dhcp-opt82 test LTP-16N(config)(profile-dhcp-opt82-test)#
Step 2. Enable insert/overwrite of DHCP option 82 with the help of the overwrite-opt82 command if needed.
Блок кода language xml LTP-16N(config)(profile-dhcp-opt82-test)# overwrite-opt82 enable
Step 3. Set the DHCP option 82 format with the circuit-id and remote-id commands if necessary. A list of possible tokens is given in Table 15.
Блок кода language xml LTP-16N(config)(profile-dhcp-opt82-test)# circuit-id format %PONSERIAL%/%ONTID% LTP-16N(config)(profile-dhcp-opt82-test)# remote-id format %OPT82_RID%
Step 4. Apply the configuration by using the commit command.
Блок кода language xml LTP-16N(config)(dhcp)# do commit
Active DHCP leases monitoring
When enabled, DHCP snooping allows monitoring of DHCP leases. To view the list of sessions use the show ip dhcp sessions command:
| Блок кода | ||
|---|---|---|
| ||
LTP-16N# show ip dhcp sessions
DHCP sessions (2):
## Serial GPON-port ONT-ID Service IP MAC Vid GEM Life time
---- ------------ --------- ------ ------- --------------- ----------------- --- ---- ---------
1 ELTX6C000090 1 1 1 192.168.101.75 E0:D9:E3:6A:28:F0 100 129 3503
2 ELTX71000030 1 3 1 192.168.101.143 70:8B:CD:BD:A5:32 100 189 3597
LTP-16N# |
PPPoE configuration
Introduction
This section describes the procedure for operating the terminal with the PPPoE. The operation of the protocol can be divided into two blocks:
- PPPoE snooping. Used to intercept PPPoE traffic, control and monitor PPPoE sessions.
- PPPoE intermediate agent. Functionality for inserting service information into PPPoE packets.
PPPoE snooping
This functionality is used to intercept and process traffic on the terminal CPU.
Currently, this functionality must be enabled if you want to control and monitor PPPoE sessions and to operate with option 82 in packets.
PPPoE snooping enabling
Step 1. The global snooping configuration is performed in the ip pppoe view, which in turn is in the configure view.
Блок кода language xml LTP-16N# configure terminal LTP-16N(configure)# ip pppoe LTP-16N(config)(pppoe)#
Step 2. Enable PPPoE snooping using the snooping enable command.
Блок кода language xml LTP-16N(config)(pppoe)# snooping enable
PPPoE intermediate agent
PPPoE Intermediate Agent is used to provide BRAS with additional information about a received PADI request. This may include information about the terminal running PPPoE Intermediate Agent as well as information about the ONT, which sent the PADI request. PADI packets are modified by interception and further processing in the terminal CPU.
...
Step 1.Create the PPPoE Intermediate Agent profile using the profile pppoe-ia command. Pass profile name as a parameter.
Блок кода language xml LTP-16N# configure terminal LTP-16N(configure)# profile pppoe-ia test LTP-16N(config)(profile-pppoe-ia-test)#
Step 2. Assign the global profile, using the pppoe-ia profile command in ip pppoe view.
Блок кода language xml LTP-16N(configure)# ip pppoe LTP-16N(config)(pppoe)# pppoe-ia profile test LTP-16N(config)(pppoe)#
Step 3. Enable PPPoE packet capture using the snooping enable command.
Блок кода language xml LTP-16N(config)(pppoe)# snooping enable
Step 4. Apply the configuration using the commit command.
Блок кода language xml LTP-16N(config)(pppoe)# do commit
PPPoE Intermediate Agent profile configuration
Step 1.Create or switch to pppoe-ia profile.
Блок кода language xml LTP-16N# configure terminal LTP-16N(configure)# profile pppoe-ia test LTP-16N(config)(profile-pppoe-ia-test)#
Step 2. Set the PPPoE Intermediate Agent format with the circuit-id and remote-id commands if necessary. A list of possible tokens is given in Table 16.
Блок кода language xml LTP-16N(config)(profile-pppoe-ia-test)# circuit-id format %PONSERIAL%/%ONTID% LTP-16N(config)(profile-pppoe-ia-test)# remote-id format %GEMID%
Step 3. Apply the configuration by using the commit command.
Блок кода language xml LTP-16N(config)(pppoe-ia)# do commit
Active PPPoE sessions monitoring
When PPPoE snooping is enabled, sessions can be monitored. To view the list of sessions use the show ip pppoe sessions command:
| Блок кода | ||
|---|---|---|
| ||
LTP-16N(config)(pppoe)# do show ip pppoe sessions PPPoE sessions (1): ## Serial GPON-port ONT ID GEM Client MAC Session ID Duration Unblock ---- ------------ --------- ------ ---- ----------------- ---------- --------- --------- 1 ELTX6C000090 1 1 129 E0:D9:E3:6A:28:F0 0x0001 0:06:00 0:00:00 |
Interface configuration
| Якорь | ||||
|---|---|---|---|---|
|
Introduction
This section describes configuration of terminal interfaces.
...
Interface | Quantity | Range |
|---|---|---|
10G-front-port | 8 | [1..8] |
gpon-port | 16 | [1..16] |
oob | 1 | - |
10G-front-ports configuration
Step 1. Switch to the view of the interface (of interface group), which settings should be changed.
Блок кода language xml LTP-16N# configure terminal LTP-16N(configure)# interface 10G-front-port 1 LTP-16N(config)(if-front-1)#
Step 2. Enable the interface by using the no shutdown command. On the contrary, the shutdown command disables the interface.
Блок кода language xml LTP-16N(config)(if-front-1)# shutdown
Scroll Pagebreak Step 3. Set the list of allowed VLANs on the port, using the vlan allow command.
Блок кода language xml LTP-16N(config)(if-front-1)# vlan allow 100,200,300
Step 4. Apply the configuration by using commit command.
Блок кода language xml LTP-16N(config)(if-front-1)# do commit
GPON interface configuration
Step 1.Switch to the view of the interface (of interface group), which settings should be changed.
Блок кода language xml LTP-16N# configure terminal LTP-16N(configure)# interface gpon-port 13 LTP-16N(config)(if-gpon-13)#
Step 2. Enable or disable interfaces with the no shutdown or shutdown command respectively if necessary.
Блок кода language xml LTP-16N(config)(if-gpon-13)# shutdown
Step 3. Apply the configuration by using the commit command.
Блок кода language xml LTP-16N(config)(if-gpon-13)# do commit
LAG configuration
Introduction
This section describes configuration of uplink interfaces aggregation. Link aggregation (IEEE 802.3ad) is a technology that allows multiple physical links to be combined into one logical link (aggregation group). Aggregation group has a higher throughput and is very reliable.
The terminal supports one mode of interface aggregation – static. All communication channels in the group are always active.
LAG configuration
Balancing configuration
To improve balance
It is possible to configure parameters for traffic balancing functions in port-channel. It is possible to configure the polynomial to be used in the interface selection function with the interface port-channel load-balance polynomial command.You can also configure which of the header fields will be used in calculations. Possible options: src-mac, dst-mac, vlan, ether-type. It is allowed to use a combination of up to 3 fields.
| Блок кода | ||
|---|---|---|
| ||
LTP-16N# configure terminal LTP-16N(configure)# interface port-channel load-balance hash src-mac dst-mac vlan LTP-16N(configure)# interface port-channel load-balance polynomial 0x9019 |
Port-channel configuration
Step 1. Create an interface port-channel and pass the index as a parameter.
Блок кода language xml LTP-16N# configure terminal LTP-16N(configure)# interface port-channel 1 LTP-16N(config)(if-port-channel-1)#
Step 2. The port-channel settings are mostly similar to the 10G-front-port settings. For example, allow VLANs passing:
Блок кода language xml LTP-16N(config)(if-port-channel-1)# vlan allow 100,200,300
Step 3. Apply the configuration by using the commit command.
Блок кода language xml LTP-16N(config)(if-port-channel-1)# do commit
Adding ports to port-channel
Step 1.To aggregate ports in a port-channel, you should go to the ports to be aggregated:
Блок кода language xml LTP-16N(configure)# interface 10G-front-port 3-4 LTP-16N(config)(if-front-3-4)#
Step 2. Set the port-channel on the interfaces using the channel-group command
Блок кода language xml LTP-16N(config)(if-front-3-4)# channel-group port-channel 1
Примечание Interface and port-channel configurations should be the same. If the configurations are different, an error will occur when trying to aggregate the interfaces. If you want to force the aggregation, you can use the force option for the channel-group command. In this case, the interfaces will be configured from the port-channel and the current configuration will be reset.
Примечание An interface can belong to only one aggregation group.
Step 3. Apply the configuration by using the commit command.
Блок кода language xml LTP-16N(config)(if-front-3-4)# channel-group port-channel 1
Предупреждение After changing the port-channel settings, the terminal will be automatically reconfigured. There may be a temporary stoppage of services.
ONT configurationЯкорь Настройка ONT Настройка ONT
| Настройка ONT | |
| Настройка ONT |
Service ModelsЯкорь Сервисные модели предоставления услуг Сервисные модели предоставления услуг
| Сервисные модели предоставления услуг | |
| Сервисные модели предоставления услуг |
This section considers main terms and classification of service models.
Introduction
The service model can generally be based on one of the service principles: N-to-1, 1-to-1 and multicast. The «VLAN for Service» (N-to-1) architecture means that a service VLAN (S-VLAN) is used to provide all users with a certain service. The «VLAN for Subscriber» (1-to-1) architecture implies that a client VLAN (C-VLAN) is used to provide a user with multiple services. These methods are often combined in practice and form a hybrid model, which uses S-VLAN and C-VLAN simultaneously.
...
This architecture is similar to N-to-1, except that a dedicated multicast GEM port is used.
VLAN ID replacement; The concept of pon vid
The transfer of traffic from the service S-VLAN to the client C-VLAN can be done either on the OLT or on the ONT. To configure the replacement place, use the concept of pon vid. Setting this parameter, equal to outer vid or user vid, defines where the label replacement will take place – on OLT or ONT. The table below describes at what stage the replacement will take place, depending on the value of pon vid.
...
Pon vid is configured in the cross-connect profile, which allows you to customize the label replacement scheme for each service. By default, the replacement is performed on the ONT.
Operating principle
The model traffic concept is used for implementation of different service models in the terminal. The model is configured in a cross-connect profile, which allows the configuration of combined circuits within a single ONT Consider each scheme in more detail.
1-to-1
Consider the operation of the service configured according to the 1-to-1 model.
The scheme of this service model is shown in the Figure 17.
...
A C-VLAN is used between an ONT and service routers (BRAS, VoIP SR) that encapsulate services for one subscriber (one ONT service), such as VoIP, Internet, and IPTV. In this case, all traffic is routed to one common GEM port.
| Scroll Pagebreak |
|---|
N-to-1
Consider an example of N-to-1 implementation. It is better to consider this scheme on the example of two ONTs.
...
Dedicated S-VLANs are used between the OLT and service routers (BRAS, VoIP SR) for each of the following services (here – Internet). The destination of the packet is defined by the MAC table, which explicitly stores the MAC address and GEM port correspondence. If no entry is found, the packet is sent to the broadcast GEM port and replicated to all ONTs using the service.
Multicast
The multicast scheme is similar to the N-to-1 scheme, except that a multicast GEM port is used and the MAC table is involved only for IGMP exchange. Multicast is sent directly to the multicast GEM port. This mechanism is closely related to IGMP snooping.
ONT licensing
Introduction
By default, OLT supports only Eltex ONTs operation. To enable any third-party ONTs, OLT requires a license. To purchase the license, contact Eltex Marketing Department.
Loading a license file to OLT
A license is a text file of the following format:
...
Use the copy command:
LTP-16N# copy tftp://<IP>/<PATH> fs://license
Download file from TFTP-server..
License successfully installed.
Where:
IP – IP address of the TFTP server;
PATH – path to the license file on the TFTP server.Use CLI:
LTP-16N# license set """<license>"""
License saved.
License successfully installed.
Where:
<license> – full content of the license file including curly brackets.
To view information about the license on the device, use the show command.Блок кода language xml LTP-16N# show license Active license information: License valid: yes Version: 1.2 Board SN: GP2B000022 Licensed vendor: all Licensed ONT count: 10 Licensed ONT online: 3The license file remains after device reload, firmware update, and configuration load. If OLT is reset to factory settings, the license is also deleted.
Deleting a license file from OLT
If necessary, you can delete a previously installed license using the no license command.
| Блок кода | ||
|---|---|---|
| ||
LTP-16N# no license License file removed. License successfully deleted from system. LTP-16N# show license Active license information: No license installed |
ONT configuration
Introduction
This section describes general principles of ONT configuration. It also defines configuration profiles.
...
ONT configuration includes assignment of configuration profiles and specification of ONT specific parameters. Configuration profiles allow general parameters to be set for all or for a range of ONTs. Profile parameters may include, for instance, DBA settings, configuration of VLAN operations in OLT and ONT, settings of Ethernet ports in ONT. Specific ONT parameters allow each separate ONT to have its own settings specified. Such settings include, for example, GPON password, subscriber's VLAN, etc.
ONT operation modes
Introduce the concept of Bridged and Routed services. For this, consider the concept of OMCI and RG management domains. These terms are determined in TR-142 Issue 2. In terms of management domains, an ONT is considered as a device, which operates in the OMCI domain only. The devices, which operate in both management domains (i. e. have an integrated router), are denoted as ONT/RG.
...
ONT is connected to RG using a Virtual Ethernet interface point (VEIP), which corresponds to the TR-069 WAN interface (described in TR-098) on the RG side. VEIP is represented by a virtual port in terminal parameters. The port has the same configuration procedure as Ethernet ports in the ports profile.
General principles of configuration
Service is the key term of ONT configuration. This term completely includes a communication channel, through which data is transferred from the interfaces located on the front panel of the terminal (see section Interface configuration) to users' ONT ports. There are two service profiles: cross-connect and dba. The cross-connect profile creates a GEM service port, the dba profile allocates an Alloc-ID for this ONT and associates a corresponding GEM port to the Alloc-ID.
...
Profile | Description |
|---|---|
cross-connect | Defines VLAN transformation in OLT and ONT. Defines service model. Defines ONT operation mode. |
dba | Defines upstream traffic parameters |
ports | Defines user port groups in ONT as well as IGMP and multicast parameters for user ports |
management | Defines TR-69 management service parameters. |
ONT profiles configuration
Cross-connect profile configuration
- Step 1. When configuring the cross-connect profile, first of all define the service delivery model, the traffic-model parameter is responsible for this.
- Step 2. Then define the ONT mode – ont-mode bridge or ont-mode router. For bridge, select a group by using the bridge group command.
- Step 3. Configure the outer vid, user vid and pon vid.
- Step 4. If the service will be used for management, iphost must be enabled. And if necessary, set an iphost id for it.
DBA profile configuration
This profile configures dynamic bandwidth allocation (DBA). These parameters allow specification of any T-CONT type described in G.984.3.
- Step 1. First you need to define the allocation-scheme — in one T-CONT or in different ones.
- Step 2. After that, configure status-reporting to define the type of ONT queues status report.
- Step 3. The bandwidth guaranteed, and bandwidth besteffort parameters define the guaranteed and best-effort bandwidth correspondingly.
Ports profile configuration
The ports profile allows to group ports in ONT. The profile also contains IGMP and multicast setting as they are separately adjusted for each port.
Up to 4 Ethernet ports can be configured.
- Step 1.Ethernet port grouping (applicable to bridge mode only) is done with the bridge-group These values mean port association with the OMCI domain, i. e. the port can be directly used in OLT to establish a data communication channel.
- Step 2. IGMP and multicast configuration is described in details in Section IGMP configuration.
Management profile configuration
In the management profile it is possible to configure parameters to control a device configured in the RG domain. There are two options for transmitting the configuration for ACS settings – via OMCI; receive in other ways (for example via DHCP opt43).
- Step 1. Set the iphost id to the value set in the cross-connect profile.
- Step 2. Set the ACS configuration obtainment mode by using the omci-configuration enable command.
- Step 3. When transmitting parameters via OMCI. Set parameters for ACS: username, password and url.
ONT configuration procedure
Figure below shows a step-by-step procedure of ONT configuration.
...
Step 1. Prior to proceed to ONT configuration, add an ONT into the OLT configuration. For an ONT to be added and configured, it does not need to be physically connected to the OLT. You can view the list of inactive ONTs with the help of the show interface ont <gpon-port> unactivated command.
Блок кода language xml LTP-16N# show interface ont 1 unactivated ----------------------------------- GPON-port 5 ONT unactivated list ----------------------------------- ## Serial ONT ID GPON-port RSSI Status 1 ELTX0600003D n/a 5 n/a unactivatedStep 2. To specify ONT settings, go to the corresponding view with the help of the interface ont command. Specify ONT serial number.
Блок кода language xml LTP-16N# configure terminal LTP-16N(configure)# interface ont 1/1 LTP-16N(config)(if-ont-1/1)# serial ELTX0600003D
Step 3. Apply the configuration by using the commit command.
Блок кода language xml LTP-16N(config)(if-ont-1/1)# do commit
Service configuration in the ont-mode bridge mode
Consider configuring a mixed scheme of services built on different traffic-model. ONT will be configured in the bridge mode.
...
Step 1. Create a cross-connect profile named Internet. Configure the bridged service specifying the bridge group the ONT port will be connected to (in this case, it is equal to 10 for the first service). Set the outer-vid to 200, replacing the label is not necessary and the traffic from the port comes without the tag, so leave the pon vid and user vid unchanged.
Блок кода language xml LTP-16N# configure terminal LTP-16N(configure)# profile cross-connect Internet LTP-16N(config)(profile-cross-connect-Internet)# ont-mode bridge LTP-16N(config)(profile-cross-connect-Internet)# bridge group 10 LTP-16N(config)(profile-cross-connect-Internet)# outer vid 200
Step 2. By analogy with the described above, create another cross-connect profile named IPTV for the second service and configure the bridge group. Additionally, configure the traffic-model for the multicast service type.
Блок кода language xml LTP-16N(config)(profile-cross-connect-IPTV)# ont-mode bridge LTP-16N(config)(profile-cross-connect-IPTV)# bridge group 11 LTP-16N(config)(profile-cross-connect-IPTV)# outer vid 98 LTP-16N(config)(profile-cross-connect-IPTV)# traffic-model multicast
Step 3. Create profile for the third service. Configure another group for him. And also configure tag replacement on the OLT and tagging traffic from the ONT port. For this set the values of pon and user vid to 10.
Блок кода language xml LTP-16N(configure)# profile cross-connect UNI_TAG LTP-16N(config)(profile-cross-connect-UNI_TAG)# ont-mode bridge LTP-16N(config)(profile-cross-connect-UNI_TAG)# bridge group 12 To view active ONT configurations LTP-16N(config)(profile-cross-connect-UNI_TAG)# outer vid 100 LTP-16N(config)(profile-cross-connect-UNI_TAG)# pon vid 10 LTP-16N(config)(profile-cross-connect-UNI_TAG)# user vid 10 LTP-16N(config)(profile-cross-connect-UNI_TAG)# traffic-model 1-to-1
Step 4. Specify DBA parameters. To do this, create a dba profile and adjust the corresponding settings. Set a value of a guaranteed bandwidth and allocation scheme in this example:
Блок кода language xml LTP-16N(configure)# profile dba AllService LTP-16N(config)(profile-dba-AllService)# allocation-scheme share-t-cont LTP-16N(config)(profile-dba-AllService)# bandwidth guaranteed 1024
Step 5. Associate bridge group with ONT port. To do this, create a ports profile and set the bridge group parameter to 10 for the eth1, eth2 port and to 11 for the eth3 port. Set the rules of multicast traffic processing for port 2:
Блок кода language xml LTP-16N(configure)# profile ports PP LTP-16N(config)(profile-ports-PP)# port 1 bridge group 10 LTP-16N(config)(profile-ports-PP)# port 2 bridge group 11 LTP-16N(config)(profile-ports-PP)# port 2 multicast LTP-16N(config)(profile-ports-PP)# port 2 igmp downstream tag-control remove-tag LTP-16N(config)(profile-ports-PP)# port 2 igmp upstream tag-control add-tag LTP-16N(config)(profile-ports-PP)# port 2 igmp upstream vid 98 LTP-16N(config)(profile-ports-PP)# port 2 igmp downstream vid 98 LTP-16N(config)(profile-ports-PP)# port 3 bridge group 12
Scroll Pagebreak Step 6. Assign the created profiles in the ONT.
Блок кода language xml LTP-16N(configure)# interface ont 1/1 LTP-16N(config)(if-ont-1/1)# service 1 profile cross-connect Internet dba AllService LTP-16N(config)(if-ont-1/1)# service 2 profile cross-connect IPTV dba AllService LTP-16N(config)(if-ont-1/1)# service 3 profile cross-connect UNI_TAG dba AllService LTP-16N(config)(if-ont-1/1)# profile ports PP
Step 7. Allow the required VLAN to pass on the uplink interface (see section Interface configuration).
Блок кода language xml LTP-16N# configure terminal LTP-16N(configure)# interface 10G-front-port 1 LTP-16N(config)(if-front-1)# vlan allow 200,100,98
Step 8. For VLAN 98, configure IGMP snooping. Also, enable IGMP Snooping globally:
Блок кода language xml LTP-16N(configure)# vlan 98 LTP-16N(config)(vlan-98)# ip igmp snooping enable LTP-16N(config)(vlan-98)# exit LTP-16N(configure)# ip igmp snooping enable
Step 9. Apply the configuration.
Блок кода language xml LTP-16N# commit
Service configuration in the ont-mode router mode
Consider a typical configuration of services for ONT configured the in router mode: HSI, IPTV, VoIP and ACS.
...
Step 1. Create a cross-connect profile named HSI. The ont-mode router mode is configured by default, so it is not necessary to set it. Set the service VLAN to 200 and the pon and user to 10. In this case, the ONT will receive traffic in 10 VLAN.
Блок кода language xml LTP-16N# configure terminal LTP-16N(configure)# profile cross-connect HSI LTP-16N(config)(profile-cross-connect-HSI)# outer vid 200 LTP-16N(config)(profile-cross-connect-HSI)# pon vid 10 LTP-16N(config)(profile-cross-connect-HSI)# user vid 10
Step 2. By analogy with the described above, create another cross-connect profile named IPTV for the second service and configure traffic-model for multicast service.
Блок кода language xml LTP-16N(configure)# profile cross-connect IPTV LTP-16N(config)(profile-cross-connect-IPTV)# outer vid 30 LTP-16N(config)(profile-cross-connect-IPTV)# user vid 30 LTP-16N(config)(profile-cross-connect-IPTV)# traffic-model multicast
Step 3. Create a cross-connect profile named STB similar to HSI. Set the service VLAN to 250. On the terminal, the traffic will go to 40 VLAN.
Блок кода language xml LTP-16N(configure)# profile cross-connect STB LTP-16N(config)(profile-cross-connect-STB)# outer vid 250 LTP-16N(config)(profile-cross-connect-STB)# pon vid 40 LTP-16N(config)(profile-cross-connect-STB)# user vid 40
Step 4. Create a cross-connect profile named VOIP similar to HSI. Set the service VLAN to 100. On the terminal, the traffic will go to 20 VLAN.
Блок кода language xml LTP-16N(configure)# profile cross-connect VOIP LTP-16N(config)(profile-cross-connect-VOIP)# outer vid 100 LTP-16N(config)(profile-cross-connect-VOIP)# pon vid 20 LTP-16N(config)(profile-cross-connect-VOIP)# user vid 20
Step 5. Create a cross-connect profile named ACS. Set the service VLAN to 2000. Also enable iphost in this service. Leave the default index value for iphost.
Блок кода language xml LTP-16N(configure)# profile cross-connect ACS LTP-16N(config)(profile-cross-connect-ACS)# outer vid 2000 LTP-16N(config)(profile-cross-connect-ACS)# iphost enable
Step 6. Specify DBA parameters. To do this, create a dba profile and adjust the corresponding settings. Set a value of a guaranteed bandwidth and allocation scheme in this example:
Блок кода language xml LTP-16N(configure)# profile dba AllService LTP-16N(config)(profile-dba-AllService)# allocation-scheme share-t-cont LTP-16N(config)(profile-dba-AllService)# bandwidth guaranteed 1024
Step 7. Create ports profile. Add to it the settings to allow multicast traffic to pass through VeIP:
Блок кода language xml LTP-16N(configure)# profile ports veip LTP-16N(config)(profile-ports-veip)# veip multicast enable LTP-16N(config)(profile-ports-veip)# veip igmp downstream vid 30 LTP-16N(config)(profile-ports-veip)# veip igmp upstream vid 30
Step 8. Create management profile. Add the configuration for authorization on the ACS server:
Блок кода language xml LTP-16N(configure)# profile management ACS LTP-16N(config)(profile-management-ACS)# username test LTP-16N(config)(profile-management-ACS)# password test_pass LTP-16N(config)(profile-management-ACS)# url http://192.168.100.100
Step 9. Assign the created profiles on the ONT
Блок кода language xml LTP-16N(configure)# interface ont 1/1 LTP-16N(config)(if-ont-1/1)# service 1 profile cross-connect HSI dba AllService LTP-16N(config)(if-ont-1/1)# service 2 profile cross-connect IPTV dba AllService LTP-16N(config)(if-ont-1/1)# service 3 profile cross-connect STB dba AllService LTP-16N(config)(if-ont-1/1)# service 4 profile cross-connect VOIP dba AllService LTP-16N(config)(if-ont-1/1)# service 5 profile cross-connect ACS dba AllService LTP-16N(config)(if-ont-1/1)# profile ports veip LTP-16N(config)(if-ont-1/1)# profile management ACS
Step 10. Allow the required VLAN to pass on the uplink interface (see section Interface configuration).
Блок кода language xml LTP-16N# configure terminal LTP-16N(configure)# interface 10G-front-port 1 LTP-16N(config)(if-front-1)# vlan allow 100,200,250,2000
Step 11. For VLAN 30, configure IGMP snooping. Also, enable IGMP Snooping globally:
Блок кода language xml LTP-16N(configure)# vlan 30 LTP-16N(config)(vlan-30)# ip igmp snooping enable LTP-16N(config)(vlan-30)# exit LTP-16N(configure)# ip igmp snooping enable
Step 12. Apply the configuration.
Блок кода language xml LTP-16N# commit
Terminal monitoring
General information
Information on current terminal firmware version
To view information on the current version of terminal firmware, use the show version command.
| Блок кода | ||
|---|---|---|
| ||
LTP-16N# show version
Eltex LTP-16N: software version 1.0.0 build 1699 on 05.11.2020 11:59 |
Terminal information preview
To view information about the terminal, use the show system environment command.
...
Parameter | Description |
|---|---|
CPU load average | Average processor load |
Free RAM/Total RAM | Free/total RAM |
Free disk space/Total disk space | Free/total non-volatile memory |
Temperature | Temperature from sensors |
Fan configured speed | Set fan rotation speed |
Fan minimum speed | Minimum fan rotation speed |
Fan speed levels | Set fan rotation speed for each level |
Fan state | Fans state and rpm value |
FPGA version | FPGA firmware version |
PLD version | PLD firmware version |
Power supply information | Information about installed power modules |
Factory | Device unique information |
Network connection check
To check network connection, use the ping command. As a parameter, pass the IP address of the node to be checked.
| Блок кода | ||
|---|---|---|
| ||
LTP-16N# ping 192.168.1.5 PING 192.168.1.5 (192.168.1.5): 56 data bytes 64 bytes from 192.168.1.5: seq=0 ttl=64 time=0.311 ms 64 bytes from 192.168.1.5: seq=1 ttl=64 time=0.223 ms 64 bytes from 192.168.1.5: seq=2 ttl=64 time=0.276 ms --- 192.168.1.5 ping statistics --- 3 packets transmitted, 3 packets received, 0% packet loss round-trip min/avg/max = 0.223/0.270/0.311 ms |
Scroll Pagebreak
Terminal operation log
Use the show log command to view log files.
...
| Блок кода | ||
|---|---|---|
| ||
LTP-16N# show log LTP.log |
Active alarms log
To view the active alarms log, use the show alarms command. Pass the type of events and/or their importance as parameters. You can view all active alarms by using the show alarm active all command.
| Блок кода | ||
|---|---|---|
| ||
LTP-16N# show alarms active all
    Active alarms (2):
     ## type           severity            description
     1 fan            critical            fan slot 1
2 fan critical fan slot 2 |
10G-front-port monitoring
View port statistics
For 10G-front-port statistics, use the show interface 10G-front-port 1 counters command. If you want advanced statistics, enter the verbose parameter.
| Блок кода | ||
|---|---|---|
| ||
LTP-16N# show interface 10G-front-port 1 counters Port UC packet recv MC packet recv BC packet recv Octets recv UC packet sent MC packet sent BC packet sent Octets sent ---- -------------- -------------- -------------- -------------- -------------- -------------- -------------- -------------- 1 0 0 0 0 0 3828 0 806192 |
View port state
To view port information such as status and SFP type, use the show interface 10G-front-port <id> state command.
| Блок кода | ||
|---|---|---|
| ||
LTP-16N# show interface 10G-front-port 1 state

Front-port             Status                 Speed                  Media
--------------------   --------------------   --------------------   --------------------
1                      up                     1G                     copper
|
gpon-port monitoring
View port state
To view information about the gpon-port and SFP state for this port, use the show interface gpon-port <id> state command.
| Блок кода | ||
|---|---|---|
| ||
LTP-16N# show interface gpon-port 1 state Port State ONT count SFP vendor SFP product number SFP vendor revision SFP temperature [C] SFP voltage [V] SFP tx bias current [mA] SFP tx power [dBm] ---- -------- --------- ------------------ ------------------ ------------------- ------------------- --------------- ------------------------ ------------------ 1 OK 3 Ligent LTE3680M-BC 1.0 45 3.27 16.84 3.72 |
MAC table monitoring
| Блок кода | ||
|---|---|---|
| ||
LTP-16N# show mac
    Loading MAC table...

                  MAC                   port   VLAN
    00:15:17:E4:27:CA        port-channel 32   1213
    92:71:65:9C:32:5D           gpon-port 16   1213
    92:07:E6:D4:58:DC           gpon-port 16   1031
    B6:F4:D0:ED:3A:2E        port-channel 32   1031

4 MAC entries |
ONT monitoring
ONT configurations list
Step 1. To view active ONT configurations, use the show interface ont <ID> configured command. As an ID, pass the GPON port number or a range of numbers.
Блок кода language xml LTP-16N# show interface ont 2 configured ----------------------------------- pon-port 2 ONT configured list ----------------------------------- ## Serial ONT ID GPON-port Status 1 ELTX6201CD9C 1 2 OK 2 ELTX6201C610 2 2 OK 3 ELTX62015240 3 2 OK 4 ELTX6201CD6C 4 2 OK 5 ELTX62015458 5 2 OK 6 ELTX6201A8F4 6 2 OK 7 ELTX6201C848 7 2 OK 8 ELTX62013B8C 8 2 OK 9 ELTX6201C830 9 2 OK 10 ELTX62015230 10 2 OK 11 ELTX62014758 11 2 OK 12 ELTX62013BE0 12 2 OK 13 ELTX6201A904 13 2 OK 14 ELTX62015214 14 2 OK 15 ELTX6201420C 15 2 OK 16 ELTX6201CD88 16 2 OK 17 ELTX6201CA0C 17 2 OK 18 ELTX6201AB04 18 2 OK 19 ELTX62018E48 19 2 OKБлок кода language xml 20 ELTX62014658 20 2 OK 21 ELTX6201AB14 21 2 OK 22 ELTX62014280 22 2 OK 23 ELTX6201CD8C 23 2 OK 24 ELTX6201B700 24 2 OK 25 ELTX6201C74C 25 2 OK 26 ELTX620141F0 26 2 OK 27 ELTX62014664 27 2 OK 28 ELTX6201CADC 28 2 OK 29 ELTX620190E8 29 2 OK 30 ELTX62018E84 30 2 OK 31 ELTX6201B714 31 2 OK 32 ELTX6201D384 32 2 OK
List of empty ONT configurations
Step 1. To view empty ONT configurations (vacant ONT IDs), use the show interface ont <ID> unconfigured command.
Блок кода language xml LTP-16N# show interface ont 1-16 unconfigured pon-port 1 ONT unconfigured: 33-128 pon-port 2 ONT unconfigured: 33-128 pon-port 3 ONT unconfigured: 33-128 pon-port 4 ONT unconfigured: 33-128 pon-port 5 ONT unconfigured: 33-128 pon-port 6 ONT unconfigured: 33-128 pon-port 7 ONT unconfigured: 33-128 pon-port 8 ONT unconfigured: 33-128 pon-port 9 ONT unconfigured: 33-128 pon-port 10 ONT unconfigured: 33-128 pon-port 11 ONT unconfigured: 33-128 pon-port 12 ONT unconfigured: 1-128 pon-port 13 ONT unconfigured: 1-128 pon-port 14 ONT unconfigured: 1-128 pon-port 15 ONT unconfigured: 2-128 pon-port 16 ONT unconfigured: 2-19,30-128
View the list of unactivated ONTs
Step 1. To view the list of ONTs that are connected but not activated, use the show interface ont <ID> unactivated command. As an argument, specify the GPON interface number or a range of numbers.
Блок кода language xml LTP-16N# show interface ont 11 unactivated ----------------------------------- pon-port 11 ONT unactivated list ----------------------------------- ## Serial ONT ID GPON-port RSSI Version EquipmentID Status 1 ELTX70000010 n/a 11 n/a n/a n/a UNACTIVATED 2 ELTX77000230 n/a 11 n/a n/a n/a UNACTIVATED
List of connected ONTs
Step 1. To view the list of online ONTs, use the show interface ont <ID> online command. As an argument, specify the GPON interface number or a range of numbers.
Блок кода language xml LTP-16N# show interface ont 2,16 online ----------------------------------- pon-port 2 ONT online list ----------------------------------- ## Serial ONT ID GPON-port RSSI Status 1 ELTX6201CD9C 1 2 -21.74 OK 2 ELTX6201C610 2 2 -19.07 OK 3 ELTX62015240 3 2 -20.09 OK 4 ELTX6201CD6C 4 2 -21.14 OK 5 ELTX62015458 5 2 -21.19 OK 6 ELTX6201A8F4 6 2 -20.00 OKБлок кода language xml 7 ELTX6201C848 7 2 -20.51 OK 8 ELTX62013B8C 8 2 -20.76 OK 9 ELTX6201C830 9 2 -20.97 OK 10 ELTX62015230 10 2 -20.04 OK 11 ELTX62014758 11 2 -20.81 OK 12 ELTX62013BE0 12 2 -20.13 OK 13 ELTX6201A904 13 2 -19.91 OK 14 ELTX62015214 14 2 -20.51 OK 15 ELTX6201420C 15 2 -20.76 OK 16 ELTX6201CD88 16 2 -21.08 OK 17 ELTX6201CA0C 17 2 -21.31 OK 18 ELTX6201AB04 18 2 -21.55 OK 19 ELTX62018E48 19 2 -21.67 OK 20 ELTX62014658 20 2 -21.08 OK 21 ELTX6201AB14 21 2 -21.43 OK 22 ELTX62014280 22 2 -21.49 OK 23 ELTX6201CD8C 23 2 -23.01 OK 24 ELTX6201B700 24 2 -21.49 OK 25 ELTX6201C74C 25 2 -21.67 OK 26 ELTX620141F0 26 2 -20.22 OK 27 ELTX62014664 27 2 -23.47 OK 28 ELTX6201CADC 28 2 -22.01 OK 29 ELTX620190E8 29 2 -20.46 OK 30 ELTX62018E84 30 2 -21.55 OK 31 ELTX6201B714 31 2 -20.13 OK 32 ELTX6201D384 32 2 -21.14 OK ----------------------------------- pon-port 16 ONT online list ----------------------------------- ## Serial ONT ID GPON-port RSSI StatusTable 21 – ONT status description
ONT status
Description
UNACTIVATED
ONT has no configurations
AUTHOK
Authentication successfully completed
CFGINPROGRESS
ONT configuration is in progress
CFGFAILED
Configuration failed
OK
ONT is in operation
MIBRESET
ONT MIB reset
MIBUPLOAD
MIB ONT upload
FAILED
ONT has a critical failure
FWUPDATING
ONT firmware update is in progress
DISABLED
ONT is disabled (technically blocked)
List of disconnected ONTs
Step 1. To view the list of offline ONTs, use the show interface ont <ID> offline command. As an argument, specify the GPON interface number or a range of numbers.
Блок кода language xml LLTP-16N# show interface ont 3 offline ----------------------------------- pon-port 3 ONT offline list ----------------------------------- ## Serial ONT ID GPON-port Status 1 ELTX5F000F1C 1 3 OFFLINE 2 ELTX5F00056C 2 3 OFFLINE 3 ELTX5F0009E0 3 3 OFFLINE 4 ELTX5F001134 4 3 OFFLINE 5 ELTX5F000120 5 3 OFFLINE 6 ELTX5F000140 6 3 OFFLINE 7 ELTX5F000144 7 3 OFFLINE
ONT statistics
To view ONT statistics, use the show interface ont 0/0 counters command. As parameters, specify the ONT ID and the type of requested statistics. Two types of gpon and gem-ports counters outputs are available. Gpon – shows total ONT packet statistics, including service packets. Gem-ports – statistics on user traffic within each gem-port.
...
| Блок кода | ||
|---|---|---|
| ||
    Drift Positive:            0
    Drift Negative:            0
    Delimiter Miss Detection:  0
    BIP Errors:                0
    BIP Units:                 284296791264
    FEC Corrected symbols:     0
    FEC Codewords Uncorrected: 0
    FEC Codewords Uncorrected: 0
    FEC Codewords:             0
    FEC Corrected Units:       0
    Rx PLOAMs Errors:          0
    Rx PLOAMs Non Idle:        74
    Rx OMCI:                   292
    Rx OMCI Packets CRC Error: 0
    Rx Bytes:                  128484
    Rx Packets:                2233
    Tx Bytes:                  45504
    Tx Packets:                948
BER Reported: 2 |
| Якорь | ||||
|---|---|---|---|---|
|
The system has the ability to configure the fans.
...
Step 1.Set the rotation speed, the default mode is auto.
Блок кода language xml LTP-16N(configure)# system fan speed 70
Terminal maintenance
Якорь Замена SFP-трансиверов Замена SFP-трансиверов
SFP transceivers replacement
| Замена SFP-трансиверов | |
| Замена SFP-трансиверов |
SFP transceivers can be installed when the terminal is turned on or off. The front panel has pairs of slots: even slots in the upper line, odd slots at the bottom. SFP transceivers are symmetrically installed for each pair of slots.
...
| Якорь | ||||
|---|---|---|---|---|
|
Ventilation units replacement
The terminal design allows ventilation units replacement even when the terminal is on.
...
- Step 1. Insert the unit into the terminal case.
- Step 2. Secure the ventilation unit to the rear panel with the mounting screws (Figure 25).
Power module replacement
The design of the terminal provides the possibility of replacing one of the power supply units without disconnecting power to the second.
...
- Step 1. Insert the unit into the device housing until you hear it click into place.
- Step 2. Secure the power supply unit to the rear panel with the mounting screws (Figure 25).
OLT firmware update
This section describes the terminal firmware update procedure. To download a firmware file, use the TFTP server available in the terminal management network. The device has two areas for firmware files, with the ability to boot from the selected one.
...
Step 4. Select the section that will be applied after reboot.
Блок кода language xml LTP-16N# firmware select slave
Step 5. Reboot the device.
Блок кода language xml LTP-16N# reboot
The list of changes
Firmware version | Document version | Issue date | Revisions |
|---|---|---|---|
1.2.0 | Issue 2 | 28.05.2021 | Synchronization with frimware version 1.2.0 |
1.0.0 | Issue 1 | 30.11.2020 | First issue |
...