Firmware version 2.6
Server requirements
For stable operation, the server must meet the following requirements:
Linux operating system with Docker support: Ubuntu Server 20.04 (recommended) and newer, Astra Linux 1.7 (server), RedOS 7.3.1, Alt Server 10;
16 GB of RAM or more;
- CPU with virtualization support with at least 4 cores;
- free hard disk space from 200 GB;
- 1 Gbps network interface availability.
Obtaining sudo privileges without additional password input (optional)
As an unprivileged user, run the command:
echo "$(whoami) ALL=(ALL) NOPASSWD: ALL" | sudo EDITOR='tee -a' visudo
Next, enter the password. After that, additional password entry is not required for executing sudo commands or switching to the superuser mode.
ECCM installation
Installation archive
The files needed to run the project are distributed as a tar archive. They can be obtained from the public cloud. Download the archive to the server and unpack it. It is recommended to unpack the archive into the pre-created separate directory.
Commands example:
wget "https://cloud.eltex-co.ru/index.php/s/P8xDfmyo3XyEs0g/download?path=%2F&files=eccm-2.6.tar.gz" -O eccm-2.6.tar.gz
mkdir eccm
tar -zxvf eccm-2.6.tar.gz -C eccm/
Docker and docker-compose installation
The easiest and fastest way to install is to switch to the directory where the installation archive was unpacked and use the compose-tools.sh script using the --install flag:
cd eccm/2.6
sudo ./compose-tools.sh --install
To check the installed docker, the following commands can be run:
docker --version
To check the installed docker-compose in Ubuntu, the following commands can be run:
docker compose version
When installing on Astra Linux, RedOS or Alt Server operating systems, the command to check the version of the installed docker-compose is:
docker-compose version
Running ECCM
The ECCM project is distributed as a set of files that allows to run all necessary services using docker-compose. The project is divided into two docker-stacks:
- database (PostgreSQL 14.10);
- ECCM service stack.
This separation is caused by the need to ensure horizontal scaling of the project and the possibility of integration with other projects of the company, such as Eltex.EDM.
Script for running ECCM
Due to the abundance of the system running parameters, a script was prepared that runs the project on one or more hosts with performance parameters that allow servicing about 100 devices. Actual performance depends on many factors, including hardware performance and the complexity of the network devices being serviced. To invoke the help information, navigate to the directory with the script and run the following command:
sudo ./compose-tools.sh -h
Running ECCM on a single host
To start the project, switch to the directory with the files of the installation archive and run the following command:
sudo ./compose-tools.sh --start <ECCM ADDRESS>
where **ECCM ADDRESS** is the IP address that is used for connection to the server. For example, if the server address is 100.110.2.2, the command will look as follows:
sudo ./compose-tools.sh --start 100.110.2.2
The script applies the address specified in the ECCM ADDRESS to the launched containers, but does not overwrite it in the variable files. To use the address specified in the variable files at launch, write the --start switch without specifying the ECCM ADDRESS.
To stop the project, run the command:
sudo ./compose-tools.sh --stop
Running ECCM on a single host with Peeper integration
To monitor ECCM operating system parameters and application performance, it is recommended to deploy Peeper.
The files required to run the project are also distributed as a tar archive. You should extract the archive into a directory created in advance within the ECCM project.
Examples of commands:
cd eccm/2.6
wget "https://cloud.eltex-co.ru/index.php/s/n4RRd4rgx9pgxUO/download?path=%2F&files=peeper-client.tar" -O peeper-client.tar
tar -xvf peeper-client.tar -C peeper
Before configuring and running ECCM in conjunction with peeper-client, the peeper-server should be already configured; instructions on how to obtain it are provided in the Peeper documentation.
Generate a token in the Grafana web interface (https://<Peeper Server address>:443). Go to the "Administration" menu → "Users and access" → "Service accounts" → "Add service account" → "Add service account token" → "Generate token".
In the peeper/.env file specify the following:
- The IP address or domain name for connecting to the Peeper server in the
PEEPER_HOSTvariable. - Set the
PEEPER_EXTERNAL_MODEvariable totrueto avoid conflicts when creating an external network in Docker. - In the
PEEPER_TOKENvariable, specify the token:
PEEPER_HOST="peeper.eltex.loc" # Domain name or IP address of the Peeper server
PEEPER_EXTERNAL_MODE="true" # false, if there is no external network in Docker on the server
PEEPER_TOKEN="" # Service account token created on the Peeper server
To collect information from the ECCM database, configure the peeper/.env.postgres file. An example of configuration is shown below:
POSTGRES_EXPORTER_ENABLED=true # Enable metrics collection from the PostgreSQL database
POSTGRES_HOST="100.110.2.2" # PostgreSQL database address for connecting and collecting metrics
POSTGRES_PORT="5432" # PostgreSQL database port for connecting and collecting metrics
POSTGRES_DB="" # Name of the PostgreSQL database to monitor
POSTGRES_USER="tester" # PostgreSQL database account for connecting and collecting metrics
POSTGRES_PASSWORD="tester" # Password for the $POSTGRES_USER account, required for collecting metrics
To run the ECCM project integrated with Peeper, add the --peeper command switch to the standard startup command:
sudo ./compose-tools.sh --start 100.110.2.2 --peeper
Running ECCM with a database on a separate server
- ECCM Application Server – server on which an application is deployed that ensures the operation of the system and interaction with devices, as well as a web user interface;
- Database Server – server with PostgreSQL 14 databases. It is possible to use one that already exists in the cluster infrastructure;
- Device Management Network – IP network for managing equipment, through which ECCM has access via L3;
- Operator/Administrator – system operator engaged in monitoring and configuration of the controlled equipment/system administrator of the company or Eltex technical support specialist, if remote access has been agreed upon.
If it is necessary to run ECCM on multiple servers (one server for the PostgreSQL database, the second server for the rest of the ECCM service stack), it is possible to use the multi-host installation option. To do this it is neccessary to:
- Install Docker and Docker Compose on both servers.
- Configure the server with databases:
2.1. To change login/password/temporary zone/RAM limits for working with the database, edit the postgres/.env file. To change parameters that affect database performance, edit the postgres/data/postgresql.conf file (the default settings are sufficient for a test run and support for about 100 devices).
2.2. Run the PostgreSQL database on the server with the database. To run the database, switch to the eccm/postgres directory and execute the command to run the container:
cd eccm/postgres
docker compose up -d
3. Configure the server with applications:
3.1. To redefine the variables responsible for user authorization in the ECCM system and project behavior (web interface address, time zone, database address, login/password for database access, etc.), edit the “eccm/.env” file;
3.2. Run ECCM on the server with ECCM using the following command:
sudo ./compose-tools.sh --start <ECCM ADDRESS> --database-host <DB ADDRESS> --database-port <DB PORT>
where <DB ADDRESS> and <DB PORT> are the IP address and port to connect to the database server. For example, if the ECCM server address is 100.110.2.2, the database server address is 100.110.2.4, and the database server port is 5432, the command is as follows:
sudo ./compose-tools.sh --start 100.110.2.2 --database-host 100.110.2.4 --database-port 5432
Environment variables
The files required to run ECCM, containing environment and configuration variables, are located in the directory where the installation archive was extracted:
postgres/.env postgres/data/postgresql.conf eccm/.env
postgres/.env
The postgres/.env file contains variables that determine the behavior of the PostgreSQL database stack when it is launched in a container. The table below provides a description of these variables:
| Variable | Default value | Description |
|---|---|---|
COMPOSE_PROJECT_NAME | postgres | Project name in docker-compose (used for identification if several projects are running on the server) |
POSTGRES_TAG | 2.6 | Version of the postgres container image |
POSTGRES_REGISTRY | hub.eltex-co.ru | The address of the docker-registry from which the postgres image will be retrieved. If a local mirror is used, its address can be specified |
ECCM_NETWORK_MODE | standalone | ESCM operating mode. Available values: cluster, standalone. If this variable is not specified, the value will be set to standalone automatically when `compose-tools.sh` is run without the “--cluster” flag |
KEEPALIVE_INTERVAL | 5 | Interval in seconds for checking the availability of a cluster node. If no response is received within this time, keepalived will switch to another available node |
ROOT_POSTGRES_USER | Parameter that allows to override the superuser login for database access and configuration | |
ROOT_POSTGRES_PASSWORD | Parameter that allows to override the superuser password for database access and configuration | |
ECCM_DATABASE | eccm | Name of the eccm service stack database |
POSTGRES_TIMEZONE | Asia/Novosibirsk | The time zone in which the system operates (specified in accordance with the tz database, for example, “Asia/Novosibirsk”) |
POSTGRES_SHM_SIZE | 2gb | Limiting the allocated RAM for working with the PostgreSQL database |
POSTGRES_PRIVILEGED_MODE | false | Running a container in privileged mode |
|
| External address of the PostgreSQL database |
|
| The port on which the PostgreSQL database is accessible |
|
| Maximum number of container log files |
| 50M | Maximum size of container log files |
| true | Enable compression of container log files |
|
| Version of the postgres-configurator container image |
| true | Activation of the postgres-configurator container at system launch |
postgres/data/postgresql.conf
The file contains parameters that affect database performance. The default settings are sufficient for a test run and support for approximately 100 devices.
eccm/.env
The eccm/.env file contains variables that determine the behavior of the project. The table below provides a description of these variables:
| Varible | Default value | Description |
|---|---|---|
COMPOSE_PROJECT_NAME | eccm | Project name in docker-compose (used for identification if several projects are running on the server) |
ECCM_PROFILE | production | Project profile |
ECCM_TAG | 2.6 | Container image version |
ECCM_REGISTRY | hub.eltex-co.ru | The address of the docker-registry from which system images will be retrieved. If a local mirror is used, its address can be specified |
ECCM_BACKBONE_ADDRESS | 192.168.0.1 | Internal address at which the ECCM system will operate with devices on the network |
ECCM_WEB_ADDRESS | 192.168.0.1 | The address at which the ECCM system web interface will operate |
ECCM_WEB_PORT | 80 | Port for accessing the web interface |
ECCM_TIMEZONE | Asia/Novosibirsk | The time zone in which the system operates (specified in accordance with the tz database, for example, “Asia/Novosibirsk”) |
ECCM_LOGLEVEL | 'INFO' | Logging level in the project |
MAX_CONCURRENT_SSH_TASKS | 20 | Number of simultaneous operations performed with devices |
POSTGRES_HOST | 192.168.0.1 | The address where the PostgreSQL database is running |
POSTGRES_PORT | 5432 | Port for accessing the PostgreSQL database |
ROOT_POSTGRES_USER | Parameter that allows overriding the superuser login for database access and configuration | |
ROOT_POSTGRES_PASSWORD | Parameter that allows to override the superuser password for database access and configuration | |
ECCM_POSTGRES_DB | eccm | Database name for ECCM services |
ECCM_POSTGRES_USER | Parameter that allows to override the default login for accessing the ECCM_POSTGRES_DB database | |
ECCM_POSTGRES_PASSWORD | Parameter that allows to override the default password for accessing the ECCM_POSTGRES_DB database | |
| 10m | Interval for displaying push notifications in the web interface when a license acquisition error occurs |
| 60m | Telegram/email notification interval when a license acquisition error occurs |
| 1 | Current node number. Must be unique in the reservation scheme |
| 1G | Physical memory limitation for a Docker container |
| | Path to the certificate file for HTTPS |
| | Path to the file with the key for HTTPS |
KEY_PASS_PATH | ./cert/key.pass | Path to the file with the key password for HTTPS |
| | The port on which ECCM will be available via HTTPS |
LOGGING_ASPECT_ENABLED | false | Enabling logging via service aspects. The aspect logs all inputs and outputs from methods, their parameters, and return values. It is not recommended to enable this parameter during normal system operation. The logging configuration variables ( |
|
| Maximum number of container log files |
| 50M | Maximum size of container log files |
| true | Enable container log file compression |
AUTH_ECCM_AUTHENTICATION_ENABLED | false | Enabling authentication using local accounts |
.env.cluster
The .env.cluster file contains variables that define the cluster's behavior when starting ECCM in a fault-tolerant system. The table below provides a description of these variables:
ECCM_NETWORK_MODE | cluster | ECCM operating mode. Available values: cluster, standalone If the --cluster switch is not specified in the startup script, the standalone mode is selected |
| false | Use of cluster restart with forced assignment of database roles. Used in cases of cluster failure |
| MASTER | External database role during cluster deployment. Used only when running ECCM in a fault-tolerant system with application and database separation |
| IP address of the external PostgreSQL database installed on another host. Do not use if a PostgreSQL database is running on the host with ECCM | |
| 5432 | Connection port for the external PostgreSQL database installed on another host. Do not use if a PostgreSQL database is running on the host with ECCM |
| IP address for connecting to the external PostgreSQL slave database installed on another host. Use when deploying a fault-tolerant system with application and database separation | |
| 5432 | Connection port to an external PostgreSQL slave database installed on another host. Use when deploying a fault-tolerant system with application and database separation |
| repmgr | Name of the service database used to monitor the status of databases in the cluster |
| repmgr | The name of the user created to manage the operation and communication between database servers in the cluster |
| repmgr | The password that provides secure access to the service database for REPMGR_USER |
| 5 | The time in seconds during which the system will wait for a response when connecting to the PostgreSQL database |
| 2 | The interval, in seconds, at which the system checks the status and availability of all servers in the cluster |
| 3 | The number of retry attempts to establish a connection with another server in the event of a failure. Each attempt is made within the REPMGR_RECONNECT_INTERVAL |
| 3 | The time in seconds between retry attempts to connect to the server after a failure |
| Allowed hosts for connecting to the cluster. All IP addresses of the hosts that make up the cluster are sspecified: master, slave and witness | |
| IP address of the master host | |
| master | Name of the master host within the ECCM database |
| 1 | Unique identifier of the master host |
| IP address of the slave host | |
| slave | Name of the slave host within the ECCM database |
| 2 | Unique identifier of the slave host |
| IP address of the witness host | |
| witness | Name of the witness host within the ECCM database |
| 100 | Unique identifier of the witness host |
| Internal server address used by Redis Sentinel for communication within the cluster. If the variable is not specified, the value will be determined automatically at startup | |
| Unique name assigned to the database cluster for monitoring purposes | |
| Password used by the monitoring service to connect to the database cluster and retrieve information about the status of the servers | |
| 2 | The minimum number of hosts required to decide on a leadership change in the Sentinel quorum |
| 5000 | The time, in milliseconds, after which the monitoring service considers a host to be unavailable |
| 10000 | The maximum time, in milliseconds, during which the monitoring system attempts to complete the automatic leadership transition between hosts |
| 0.0.0.0 | Network addresses on which the server listens for incoming connections for replication It is recommended to leave the REDIS_BIND value at its default to avoid issues with network interfaces |
| eccm | The name of the primary ECCM database. Duplicates the database name from postgres/.env |
| 5 | The time in seconds between consecutive attempts to check the database's readiness to accept connections |
| cluster | The certificate's common name. Must match the certificate's common name in the [dn] block |
| cluster.crt | The name of the cluster certificate |
| ca.crt | The name of the root certificate. Required for authorizing the cluster certificate in Redis/Sentinel and PostgreSQL |
| cluster.key | The name of the cluster certificate key |
| changeit | The password for truststore.p12 when generated using ECCM |
| truststore.p12 | The name of truststore.p12 when loading a custom truststore.p12 |
| The name under which Java will store and identify the certificate within truststore.p12 |
Web interface access
To connect to the ECCM web interface, open a browser and enter the following in the address bar:
http://<IP address of your server (ECCM_WEB_ADDRESS)>/
The default login is 'eccm', password 'eccm'.
Options used by compose-tools.sh
| Option | Description |
|---|---|
| --clean, -c | Cleaning all containers, volumes, and networks |
| --delete-containers | Removing containers without removing volumes and networks |
| --dhcp | Activation of a DHCP server with support for Zero Touch Provisioning (ZTP) functionality, which automatically adds devices to the system |
| --database-host <HOST> | IP address for connecting to an external PostgreSQL database installed on another host. For a fault-tolerant system with a separation between the application and the database, specify the IP address of the master database. Do not use if the PostgreSQL database is running on the host with ECCM |
| --database-port <PORT> | Port for connecting to an external PostgreSQL database installed on another host. Do not use if the PostgreSQL database is running on the host with ECCM |
| --backup-database-host <HOST> | The IP address of the PostgreSQL slave database installed on another host. Used when launching a fault-tolerant system with a separation between the application and the database |
| --backup-database-port <PORT> | The port for connecting to the PostgreSQL slave database installed on another host |
| --help, -h | Calling up reference information |
| --https | Activation of https support mode. Requires a certificate |
| --install | Installing Docker and Docker Compose on the host |
| --interactive, -i | Start the system in interactive mode. Use with the --start key |
| --load | Load all available .tar.gz archives from the image directory into docker |
| --logging, -l <LEVEL> | Set the logging level for the ECCM project. Available values: DEBUG, INFO |
| --logging-aspect | Enabling logging via service aspects. The aspect logs all entries and exits from methods, their parameters, and return values. It is not recommended to enable this parameter during normal system operation |
| --peeper | Launching the system integrated with the Peeper monitoring service |
| --pull, -p | Downloading/updating images before system launch |
| --rootlog <LEVEL> | Set the logging level for all projects. Available values: DEBUG, INFO |
| --save | Saving all Docker images to .tar.gz archives |
| --start, -s <ADDRESS> | Running the system with the IP address that will be used to connect to the server |
| --stop | System shutdown |
| --storage <ADDRESS> | ECCM address in the device management network (backbone). Used to store device firmware |
| --tracing, -t <ADDRESS> | Activation of the Jaeger OpenTracing tracing service. It is necessary to specify the IP address of the Jaeger server |
| --show-containers | Show all containers on the server |
| --show-images | Show all images on the server |
| --recreate-service <SERVICE> | Recreate the container with new parameters The container is recreated according to the .env file of the corresponding compose project. |
| --cluster <NODE_ROLE> | Launching the system in the cluster mode with a specific role. Available values: MASTER, SLAVE, WITNESS |
The --metrics and -m switches are no longer supported, as all metric collection is now handled by Peeper. Updated dashboards will only be provided for Peeper-server.
Examples of use
To install Docker and Docker-compose on the host, run the command:
sudo ./compose-tools.sh --install
To update the images of all ECCM containers, run the command:
sudo ./compose-tools.sh --pull
To run the project, enter the directory containing the installation archive files and run the command:
sudo ./compose-tools.sh --start <ECCM ADDRESS>
To run and connect the project to a database installed on another host, run the command:
sudo ./compose-tools.sh --start <ECCM ADDRESS> --database-host <DB ADDRESS> --database-port <DB PORT>
To stop the project, run the command:
sudo ./compose-tools.sh --stop
To clean all containers, volumes, and ECCM networks, run the command:
sudo ./compose-tools.sh --clean
When running the script with the --clean flag, data from the PostgreSQL database will also be deleted. This flag is recommended only when completely uninstalling ECCM from the server.
To run the project with the required logging level, add the --logging key to the launch line:
sudo ./compose-tools.sh --start <ECCM ADDRESS> --logging DEBUG
Since version 1.5, the project has a DHCP server with support for Zero Touch Provisioning (ZTP) functionality, which automatically adds devices to the system. The server is disabled by default. To activate, add the --dhcp key to the launch line.:
sudo ./compose-tools.sh --start <ECCM ADDRESS> --dhcp
To save all container images to archives .tar.gz run the command:
sudo ./compose-tools.sh --save
To convert archives with images (.tar.gz ) in docker images, run the command:
sudo ./compose-tools.sh --load
To convert a container with the new parameters, run the command (the container will be recreated according to the file.env of the corresponding compose project):
sudo ./compose-tools.sh --recreate-service monitoring-service
Known issues and solution methods
Possible errors during project installation
Error:
E: Cannot find the conntrack packagePossible reason: the system is configured with irrelevant package manager repositories.
Solution: add the actual repository to the /etc/apt/sources.list file and run the project installation:
echo "deb https://download.astralinux.ru/astra/stable/1.7_x86-64/repository-extended/ 1.7_x86-64 main contrib non-free" | sudo tee -a /etc/apt/sources.list
sudo ./compose-tools.sh --install
Possible errors during project launching
Error:
ERROR: Couldn't connect to Docker daemon at http+[docker://localhost](docker://localhost) - is it running?Possible reason: docker daemon is not running. To check this, run the command:
sudo systemctl status docker
If the status in the Active line is different from Active (running), the cause is correctly determined.
Solution: run docker with the command:
sudo systemctl start docker
Error:
Got permission denied while trying to connect to the Docker daemon socket at [unix:///var/run/docker.sock]
(unix://intdocs.eltex.loc/var/run/docker.sock): Get http://%2Fvar%2Frun%2Fdocker.sock/v1.40/containers/json:
dial unix /var/run/docker.sock: connect: permission denied
Possible reason: the launch was performed as an unprivileged user who was not added to the docker group.
Solution 1 (recommended): add the user to the docker group by the following command:
sudo usermod -aG docker $(whoami)
Solution 2: perform all operations with root privileges.
Error:
Services starting...
Creating network "eccm_eltex-internal" with the default driver
ERROR: Pool overlaps with other one on this address space
Possible reason: the subnet specified in ECCM_INTERNAL_SUBNETWORK, is already in use by docker.
Solution: select a different subnet in the .env file. It is possible to view subnets already created by docker using the command:
sudo docker network inspect $(docker network ls --filter "DRIVER=bridge" --format '{{ .Name }}') -f '{{ .Name }} {{ (index .IPAM.Config 0).Subnet }}'
Possible errors during the work of the project
Error: monitoring is not working correctly, device metrics are not collected.
Possible reason: the monitoring service does not have enough memory to work correctly. The monitoring-service logs contain entries like:
WARN [b1a52920966f70af] [item-poll-executor ] o.e.e.m.service.BackpressureController : Batch size adjusted for job 'item polling': 100000 → 0 (adjustment factor: 0.000, memory usage: 97%)
Solution: increase the memory limit for the monitoring-service. To do this, increase the value of the ECCM_MONITORING_SERVICE_XMX variable in the eccm/.env file:
-ECCM_MONITORING_SERVICE_XMX=1G  <--- old value
+ECCM_MONITORING_SERVICE_XMX=2G  <--- new value
Possible errors when stopping a project
Error:
ERROR: error while removing network: network eccm_eltex-internal id 324bd72dd9c107cf2ea48effb75d9e7ad2dfbc8f5f7317b89cd7f318d61d5c4b has active endpointsPossible cause: docker did not completely clear the cache.
Solution: restart docker using the command:
sudo systemctl restart docker
Possible authentication errors
Error: Unable to authenticate with an LDAP account.
Possible cause: incorrect LDAP server connection configuration.
Solution: set the AUTH_ECCM_AUTHENTICATION_ENABLED=true variable in the eccm/.env file and restart the identity-provider service:
sudo ./compose-tools.sh --recreate-service identity-provider
Local account authentication will then be available.
Recommendations for ECCM technical support requests
Contact the company's Service Center for advice on system operation. Refer to the last page of this manual for contact methods.
For faster and more convenient interaction with ECCM technical support specialists, please provide the following information when contacting:
- The installed version of ECCM and the license used;
- Whether there is access to the Internet from the server where the firmware is deployed (no access, direct access, via NAT, via Proxy, etc.);
- The time the issue occurred (preferably as accurate as possible);
- Screenshot or video file if the issue occurred in the browser GUI;
- Device information (this could be device IP address, device model) if the problem was related to some device.
Defining the ECCM version and license
It is possible to determine the installed version of ECCM using one of the following methods:
- When downloading a release archive, look for version information in its name,
eccm-2.6.tar.gz. - If the original tar.gz archive has been deleted, the version information can be found in the configuration file
$ECCM_ROOT/eccm/.env(in a line like:ECCM_TAG=2.6). - Check the version information in the lower left corner of the web interface screen of the running ECCM:
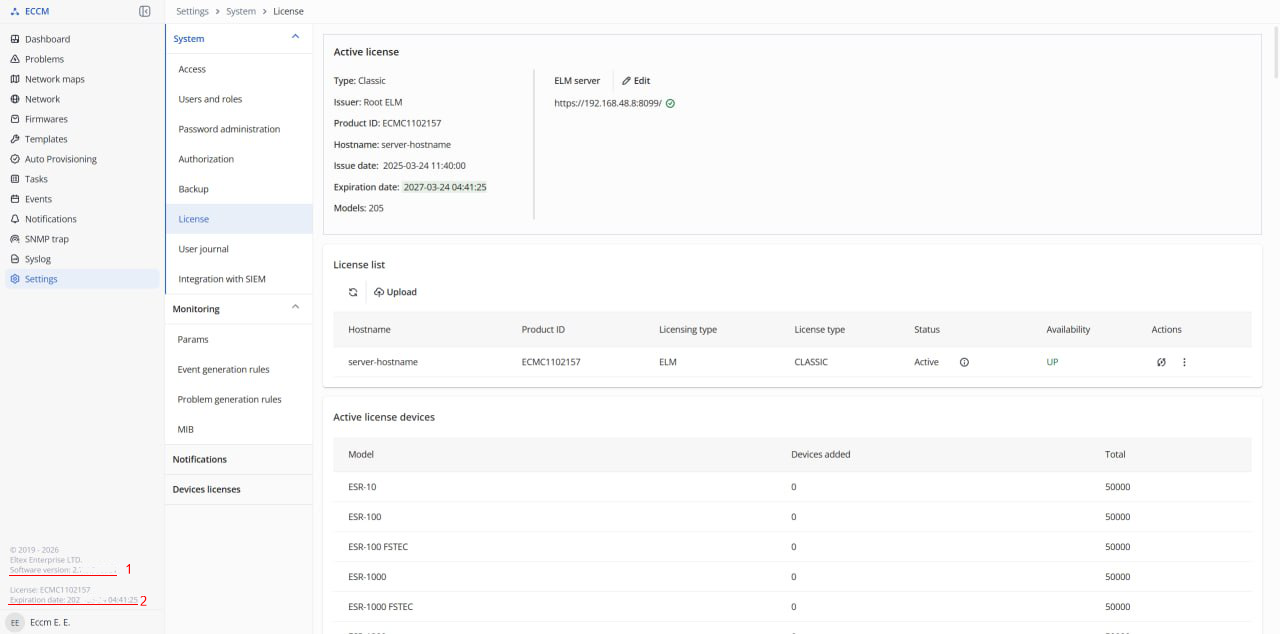
1 – ECCM version;
2 – validity period of the issued license.
The license can be attached from the source file or uploaded from the ECCM web interface.
Information collection script
The script automates the collection of metrics from the ECCM system, and then packages them into a compressed archive for more convenient transportation. Designed to run on Linux/Ubuntu OS.
Running the script:
1. Enter the ~/eccm/<ECCM version> directory/:
cd ~/eccm/<ECCM version>/
2. Run the following command:
sudo ./technical_support.sh
The script must be run in privileged mode, otherwise not all data will be collected.
3. Wait for the script to collect the information;
4. The <date_time>-technical_support.tar.gz archive will be loaded into the directory.
This archive can be sent to the technical support specialists to familiarize them with all the necessary information.