Дерево страниц
Перейти к концу метаданных
Переход к началу метаданных


General information

SoftWLC controller backup is necessary for synchronization of system-critical files (settings, firmware files, data uploads), MySQL databases, MongoDB databases, as well as DHCP servers. Such a model ensures availability and relevance of data on both controllers in case of failure of one, network unavailability, power supply problems.

SoftWLC controller backup configuration includes the following steps:

  • installing and configuring keepalived (performed according to the master-slave scheme)
  • configuring rsync
  • configuring MySQL replication (performed by counter replication on the master-master principle)
  • configuring replicaSet MongoDB (replication is performed by combining 3 nodes into a Replica Set)
  • configuring Eltex-PCRF operation in cluster mode
  • changing configuration of modules for them to use virtual IP

In configuration examples of this section, IP addresses will be referred to as <ip_server1>, <ip_server2> and <virtual_ip>, where:

  • <ip_server1> — real ip address of the first server
  • <ip_server2> — real ip address of the second server
  • <virtual_ip> — virtual ip address

For correct operation, it is required to provide L2 connectivity between two remote servers.

Installing and configuring keepalived

Package description

Keepalived package is an open source software used to perform high availability and load balancing functions. The first function is based on the implementation of the VRRP protocol, and the second is based on the Linux Virtual Server (IPVS) kernel module. Keepalived is not developed by Eltex and does not include adjustments other than configuration. Keepalived is used to provide backup for SoftWLC controllers with only VRRP functions.

Installing keepalived

In order to install the package, download it on the server and run the following command (installation must be done under the root superuser on both servers):

admin@ubuntu:/# sudo apt update
admin@ubuntu:/# sudo apt install keepalived

After installation, add the Keepalived daemon to the autostart and run it:

admin@ubuntu:/# sudo systemctl enable keepalived
admin@ubuntu:/# sudo systemctl start keepalived


Main configuration file

On both servers, in the /etc/keepalived/keepalived.conf file, change the following parameters: 

<interface> — name of the network interface (different for each server) similar to the entry (eth1);

<virtual_ip> — virtual ip address (with prefix) similar to the entry (100.111.195.202 /24);

<ip_address of another server> — ip address of another server similar to the entry (100.111.195.200);

/etc/keepalived/keepalived.conf
! Configuration File for keepalived
 
global_defs {
 
   script_user root
   enable_script_security 
}

vrrp_script check_network {
    script "/etc/keepalived/check_ping.sh"
    interval 5
    weight 50
    fall 3
    rise 3
    init_fail
    user root
}

vrrp_instance VI_SWLC {
    state BACKUP
    interface <interface>
    virtual_router_id 1
    track_script {
        check_network
    }
    track_interface {
        <interface> weight 50
    }
    priority 150
    advert_int 1
    nopreempt
	# Uncomment and comment "nopreempt" if preemption needed
	#preempt_delay 180
    authentication {
        auth_type PASS
        auth_pass eltex
    }
    virtual_ipaddress {
        <virtual_ip> dev <interface> label <interface>:1
    }
 
    notify_master "/etc/keepalived/keep_notify.sh master"
    notify_backup "/etc/keepalived/keep_notify.sh backup"
    notify_fault "/etc/keepalived/keep_notify.sh fault"
 
    unicast_peer {
        <ip_address_other_servers>
    }
}

Test script

The script pings a default gateway and returns the result code. Thus, SoftWLC is guaranteed to be accessible for external clients if the script has been executed successfully. 

In the current implementation on both servers, it is proposed to use the following as a test script:

/etc/keepalived/check_ping.sh
#!/bin/bash

# host to ping
# there - default gw
HOST=<default_gw_ip>
# -q quiet
# -c nb of pings to perform
ping -q -c5 $HOST > /dev/null

# $? var keeping result of execution
# previous command
if [ $? -eq 0 ]
    then
        echo `date +"%T %F"` "OK gw reachable"
        EXIT_CODE=0
    else
        echo `date +"%T %F"` "ERROR gw unreacheble!"
        EXIT_CODE=1
fi

exit $EXIT_CODE

where <default_gw_ip> is the default gateway for this server, similar to the entry (100.10.194.1);.

Configuring role change

When the server state changes, the script keep_notify.sh is executed where <mysql_user> and <mysql_password> are the login and password from the MySQL database (by default root/root).

/etc/keepalived/keep_notify.sh
#!/bin/bash

MYSQL_USER="<mysql_user>"
MYSQL_PASSWORD="<mysql_password>"

mongo_set_role() {
    local role="$1"
    if [[ "$(which mongo)" ]]; then
        mongo --quiet --eval "var role=\"$role\"" admin /etc/keepalived/mongo_switch.js
        # Uncomment if using mongodb auth
        #mongo -u<username> -p<password> --quiet --eval "var role=\"$role\"" admin /etc/keepalived/mongo_switch.js
    fi
}

if ! lockfile-create --use-pid -r 5 /tmp/keep.mode.lock; then
    echo "Unable to lock"
    echo "Unable to lock" > /tmp/keep.mode.lock.fail
    exit 0
fi

case "$1" in
    master)
    #  ems_reload_all
    echo "MASTER" > /tmp/keep.mode
  
    mongo_set_role master
    service eltex-ems restart
    service tomcat8 restart
    service eltex-ngw restart

    # restart MySQL slave to get updates immediately after reestablishing communication,
    # rather than wait for a heartbeat from the second server
    mysql -u$MYSQL_USER -p$MYSQL_PASSWORD -e "stop slave"
    mysql -u$MYSQL_USER -p$MYSQL_PASSWORD -e "start slave"
  ;;
 backup)
    echo "BACKUP" > /tmp/keep.mode
    mongo_set_role slave
    service mongod restart
    service eltex-ems stop
    service tomcat8 stop
    service eltex-ngw stop
    mysql -u$MYSQL_USER -p$MYSQL_PASSWORD -e "stop slave"
    mysql -u$MYSQL_USER -p$MYSQL_PASSWORD -e "start slave"
 ;;
 fault)
    echo "FAULT" > /tmp/keep.mode
    mongo_set_role slave
    service mongod restart
 ;;
 *)
    echo "Usage: $0 {master|backup|fault}"
    exit 1
esac

lockfile-remove /tmp/keep.mode.lock;

exit 0

replicaSet MongoDB master changing script

/etc/keepalived/mongo_switch.js
// provided by environment
var role;

if (role != 'master' && role != 'slave') {
    throw "Role must be either master or slave";
}

var thisIsMaster = (role == 'master');
var status = rs.isMaster();
var thisHost = status.me;

print("Primary: " + status.ismaster + "; applying configuration ...");
var cfg = rs.conf();
for (var i = 0; i < cfg.members.length; i++) {
    var member = cfg.members[i];
    var self = (member.host == thisHost);
    if (self ^ thisIsMaster) {
        // Configuration for slave
        member.priority = 1;
        member.votes = 0;

        print(member.host + ": secondary");
    } else {
        // Configuration for master
        member.priority = 2;
        member.votes = 1;

        print(member.host + ": primary");
    }
}

var result = rs.reconfig(cfg, { force: !status.ismaster });
if (result.ok == 1) {
    print("Reconfiguration done");
} else {
    print(result);
}

For scripts to work correctly, assign rights for their execution:

admin@swlc01-server:/# sudo chmod +x /etc/keepalived/check_ping.sh
admin@swlc01-server:/# sudo chmod +x /etc/keepalived/keep_notify.sh
admin@swlc01-server:/# sudo chmod +x /etc/keepalived/mongo_switch.js

Saving log to separate file

By default, keepalived saves a log to the /var/log/syslog file. For keepalived debugging, monitoring and managing convenience, separate log filing can be configured.

rsyslog configuration example is introduced below:

nano -w /etc/rsyslog.d/10-keepalived.conf
if $programname contains 'Keepalived' then /var/log/keepalived.log
if $programname contains 'Keepalived' then ~

Then restart rsyslog using the command:

admin@swlc01-server:/#sudo service rsyslog restart

Now messages from the keepalived daemon will only get into the log file /var/log/keepalived.log and will not get into /var/log/syslog.

Starting/stopping keepalived procedure

To start the service, run the following command:

admin@master:/#sudo service keepalived start

To stop the service:

admin@master:/#sudo service keepalived stop

To check the service status, run the command:

admin@master:/#sudo service keepalived status

On one of the servers, if configured correctly, an interface with a virtual ip should be displayed.

To check the operation of the keepalived service, disable the server that has virtual_ip present in the interfaces. Virtual_ip should appear on the second server

Configuring rsync

Rsync in the backup scheme is responsible for synchronizing service files, Eltex-EMS and Eltex-APB services, as well as firmware files, configuration templates, point configuration uploads. Rsync is a client-server software. Master server acts as a client and synchronizes slave server's directories with local ones.

Configuring rsync server

To enable the rsync server, it is necessary to set the value RSYNC_ENABLE=true on each server in the /etc/default/rsync file:


Create the /etc/rsyncd.conf file. The file listing is given below.

hosts allow = <another_server_ip> <virtual ip>

The entry hosts allow = <another_server_ip> <virtual ip> in the configuration occurs in 3 places, do not forget to correct all the values!
/etc/rsyncd.conf
[ems-conf]
path = /usr/lib/eltex-ems/conf/
use chroot = no
max connections = 2
lock file = /var/lock/rsyncd
read only = no
list = no
uid = root
auth users = backup
secrets file = /etc/rsyncd.secrets
strict modes = yes
# IP address of the server that will have access to the resource, e.g. the address of the second server in the pair
hosts allow = <another_server_ip> <virtual_ip>
ignore errors = no
ignore nonreadable = yes
transfer logging = no
timeout = 60
refuse options = checksum dry-run
dont compress = *.gz *.tgz *.zip *.z *.rpm *.deb *.iso *.bz2 *.tbz
 
[ems-tftp]
path = /tftpboot
use chroot = no
max connections = 2
lock file = /var/lock/rsyncd.tftp
read only = no
list = no
uid = root
auth users = backup
secrets file = /etc/rsyncd.secrets
strict modes = yes
hosts allow = <another_server_ip> <virtual_ip>
ignore errors = no
ignore nonreadable = yes
transfer logging = no
timeout = 60
refuse options = checksum dry-run
dont compress = *.gz *.tgz *.zip *.z *.rpm *.deb *.iso *.bz2 *.tbz

[ems-wp]
path = /var/ems-data/WP
use chroot = no
max connections = 2
lock file = /var/lock/rsyncd.ems-wp
read only = no
list = no
uid = root
auth users = backup
secrets file = /etc/rsyncd.secrets
strict modes = yes
hosts allow = <another_server_ip> <virtual_ip>
ignore errors = no
ignore nonreadable = yes
transfer logging = no
timeout = 60
refuse options = checksum dry-run
dont compress = *.gz *.tgz *.zip *.z *.rpm *.deb *.iso *.bz2 *.tbz

For authentication, configure the rsync user. For this, create /etc/rsyncd.secrets files on each server and specify a password in them.

backup:rspasswd

Assign file access rights by running on both servers:

admin@swlc01-server:/#sudo chmod 600 /etc/rsyncd.secrets

Configuring synchronization start
Create files /etc/rsync_client.secrets, in which specify the password:                           

admin@swlc01-server:/# echo "rspasswd" > /etc/rsync_client.secrets && chmod 600 /etc/rsync_client.secrets

The file synchronization operation is performed by the cron task in which the script /usr/lib/eltex-ems/scripts/rsync_ems_backup.sh is executed. The script starts rsync client and synchronizes local directories with directories of the second (backup) server.  Synchronization is started only if the server is in the master state. 
In line 6, replace HOST with the ip address of another server (Example: HOST=100.111.195.201)

/usr/lib/eltex-ems/scripts/rsync_ems_backup.sh
#!/bin/bash

LOCKFILE="/run/lock/rsync_ems_backup"

# IP address backup server
HOST=<other_server_ip>
# Check if we're root
if [ `whoami` != "root" ]
    then
	echo "This script should be run by root."
	exit 1
fi

# Check and create lock file
if ! lockfile-create --use-pid -r 0 $LOCKFILE &> /dev/null ; then
    echo "Backup is already running"
    exit 0
fi

# Check - if we're master - try to perform backup to slave
SRVMODE=`cat /tmp/keep.mode`
if [ "$SRVMODE" == "MASTER" ]
    then
	rsync -urlogtp --delete-after --password-file=/etc/rsync_client.secrets /usr/lib/eltex-ems/conf/ backup@$HOST::ems-conf > /tmp/rsync_ems_conf.log 2>&1
	echo $? >> /tmp/rsync_ems_conf_result.log
	rsync -urlogtp --delete-after --password-file=/etc/rsync_client.secrets /tftpboot/ backup@$HOST::ems-tftp > /tmp/rsync_ems_tftpboot.log 2>&1
	echo $? >> /tmp/rsync_ems_tftpboot_result.log
    rsync -urlogtp --delete-after --password-file=/etc/rsync_client.secrets /var/ems-data/WP/ backup@$HOST::ems-wp > /tmp/rsync_ems_wp.log 2>&1
    echo $? >> /tmp/rsync_ems_wp_result.log
else
	echo "Not master. No action will be performed."
fi

lockfile-remove $LOCKFILE


Create cron tasks on both servers to start synchronization every minute:

root@swlc01-server:/# crontab -l | { cat; echo "*/1 * * * * /usr/lib/eltex-ems/scripts/rsync_ems_backup.sh"; } | crontab

Checking the task list:

root@swlc01-server:/# crontab -l
root@swlc01-server:/# */1 * * * * /usr/lib/eltex-ems/scripts/rsync_ems_backup.sh

If the task was not added or was accidentally added several times, then edit the list manually:

root@swlc01-server:/# crontab -e

Select an editor.  To change later, run 'select-editor'.
  1. /bin/nano        <---- easiest
  2. /usr/bin/vim.tiny
  3. /usr/bin/code
  4. /bin/ed

Choose 1-4 [1]: 1                                 # choose an editor

Starting/stopping procedure

To start the service, use the command:

admin@swlc01-server:/# sudo service rsync start

To stop the service, use the command:

admin@swlc01-server:/# sudo service rsync stop

To check the service status, use the command:

admin@swlc01-server:/# sudo service rsync status

Rsync operation can be checked in EMS. In the "Information" tab check the State of backup system-Rsync service section. 

Both servers should have an entry like:

OK. Successful synchronization of files from directory: /usr/lib/eltex-ems/conf/* 
OK. Successful synchronization of files from directory: /tftpboot/* 
OK. Successful synchronization of files from directory: /var/ems-data/WP/*

Configuring MySQL replication

Backup of data stored in MySQL database is carried out by master-master replication. That means each server is both master and slave at the same time. The scheme implies writing all database updates of the first server to a special binary log. The second server reads the log and applies the changes.   The second server replicates data from the first, and the first from the second. That allows having a relevant copy of a database on two hosts simultaneously. If connection fails, changes are accumulated and then synchronized after reconnection.

Data dump transferring and transferring to the second server

When configuring backup during operation (i.e. if the current server's MySQL already has data in it), it is necessary to replicate data to the second server. This can be done using the mysqldump utility.

To do this, lock the tables on the first server, remove the dump, unlock the tables and copy the resulting file to the second server:

root@swlc01-server:/# mysql -uroot -proot -e "FLUSH TABLES WITH READ LOCK;"
root@swlc01-server:/# mysqldump -uroot -proot --databases ELTEX_PORTAL eltex_alert eltex_auth_service eltex_ems radius wireless > mysqldump_master.sql
root@swlc01-server:/# mysql -uroot -proot -e "UNLOCK TABLES;"
root@swlc01-server:/# scp mysqldump_master.sql <username>@<ip_server2>:/home/<username>/

Then generate a dump on the second server:

root@swlc01-server:/# mysql -uroot -proot < /home/<username>/mysqldump_master.sql

Configuring MySQL

Mysql daemon configuration aims at specifying binary logs writing parameters. The words "first server" and "second server" are further conditional and used to refer to differences in server configurations:

In the /etc/mysql/my.cnf file, add the path to the file /etc/mysql/mysql.conf.d/

Comment out or delete a line on both servers:

bind-address = 127.0.0.1

Specify server-id. For servers, set unique identifiers, for example, for the first:

server-id = 1

for the second:

server-id = 2

Enable binary logs on both servers:

log_bin = /var/log/mysql/mysql-bin.log

specify auto_increment_increment (increment step) and auto_increment_offset (start point) parameters.

For the first server:

auto_increment_increment= 2
auto_increment_offset = 1

For the second server:

auto_increment_increment= 2
auto_increment_offset = 2

On both servers: specify the databases for which logs will be written:

binlog-do-db = eltex_alert
binlog-do-db = eltex_ems
binlog-do-db = wireless
binlog-do-db = radius
binlog-do-db = eltex_auth_service
binlog-do-db = ELTEX_PORTAL
binlog-do-db = eltex_doors
binlog-do-db = eltex_ngw

specify databases for which logs will not be generated:

binlog-ignore-db = mysql
binlog-ignore-db = Syslog
binlog-ignore-db = performance_schema
binlog-ignore-db = information_schema

Restart mysql  on each server and create a database for replication:

admin@swlc01-server:/# sudo service mysql restart

Creating user accounts

For replication to work, a service account should be created on both servers. The server will connect master server and get data changes using this account.

Create an account in the MySQL console for replication on the first server:

GRANT SELECT, SUPER, REPLICATION SLAVE, REPLICATION CLIENT ON *.* TO 'replication'@'<ip_server2>' IDENTIFIED BY 'password';
GRANT SELECT, SUPER, REPLICATION SLAVE, REPLICATION CLIENT ON *.* TO 'replication'@'<ip_server1>' IDENTIFIED BY 'password'; #required to check the replication status from EMS
FLUSH PRIVILEGES;

Create an account in the MySQL console for replication on the second server:

GRANT SELECT, SUPER, REPLICATION SLAVE, REPLICATION CLIENT ON *.* TO 'replication'@'<ip_server1>' IDENTIFIED BY 'password';
GRANT SELECT, SUPER, REPLICATION SLAVE, REPLICATION CLIENT ON *.* TO 'replication'@'<ip_server2>' IDENTIFIED BY 'password'; #required to check the replication status from EMS
FLUSH PRIVILEGES;

SELECT privilege is used to check replication performance from GUI EMS

Granting rights to service users

Open /usr/lib/eltex-ems/conf/config.txt , see which username/password are used (by default - javauser / javapassword)

Grant them external access rights on both servers:

GRANT ALL PRIVILEGES ON *.* TO 'javauser'@'%' IDENTIFIED BY 'javapassword';
GRANT ALL PRIVILEGES ON eltex_auth_service.* TO 'javauser'@'%'; 
GRANT ALL PRIVILEGES ON `radius`.* TO 'javauser'@'%';             
GRANT ALL PRIVILEGES ON `wireless`.* TO 'javauser'@'%';           
GRANT ALL PRIVILEGES ON `Syslog`.* TO 'javauser'@'%';             
GRANT ALL PRIVILEGES ON `eltex_doors`.* TO 'javauser'@'%';        
GRANT ALL PRIVILEGES ON `eltex_ngw`.* TO 'javauser'@'%';          
GRANT ALL PRIVILEGES ON `ELTEX_PORTAL`.* TO 'javauser'@'%';       
GRANT ALL PRIVILEGES ON `eltex_ems`.* TO 'javauser'@'%';          
GRANT ALL PRIVILEGES ON `eltex_alert`.* TO 'javauser'@'%';        
GRANT ALL PRIVILEGES ON `eltex_auth_service`.* TO 'javauser'@'%';
FLUSH PRIVILEGES;

Starting replication

Starting replication on the second server

Run the show master status command in MySQL console on the first server and analyze the values obtained:

mysql> show master status \G

*************************** 1. row ***************************
            File: mysql-bin.000001
        Position: 00000107
    Binlog_Do_DB: eltex_alert,eltex_ems,wireless,radius,eltex_auth_service,ELTEX_PORTAL,eltex_doors,eltex_ngw
Binlog_Ignore_DB: mysql,Syslog,performance_schema,information_schema
1 row in set (0.00 sec)

Remember the File and Position parameters.

Configure and start replication of the second server from the first one (perform actions on the second server):

STOP SLAVE;
CHANGE MASTER TO MASTER_HOST='<ip_server1>', MASTER_USER='replication', MASTER_PASSWORD='password', MASTER_LOG_FILE='mysql-bin.000001', MASTER_LOG_POS=107;
START SLAVE;

where

MASTER_LOG_FILE='mysql-bin.000001' — specify the File value received on the first server;
MASTER_LOG_POS=107 – specify the Position value received on the first server.

Check the replication status on the second server:

mysql> show slave status \G
*************************** 1. row ***************************
               Slave_IO_State: Waiting for master to send event
                  Master_Host: <ip_server1>
                  Master_User: replication
                  Master_Port: 3306
                Connect_Retry: 60
              Master_Log_File: mysql-bin.000001
          Read_Master_Log_Pos: 107
               Relay_Log_File: mysqld-relay-bin.000001
                Relay_Log_Pos: 107
        Relay_Master_Log_File: mysql-bin.000001
             Slave_IO_Running: Yes
            Slave_SQL_Running: Yes
              Replicate_Do_DB:
          Replicate_Ignore_DB:
           Replicate_Do_Table:
       Replicate_Ignore_Table:
      Replicate_Wild_Do_Table:
  Replicate_Wild_Ignore_Table:
                   Last_Errno: 0
                   Last_Error:
                 Skip_Counter: 0
          Exec_Master_Log_Pos: 107
              Relay_Log_Space: 107
              Until_Condition: None
               Until_Log_File:
                Until_Log_Pos: 0
           Master_SSL_Allowed: No
           Master_SSL_CA_File:
           Master_SSL_CA_Path:
              Master_SSL_Cert:
            Master_SSL_Cipher:
               Master_SSL_Key:
        Seconds_Behind_Master: 0
Master_SSL_Verify_Server_Cert: No
                Last_IO_Errno: 0
                Last_IO_Error:
               Last_SQL_Errno: 0
               Last_SQL_Error:
  Replicate_Ignore_Server_Ids:
             Master_Server_Id: 2
1 row in set (0.00 sec)

If the Slave_IO_Running and Slave_SQL_Running parameters are set to "Yes", replication has started successfully.

Starting replication on the first server

On the second server, run:

mysql> show master status \G

*************************** 1. row ***************************
            File: mysql-bin.000001
        Position: 00000107
    Binlog_Do_DB: eltex_alert,eltex_ems,eltex_ont,radius,wireless,eltex_auth_service,payments,ELTEX_PORTAL
Binlog_Ignore_DB: mysql,Syslog,performance_schema,information_schema
1 row in set (0.00 sec)

Configure and start replication of the first server from the second (perform actions on the first server):

STOP SLAVE;
CHANGE MASTER TO MASTER_HOST='<ip_server2>', MASTER_USER='replication', MASTER_PASSWORD='password', MASTER_LOG_FILE='mysql-bin.000001', MASTER_LOG_POS=107;
START SLAVE;

Check the replication status on the first server:

mysql> show slave status \G
*************************** 1. row *************************** 
               Slave_IO_State: Waiting for master to send event
                  Master_Host: <ip_server2>
                  Master_User: replication
                  Master_Port: 3306
                Connect_Retry: 60
              Master_Log_File: mysql-bin.000001
          Read_Master_Log_Pos: 107
               Relay_Log_File: mysqld-relay-bin.000001
                Relay_Log_Pos: 107
        Relay_Master_Log_File: mysql-bin.000001
             Slave_IO_Running: Yes
            Slave_SQL_Running: Yes
...

If the Slave_IO_Running and Slave_SQL_Running parameters are set to "Yes", the values of Master_Log_File and Read_Master_Log_Pos are replicated in both directions.

Checking replication from EMS-GUI

MySQL replication state can be controlled from GUI EMS. To do this, edit the configuration file /etc/eltex-ems/check-ems-replication.conf. Changes must be made on both servers.

/etc/eltex-ems/check-ems-replication.conf
# Enable("Yes") / Disable("No") replication check
ENABLE_REPLICATION="Yes"

# The first replication host's address
HOST1=<ip_server1>
# The second replication host's address
HOST2=<ip_server2>
 

# mysql server access parameters
#  mysql user
USER="replication"
#  mysql password
PASSWORD="password"

where

ENABLE_REPLICATION — whether replication verification is enabled (set to "Yes");
HOST1, HOST2 — ip addresses of servers;
USER, PASSWORD — login/password of the account for replication to work.
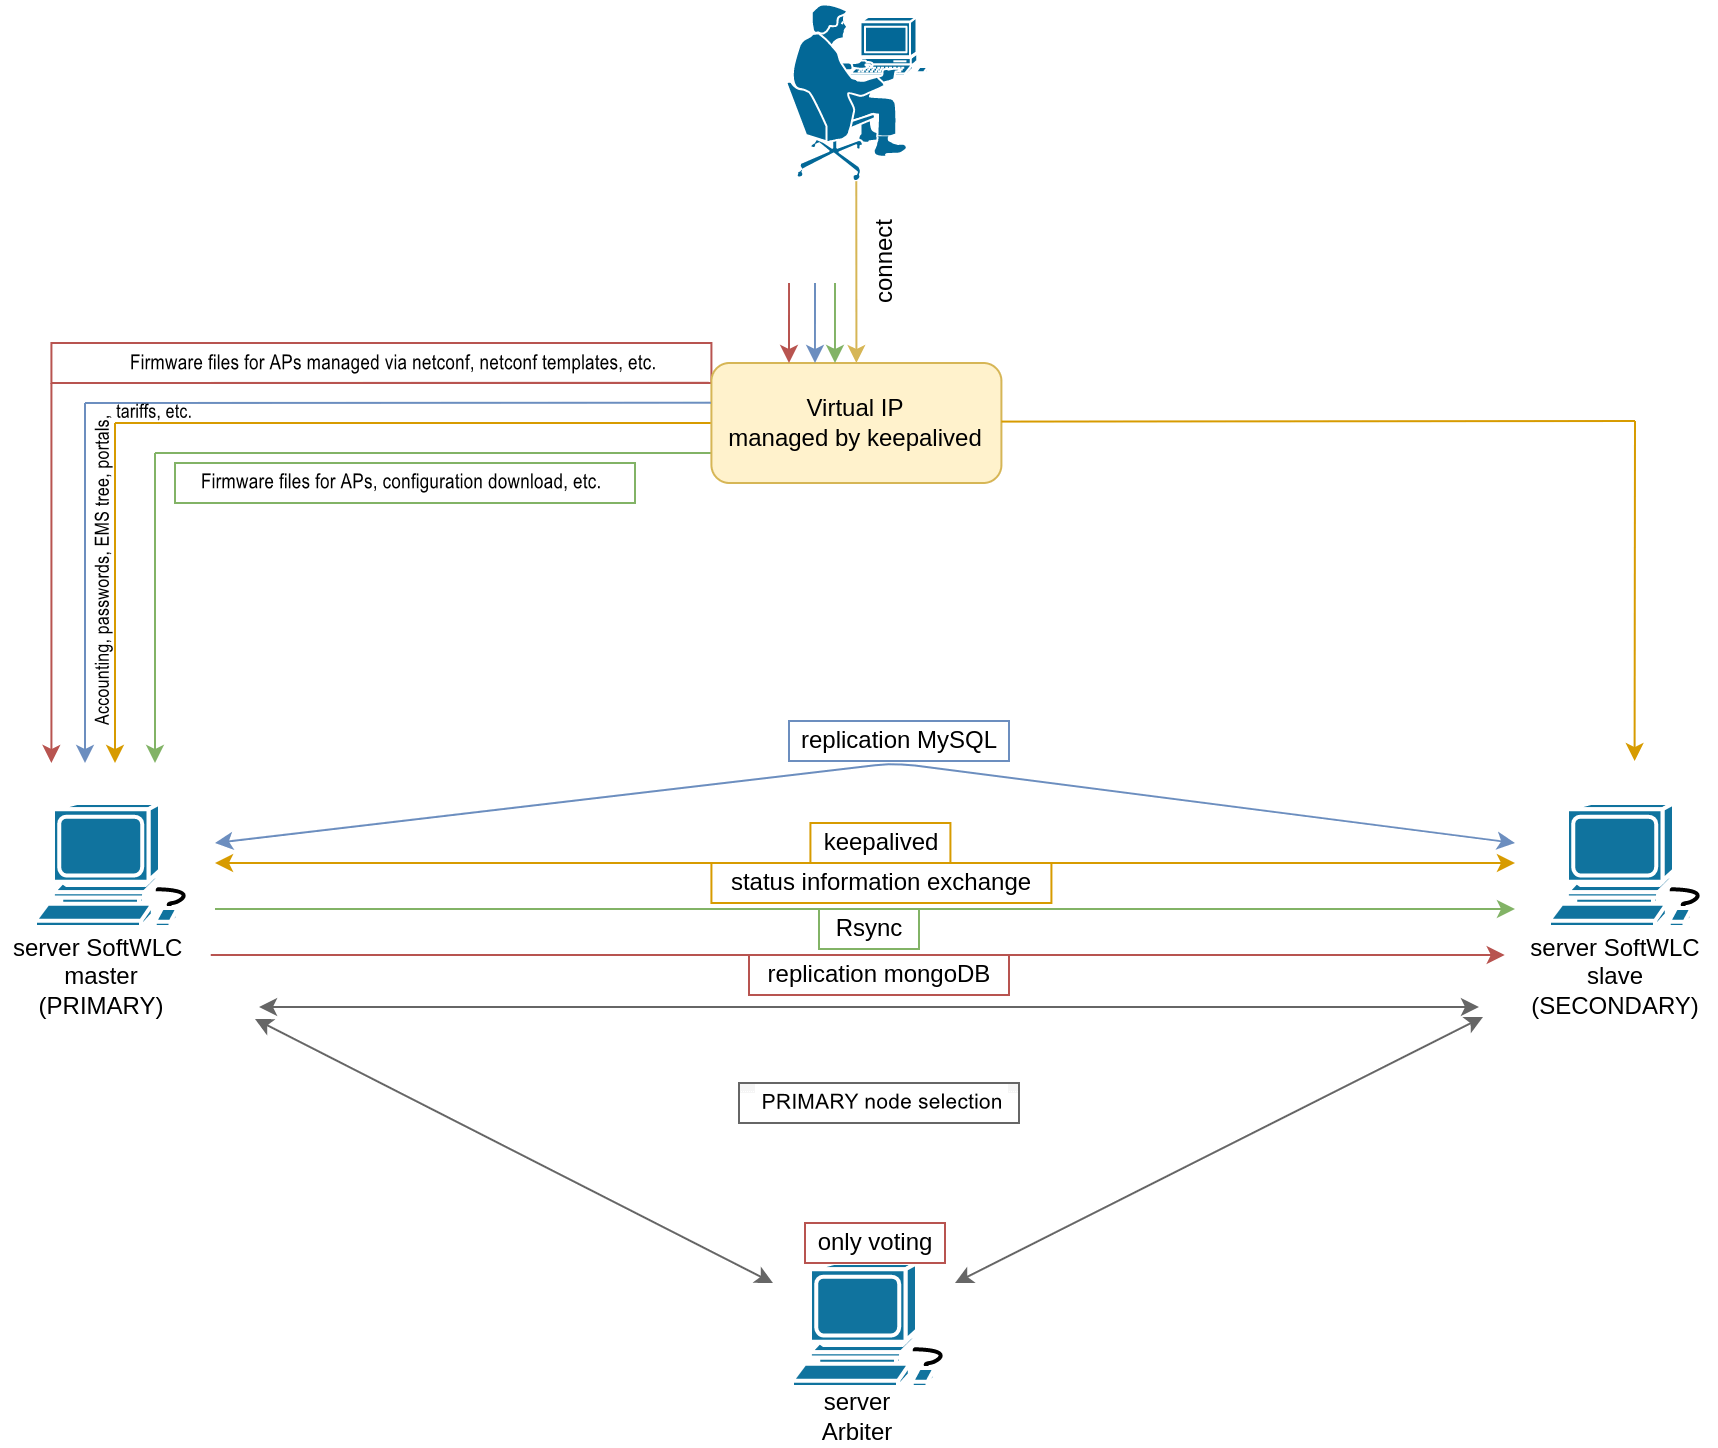
After saving the changes, replication state can be checked via GUI EMS in Information → State of backup system → MySQL section.

Configuring MongoDB

In MongoDB, replication is performed by grouping several (3 for standard configuration) nodes into Replica Set. Replica Set consists of one primary node and several secondary nodes. The following scheme explains it in details:

  • Primary — the primary server of MongoDB.
  • Secondary — exact copies of database(s) with real-time synchronization.
  • Arbiter — server is only responsible for the election of a successor, it cannot become a successor itself, therefore it is recommended to give minimum resources for arbiter, SoftWLC does not need to be installed on the arbiter.

Minimum requirements for mongo-db arbiter:

  • vCore: 1, 64-bit x86 CPUs
  • vRAM: 2 GB
  • vHDD: 20 GB
For replication to work correctly, MongoDB versions must match on all hosts.

​All data modification operations are performed only on primary. Thus, MongoDB automatically performs failover and replaces Primary with an operating node if current Primary fails. But that requires 3+ nodes in Replica Set.

In default configuration, Replica Set that consists of two nodes completely goes down when one of them fails (even a Secondary one).

Installing mongodb on arbiter

For replication to work correctly, MongoDB versions must match on all hosts. For standard mongo installation, version 3.6.3 is required, for the example below, version 4 is required. 

To install the required version of mongodb, perform the following steps:

Create a file /etc/apt/sources.list.d/mongodb-org-4.0.list and write the mongo repo into it

deb [ arch=amd64 ] http://mirror.yandex.ru/mirrors/repo.mongodb.org/apt/ubuntu bionic/mongodb-org/4.0 multiverse

On the server, run the following command:

sudo apt-key adv --keyserver hkp://keyserver.ubuntu.com:80 --recv 9DA31620334BD75D9DCB49F368818C72E52529D4

Download mongodb-org

sudo apt-get update
sudo apt install mongodb-org

Make sure that mongodb version 4.0.28 or higher is installed on the server

mongo --version или dpkg -l | grep mongo

Run the following commands:

sudo systemctl enable mongod.service
sudo systemctl start mongod.service

replicaSet configuration

In /etc/mongod.conf on all nodes:

Add/uncomment a block:

replication:
   replSetName: "<replica_set_name>"

where <replica_set_name> is the name of the replica set. The name is chosen arbitrarily, but must be the same on all servers.

Allow external connections by specifying the address 0.0.0.0 in the bindIp parameter (bind_ip in the old version of mongo) (0.0.0.0 — allows connections from any ip addresses):

  bindIp: 0.0.0.0

Restart MongoDB:

root@swlc01-server:/# service mongod restart 

On the first node, open MongoDB console:

root@swlc01-server:/# mongo

Create replica set configuration:

If you want to use hostname instead of ip address in the configuration, then, in /etc/hostname on all nodes, specify names of nodes and, in /etc/hosts on all nodes, add all nodes with the type <IP_address> <hostname>

rs.initiate(
   {
      _id: "replica_set_name",
      version: 1,
      members: [
         { _id: 0, host : "ip_mongo_primary:27017" },
         { _id: 1, host : "ip_mongo_secondary:27017" }
      ]
   }
)

Add Arbiter node in Replica Set (on PRIMARY):

rs.add("<ip_server>:27017",true) 

After a while, shell prompt should be changed to:

replica_set_name:PRIMARY>

To view the Replica Set configuration, run the following command:

replica_set_name:PRIMARY> rs.config()

To check the Replica Set status, run the rs.status()command in the MongoDB console.

Adding/deleting/changing nodes in Replica Set

Configuration of nodes in Replica Set can be performed only on PRIMARY.

Add Secondary node in Replica Set (on PRIMARY):

rs.add("<ip_server>:27017")

If MongoDB responds to this command with an error, maybe there is no connection to the second node (or bindIp: 127.0.0.1 is registered there), or replication block is not configured there.
On the second node, MongoDB management console prompt should be changed to:

root@swlc01-server:/# mongo
replica_set_name:SECONDARY>

Add Arbiter node in Replica Set:

replica_set_name:PRIMARY> rs.add("<ip_server>:27017",true)

Delete a node from Replica Set (run on PRIMARY):

replica_set_name:PRIMARY> rs.remove("<ip_server>:27017")

To update the server's address, run the following commands:

replica_set_name:PRIMARY> cfg = rs.conf()
replica_set_name:PRIMARY> cfg.members[<index>].host = "<ip_server>:27017"
replica_set_name:PRIMARY> rs.reconfig(cfg)

To check replication performance, disable the PRIMARY server: the server that was SECONDARY will switch to the PRIMARY status

Eltex-PCRF operation in cluster mode

Configuring PCRF cluster

Open 5701 tcp and 5801 tcp ports between PCRF servers. 

On servers, in /etc/eltex-pcrf/hazelcast-cluster-network.xml configuration files, specify the addresses of the network interfaces (lines 5 and 22 of the example contain the server's address, and lines 14 and 15 contain the list of all cluster members).
Configuration example:

<network>
    <!-- Write here public address of the node -->
 
    <!-- specify the server's own address here -->
    <public-address>ip_server1</public-address>
    <port auto-increment="false" port-count="100">5701</port>
    <outbound-ports>
        <ports>0</ports>
    </outbound-ports>
    <join>
        <multicast enabled="false"/>
        <tcp-ip enabled="true">
            <!-- List IP addresses of all cluster members (including this one) -->
            <member>ip_server1</member>
            <member>ip_server2</member>
        </tcp-ip>
        <discovery-strategies>
        </discovery-strategies>
    </join>
    <interfaces enabled="true">
    <!-- specify the server's own address here -->
        <interface>ip_server1</interface>
    </interfaces>

Permit cluster start in /etc/eltex-pcrf/eltex-pcrf configuration.json configuration file:

"cluster.enable" : true,

Restart Eltex-PCRF using the command:

admin@swlc01-server:/# sudo service eltex-pcrf restart

Cluster state check

{
  "data" : {
    "enabled" : true,
    "state" : "ACTIVE",
    "members" : [ {
      "address" : "ip_server1",
      "local" : true,
      "active" : true
    }, {
      "address" : "ip_server2",
      "local" : false,
      "active" : true
    } ],
    "messagesStats" : {
      "received" : 45157,
      "sent" : 45144
    },
    "mongo" : {
      "available" : false,
      "error" : "not running with --replSet"
    }
  },
  "key" : "PcrfErrorCode.success",
  "message" : "Success",
  "code" : 0,
  "args" : [ ]
}

Specifics of ESR configuration for interaction with PCRF cluster

When using a PCRF cluster on ESR, configure interaction with all nodes of the cluster using their real address.

Configuring SoftWLC modules

It is necessary to configure SoftWLC modules on both servers to interact with controller via virtual ip. The following configuration files should be modified.


When changing the Mysql and MongoDB database connection settings, be extremely careful with the DB connection settings. Configuration errors, such as errors in characters between parameters (for example, "?" instead of "&"), extra characters, etc. will cause hard-to-diagnose DB connection errors!

After making changes to the configuration files, restart the corresponding service:

root@swlc01-server:/# service eltex-<service_name> restart

If you use a single-host system on each of the SoftWLC servers, replacing localhost or 127.0.0.1 with <virtual_ip> in the configuration files of the services that access the MySQL database is not required.

/etc/eltex-apb/application.conf
# maximum number of outgoing messages in queue for each session
sessionMessageQueueSize = 100

# cache config file path
cacheConfigFile = /etc/eltex-apb/ehcache.xml

# path to the file with permitted hosts
hostsFile = /etc/eltex-apb/hosts.json

pingJob {
  # ping job interval
  interval = 60s

  # timeout waiting for subscribe-request after connecting the access point to the server
  subscribeIdleTimeout = 60s
  # timeout during that the session will stay opened without receiving any message
  messageIdleTimeout = 90s
  # interval of ping to be sent to the websocket session
  pingIdleTimeout = 30s
}

# eltex-mercury connection properties
mercury {
  host = localhost
  port = 6565
  poolSize = 50
}
nbi.client.login=admin
nbi.client.password=password
  • Change localhost to <virtual_ip> in line 24.
/etc/eltex-pcrf/eltex-pcrf.json
{
  "auth.address" : "0.0.0.0",
  "auth.port" : 31812,
  "auth.mac.open.timeout.s" : 3600,
  "auth.mac.welcome.service" : "WELCOME",

  "acct.address" : "0.0.0.0",
  "acct.ports" : [1813, 31813],

  "lease.saver.address" : "0.0.0.0",
  "lease.saver.port" : 4381,

  "aaa.instances" : 5,
  "aaa.host" : "127.0.0.1",
  "aaa.secret" : "testing123",
  "aaa.auth.port" : 1812,
  "aaa.acct.port" : 1813,
  "aaa.rest.port" : 7080,
  "aaa.timeout" : 10,
  "aaa.attempts" : 1,

  "web.monitoring.port" : 7070,

  "cluster.enable" : false,
  "cluster.eventBusPort" : 5801,

  "radius" : {
    "url": "jdbc:mysql://localhost/radius?useUnicode=true&characterEncoding=utf8&connectTimeout=5000&socketTimeout=5000&autoReconnect=true&useSSL=false",
    "user": "javauser",
    "password": "javapassword",
    "max_pool_size": 16
  },

  "mongo.pcrf" : {
    "connection_string": "mongodb://localhost:27017/pcrf?replicaSet=<YourClasterName>&waitQueueMultiple=500&connectTimeoutMS=10000&socketTimeoutMS=0&readPreference=secondaryPreferred",
    "db_name": "pcrf"
  },

  "mongo.ott" : {
    "connection_string": "mongodb://localhost:27017/ott?replicaSet=<YourClasterName>&waitQueueMultiple=500&connectTimeoutMS=10000&socketTimeoutMS=0&readPreference=secondaryPreferred",
    "db_name": "ott"
  },

  "session.storage" : {
    "session.check.period.s" : 300,
    "unauth.store.time.s" : 600,
    "interval.number.expired" : 3,
    "min.interval.s" : 45,
    "default.interval.s" : 600
  },

  "bras.coa" : {
    "coa.timeout" : 10,
    "coa.attempts" : 1,
    "remote.coa.port" : 3799,
    "executor.size" : 100,
    "log.clean.period.s" : 600,
    "log.store.period" : {
      "period" : 14,
      "unit" : "D"
    }
  },

  "sql.ems" : {
    "url": "jdbc:mysql://localhost/eltex_ems?useUnicode=true&characterEncoding=utf8&connectTimeout=5000&socketTimeout=5000&autoReconnect=true&useSSL=false",
    "user": "javauser",
    "password": "javapassword",
    "max_pool_size": 16
  },

  "sql.wireless" : {
    "url": "jdbc:mysql://localhost/wireless?useUnicode=true&characterEncoding=utf8&connectTimeout=5000&socketTimeout=5000&autoReconnect=true&useSSL=false",
    "user": "javauser",
    "password": "javapassword",
    "max_pool_size": 16
  },

  "sql.auth.service" : {
    "url": "jdbc:mysql://localhost/eltex_auth_service?zeroDateTimeBehavior=convertToNull&useUnicode=true&characterEncoding=utf8&connectTimeout=5000&socketTimeout=5000&useSSL=false",
    "user": "javauser",
    "password": "javapassword",
    "max_pool_size": 4
  },

  "language" : "en",

  "radius.nbi" : {
    "wdsl.url" : "http://localhost:8080/axis2/services/RadiusNbiService?wsdl",
    "username" : "softwlc_service",
    "password" : "softwlc",
    "connection.timeout.ms" : 30000,
    "request.timeout.ms" : 120000
  },

  "tariffs.update.interval" : {
    "interval" : 1,
    "unit" : "hours"
  },

  "bras.cron.update.interval": {
    "interval" : 1,
    "unit": "hours"
  },

  "filters.cache.dir" : "/var/lib/eltex-pcrf/filters/",

  "clickhouse": {
    "url": "jdbc:clickhouse://localhost:8123/radius",
    "user_name": "javauser",
    "user_password": "javapassword"
  },

  "accounting.options": {
    "use_clickhouse": false,
    "use_mysql": true,
    "batch_interval_ms": 300000,
    "max_queue_load": 100
  }
}
mongodb://192.168.10.3:27017,192.168.10.4:27017/pcrf?replicaSet=Cluster&waitQueueMultiple=500&connectTimeoutMS=10000&socketTimeoutMS=0&readPreference=secondaryPreferred

mongodb://192.168.10.3:27017,192.168.10.4:27017/ott?replicaSet=Cluster&waitQueueMultiple=500&connectTimeoutMS=10000&socketTimeoutMS=0&readPreference=secondaryPreferred
  • Change localhost to <virtualip> in all lines except line 14.
  • Change 127.0.0.1 to <virtualip> in all lines except line 14.
/etc/eltex-portal-constructor/application.conf
login {
    # The number of attempts to log into Admin Panel before locking
    maxAttemptsLogin = 3
    maxAttemptsIP = 5
    #Duration of the blocking period (in minutes) that starts after reaching the maximum number of attempts to log into the Admin Panel
    blockTime = 5m
}

access {
    // Temporarily set plaintext-secret right here (HMAC256), then use the path in FS to the PEM file (RSA256)
    secret = "secret"
}

database {
    host = localhost
    port = 3306
    name = ELTEX_PORTAL
    user = javauser
    password = javapassword

    pool {
        # Time to wait for a connection
        connectionTimeout = 10s
        # Time to wait for connection validation
        validationTimeout = 3s

        min = 1
        max = 10
    }

    cache {
        # Limit of cached simple entries count (for each query type)
        maxEntries = 1000
        # Limit of total cached portal resources size
        maxResourceBytes = 32m
        # Maximum time to retain items in the cache
        expireTime = 30s
    }
}

sso {
    enabled = false
    # Must be in double quotes
    version = "1.0"

    rest {
        scheme = http
        host = localhost
        port = 80
        sso_api_path = /apiman-gateway/b2b_test
    }
    auth {
        scheme = http
        host = localhost
        port = 80
        authentication_path = /auth/realms/b2b/protocol/openid-connect/auth
        logout_path = /auth/realms/b2b/protocol/openid-connect/logout
    }


    params {
        client_id = id
        # URL of epadmin, URL must be in double quotes (!!!)
        redirect_uri = "http://localhost:8080/epadmin/sso"
        client_secret = secret
    }
}

jetty {
    http.port = 9001
    https {
        port = 9444
        keystorePass = 12345
        keystoreFile = /etc/eltex-portal-constructor/localhost.pfx
        keystoreType = PKCS12
        keyAlias = 1
        ciphers = [
            TLS_RSA_WITH_AES_128_CBC_SHA256
            TLS_RSA_WITH_AES_128_CBC_SHA
            TLS_RSA_WITH_AES_256_CBC_SHA256
            TLS_RSA_WITH_AES_256_CBC_SHA
        ]
    }
    multipart {
        maxFileSize = 100MB
        maxRequestSize = 100MB
    }
}

validation {
    public_key = /etc/eltex-doors/keys/public.pem
}

logging {
  host = localhost
  port = 9099
}
  • Change localhost to <virtualip> in the lines 15, 48, 54, 64, 95.
/etc/eltex-portal/application.conf
portal {
    defaultRedirectUrl = "http://eltex-co.ru"

    scheduler {
        tariffCheckerPeriod = 1d
        paymentsCleanerPeriod = "0 0 * * * ?"
    }
}

jetty {
    https {
        port = 9443
        keystorePass = 12345
        keystoreFile = /etc/eltex-portal/localhost.pfx
        keystoreType = PKCS12
        keyAlias = 1
        ciphers = [
            TLS_RSA_WITH_AES_128_CBC_SHA256
            TLS_RSA_WITH_AES_128_CBC_SHA
            TLS_RSA_WITH_AES_256_CBC_SHA256
            TLS_RSA_WITH_AES_256_CBC_SHA
        ]
    }
}

database {
    host = localhost
    port = 3306
    name = ELTEX_PORTAL
    user = javauser
    password = javapassword

    pool {
        # Time to wait for a connection
        connectionTimeout = 10s
        # Time to wait for connection validation
        validationTimeout = 3s

        min = 1
        max = 10
    }

    cache {
        # Limit of cached simple entries count (for each query type)
        maxEntries = 1000
        # Limit of total cached portal resources size
        maxResourceBytes = 32m
        # Maximum time to retain items in the cache
        expireTime = 2m
    }
}

// JWT validation. You need a key from Eltex Doors.
// Or you could generate it yourself.
validation {
   public_key = "etc/eltex-doors/keys/public.pem"
  • Change localhost to <virtualip> in line 27.
/etc/eltex-radius-nbi/radius_nbi_config.txt
# DB  radius(alias=radius)
radius.jdbc.driver=org.gjt.mm.mysql.Driver
radius.jdbc.dbUrl=jdbc:mysql://localhost/radius?zeroDateTimeBehavior=convertToNull&useUnicode=true&characterEncoding=utf8&relaxAutoCommit=true&connectTimeout=5000
radius.jdbc.username=javauser
radius.jdbc.password=javapassword
radius.jdbc.maxPoolSize=48
radius.jdbc.inUse=yes

# DB  radius replica(alias=radiusReplicaPool)
#TODO: Change it to replica url
radius.jdbc.replica.driver=org.gjt.mm.mysql.Driver
radius.jdbc.replica.dbUrl=jdbc:mysql://localhost/radius?zeroDateTimeBehavior=convertToNull&useUnicode=true&characterEncoding=utf8&relaxAutoCommit=true&connectTimeout=5000
radius.jdbc.replica.username=javauser
radius.jdbc.replica.password=javapassword
radius.jdbc.replica.maxPoolSize=48
radius.jdbc.replica.inUse=yes

# DB ems(alias=ems)
ems.jdbc.driver=org.gjt.mm.mysql.Driver
ems.jdbc.dbUrl=jdbc:mysql://localhost/eltex_ems?zeroDateTimeBehavior=convertToNull&useUnicode=true&characterEncoding=utf8&relaxAutoCommit=true&connectTimeout=5000&noAccessToProcedureBodies=true
ems.jdbc.username=javauser
ems.jdbc.password=javapassword
ems.jdbc.maxPoolSize=48
ems.jdbc.inUse=yes

# DB  wireless (alias=wireless)
wireless.jdbc.driver=org.gjt.mm.mysql.Driver
wireless.jdbc.dbUrl=jdbc:mysql://localhost/wireless?zeroDateTimeBehavior=convertToNull&useUnicode=true&characterEncoding=utf8&relaxAutoCommit=true&connectTimeout=5000
wireless.jdbc.username=javauser
wireless.jdbc.password=javapassword
wireless.jdbc.maxPoolSize=48
wireless.jdbc.inUse=yes

# DB logs (alias=logs)
logs.jdbc.driver=org.gjt.mm.mysql.Driver
logs.jdbc.dbUrl=jdbc:mysql://localhost/eltex_alert?zeroDateTimeBehavior=convertToNull&useUnicode=true&characterEncoding=utf8&relaxAutoCommit=true&connectTimeout=5000
logs.jdbc.username=javauser
logs.jdbc.password=javapassword
logs.jdbc.maxPoolSize=48
logs.jdbc.inUse=yes

# DB logs (alias=eltex_auth_service)
eltex_auth_service.jdbc.driver=org.gjt.mm.mysql.Driver
eltex_auth_service.jdbc.dbUrl=jdbc:mysql://localhost/eltex_auth_service?zeroDateTimeBehavior=convertToNull&useUnicode=true&characterEncoding=utf8&relaxAutoCommit=true&connectTimeout=5000
eltex_auth_service.jdbc.username=javauser
eltex_auth_service.jdbc.password=javapassword
eltex_auth_service.jdbc.maxPoolSize=48
eltex_auth_service.jdbc.inUse=no

# ems-northbound address
ems.nbi.host=127.0.0.1
ems.nbi.port=8080
ems.nbi.path=northbound
ems.nbi.protocol=http

# eltex_auth_service
auth.port=22
auth.host=127.0.0.1
auth.username=username
auth.password=password

# freeradius-domain-1
freeradius-domain-1.port=22
freeradius-domain-1.host=192.168.0.1
freeradius-domain-1.username=username
freeradius-domain-1.password=password

# freeradius-domain-2
freeradius-domain-2.port=22
freeradius-domain-2.host=192.168.0.2
freeradius-domain-2.username=username
freeradius-domain-2.password=password

# tomcat url
tomcat.host=127.0.0.1
tomcat.port=8080

# pcrf stuff
pcrf.enabled=true
pcrf.url=http://localhost:7070
pcrf.username=admin
pcrf.password=password

# pcrf mongodb connector
pcrf.mongodb.enabled=true
pcrf.mongodb.uri=mongodb://localhost:27017/pcrf?replicaSet=<YourClusterName>

# wifi-customer-cab mongodb connector
wificab.mongodb.enabled=true
wificab.mongodb.uri=mongodb://localhost:27017/wifi-customer-cab?replicaSet=<YourClusterName>

# Eltex.SORM2.replicator MongoDB 'sorm2' connect
sorm2.mongodb.enabled=false
sorm2.mongodb.uri=mongodb://localhost:27017/sorm2?replicaSet=<YourClusterName>

# wifi-customer-cab request settings
wificab.timeout=90000

# Eltex.SORM2.replicator host to use API
sorm2.enabled=false
sorm2.url=http://localhost:7071
sorm2.username=admin
sorm2.password=password

#It enables records export to SORM3 while editing wifi users
sorm3.enabled=false

# ott mongodb connector
ott.mongodb.enabled=true
ott.mongodb.uri=mongodb://localhost:27017/ott?replicaSet=<YourClusterName>

# metrics
metric.interval.s=900

###########################################################################
##########################DB ELTEX_PORTAL settings#########################
###########################################################################
portal.db.driver=com.mysql.jdbc.Driver
portal.db.url=jdbc:mysql://localhost:3306/ELTEX_PORTAL?max_allowed_packet=32362048&useUnicode=true&characterEncoding=utf8
portal.db.username=javauser
portal.db.password=javapass
pcrf.mongodb.uri=mongodb://192.168.10.3:27017,192.168.10.4:27017/pcrf?replicaSet=Cluster
wificab.mongodb.uri=mongodb://192.168.10.3:27017,192.168.10.4:27017/wifi-customer-cab?replicaSet=Cluster
sorm2.mongodb.uri=mongodb://192.168.10.3:27017,192.168.10.4:27017/sorm2?replicaSet=Cluster
ott.mongodb.uri=mongodb://192.168.10.3:27017,192.168.10.4:27017/ott?replicaSet=Cluster
  • Change localhost to <virtualip> in all lines.
  • Change 127.0.0.1 to <virtualip> in all lines.
/etc/eltex-ngw/application.conf
// Server configuration
server {
    // server port
    port = 8040
    // number of threads in executor that executes handlers and different gateways
    threads = 50
}

http {
    // Timeout of http connection to the end gateway
    connectionTimeout = 30s
    // Number of maximum simultaneous http connections
    maxConnections = 50
    // Time that connection will be kept alive
    keepAliveTimeout = 5s
    // Whether to check SSL certificate
    checkCert = true
    // HTTP User Agent
    userAgent = eltex-ngw

}

sms {
    // Incoming (user to service) sms config
    incoming.config = "smsc.conf"
    // Outgoing (service to user) sms config
    outgoing.config = "smsc.conf"
}

call {
    // Incoming (user to service) call config
    incoming.config = ""
    // Outgoing (service to user) call config
    outgoing.config = ""
}

email {
    // Outgoing (service to user) email config
    outgoing.config = ""

}

database {
    host = localhost
    port = 3306
    name = eltex_ngw
    user = javauser
    password = javapassword

    pool {
        # Time to wait for a connection
        connectionTimeout = 10s
        # Time to wait for connection validation
        validationTimeout = 3s

        min = 1
        max = 10
    }
  • Change localhost to virtual_ip in line 44.
/etc/eltex-radius/local.conf
# Ports on which the server will listen
auth_port=1812
acct_port=1813
inner_tunnel_port=18121

# MySQL database
db_host="localhost"
db_port=3306
db_login="radius"
db_password="radpass"
db_name="radius"

# MySQL 'wireless' database
wireless_db_host="localhost"
wireless_db_port=3306
wireless_db_login="javauser"
wireless_db_password="javapassword"
wireless_db_name="wireless"

# PCRF
# If you setting pcrf_enabled=0, then you also should enable accounting port listening in "default" server
pcrf_host="127.0.0.1"
pcrf_port=7080
pcrf_enabled=1

# EAP
ca_cert_name="local.pem"
tls_key_password="1234

# Proxying
proxy_auth=0
proxy_domain_regex="^(.+\.)?enterprise\.root$"
proxy_host="127.0.0.1"
proxy_port=18121
proxy_secret="eltex"

# Ubiquity vendor detection
ubi_vendor_regex="Apple|Ubiquiti"
vendor_group_enabled=1

# Settings of runtime NAS discovery
dynamic_clients=false
dynamic_client_subnet=192.168.0.0/16
dynamic_client_lifetime=3600
dynamic_client_rate_limit=false

# Proxy SSID (for example to eltex-eap-tls) #139679
proxy_ssid_enabled=0
proxy_ssid_value="EAP_TLS"
proxy_ssid_host="127.0.0.1"
proxy_ssid_port=18122
proxy_ssid_secret="eltex"
  • Change localhost to <virtualip> in all lines.
  • Change 127.0.0.1 to <virtualip> in all lines.
/etc/eltex-wifi-cab/system.xml
<?xml version="1.0" encoding="UTF-8" standalone="no"?>
<!DOCTYPE properties SYSTEM "http://java.sun.com/dtd/properties.dtd">
<properties>
    <entry key="mongoaddress">mongodb://localhost:27017/wifi-customer-cab?replicaSet=<YourClusterName></entry>
    <entry key="nbiaddress">http://localhost:8080/axis2/services/RadiusNbiService?wsdl</entry>
    <entry key="nbi.serviceLogin.user">softwlc_service</entry>
    <entry key="nbi.serviceLogin.password">password</entry>
    <entry key="nbi.serviceLogin.requestTimeout.sec">120</entry>

    <!--Bonnie or NBI-->
    <entry key="data.service.type">NBI</entry>
    <entry key="bonnie.service.host">localhost</entry>
    <entry key="bonnie.service.port">9070</entry>

    <!--Bruce-->
    <entry key="bruce.service.host">localhost</entry>
    <entry key="bruce.service.port">8008</entry>

    <!-- Support link  -->
    <entry key="support.page.enabled">false</entry>
    <entry key="support.page.url">http://eltex-co.ru</entry>

    <!-- DPI link  -->
    <entry key="dpi.page.enabled">false</entry>
    <entry key="dpi.page.url">https://filter.wifi.example.org/</entry>

    <!-- SSO Settings -->
    <entry key="sso.enabled">false</entry>
    <entry key="sso.redirectUri">http://localhost:8080/wifi-cab/sso</entry>
    <entry key="sso.clientSecret"></entry>
    <entry key="sso.clientId"></entry>

    <!-- SSO Auth -->
    <entry key="sso.auth.server.protocol">http</entry>
    <entry key="sso.auth.server.address"></entry>
    <entry key="sso.auth.server.port">80</entry>

    <entry key="sso.auth.auth.path">/auth/realms/b2b/protocol/openid-connect/auth</entry>
    <entry key="sso.auth.logout.path">/auth/realms/b2b/protocol/openid-connect/logout</entry>

    <!-- SSO REST -->
    <entry key="sso.rest.server.protocol">http</entry>
    <entry key="sso.rest.server.address"></entry>
    <entry key="sso.rest.server.port">80</entry>
    <entry key="sso.rest.server.timeout.sec">10</entry>
    <entry key="sso.rest.protocol.version">2.0</entry>
    <entry key="sso.rest.username"></entry>
    <entry key="sso.rest.password"></entry>

    <entry key="sso.rest.getToken.path">/apiman-gateway/b2b_test/getToken</entry>
    <entry key="sso.rest.getUserInfo.path">/apiman-gateway/b2b_test/getUserInfo</entry>
    <entry key="sso.rest.addUser.path">/apiman-gateway/b2b_test/addUser</entry>
    <entry key="sso.rest.updateUser.path">/apiman-gateway/b2b_test/updateUser</entry>
    <entry key="sso.rest.delUser.path">/apiman-gateway/b2b_test/delUser</entry>
    <entry key="sso.rest.addUserParam.path">/apiman-gateway/b2b_test/addUserParam</entry>
    <entry key="sso.rest.delUserParam.path">/apiman-gateway/b2b_test/delUserParam</entry>
    <entry key="sso.rest.getUserByName.path">/apiman-gateway/b2b_test/getUserByName</entry>
    <entry key="sso.rest.resetPassword.path">/apiman-gateway/b2b_test/resetPassword</entry>
    <entry key="sso.rest.getUserByParam.path">/apiman-gateway/b2b_test/getUserByParam</entry>
    <entry key="sso.rest.getUserByEmail.path">/apiman-gateway/b2b_test/getUserByEmail</entry

</properties>
<entry key="mongoaddress">mongodb://192.168.10.3:27017,192.168.10.4:27017/wifi-customer-cab?replicaSet=Cluster</entry>
  • Change localhost to <virtualip> in all lines.
/usr/lib/eltex-ems/conf/config.txt
# DB Event
poolName1=event
event.jdbc.driver=org.gjt.mm.mysql.Driver
event.jdbc.dbUrl=jdbc:mysql://localhost/eltex_alert?useUnicode=true&characterEncoding=utf8&relaxAutoCommit=true&connectTimeout=5000
event.jdbc.username=javauser
event.jdbc.password=javapassword
event.jdbc.maxPoolSize=32
event.jdbc.inUse=yes
# remote db host access with su privileges
# event.ssh.login=
# event.ssh.password=
# event.ssh.port=

# DB Tree
poolName2=tree
tree.jdbc.driver=org.gjt.mm.mysql.Driver
tree.jdbc.dbUrl=jdbc:mysql://localhost/eltex_ems?useUnicode=true&characterEncoding=utf8&relaxAutoCommit=true&connectTimeout=5000&noAccessToProcedureBodies=true
tree.jdbc.username=javauser
tree.jdbc.password=javapassword
tree.jdbc.maxPoolSize=20
tree.jdbc.inUse=yes

# DB Ont
poolName3=ont
ont.jdbc.driver=org.gjt.mm.mysql.Driver
ont.jdbc.dbUrl=jdbc:mysql://localhost/eltex_ont?useUnicode=true&characterEncoding=utf8&relaxAutoCommit=true&connectTimeout=5000
ont.jdbc.username=javauser
ont.jdbc.password=javapassword
ont.jdbc.maxPoolSize=40
ont.jdbc.inUse=yes

# DB Syslog
poolName4=syslog
syslog.jdbc.driver=org.gjt.mm.mysql.Driver
syslog.jdbc.dbUrl=jdbc:mysql://localhost/Syslog?useUnicode=true&characterEncoding=utf8&relaxAutoCommit=true&connectTimeout=5000
syslog.jdbc.username=javauser
syslog.jdbc.password=javapassword
syslog.jdbc.maxPoolSize=4
syslog.jdbc.inUse=yes
# remote db host access with su privileges
# syslog.ssh.login=
# syslog.ssh.password=
# syslog.ssh.port=

# DB acsmain (alias=cpe)
poolName5=cpe
cpe.jdbc.driver=org.gjt.mm.mysql.Driver
cpe.jdbc.dbUrl=jdbc:mysql://localhost/acsmain?useUnicode=true&characterEncoding=utf8&relaxAutoCommit=true&connectTimeout=5000
cpe.jdbc.username=javauser
cpe.jdbc.password=javapassword
cpe.jdbc.maxPoolSize=2
cpe.jdbc.inUse=yes

# DB  acscmds(alias=cmds)
poolName6=cmds
cmds.jdbc.driver=org.gjt.mm.mysql.Driver
cmds.jdbc.dbUrl=jdbc:mysql://localhost/acscmds?useUnicode=true&characterEncoding=utf8&relaxAutoCommit=true&connectTimeout=5000
cmds.jdbc.username=javauser
cmds.jdbc.password=javapassword
cmds.jdbc.maxPoolSize=2
cmds.jdbc.inUse=yes

# DB  acsinf(alias=inf)
poolName7=inf
inf.jdbc.driver=org.gjt.mm.mysql.Driver
inf.jdbc.dbUrl=jdbc:mysql://localhost/acsinf?useUnicode=true&characterEncoding=utf8&relaxAutoCommit=true&connectTimeout=5000
inf.jdbc.username=javauser
inf.jdbc.password=javapassword
inf.jdbc.maxPoolSize=2
inf.jdbc.inUse=yes

# DB  acscache(alias=cache)
poolName8=cache
cache.jdbc.driver=org.gjt.mm.mysql.Driver
cache.jdbc.dbUrl=jdbc:mysql://localhost/acscache?useUnicode=true&characterEncoding=utf8&relaxAutoCommit=true&connectTimeout=5000
cache.jdbc.username=javauser
cache.jdbc.password=javapassword
cache.jdbc.maxPoolSize=2
cache.jdbc.inUse=yes

# DB  radius(alias=radius)
poolName9=radius
radius.jdbc.driver=org.gjt.mm.mysql.Driver
radius.jdbc.dbUrl=jdbc:mysql://localhost/radius?useUnicode=true&characterEncoding=utf8&relaxAutoCommit=true&connectTimeout=5000
radius.jdbc.username=javauser
radius.jdbc.password=javapassword
radius.jdbc.maxPoolSize=40
radius.jdbc.inUse=yes
# remote db host access with su privileges
# radius.ssh.login=
# radius.ssh.password=
# radius.ssh.port=

# ------------------------------------------- SSID ---------------------------------------------
# DB  wireless (alias=wireless)
poolName10=wireless
wireless.jdbc.driver=org.gjt.mm.mysql.Driver
wireless.jdbc.dbUrl=jdbc:mysql://localhost/wireless?useUnicode=true&characterEncoding=utf8&relaxAutoCommit=true&connectTimeout=5000
wireless.jdbc.username=javauser
wireless.jdbc.password=javapassword
wireless.jdbc.maxPoolSize=30
wireless.jdbc.inUse=yes

# memcached server address
#memcached_server_ip_port=127.0.0.1:11211
  • Change localhost to <virtualip> in the lines 4, 17, 26, 35, 48, 57, 66, 75, 84, 98.

Adding user to NAS table

To access your Admin Panel, you need to add the appropriate entries to the NAS table.

The table is stored in eltex_auth_service database. It contains the addresses of clients that have rights to send user authorization requests. If a client is not included into the table, authorization requests will be ignored.

To do this, in your Admin Panel, in the SettingsServer addresses section, add: 

  • <ip_server_1> — Server-1 IP address
  • <ip_server_2> — Server-2 IP address
  • <virtual_ip> — Virtual IP address


RADIUS key — eltex


Changing configuration via GUI

SoftWLC modules should also be configured via graphical interface.

Admin Panel

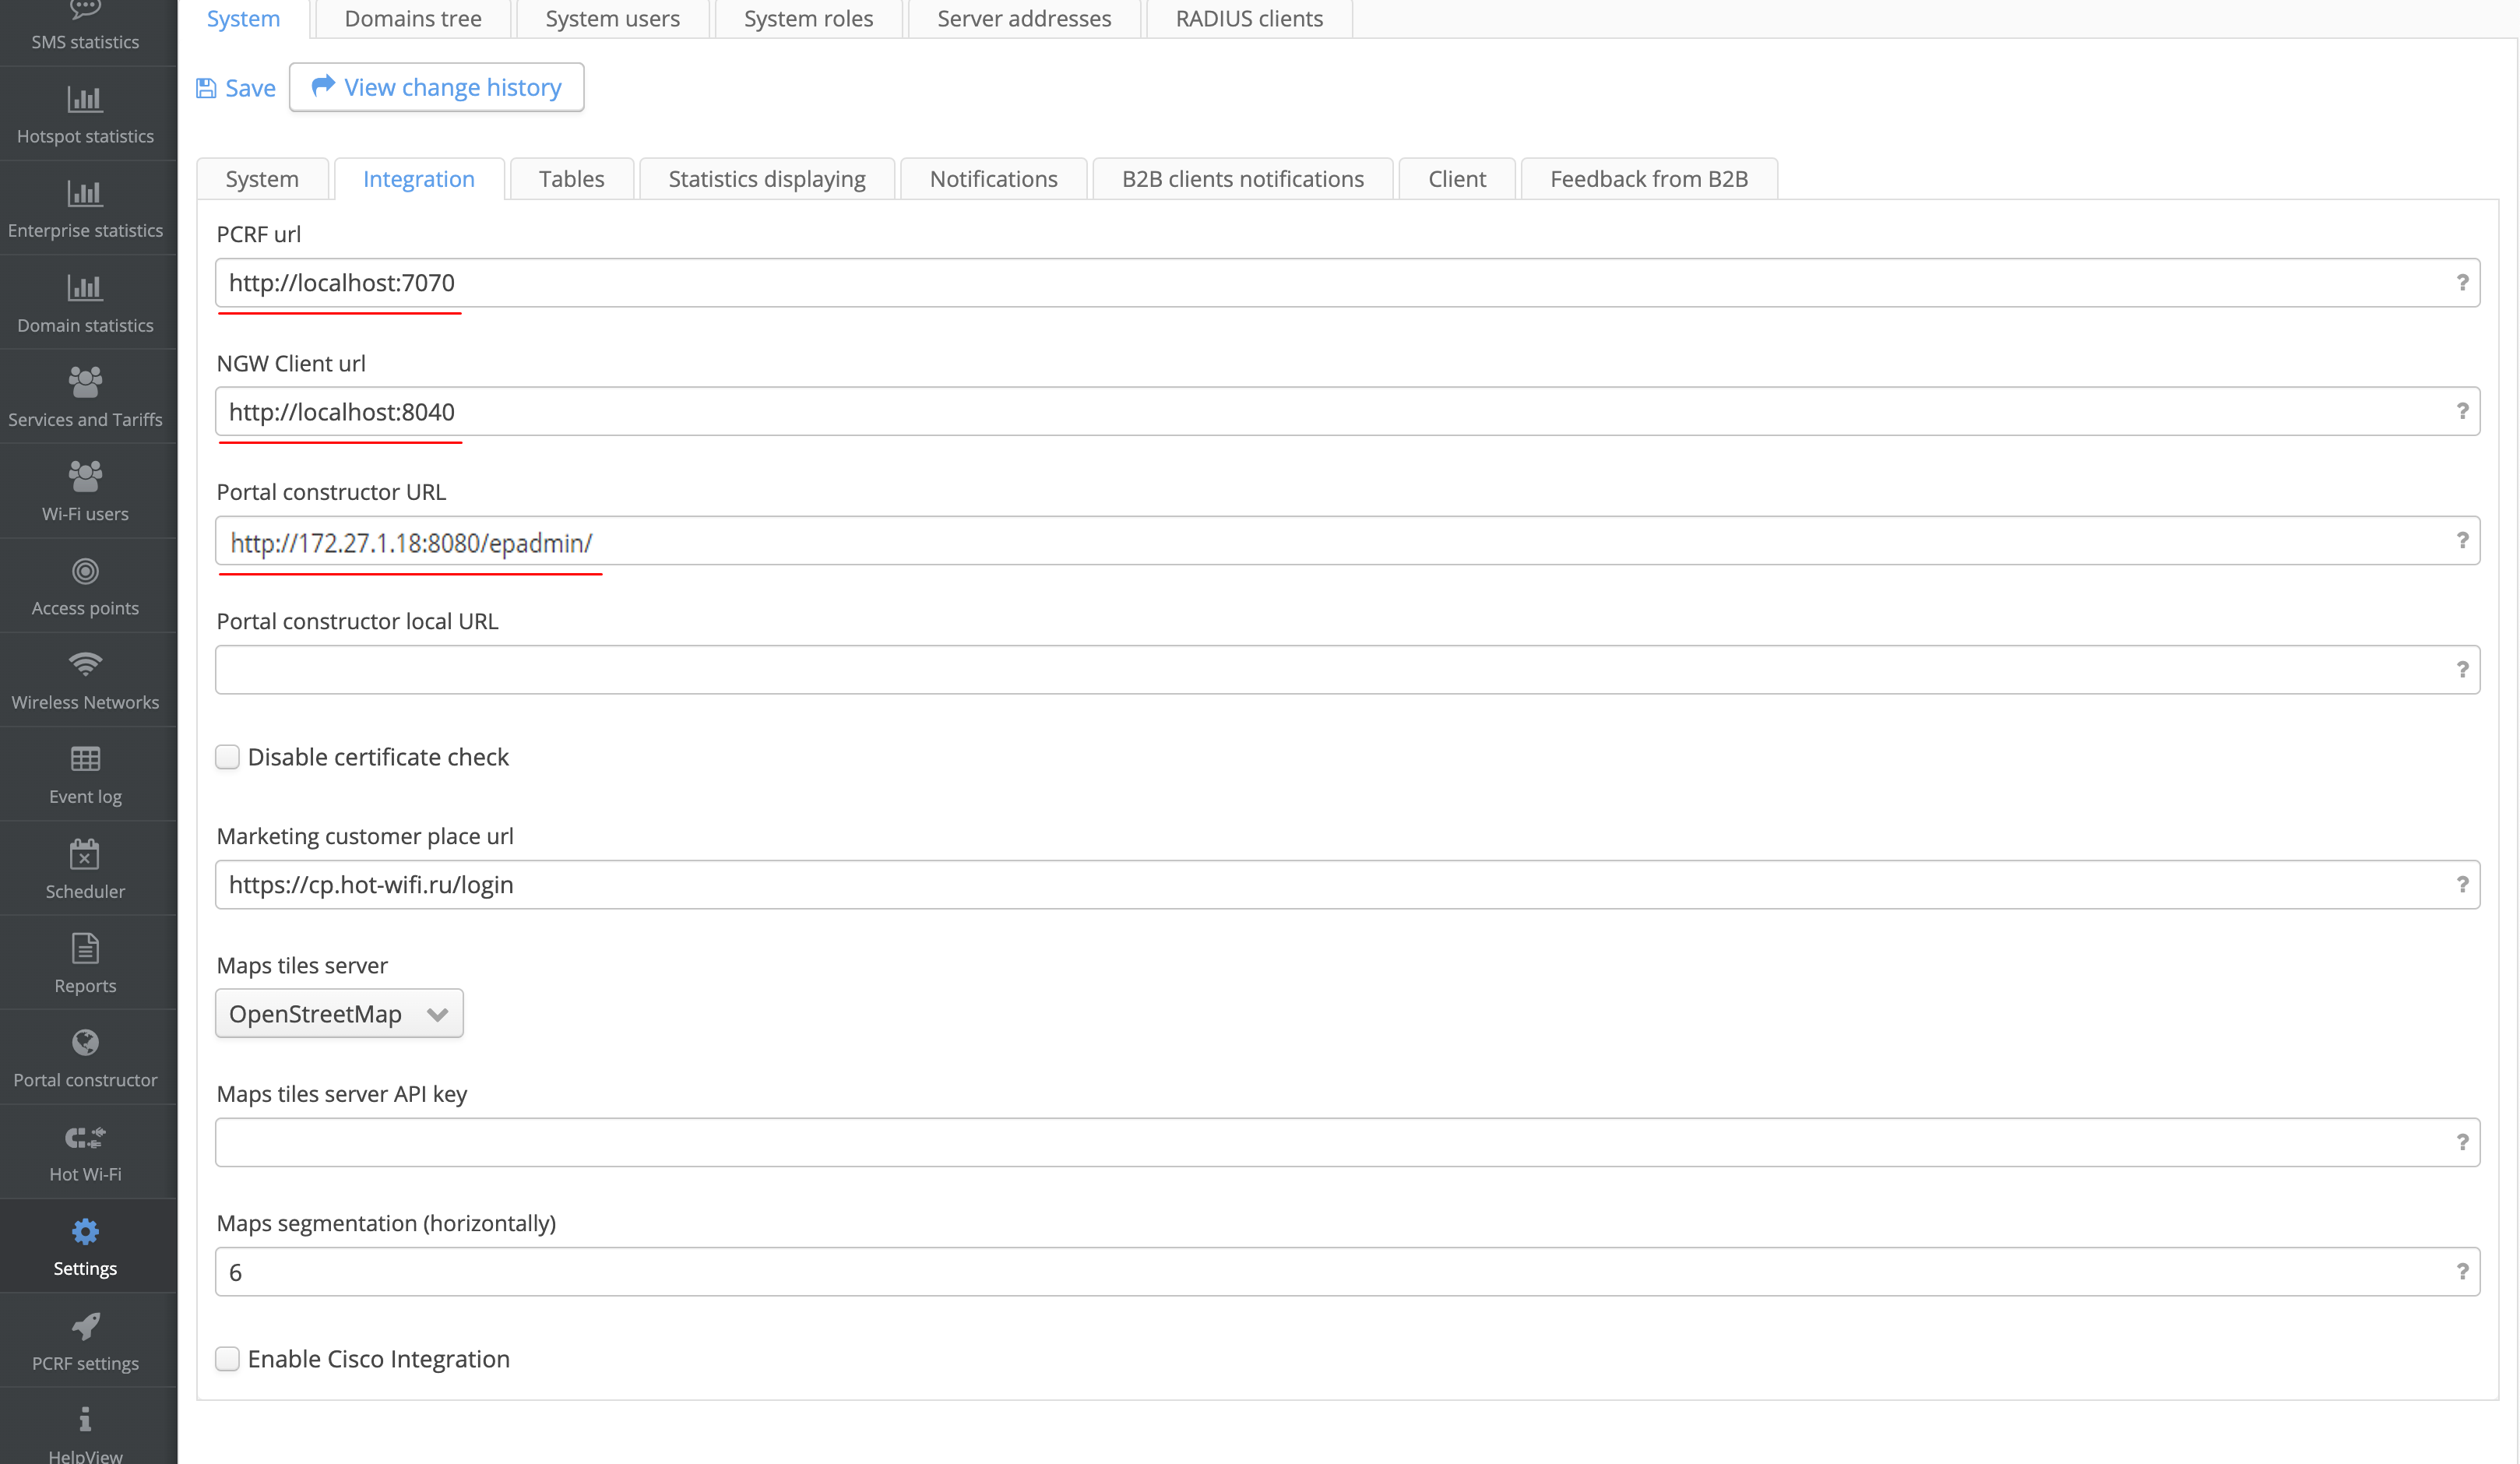
In the section Settings → Integration in the parameters PCRF url, NGW Client url and Portal constructor URL, change localhost to a virtual ip address:

Portal Constructor

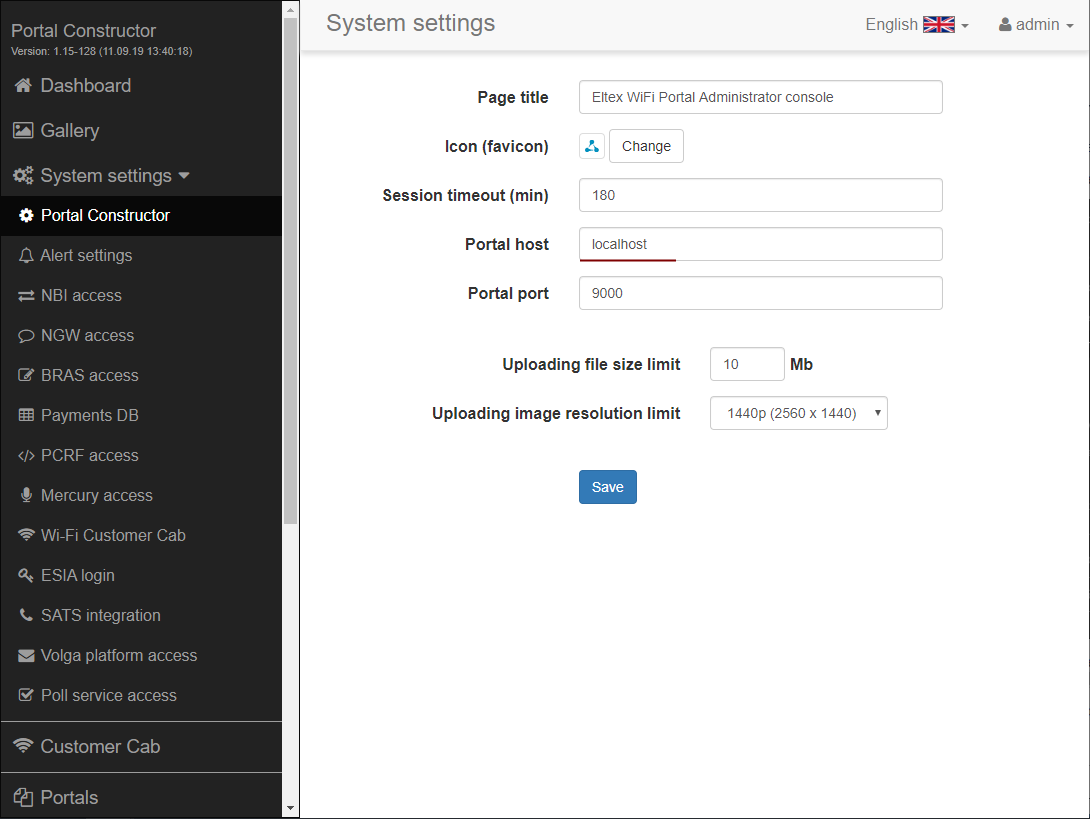
Replace localhost with a virtual IP address in the following sections:

System settings → Portal Constructor

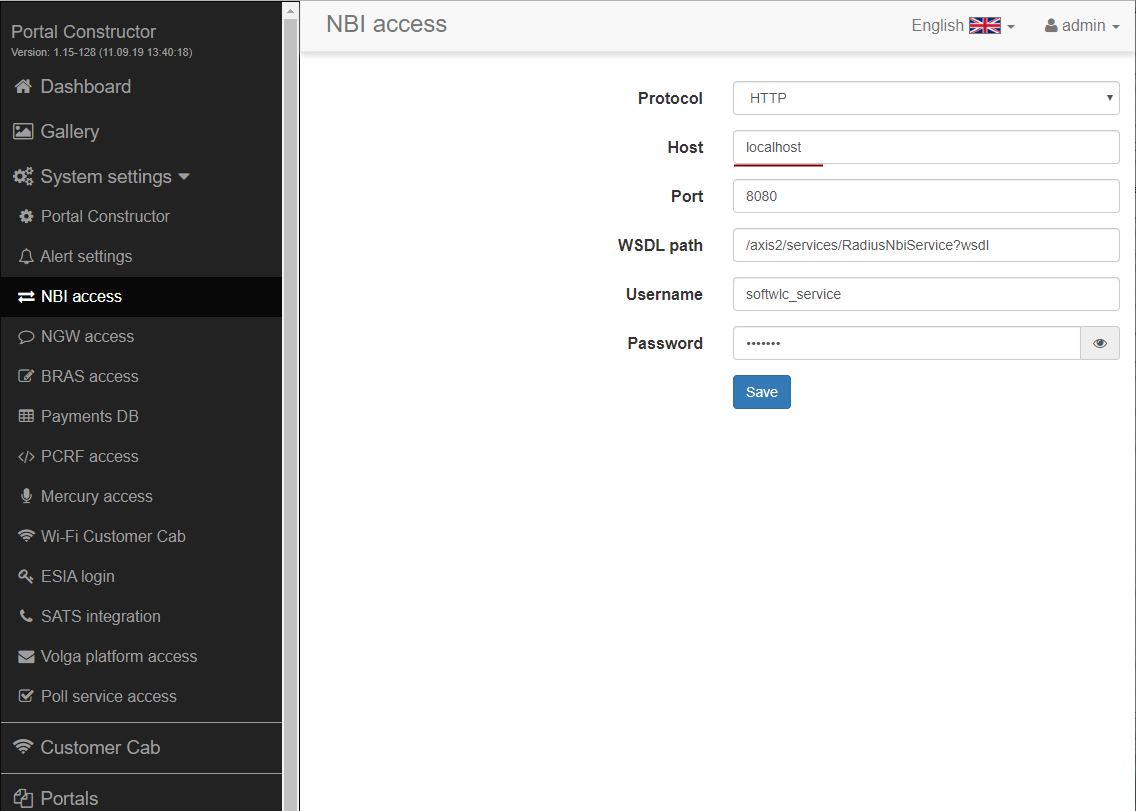
System settings → NBI access

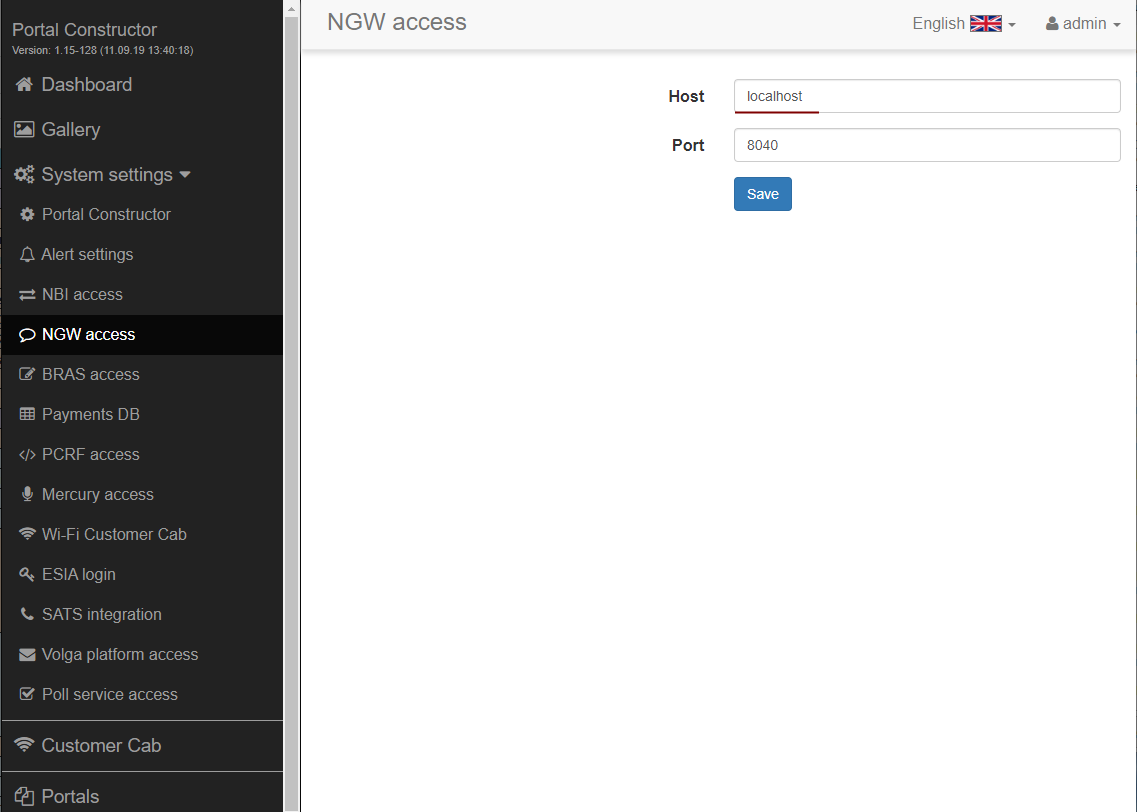
System settings → NGW access

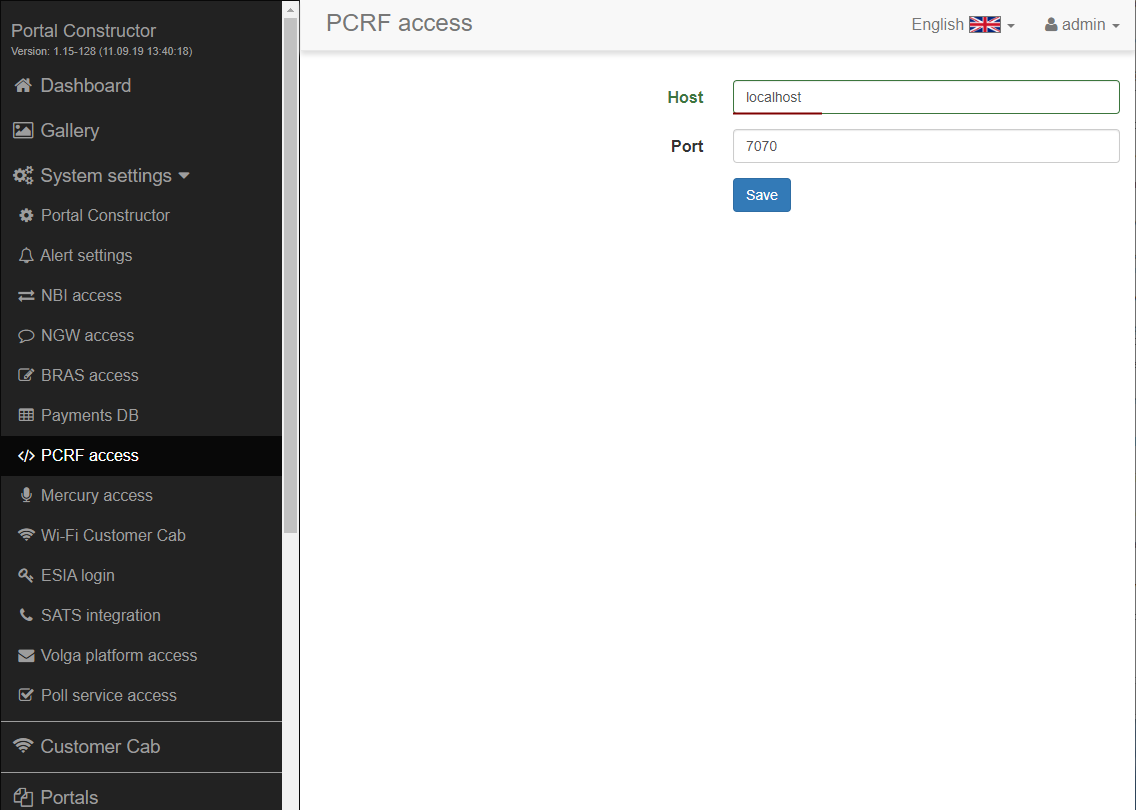
System settings → PCRF access

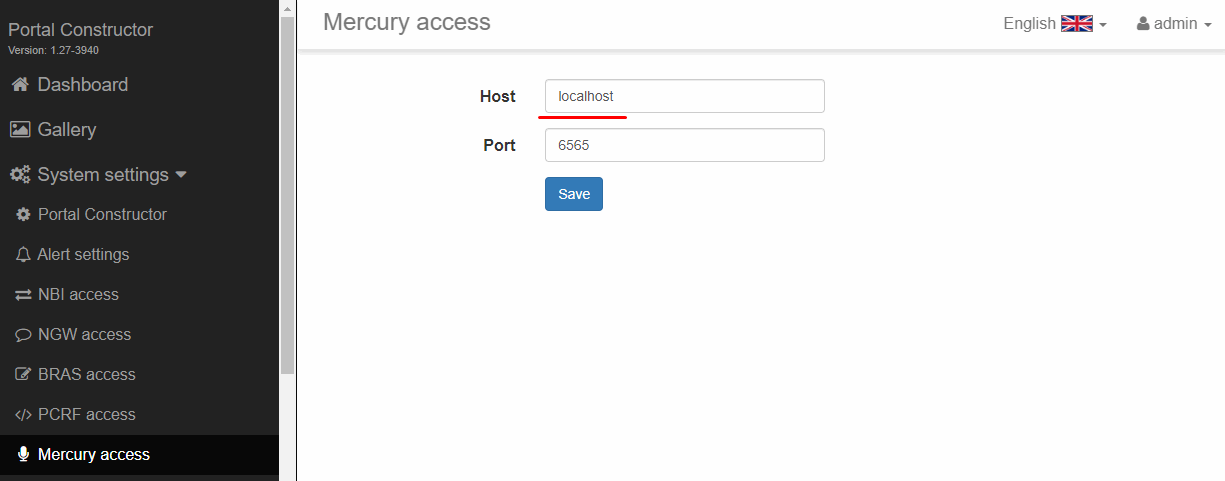
System settings → Mercury access

EMS-GUI

In EMS GUI, replace localhost (or 127.0.0.1) with a virtual IP address in the following sections:

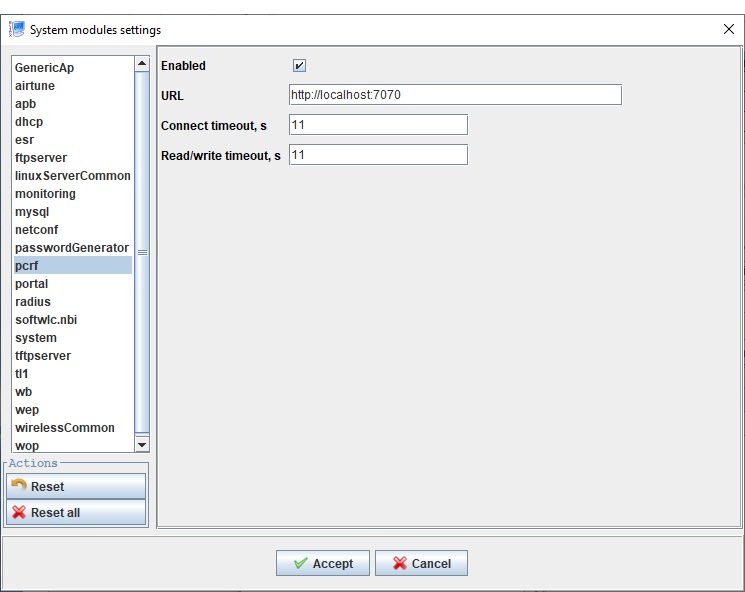
Administration → EMS server configuration → System modules settings → pcrf

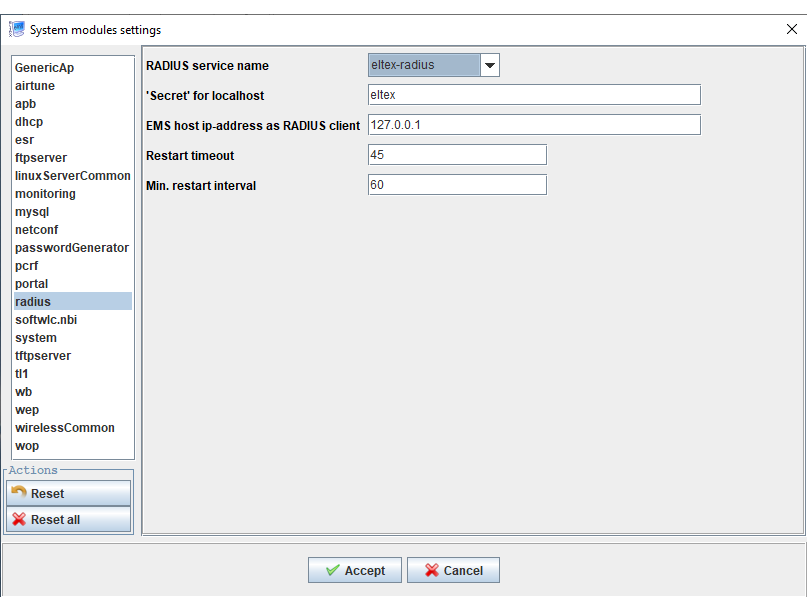
Administration → EMS server configuration → System modules settings → radius

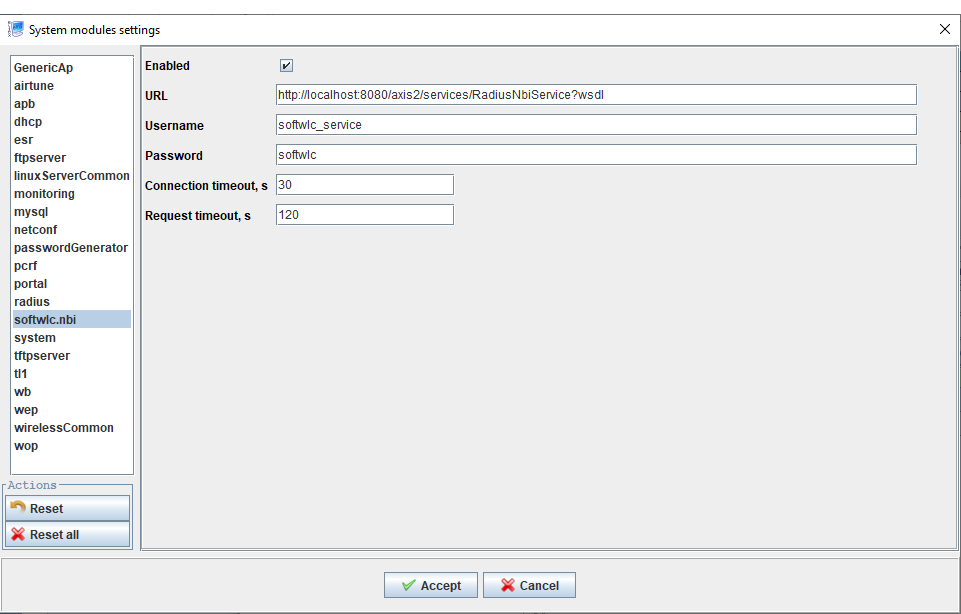
Administration → EMS server configuration → System modules settings → softwlc.nbi

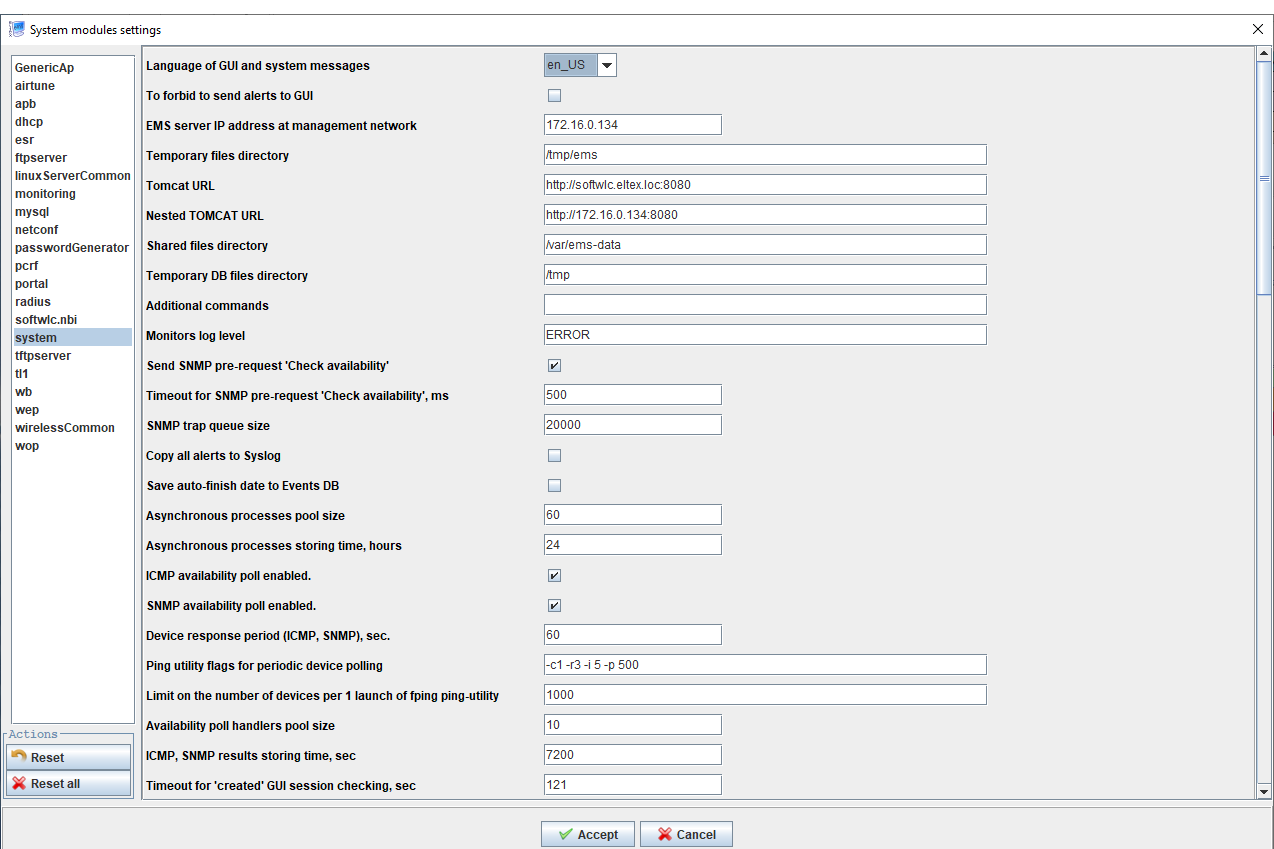
Administration → EMS server configuration → System modules settings → system

Administration → EMS server configuration → System modules settings → tftpserver

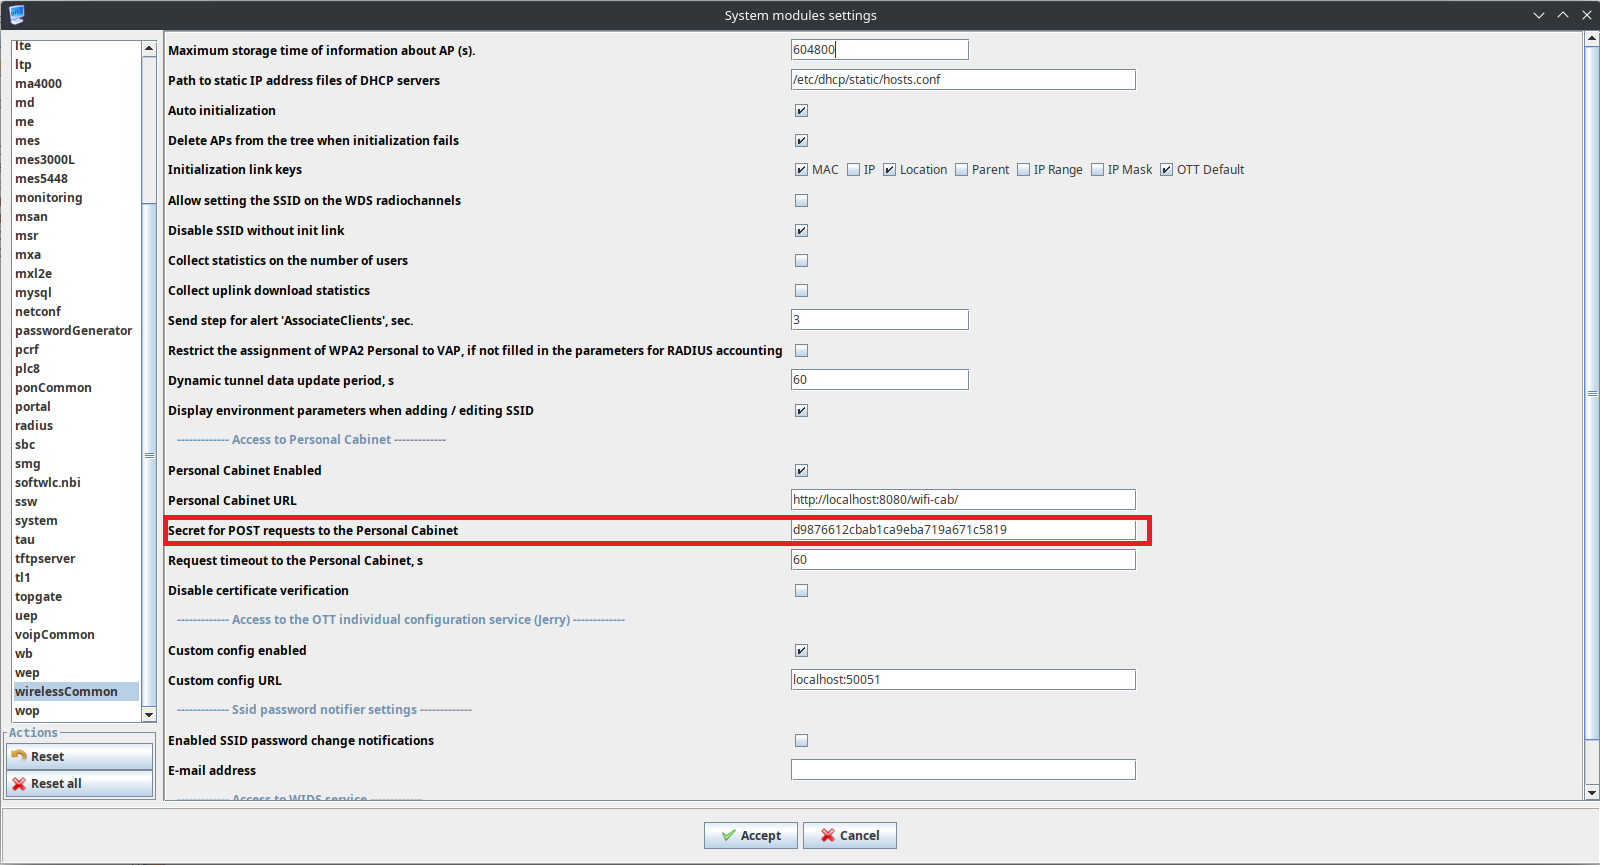
Administration → EMS server configuration → System modules →wirelessCommon

This key must match the /etc/eltex-wifi-cab/local_secret file on each host where eltex-wifi-cab is installed. 

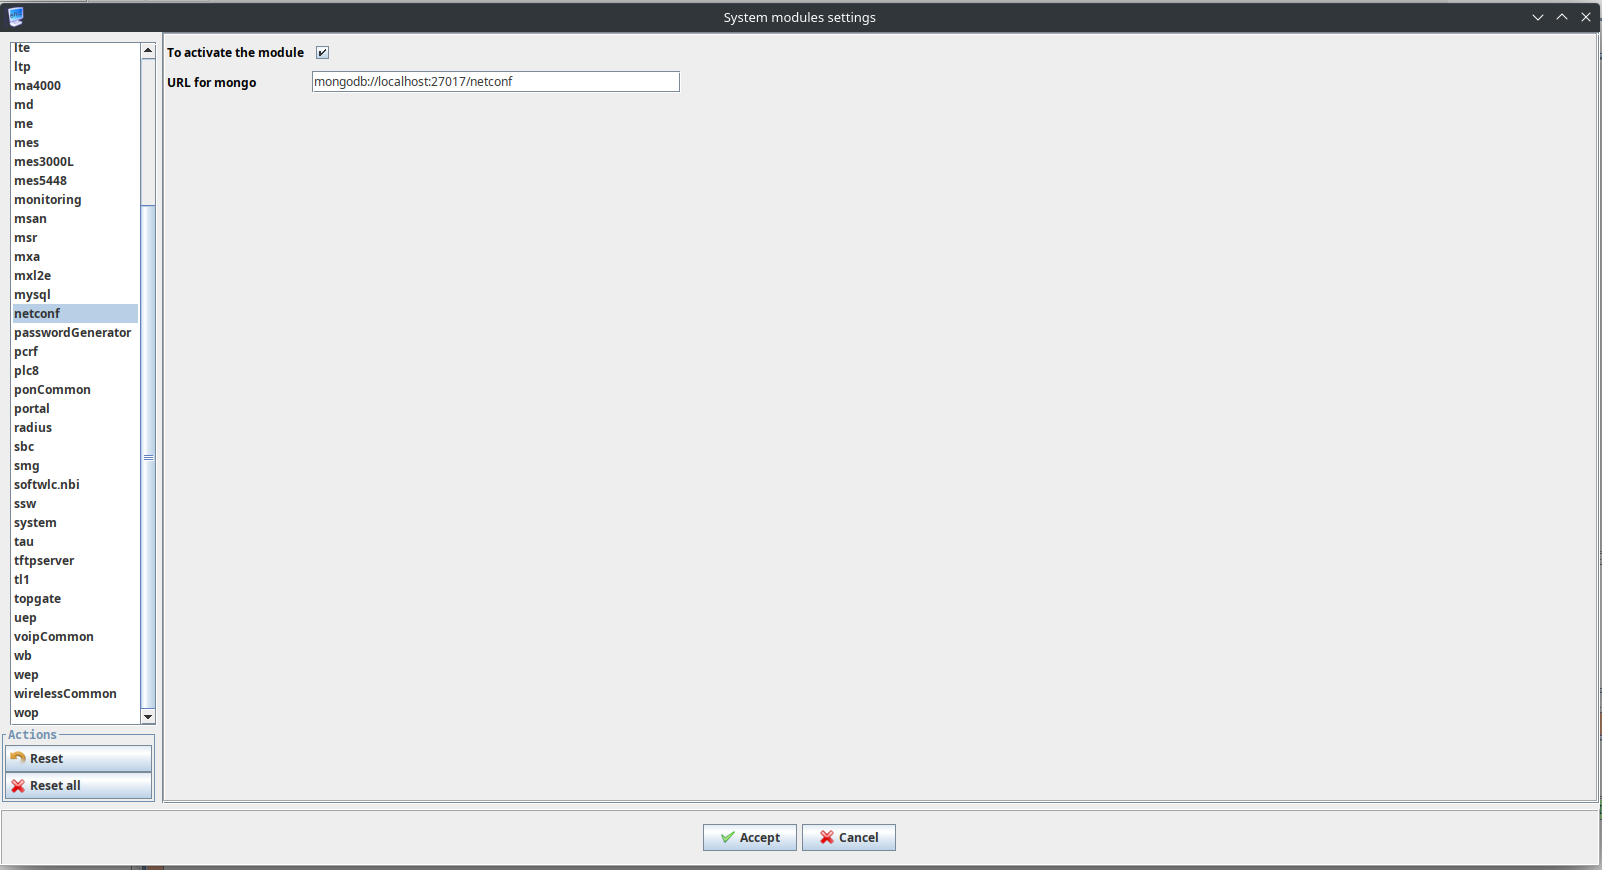
If you use the netconf module, then it is also necessary to update information there.

Administration → EMS server configuration → System modules settings → netconf

  • Нет меток