| scroll-ignoreonly | ||||||||||||||||
|---|---|---|---|---|---|---|---|---|---|---|---|---|---|---|---|---|
| ||||||||||||||||
Firmware version 2.2 |
| A Shared Block | |||||
|---|---|---|---|---|---|
| |||||
|
Оглавление printable false
Server requirements
For stable operation, the server must meet the following requirements:
Linux operating system with Docker support: Ubuntu Server 20.04 (recommended) and newer, Astra Linux 1.7 (server), RedOS 7.3.1, Alt Server 10;
16 GB of RAM or more;
- CPU with virtualization support with at least 4 cores;
- free hard disk space from 200GB;
- 1Gbit/s network interface availability.
Obtaining sudo privileges without additional password input (optional)
As an unprivileged user, run the command:
...
Next, enter the password. After that, additional password entry is not required for executing sudo commands or switching to the superuser mode.
Якорь Install_ECCM Install_ECCM
ECCM installation
| Install_ECCM | |
| Install_ECCM |
Installation archive
The files needed to run the project are distributed as a tar archive. They can be obtained from the public cloud. Download the archive to the server and unpack it. It is recommended to unpack the archive into the pre-created separate directory.
...
| Блок кода |
|---|
wget "https://cloud.eltex-co.ru/index.php/s/P8xDfmyo3XyEs0g/download?path=%2F&files=eccm-2.2.tar.gz" -O eccm-2.2.tar.gz mkdir eccm tar -zxvf eccm-2.2.tar.gz -C eccm/ |
Docker and docker-compose installation
The easiest and fastest way to install is to switch to the directory where the installation archive was unpacked and use the compose-tools.sh script using the --install flag:
...
| Блок кода |
|---|
docker compose version |
Scroll Pagebreak
When installing on Astra Linux, RedOS or Alt Server operating systems, the command to check the version of the installed docker-compose is:
| Блок кода |
|---|
docker-compose version |
...
Running ECCM
The ECCM project is distributed as a set of files that allows to run all necessary services using docker-compose. The project is divided into two docker-stacks:
- database (PostgreSQL 14.10);
- ECCM service stack.
This separation is caused by the need to ensure horizontal scaling of the project and the possibility of integration with other projects of the company, such as Eltex.EDM.
...
Script for running ECCM
Due to the abundance of the system startup running parameters, a script was prepared that runs the project on one or more hosts with performance parameters that allow servicing about 100 devices. Actual performance depends on many factors, including hardware performance and the complexity of the network devices being serviced. To invoke the help information, navigate to the directory with the script and run the following command:
| Блок кода |
|---|
sudo ./compose-tools.sh -h |
Running ECCM on a single host
To start the project, switch to the directory with the files of the installation archive and run the following command:
...
| Блок кода |
|---|
sudo ./compose-tools.sh --stop |
Running ECCM with a database on a separate server
draw.io Diagram border true viewerToolbar true fitWindow false diagramName Структурная схема_в2 simpleViewer false width 400 diagramWidth 772 revision 1
- ECCM Application Server — server on which an application is deployed that ensures the operation of the system and interaction with devices, as well as a web user interface;
- Database Server — server with Postgres14 databases. It is possible to use one that already exists in the cluster infrastructure .
- ;
- Device Management Network — IP network for managing equipment, through which ECCM has access via L3 .
- ;
- Operator/Administrator — system operator engaged in monitoring and configuration of the controlled equipment/system administrator of the company or ELTEX technical support specialist, if remote access has been agreed upon.
If it is necessary to run ЕССM on multiple servers (one server for the Postgres database, the second server for the rest of the ЕССM service stack), it is possible to use the multi-host installation option. To do this it is neccessary to:
- Install Docker and Docker Compose on both servers.
- Configure the server with databases:
2.1. To change login/password/temporary zone/RAM limits for working with the database, edit the postgres/.env file. To change parameters that affect database performance, edit the postgres/data/postgresql.conf file (the default settings are sufficient for a test run and support for about 100 devices).
2.2. Run the PostgreSQL database on the server with the database. To run the database, switch to the eccm/postgres directory and execute the command to run the container:
| Блок кода |
|---|
cd eccm/postgers docker compose up -d |
3. Configure the server with applications:
3.1. To redefine the variables responsible for user authorization in the ECCM system and project behavior (web interface address, time zone, database address, login/password for database access, etc.), edit the “eccm/.env” file;
3.2. Run ECCM on the server with ECCM using the following command:
| Блок кода |
|---|
sudo ./compose-tools.sh --start <ECCM ADDRESS> --database-host <DB ADDRESS> --database-port <DB PORT> |
where <DB ADDRESS> and <DB PORT> are the IP address and port to connect to the database server. For example, if the ESSM server address is 100.110.2.2, the database server address is 100.110.2.4, and the database server port is 5432, the command is as follows:
| Блок кода |
|---|
sudo ./compose-tools.sh --start 100.110.2.2 --database-host 100.110.2.4 --database-port 5432 |
Якорь Vars Vars
Environment variables
| Vars | |
| Vars |
The files required to run ECCM, containing environment and configuration variables, are located in the directory where the installation archive was extracted:
| Блок кода |
|---|
postgres/.env postgres/data/postgresql.conf eccm/.env |
Якорь Postgres Postgres
postgres/.env
| Postgres | |
| Postgres |
The postgres/.env file contains variables that determine the behavior of the Postgres database stack when it is launched in a container. The table below provides a description of these variables:
| Varible | Default value | Description |
|---|---|---|
COMPOSE_PROJECT_NAME | postgres | Project name in docker-compose (used for identification if several projects are running on the server) |
POSTGRES_TAG | 2.2 | Version of the postgres container image |
POSTGRES_REGISTRY | hub.eltex-co.ru | The address of the docker-registry from which the postgres image will be retrieved. If a local mirror is used, its address can be specified. |
ROOT_POSTGRES_USER | Parameter that allows to override the superuser login for database access and configuration | |
ROOT_POSTGRES_PASSWORD | Parameter that allows to override the superuser password for database access and configuration | |
ECCM_DATABASE | eccm | Name of the eccm service stack database |
POSTGRES_TIMEZONE | Asia/Novosibirsk | The time zone in which the system operates (specified in accordance with the tz database, for example, “Asia/Novosibirsk”) |
POSTGRES_SHM_SIZE | 2gb | Limiting the allocated RAM for working with the Postgres database |
POSTGRES_PRIVILEGED_MODE | false | Running a container in privileged mode |
|
| External address of the Postgres database |
|
| Maximum number of container log files |
| 50M | Maximum size of container log files |
| true | Enable compression of container log files |
| hub.eltex-co.ru | The address of the docker-registry from which the postgres-configurator image will be retrieved. If a local mirror is used, its address can be specified |
|
| Version of the postgres-configurator container image |
| true | Activation of the postgres-configurator container at system launch |
Якорь Postgresdata Postgresdata
postgres/data/postgresql.conf
| Postgresdata | |
| Postgresdata |
The file contains parameters that affect database performance. The default settings are sufficient for a test run and support for approximately 100 devices.
Якорь Eccm Eccm
eccm/.env
| Eccm | |
| Eccm |
The eccm/.env file contains variables that determine the behavior of the project. The table below provides a description of these variables:
| Varible | Default value | Description | ||||||||
|---|---|---|---|---|---|---|---|---|---|---|
COMPOSE_PROJECT_NAME | eccm | Название проекта в Project name in docker-compose (используется для идентификации, в случае если на сервере запущено несколько проектовused for identification if several projects are running on the server) | ||||||||
ECCM_PROFILE | productionПрофиль | проектаProject profile | ||||||||
ECCM_TAG | 2.2 | Версия образов контейнеровContainer image version | ||||||||
ECCM_REGISTRY | hub.eltex-co.ru | Адрес The address of the docker-registry , с которого будет выполняться получение образов системы. Если используется локальное зеркало, то можно указать его адресfrom which system images will be retrieved. If a local mirror is used, its address can be specified | ||||||||
ECCM_BACKBONE_ADDRESS | 192.168.0.1 | Внутренний адрес, на котором будет работать система ECCM с устройствами в сетиInternal address at which the ECCM system will operate with devices on the network | ||||||||
ECCM_WEB_ADDRESS | 192.168.0.1 | Адрес, на котором будет работать web-интерфейс системы ECCMThe address at which the ECCM system web interface will operate | ||||||||
ECCM_WEB_PORT | 80Порт для доступа к web-интерфейсу | Port for accessing the web interface | ||||||||
ECCM_TIMEZONE | Asia/NovosibirskВременной пояс, в котором работает система (указывается в соответствии с tz database, например "Asia/Novosibirsk" | The time zone in which the system operates (specified in accordance with the tz database, for example, “Asia/Novosibirsk”) | ||||||||
ECCM_LOGLEVEL | 'INFO'Уровень логирования в проекте | Logging level in the project | ||||||||
MAX_CONCURRENT_SSH_TASKS | 20Количество одновременно выполняемых операций с устройствами | Number of simultaneous operations performed with devices | ||||||||
POSTGRES_HOST | 192.168.0.1 | Адрес, на котором работает БД PostgresThe address where the Postgres database is running | ||||||||
POSTGRES_PORT | 5432Порт для доступа к БД Postgres | Port for accessing the Postgres database | ||||||||
ROOT_POSTGRES_USERПараметр, позволяющий переопределить логин суперпользователя для доступа и конфигурирования базы данных | Parameter that allows overriding the superuser login for database access and configuration | |||||||||
ROOT_POSTGRES_PASSWORDПараметр, позволяющий переопределить пароль суперпользователя для доступа и конфигурирования базы данных | Parameter that allows to override the superuser password for database access and configuration | |||||||||
ECCM_POSTGRES_DB | eccmНазвание базы данных для сервисов eccm | Database name for eccm services | ||||||||
ECCM_POSTGRES_USERПараметр, позволяющий переопределить логин по умолчанию для доступа к базе данных | Parameter that allows to override the default login for accessing the ECCM_POSTGRES_DB database | |||||||||
ECCM_POSTGRES_PASSWORDПараметр, позволяющий переопределить пароль по умолчанию для доступа к базе данных | Parameter that allows to override the default password for accessing the ECCM_POSTGRES_DB database | |||||||||
| 10mИнтервал отображения push-уведомлений в веб-интерфейсе при ошибке получения лицензии | Interval for displaying push notifications in the web interface when a license acquisition error occurs | ||||||||
| 60mИнтервал | рассылки уведомлений telegram/email при ошибке получения лицензииTelegram/email notification interval when a license acquisition error occurs | ||||||||
| 1Номер текущей ноды. Должен быть уникальным в схеме резервирования | Current node number. Must be unique in the reservation scheme | ||||||||
| 1GОграничение физической памяти для docker-контейнера | Physical memory limitation for a Docker container | ||||||||
| | Путь к файлу с сертификатом для HTTPSPath to the certificate file for HTTPS | ||||||||
| | Path to the file with the key for HTTPS | ||||||||
KEY_PASS_PATH | ./cert/key.passПуть к файлу с паролем ключа для HTTPS | Path to the file with the key password for HTTPS | ||||||||
| | , на котором ECCM будет доступен по The port on which ECCM will be available via HTTPS | ||||||||
LOGGING_ASPECT_ENABLED | false | Enabling logging via service aspects. The aspect logs all inputs and outputs from methods, their parameters, and return values.
Включение логирования через аспекты сервисов. Аспект логирует все входы и выходы из методов, их параметры, а также возвращаемые значения
| ||||||||
|
| Maximum number of container log files | ||||||||
| 50MМаксимальный размер лог-файлов контейнера | Maximum size of container log files | ||||||||
| trueРазрешить сжатие лог-файлов контейнера | Enable container log file compression | ||||||||
AUTH_ECCM_AUTHENTICATION_ENABLED | false | Включение аутентификации с помощью локальных учетных записей |
Доступ к web-интерфейсу
| Enabling authentication using local accounts |
Web interface access
To connect to the ECCM web interface, open a browser and enter the following in the address barДля подключения к web-интерфейсу ECCM откройте браузер и в адресной строке введите следующее:
http://<IP
...
address of your server (ECCM_WEB_ADDRESS)>/
| Подсказка |
|---|
| По умолчанию используется логин The default login is 'eccm', парольpassword 'eccm'. |
Якорь Composetools Composetools
| Composetools | |
| Composetools |
...
Options used by compose-tools.sh
| ОпцияOption | ОписаниеDescription | ||
|---|---|---|---|
| --clean, -cОчистка всех контейнеров, томов и | сетейCleaning all containers, volumes, and networks | ||
| --delete-containersУдаление контейнеров без удаления томов и сетей | Removing containers without removing volumes and networks | ||
| --dhcp | Активация DHCP-сервера с поддержкой функциональности Activation of a DHCP server with support for Zero Touch Provisioning (ZTP) , автоматически добавляющей устройства в системуfunctionality, which automatically adds devices to the system | ||
| --database-host <HOST> | IP -адрес подключения к внешней базе данных PostgreSQL, установленной на другом хосте. Не использовать, если на хосте с ЕССМ запущена БД PostgreSQLaddress for connecting to an external PostgreSQL database installed on another host. Do not use if the PostgreSQL database is running on the host with ЕССM | ||
| --database-port <PORT> | Порт подключения к внешней базе данных PostgreSQL, установленной на другом хосте. Не использовать, если на хосте с ЕССМ запущена БД PostgreSQLPort for connecting to an external PostgreSQL database installed on another host. Do not use if the PostgreSQL database is running on the host with ЕССM | ||
| --help, -h | Вызов справочной информацииCalling up reference information | ||
| --httpsАктивация режима | поддержки https. Требует наличия сертификатаActivation of https support mode. Requires a certificate | ||
| --installУстановка | Installing Docker и Docker-compose на хостand Docker Compose on the host | ||
| --interactive, -i | Запуск системы в интерактивном режиме. Использовать с ключом Start the system in interactive mode. Use with the --start key | ||
| --load | Загрузить все доступные архивы Load all available .tar.gz из директории с образами в archives from the image directory into docker | ||
| --logging, -l <LEVEL> | Задание уровня логирования для проекта ЕССМ. Доступные значенияSet the logging level for the ESSM project. Available values: DEBUG, INFO | ||
| --logging-aspect | Включение логирования через аспекты сервисов. Аспект логирует все входы и выходы из методов, их параметры, а также возвращаемые значения. Не рекомендуется включать этот параметр при штатной работе системыEnabling logging via service aspects. The aspect logs all entries and exits from methods, their parameters, and return values. It is not recommended to enable this parameter during normal system operation | ||
| --metrics, -m | Запуск системы в режиме сбора метрик. В этом режиме запускаются сервисы Launching the system in metric collection mode. In this mode, Grafana, Prometheus и дополнительные средства мониторинга хоста, docker-контейнеров и БД PostgreSQL. Веб-интерфейс Grafana доступен по адресу , and additional monitoring tools for the host, Docker containers, and PostgreSQL databases are launched. The Grafana web interface is available at http://<IP_ECCM>:3000 | ||
| --pull, -p | Скачивание/обновление образов перед запуском системыDownloading/updating images before system launch | ||
| --rootlog <LEVEL> | Задание уровня логирования для всех проектов. Доступные значенияSet the logging level for all projects. Available values: DEBUG, INFO | ||
| --save | Сохранение всех docker-образов в архивы Saving all Docker images to .tar.gz archives | ||
| --start, -s <ADDRESS>Запуск системы с IP-адресом, по которому будет выполняться подключение к серверу | Running the system with the IP address that will be used to connect to the server | ||
| --stop | Остановка системыSystem shutdown | ||
| --storage <ADDRESS> | Адрес ECCM в сети управления устройствами ECCM address in the device management network (backbone). Используется для хранения прошивок устройствUsed to store device firmware | ||
| --tracing, -t <ADDRESS> | Активация сервиса трассировок Activation of the Jaeger OpenTracing . Необходимо указать IP-адрес Jaeger-сервераtracing service. It is necessary to specify the IP address of the Jaeger server | ||
| --show-containersПоказать | все контейнеры на сервереShow all containers on the server | ||
| --show-imagesПоказать | все образы на сервереShow all images on the server | ||
| --recreate-service <SERVICE> | Пересоздать контейнер с новыми параметрамиRecreate the container with new parameters
|
Scroll Pagebreak
Примеры использования
Examples of use
To install Docker and Docker-compose on the host, run the commandДля установки Docker и Docker-compose на хост выполните команду:
| Блок кода |
|---|
sudo ./compose-tools.sh --install |
Для обновления образов всех контейнеров ECCM выполните командуTo update the images of all ECCM containers, run the command:
| Блок кода |
|---|
sudo ./compose-tools.sh --pull |
Для запуска проекта перейдите в директорию с файлами установочного архива и выполните командуTo run the project, enter the directory containing the installation archive files and run the command:
| Блок кода |
|---|
sudo ./compose-tools.sh --start <ECCM ADDRESS> |
Для запуска и подключения проекта к базе данных, установленной на другом хосте, выполните командуTo run and connect the project to a database installed on another host, run the command:
| Блок кода |
|---|
sudo ./compose-tools.sh --start <ECCM ADDRESS> --database-host <DB ADDRESS> --database-port <DB PORT> |
Для остановки проекта выполните командуTo stop the project, run the command:
| Блок кода |
|---|
sudo ./compose-tools.sh --stop |
Для очистки всех контейнеров, томов и сетей ECCM выполните командуTo clean all containers, volumes, and ECCM networks, run the command:
| Блок кода |
|---|
sudo ./compose-tools.sh --clean |
| Примечание |
|---|
| При запуске скрипта с флагом When running the script with the flag, data from the Postgres database will also be deleted. This flag is recommended only when completely uninstalling ECCM from the server. |
To run the project with the required logging level, add the --logging key to the launch lineДля запуска проекта с нужным уровнем логирования добавьте ключ --logging в строку запуска:
| Блок кода |
|---|
sudo ./compose-tools.sh --start <ECCM ADDRESS> --logging DEBUG |
С версии Since version 1.5 в проекте присутствует DHCP-сервер с поддержкой функциональности отключен. Для активации добавьте ключ --dhcp в строку запуска, the project has a DHCP server with support for Zero Touch Provisioning (ZTP), автоматически добавляющей устройства в систему. По умолчанию сервер functionality, which automatically adds devices to the system. The server is disabled by default. To activate, add the --dhcp key to the launch line.:
| Блок кода |
|---|
sudo ./compose-tools.sh --start <ECCM ADDRESS> --dhcp |
Для сохранения всех образов контейнеров в архивы To save all container images to archives .tar.gz выполните команду run the command:
| Блок кода |
|---|
sudo ./compose-tools.sh --save |
Scroll Pagebreak
Для преобразования архивов с образами To convert archives with images (.tar.gz ) в docker-образы выполните команду in docker images, run the command:
| Блок кода |
|---|
sudo ./compose-tools.sh --load |
Для преобразования контейнера с новыми параметрами выполните команду (контейнер пересоздаcтся согласно файлу .env соответствующего compose-проектаTo convert a container with the new parameters, run the command (the container will be recreated according to the file.env of the corresponding compose project):
| Блок кода |
|---|
sudo ./compose-tools.sh --recreate-service monitoring-service |
Известные проблемы и методы решения
Возможные ошибки при установке проекта
Known issues and solution methods
Possible errors during project installation
ErrorОшибка:
E: НевозможноCannot найтиfind пакетthe conntrack package
Возможная причина: в системе настроены неактуальные репозитории менеджера пакетов.
Possible reason: the system is configured with irrelevant package manager repositories.
Решение: добавить актуальный репозиторий в файл Solution: add the actual repository to the /etc/apt/sources.list и запустить установку проекта file and run the project installation:
| Блок кода |
|---|
echo "deb https://download.astralinux.ru/astra/stable/1.7_x86-64/repository-extended/ 1.7_x86-64 main contrib non-free" | sudo tee -a /etc/apt/sources.list sudo ./compose-tools.sh --install |
Возможные ошибки при запуске проекта
Possible errors during project launching
ErrorОшибка:
ERROR: Couldn't connect to Docker daemon at http+[docker://localhost](docker://localhost) - is it running?Возможная причинаPossible reason: docker -демон не запущен. Для проверки выполните командуdaemon is not running. To check this, run the command:
| Блок кода |
|---|
sudo systemctl status docker |
Если в строке Active статус отличается от If the status in the Active line is different from Active (running), причина определена верноthe cause is correctly determined.
РешениеSolution: запустить run docker командойwith the command:
| Блок кода |
|---|
sudo systemctl start docker |
ОшибкаError:
Got permission denied while trying to connect to the Docker daemon socket at [unix:///var/run/docker.sock]
(unix://intdocs.eltex.loc/var/run/docker.sock): Get http://%2Fvar%2Frun%2Fdocker.sock/v1.40/containers/json:
dial unix /var/run/docker.sock: connect: permission denied
Возможная причина: запуск производился от имени непривилегированного пользователя, который не был добавлен в группу docker.
Possible reason: the launch was performed as an unprivileged user who was not added to the docker group.
Solution 1 (recommended): add the user to the docker group by the following commandРешение 1 (рекомендуется): добавить пользователя в группу docker с помощью команды:
| Блок кода |
|---|
sudo usermod -aG docker $(whoami) |
Решение Solution 2:выполнять все операции с привилегиями root perform all operations with root privileges.
ОшибкаError:
Services starting...
Creating network "eccm_eltex-internal" with the default driver
ERROR: Pool overlaps with other one on this address space
Возможная причина: подсеть, указанная в Possible reason: the subnet specified in ECCM_INTERNAL_SUBNETWORK, уже используется is already in use by docker.
Решение: выбрать другую подсеть в файле Solution: select a different subnet in the .env. Просмотреть уже созданные docker-ом подсети можно с помощью команды file. It is possible to view subnets already created by docker using the command:
| Блок кода |
|---|
sudo docker network inspect $(docker network ls --filter "DRIVER=bridge" --format '{{ .Name }}') -f '{{ .Name }} {{ (index .IPAM.Config 0).Subnet }}' |
Возможные ошибки при работе проекта
Ошибка: некорректно работает мониторинг, не собираются метрики устройств.
Possible errors during the work of the project
Error: monitoring is not working correctly, device metrics are not collected.
Possible reason: the monitoring service does not have enough memory to work correctly. The monitoring-service logs contain entries likeВозможная причина: сервису мониторинга не хватает памяти для корректной работы. В логах monitoring-service встречаются записи типа:
WARN [b1a52920966f70af] [item-poll-executor ] o.e.e.m.service.BackpressureController : Batch size adjusted for job 'item polling': 100000 → 0 (adjustment factor: 0.000, memory usage: 97%)
Решение: увеличить лимит памяти для Solution: increase the memory limit for the monitoring-service. Для этого в файле eccm/.env увеличить значение переменной To do this, increase the value of the ECCM_MONITORING_SERVICE_XMX variable in the eccm/.env file:
-ECCM_MONITORING_SERVICE_XMX=1G  <--- староеold значениеvalue
+ECCM_MONITORING_SERVICE_XMX=2G  <--- новоеnew значение
Возможные ошибки при остановке проекта
valuePossible errors when stopping a project
ErrorОшибка:
ERROR: error while removing network: network eccm_eltex-internal id 324bd72dd9c107cf2ea48effb75d9e7ad2dfbc8f5f7317b89cd7f318d61d5c4b has active endpointsВозможная причинаPossible cause: docker не полностью очистил кэшdid not completely clear the cache.
РешениеSolution: перезапуск docker с помощью командыrestart docker using the command:
| Блок кода |
|---|
sudo systemctl restart docker |
Scroll Pagebreak
Возможные ошибки при аутентификации
Ошибка: невозможно аутентифицироваться с помощью учетной записи LDAP.
Возможная причина: некорректная настройка подключения к LDAP-серверу.
Possible authentication errors
Error: Unable to authenticate with an LDAP account.
Possible cause: incorrect LDAP server connection configuration.
Решение: в файле eccm/.env установить переменную Solution: set the AUTH_ECCM_AUTHENTICATION_ENABLED=true и перезапустить сервис variable in the eccm/.env file and restart the identity-provider service:
| Блок кода |
|---|
sudo ./compose-tools.sh --recreate-service identity-provider |
После этого будет доступна аутентификация по локальной учетной записиLocal account authentication will then be available.Scroll Pagebreak
Якорь Techsupp Techsupp
| Techsupp | |
| Techsupp |
...
Recommendations for ECCM technical support requests
Contact the company's Service Center for advice on system operation. Refer to the last page of this manual for contact methods.
For faster and more convenient interaction with ECCM technical support specialists, please provide the following information when contacting:
- The installed version of ECCM and the license used;
- Whether there is access to the Internet from the server where the firmware is deployed (no access, direct access, via NAT, via Proxy, etc.);
- The time the issue occurred (preferably as accurate as possible);
- Screenshot or video file if the issue occurred in the browser GUI;
- Device information (this could be device IP address, device model) if the problem was related to some device.
Defining the ECCM version and license
It is possible to determine the installed version of ECCM using one of the following methods:
Для получения консультации по работе системы обратитесь в Сервисный центр компании. Способы обращения указаны на последней странице данного руководства.
Для более быстрого и удобного взаимодействия с сотрудниками технической поддержки ECCM укажите при обращении следующую информацию:
- Установленная версия ECCM и используемая лицензия;
- Есть ли доступ в сеть Интернет с сервера, на котором разворачивается ПО (без доступа, прямой доступ, через NAT, через Proxy и т. п.);
- Время возникновения проблемы (желательно как можно более точное);
- Скриншот или видеофайл, если проблема проявилась в GUI браузера;
- Информация об устройстве (это может быть IP-адрес устройства, модель устройства), если проблема была связана с каким-то устройством.
Также настоятельно рекомендуется воспользоваться скриптом для сбора информации.
Определение версии ECCM и лицензии
Определить установленную версию ECCM можно одним из следующих способов:
- При загрузке релизного архива найти информацию о версии в его имени, например,
- When downloading a release archive, look for version information in its name,
eccm-2.2.tar.gz. Если исходный архив - If the original tar.gz был удалён, то информацию о версии можно найти в конфигурационном файле
- archive has been deleted, the version information can be found in the configuration file
$ECCM_ROOT/eccm/.env (в строке вида: - (in a line like:
ECCM_TAG=2.2). Просмотреть информацию о версии в левом нижнем углу экрана веб-интерфейса запущенного - Check the version information in the lower left corner of the web interface screen of the running ECCM:
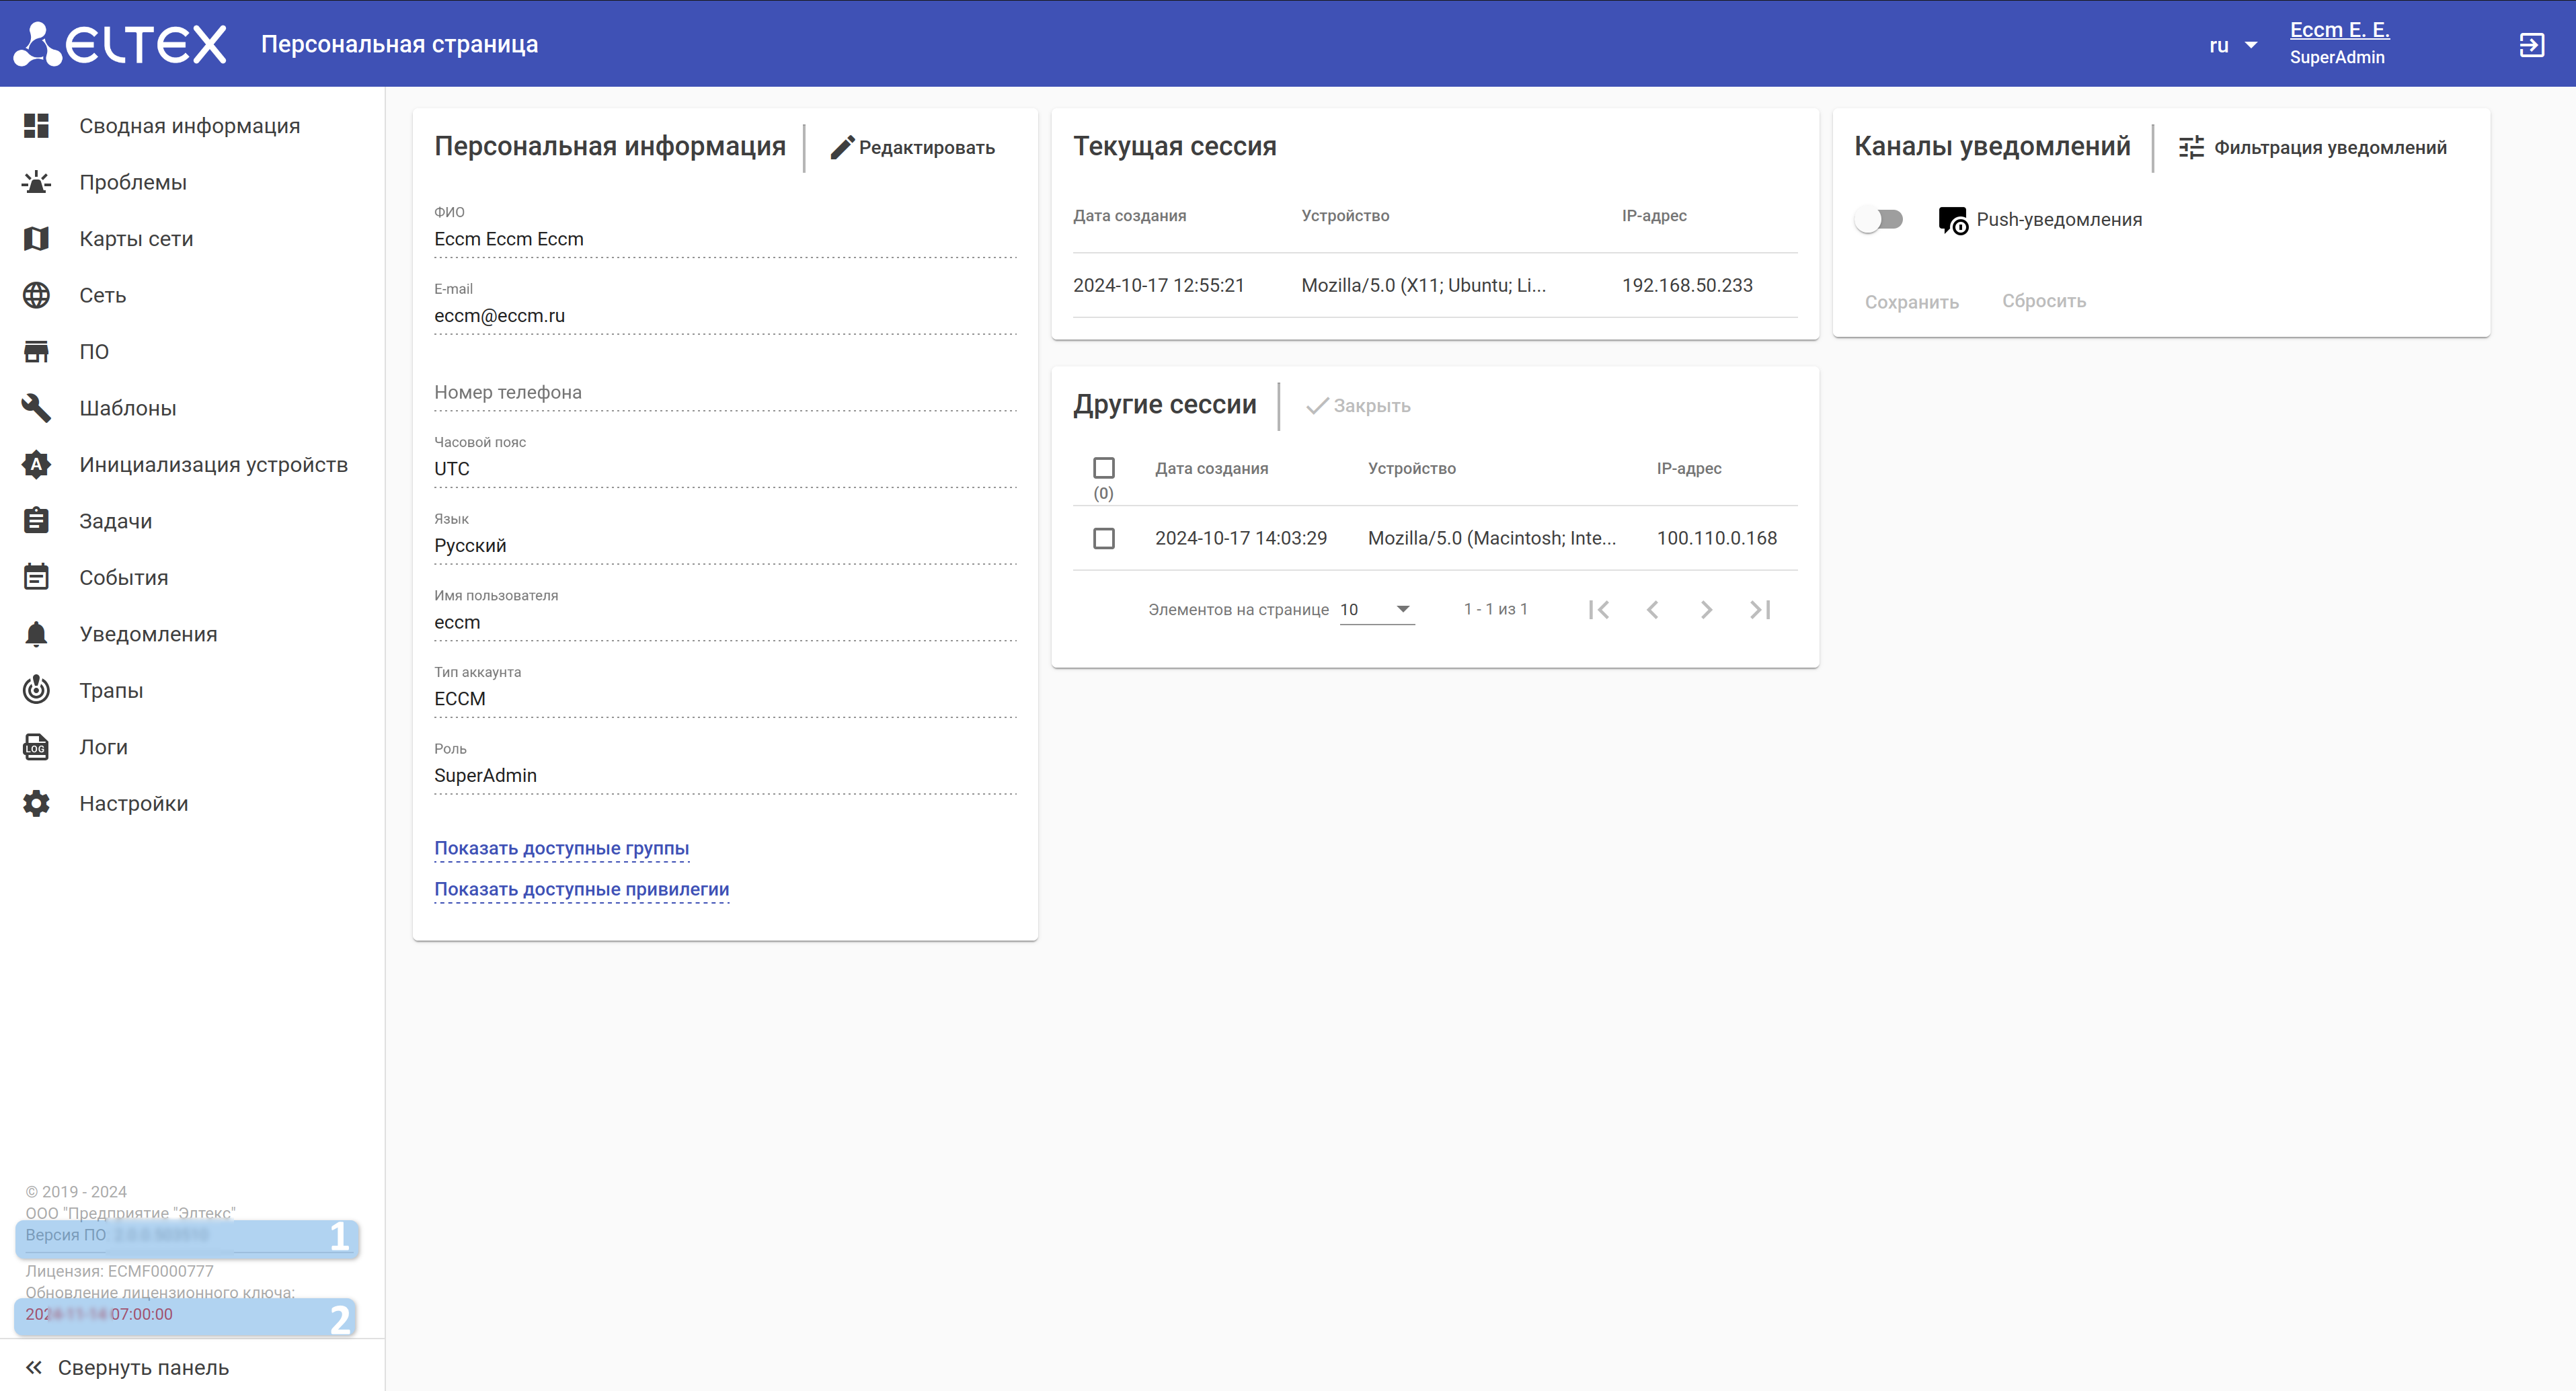
1 — версия ECCM version;
2 — срок действия выпущенной лицензии.Лицензию можно приложить из исходного файла или выгрузить из веб-интерфейса ECCM. Подробное описание приведено в разделе документации "Руководство пользователя" → "Настройки" → "Система" → "Лицензия"validity period of the issued license.
The license can be attached from the source file or uploaded from the ECCM web interface.
Якорь Script Script
| Script | |
| Script |
...
Скрипт автоматизирует сбор метрик c системы ECCM, а затем упаковывает их в сжатый архив для более удобной транспортировки. Предназначен для выполнения на ОС Linux/Ubuntu.
Запуск скрипта:
...
Information collection script
The script automates the collection of metrics from the ECCM system, and then packages them into a compressed archive for more convenient transportation. Designed to run on Linux/Ubuntu OS.
Running the script:
1. Enter the ~/eccm/<ECCM version> directory/:
| Блок кода |
|---|
cd ~/eccm/<версия<ECCM ECCM>version>/ |
2.
...
Run the following command:
| Блок кода |
|---|
sudo ./technical_support.sh |
| Примечание |
|---|
Скрипт необходимо запускать в привилегированном режиме, иначе будут собраны не все данные. |
...
The script must be run in privileged mode, otherwise not all data will be collected. |
3. Wait for the script to collect the information;
4.
...
The <date_time>-technical_support.tar.gz archive will be loaded into the directory.
This archive can be sent to the technical support specialists to familiarize them with all the necessary information.Данный архив можно отправить сотрудникам технической поддержки для того чтобы они ознакомились со всей необходимой информацией.